Database Preparation for Oracle
This section describes the necessary database preparation that must be completed before any of the SICS software can be executed. Your DBA will be responsible for correctly configuring and creating the SICS database.
Database setup
Before any of the SICS tables can be created, you will need to create the files necessary for the storage of the database using the DBMS tools. This will generally involve creating the instance, specifying where the tablespace files will be stored, creating and configuring the database for your specific requirements.
See section Database Structure for guidance on SICS-specific issues.
Create the Environment table
The environment table CNU_ENVIRONMENT must be created in its own schema. The suggested schema is SICS. No other tables should be created in this schema. Specifically, one should not create P&C or Life tables in this schema.
Create a database user SICS with the appropriate database privileges. See the sections below for your specific DBMS.
Run the SICS System Administration Utility. Logon as SICS.
When asked for an environment, choose Personal Database.
Choose the Database Setup, Manage Environments option.
Insert the required environments into this table (right click to add an environment).
Change the name of the owner as required. This should be the planned SICS Table Owner as described in Creating the SICS Table Owner.
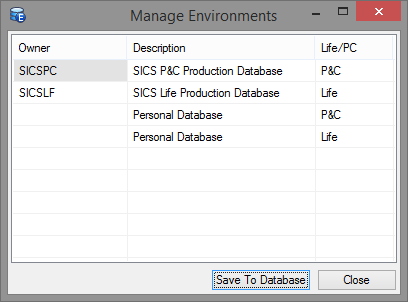
Figure 3 - Manage Environments Window
Choose Save to Database, then Close and log off from the SICS System Administration Utility.
This will create the environment table within the schema SICS. The Owner column above lists the schema name of the owner of the SICS tables for an environment.
The Description column is a string that describes the environment. This will be shown to the user on logon.
The Life/P&C column defines whether the environment contains a Life or P&C installation.
NOTE:
During login, the user will be presented with a list of environments matching the runtime used (P&C or Life). After selection of an environment, the Owner of that environment will be prefixed to all table names in all SQL subsequently issued from SICS via JDBC to the database. However, if the Owner is empty (blank), no table name prefixing takes place. This effectively means the user will access his/her own (personal) database tables (assuming (s)he has any). It is not required to include the ‘Personal Database’ environments as shown in the screenshot above. If no personal environment is created a special procedure must be followed to update the list of environments in the future. When logging in as SICS the environment must be specified on the command line for the SICS runtime startup as -deSICS.
If the CNU_ENVIRONMENT table is empty or does not exist, then a dummy environment with description ‘Personal Database’ and an empty Owner will be presented to the user during logon. This will normally only be the case the first time one logs on as SICS, that is, before creating the CNU_ENVIRONMENT table as described above.
Environments can be added to the system at any time by simply logging on to the SICS System Administration Utility as the environment table owner (SICS) and updating as above.
Environment Table Owner Privileges
The SICS user should have CONNECT, RESOURCE and CREATE PUBLIC SYNONYMS privileges.
You then need to create a public synonym for the environment table called CNU_ENVIRONMENT. This will allow access to the environment table to all users of the system, and negates the need for a synonym per user.
Logon to SQL*Plus as SICS and issue the following SQL statement:
CREATE PUBLIC SYNONYM CNU_ENVIRONMENT FOR SICS.CNU_ENVIRONMENT;
Environment Table for P&C and Life Co-existence
It is possible to run both the Life and the P&C system over the same set of database tables. This is described in section Co-existence of SICS P&C and Life.
With respect to the environment table, two rows/environments must be inserted into the table. Make one environment for P&C and another for Life, both pointing to the same schema owner.
Database Users file setup
The file SysUsers.txt is used during SICS Database Tables creation (see section Create Database Tables) to create the initial SICS users. A database record is created for all users defined in this file. The delivered file contains the definition for two sample users named User1 and User2.
Each user entry has the following format:
USERID <tab> LAST NAME <tab> FIRST NAME
You will need to edit this file to include as many initial users of the SICS database as required. Please note that you must follow this format strictly. Empty lines and spaces instead of tabs will halt the installation-process.
SysUsers.txt can be found in the <installation_root>\setup folder.
Before a SICS user name can be used for logging on to SICS, the user name must be created as a user on the target database management system and privileges assigned. This can be done after the Sysusers.txt file has been loaded when loading base data.
See section Create Database Tables for details.
After the initial users have been created during system setup, additional users may be added as required by using the SICS Create User option.
See section Create Additional Users for details.
Creating the SICS Table Owner
Before continuing with the next phase of the setup, an initial user (suggested name SICSPC for SICS P&C or SICSLF for SICS Life) must be created on the DBMS. The name of the user must be the same as the table owner from the environment table created earlier (see Create the Environment table.) You should create one user per Owner specified in the environment table, which relate to the P&C or Life installations. The user should be created with the appropriate database privileges. See the sections below for your specific DBMS.
When you later run the SICS System Administration Utility to create the SICS tables, you must use this user name to log on to the database.
The SICSPC (SICSLF) user will then become the owner of the SICS tables.
The delivered SICS reporting universe files reference a database user named SICSPC (SICSLF). Customers using the SICS reporting solution without the Business Objects Designer module, cannot change this database connection information and must therefore use the suggested names above as the owners of the SICS tables.
Therefore, if you create the tables with another owner, you will not be able to use the SICS Reporting facility (unless you have the Business Objects Designer module).
Note that the SICSPC (SICSLF) user does not have to be included in the SysUsers.txt file, since the SICS Create Tables function (see section Create Database Tables) will automatically create a SICS user for the table’s owner. This SICS user will be assigned the System Administrator role within the SICS security system.
SICS Table Owner privileges
The SICS Table Owner will require CONNECT privileges to the database and SELECT on the CNU_ENVIRONMENT table from SICS.
- Logon to SQL*Plus as user SICS.
-
Issue the following SQL statement (change the user name SICSPC as required):
GRANT SELECT ON CNU_ENVIRONMENT TO SICSPC;
The public synonym created in <a href=”#db-prep-oracle-environment-table-owner-privileges>Environment Table Owner Privileges</a> will provide the ability for this user to access the CNU_ENVIRONMENT table.
Creating SICS Database tables
System Users File
It is assumed that the SysUsers.txt file has been modified to include all required SICS users.
Please refer to section Database Users file setup for details.
Create Database Tables
Start the SICS System Administration Utility by selecting SICS P&C (Life) System Administration Utility from the SICS menu item on the Windows Programs menu. Login as the SICS Table Owner as defined in Creating the SICS Table Owner. Note that after the tables have been created they will be owned by this User ID (SICSPC or SICSLF).
When prompted to select the environment, choose the appropriate item for this installation from the list, as entered in Create the Environment table.
Open the Database Setup Folder. You have the following options:
- Manage Environments:
With this option, you can add, remove and rename the different environments specified in the
CNU_ENVIRONMENTtable. See Create the Environment table for configuration details of this table. -
Manage Tables: This option will present you with a window, allowing you to selectively create or drop tables and views, constraints, indexes and table comments.
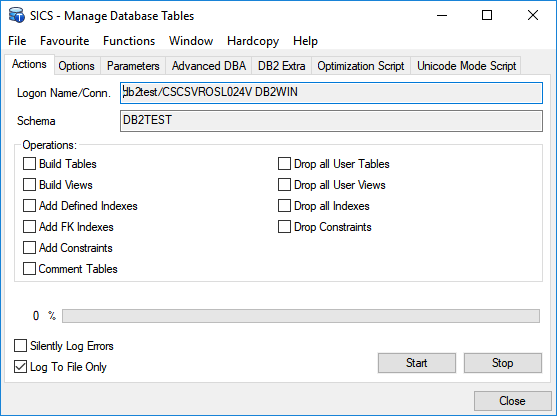
If you create tables using this option, you must also create base data and sample reference data, if required. NOTE:
‘Drop all User Views’ will NOT drop views prefixed byV_. This prefix is reserved for the client’s own use.
NOTE:
‘Drop all Indexes’ will NOT drop indexes with these prefixes:
BO_used by Business Objects reporting
CLI_intended for client’s own use.-
Manage Tables - Options: The Options tab on this window allows you to specify the Tablespaces where you wish to put the tables.
Use the Aliases window to specify aliases (A,B,Cetc.) for your tablespace names, and the Mapper window to map the tables and indexes onto these aliases. If you need to do the mapping in stages, the Mapper window is saved in the SICS System directory astablespacemappings.ini. The tablespaces you specify must be manually created in advance.
NOTE:
See 4.Database Specific Considerations. -
Manage Tables - Parameters: The Parameters tab on this window allows you to specify additional DDL parameters. For example, you can specify freespace information for indexes. The parameter string you specify is appended to the appropriate DDL statement. It is your responsibility to supply a string that adheres to the syntax rules of your choice of database. You may leave the parameter field(s) empty. For Oracle, some or more of these parameters may be relevant for creation of indexes:
TABLESPACE <tablespace> PCTFREE <pctfree> STORAGE <storage-clause>
Every time you use the “Manage Tables” window, you should review the parameters.
Note that your previous choices may or may not be kept between uses of this window. -
- Create Base Data: This option will create all data that is necessary to run the SICS system. This includes Reference Data (System Defined values only, not Sample values); Countries, States, Currencies, Users and Security Information.
- Create Sample Reference Data: This option will create additional Reference Data values (additional to the System Defined values). If the sample values are not created, many of the reference data types will not contain any values, or only a limited set of system defined values. This will limit the usage of the system. Hence, you will have to go through the Reference Data Types and add your own values. All Sample Reference Data values can be deleted/edited by the System Administrator. For more information on Reference Data, refer to the SICS User’s Guide.
- Create Sample Data: This option will load the SICS development team sample data into the database. This option is only relevant if you want to create a test database. This option should not be used when setting up the production environment. Some sample Business Partners, Reporting Units, Entry Codes, etc. will be created.
Database Specific Considerations
Tuning for Performance
It is the responsibility of the DBA at the customer site to make sure the database is properly tuned.
Above all, it is utmost important to make sure database statistics are up-to-date. Without these statistics, the database optimizer will not be able to do its job properly.
To process one schema, run the following:
EXECUTE DBMS_UTILITY.ANALYZE_SCHEMA('SICSPC','COMPUTE')
To process one specific table, run the following:
ANALYZE TABLE tablename COMPUTE STATISTICS
Dropping All Tables And Views
The SICS System Administration Utility ‘Database Setup’ -> ‘Manage Tables’ -> ‘Drop All User Tables’ option will drop all tables owned by the logged on user. The option ‘Drop All User Views’ will drop all views owned by the logged in user. In other words, the drops are not confined to tables (and views) created/used by SICS.
Tablespace Considerations
SICS creates around 800 tables in the database (this is for a Life/Combined environment).
For the initial setup of SICS, make sure the tablespace(s) in which the tables will be created are defined such that the storage space reserved for each table is not too big, compared to the available total diskspace for the tablespace(s).
After running SICS for a while, the DBA at the customer site should read just the storage parameters based on the experience gained.
Sample creation of tablespace:
CREATE TABLESPACE xxx
DATAFILE 'yyyyyy' SIZE 500M
DEFAULT STORAGE (
	INITIAL 40K
	NEXT 100K
	MINEXTENTS 1
	MAXEXTENTS 999
	PCTINCREASE 10)
ONLINE
Creation of the SICS Role / Group
The SICS Role is used to assign the relevant database privileges to the users of the system. The creation of this role negates the need for assigning select, insert, update and delete privileges to all tables to all users, and also allows the users to read the CNU_ENVIRONMENT table. By specifying these privileges once only in a role and assigning the role to all users, this drastically cuts down the user creation time.
Note:
You can not complete the following steps until the SICS database tables have been created (as described in Create Database Tables).
SICS Role creation
To create the role perform the following steps.
Create the role and grant select, insert, update and delete access to all SICS database tables. You can do this as follows:
Log on to SQL*Plus as SYSTEM user
Create a new role which will be used by all SICS users:
CREATE ROLE SICSG2 NOT IDENTIFIED;
Grant update, select, insert and delete rights on SICS tables as well as select on SICS views (not including views used by the Business Objects reporting universes) to the new role.
First create a script with the required statements:
SET HEADING OFF;
SET TERMOUT OFF;
SET FEEDBACK OFF;
SPOOL C:\TEMP\GRANTS.SQL;
SELECT GRANT SELECT, INSERT, UPDATE, DELETE ON SICSPC. '||TABLE_NAME||' TO SICSG2;'
FROM DBA_TABLES WHERE OWNER = 'SICSPC';
SELECT 'GRANT SELECT ON SICSPC'||'.'||VIEW_NAME||' TO SICSG2;' FROM DBA_VIEWS WHERE OWNER = 'SICSPC' AND VIEW_NAME NOT LIKE 'V_%';
SPOOL OFF;
Then log on as the owner SICSPC and run the grant script created:
@C:\TEMP\GRANTS.SQL
Grant select on the CNU_ENVIRONMENT table:
Log on to SQL*Plus as the owner of the environment table SICS
Grant select on the table:
GRANT SELECT ON CNU_ENVIRONMENT TO SICSG2;
Note:
The above scripts assume that the owner of the database tables is SICSPC, the owner of the environment table is SICS and the role to be created is SICSG2. Amend the scripts as appropriate if these values are different for your installation.
One and Two Level Roles / Groups
For a One-Level Login (see One Level Logins), the above role/group/procedure can be used for the First Level user.
For a Two-Level Login (see Two Level Logins, the role/group/procedure created above will be assigned to the Second Level User. The first level users will simply have select privileges on the SICS.CNU_ENVIRONMENT, SICSPC.CNU_USER and SICSPC.CNU_SECUREOPTS tables (see User Database Privileges for more information).
If the User Authorization Interface (UAI) is in use, then the first level users also need SELECT privileges on the SICSPC.SYSTEM_PARAMETERS and SICS4PC.SYS_PARAM_VALUES tables.
The privileges for the first level user can also be assigned to a role or group (suggested name SICSG1.) This will make it easier to create new users in the database. Simply grant the role to the user (or assign the new user to the group) for the user to inherit the privileges.
SICS Configuration
After the database has been loaded with startup data, as described in the previous section, the SICS System Administrator must configure various system functions before general operation of the system.
As mentioned earlier, the User ID that is used when the database is loaded with initialization data is automatically designated as the system administrator.
User Security Configuration
The following sections describe how to define users to the system and assign general categories of allowable business functions (User Roles).
One and Two Level Logins
SICS handles it’s own security internally, utilizing the user role and use cases concepts to facilitate this, and thus the software reads data from the database to control user access. This means that the user has to have database access to all of the data so that the security components of SICS can be utilized. These access privileges are controlled by the database Role in Oracle (see Creation of the SICS Role / Group.)
This Role or Group has to have select, update, insert and delete privileges to all of the SICS tables in the database. SICS itself then controls whether a particular table can be manipulated by the user, based on his or her user role.
Therefore, a user will have a specific user ID, with SICS Role or Group access that has select, update, insert and delete on all SICS tables and select on all SICS views (and select on the CNU_ENVIRONMENT table.) This is defined as a One-Level Login.
SICS has it’s own application-level security system, preventing unauthorized access to application functions. On a database level, however, a user needs access to all tables. Because of this, there exists a possibility that tables can be accessed and altered from an external source, such as SQL Plus. To solve this security problem, a second level of security has been developed in SICS that removes this possibility. This solution is called the Two-level Login.
The Two-Level Login utilizes two user IDs on the database, one of which is hidden from the user. The SICS System Administrator will control the user ID and password from within the Security window in the SICS System Administration utility. This will only be available to view by users with SICS Security Administration rights.
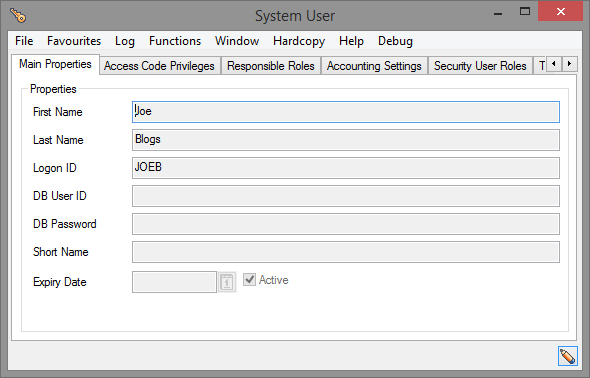
Figure 4 - One-Level Login
In a One-Level login, the DB User ID shown above has to be empty or equivalent to the Logon ID. This tells SICS that only the One-Level Login is in use. Note that the DB Password field should be left empty.
The Logon ID will be the ID that the user utilizes to log onto SICS.
If this login method is being used, then the user will only require one user ID on the Database, and one equivalent user defined in the SICS Security System. In this example, these will both be the user ‘JOEB’. This user will require access to all of the SICS tables and views in the database, which is assigned through the Role or Group. See User Database Privileges below for details on how to assign the Role or Group to the user.
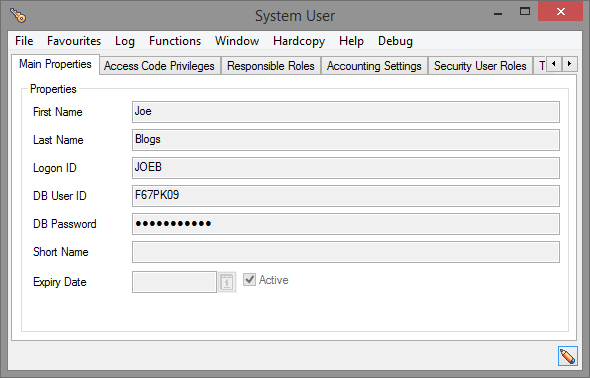
Figure 5 - Two-Level Login
In a Two-Level Login system, the Logon ID will be the ID that the user logs on to SICS with, in this case ‘JOEB’. This is the first user ID, which MUST be defined on the database with simply SELECT privileges on the CNU_ENVIRONMENT, SICSPC.CNU_USER and SICSPC.CNU_SECUREOPTS tables. (If the User Authorization Interface (UAI) is in use, then the first level users also need SELECT privileges on the SICSPC.SYSTEM_PARAMETERS and SICS4PC.SYS_PARAM_VALUES tables.)
The second user ID is given by the DB User ID field in the window above, in this case ‘F67PK09’. This tells SICS that the Two-Level Login is being used, and so after the Environment table and User table have been accessed, the first user will be logged out of the database. The second user will then be logged back into the database automatically, using the password given in the DB Password field. This must match the password for the second-level user on the database or the connection will fail. This user will require access to all of the SICS tables and views in the database, which is assigned through the Role or Group.
Note that in a two-level login system, all Events in SICS will be logged under the first user ID. The second level ID should not be defined in SICS Security. The user will not be aware of the second user ID on the database, and should never be allowed to view the user settings. If the user manages to obtain their second level login ID and password, then they could login to the SICS database using an external program, and perform updates and deletes using SQL.
See User Database Privileges below for details on how to assign the various privileges, Roles or Groups to the two user ID’s.
If security is a key concern in your organisation, then it is recommended to use the Two-Level Login. This will complicate the administration of the system due to the hidden second user ID, and will increase the required time to add new users to the system, but will provide a secure SICS database.
Using Database Remote OS Authentication
SICS can connect to the database letting the database server check with Windows that the user has been authenticated. In other words, if the user successfully logged in to Windows, then the user can also start SICS and connect to the database without providing an additional password.
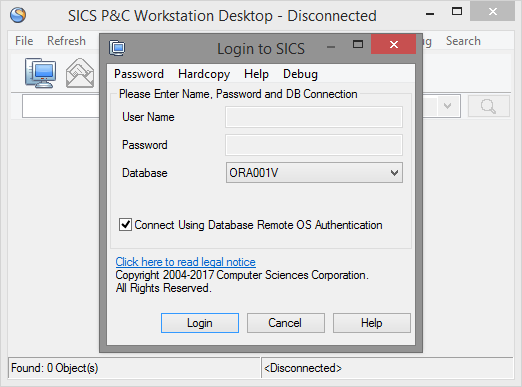
Figure 6 - The SICS Login Screen
To log on using “Database Remote OS Authentication” the user ticks the “Connect Using Database Remote OS Authentication” checkbox on the login dialogue. Only the database the user wants to logon to needs to be specified.
To enable this feature, the database administrator has to change the setting on the database. The procedure is described below.
Setting up Oracle for Remote OS Authentication
Please note that this description is based on using Oracle 10g / 11g. Other releases of Oracle may have different requirements. Please use your Oracle documentation to configure your database to handle remote OS authentication.
On the Oracle server these settings must be specified in the setup file for the database:
REMOTE_OS_AUTHENT = TRUE
OS_AUTHENT_PREFIX = ""
REMOTE_OS_AUTHENT specifies whether remote clients will be authenticated over insecure connections, this parameter is now deprecated. It is retained for backward compatibility only. This means the parameter will still work, but the ORA-32004 should be a strong incentive to phase out any functionality relying on it. Stepping up ‘out-of-the-box’ security Oracle has decided to deprecate this potentially dangerous parameter in the 11g releases.
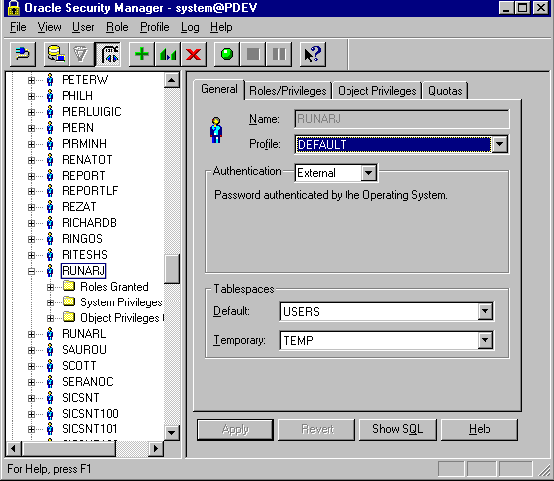
Figure 7 - Oracle Security Manager
In the “Oracle Security Manager” every user to use “Database Remote OS Authentication”, must have “Authentication” set to “External”.
Configuring SICS clients for Oracle Remote OS Authentication
The type 4 JDBC driver (thin driver) must be used in order to use remote OS authentication with Oracle 10g and 11g. Use the driver specified in Hardware and Software Requirements. Refer to the file sics-database-sources.xml and Oracle documentation for details on configuring and using remote OS authentication.
Create Additional Users
After the initial users have been created during system setup, additional users may be added by using the SICS Create User option (accessible from the SICS Desktop -> System Administration -> Security -> Users).
- Login to the SICS Workstation as the system administrator and double-click the Security icon under the System Administration folder.
- Use the Access Security Manager window to create any additional system users that were not defined in the
SysUsers.txtfile. From the System Users tab, right click and select New… from the popup menu.
You will also need to give the user privileges to the appropriate tables, and also assign SICS user roles.
NOTE:
If you intend to export the data from one schema into another, then the owner of the target schema should be defined as a SICS user with System Administrator role before the export takes place. Otherwise SICS access security will prevent the target schema owner to log in as himself.
User Database Privileges
One-Level Logins
For each SICS user that you define - either by adding names to the SysUsers.txt file, or by creating users from the SICS System Administration Utility - you must also:
Create an equivalent database user.
Grant the SICS role to the new user:
GRANT SICSG2 TO <USERID>
Two-Level Logins
For each SICS user that you define - either by adding names to the SysUsers.txt file, or by creating users from the SICS System Administration Utility - you must also:
Create two database users, one for the first level login and one for the second level login. A general second level user can be used if preferred (i.e. Use the same second level login for each user.)
Grant the 1st level role to the 1st level user:
GRANT SICSG1 TO <USERID>
Grant the 2nd level role to the 2nd level user:
GRANT SICSG2 TO <USERID>
General Information
You can not complete the above steps until the SICS group/role has been created (as described in Creation of the SICS Role / Group).
NOTE:
When you have successfully created new SICS users (both in SICS and on the database) you can log on to SICS using the new user names. These users will not have any initial SICS Access Rights. Thus, initially, the SICS Workstation will appear blank (no folders will be visible).
You have to grant the SICS users access rights, as described in section Assign Users to User Profiles below.
Assign users to user profiles
A few sample, predefined User Roles are created as part of loading the Base Data. In addition, the system defined User Role “System Administrator” is created.
Logon to the SICS System Administration Utility as the System Administrator (the owner of the tables) and choose System Administration, Security.
- From the User Roles tab, double-click a user role, select the Members tab, right-click on the user list, and select Assign Members… from the popup menu.
Note that if a new SICS user has not been assigned to a user role, the user will not have access to any of the SICS functions.
If you login to SICS as a user without any access rights, the SICS Workstation will appear ‘blank’ (no system folders will be visible).
Verify System Parameters
The System Parameters have been set up by default as part of the database creation process, but they may be inappropriate for your operation. Therefore, you will need to check and/or alter them as appropriate.
Login to the SICS Workstation as the system administrator and double-click the System Parameter Maintenance icon under the System Administration folder.
Verify or modify the System Parameters as necessary.