SICS Operational Reporting Setup and Configuration
Foreword
Copyright 2021, DXC Technology Company. All Rights Reserved.
Warning: The SICS computer program is protected by copyright law and international treaties. Unauthorized reproduction or distribution of this program, or any portion of it, may result in severe civil and criminal penalties, and will be prosecuted to the maximum extent possible under the law.
DXC, the DXC logo, SICS, and dxc.technology are trademarks or registered trademarks of DXC Technology Company, registered in the United States and other jurisdictions worldwide. Other product and service names might be trademarks of DXC or other companies.
The SICS Product is delivered with Open Source Software (OSS) components potentially developed or owned by third parties. OSS components may be used according to the terms and conditions of the specific license under which the relevant OSS components are distributed, but are provided "AS IS" by such third parties and DXC.
Requirements
- Java 8 or later runtime environment.
- For best performances, the index should be stored on a unit having a low random-access IO latency, like a SSD.
SICS Operational Reporting Server
SICS Operational Reporting Server is an analytics and visualization web platform to give real-time visualization of operational data within SICS.
SICS Operational Reporting Server Installation
SICS Operational Reporting Server is a Web Application and can potentially be deployed in any Application Server. It has been successfully tested using Tomcat 8.
For deploying an instance of SICS Operational Reporting Server it is enough to deploy SicsOperationalReportingServer.war using the standard procedure for the chosen Application Server.
The WAR file can be found in the SICS delivery folder.
SICS Operational Reporting Server Configuration
Enable Basic Authentication
To enable basic authentication, uncomment the auth-constraint element in the security-constraint element. Map the user or group to the security role: sics-operational-reporting in the application server.
<security-constraint>
	<web-resource-collection>
		<web-resource-name>SICS Operational Reporting Server</web-resource-name>
		<url-pattern>/*</url-pattern>
	</web-resource-collection>
	<auth-constraint>
		<role-name>sics-operational-reporting</role-name>
	</auth-constraint>
	<user-data-constraint>
		<!-- To automatically redirect any access via HTTP to HTTPS, set transport-guarantee to 'CONFIDENTIAL' -->
		<transport-guarantee>NONE</transport-guarantee>
	</user-data-constraint>
</security-constraint>
Enable Database Authentication
To enable database authentication, the init-param: enableDatabaseAuth must be set to true and a database connection provided by the JNDI DataSource: jdbc/sor. You can configure the JNDI DataSource in META-INF/context.xml or through the application server administration pages.
<init-param>
	<description>
		Enable database authentication.

		Requires a database connection provided by JNDI DataSource: jdbc/sor
		Defaults to false.
	</description>
	<param-name>enableDatabaseAuth</param-name>
	<param-value>true</param-value>
</init-param>
Logging
Server logging can be configured in WEB-INF/classes/log4j2.xml.
Connect SICS Operational Reporting Server to Solr for Operational Reporting
SICS Operational Reporting Server requires a connection to Solr for Operational Reporting where all the operational data is stored/indexed. It is therefore necessary to configure SicsOperationalReportingMode and SicsOperationalReportingUrl init parameters in WEB-INF/web.xml.
<init-param>
	<description>
		SICS Operational Reporting Mode

      	cloud - Apache Solr Cloud Mode
      	server - Apache Solr Server Mode
	</description>
	<param-name>SicsOperationalReportingMode</param-name>
	<param-value>cloud</param-value>
</init-param>

<init-param>
	<description>
		SICS Operational Reporting URL

		This setting is required to connect SICS Operational Reporting Server
		to Solr for Operational Reporting.
	</description>

	<param-name>SicsOperationalReportingUrl</param-name>
	<param-value>localhost:2181/solr</param-value>
</init-param>
SICS Operational Reporting Server Web Application

Common Features
Data/Time Filters
SICS Operational Reporting Web Application has three types of date/time filters, Quick, Relative and Absolute. To show/hide the Date/Time filter view: click on the date/time filter button with the clock symbol in upper right corner of the web page or in the drop-down menu for smaller screen sizes.
Quick
A Quick date/time filter is a commonly used relative filter. E.g. Today, This Week, This Month, This Year, etc.
Relative
A Relative date/time filter is used to filter data relative to current date/time. E.g. last number of seconds, minutes, hours, years.
Absolute
An Absolute date/time filter is used to filter data from a particular time frame. E.g. From: 01.03.2017 00:00:00 To: 04.03.2017 23:59:59
Automatically retrieve new data
SICS Operational Reporting Web Application will by default retrieve new data from the server every 5 seconds. The update interval can be adjusted or turned off by editing the values in the Auto-refresh panel located in the Data/Time filter view.
Add field value filter
Table
If a column value in a table is hyper-linked; it is possible to filter by that value by clicking on the link.
Pie Chart
All pie charts have drill-down functionality. Filter by the value of a slice by clicking on it.
Bar Chart
The bar chart on the eMessaging module has drill-down functionality. Filter by the eMessage a bar represents by clicking on it.
Search Form (Walkback Explorer)
You can apply field value filters by using the search form located in the Filter panel.
Select a field type in the drop-down menu, provide the filter value in the text field and click on the find icon.
Remove field value filter
Remove previously applied filters by clicking on the [x] link next to the applied filter located in the Info or Filter panel.
Modules
eMessaging
Display eMessaging processing benchmarks in SICS.
Login Attempts
Display login attempts in SICS, both successful and unsuccessful.
Security Violations
Display security violations in SICS.
Performance Analysis
Create Operation
Display processing benchmarks from create activities in SICS.
Find Operation
Display processing benchmarks from find activities in SICS.
Servers
SICS ADH Server
Display processing benchmarks from SICS ADH Server requests.
SICS Batch Server
Display processing benchmark from Batch Jobs.
SICS eMessaging Server
Display processing benchmarks from SICS eMessaging Server requests.
SICS API Server
Display processing benchmarks from SICS API Server requests.
Walkback Explorer
Display Walkback files uploaded to Operational Reporting.
Open a Walkback file
In the drop-down menu for a file located in the result table: a Walkback file can be viewed in a human readable format by clicking on the Open button.
Download a Walkback file
In the drop-down menu for a file located in the result table: a Walkback file can be downloaded as ZIP by clicking on the Download button.
SICS Operational Reporting Solr Server and SICS Operational Reporting SolrCloud Mode
Apache ZooKeeper installation
The responsibility of Apache ZooKeeper is for caching and distribution of configuration to SICS Operational Reporting Nodes. ZooKeeper also maintain an overview of which nodes that are available.
For a reliable ZooKeeper service, you should deploy ZooKeeper in a cluster known as an ensemble. As long as a majority of the ensemble are up, the service will be available.
In a production environment, it is recommended to use more than three and an odd number of ZooKeeper instances in the ensemble. For example, if you have four ZooKeeper instances in the ensemble, ZooKeeper can only handle failure of one instance; if two instances fail, the remaining two instances do not constitute the majority. However, if you have five instances in the ensemble, ZooKeeper can handle failure of up to two instances because the remaining three instances do constitute the majority.
To configure the ZooKeeper ensemble, add the following entry to zoo.cfg for each ZooKeeper instance in the ensemble.
server.<positiveId>=<hostname>:<port1>:<port2>
Example:
server.1=zoo1:2888:3888
server.2=zoo2:2888:3888
server.3=zoo3:2888:3888
Apache ZooKeeper 3.4.13 can be downloaded at:
https://archive.apache.org/dist/zookeeper/zookeeper-3.4.13/zookeeper-3.4.13.tar.gz
Extract zookeeper-3.4.13.tar.gz to a preferred location referred to as <ZK_HOME>.
On Windows you can use tools such as: 7-zip, WinRAR, etc., on Linux please do:
tar -xvfz --strip-components=1 zookeeper-3.4.13.tar.gz <ZK_HOME>
On Linux all the ZooKeeper script file must be made executable, please do:
chmod +x <ZK_HOME>/bin/*
Copy or rename
Open
- tickTime
- The basic time unit in milliseconds used by ZooKeeper. It is used to do heartbeats and the minimum session timeout will be twice the tickTime.
- dataDir
- The location to store the in-memory database snapshot and, unless specified otherwise, the transaction log of updated to the database.
- clientPort
- The port to listen for client connections
To start a ZooKeeper instance on Linux, please do:
<ZK_HOME>/bin/zkServer.sh start
To start a ZooKeeper instance on Windows, please do:
<ZK_HOME>/bin/zkServer.cmd
To stop a running ZooKeeper instance on Linux, please do:
<ZK_HOME>/bin/zkServer.sh stop
To stop a running ZooKeeper instance on Windows, exit the command prompt or enter: ctrl + c.
SICS Operational Reporting Solr Installation
Extract SicsOperationalReportingSolrNode.zip to a preferred location.
To override Solr settings, please edit bin/solr.in.sh (Linux) or bin/solr.in.cmd (Windows).
Note that in production SolrCloud environments, the SOLR_HOST variable should be set to the hostname of the server, as this determines the address of the node when it registers with ZooKeeper.
To start Solr for the first time after installation, simply do:
bin/solr start
This will launch a standalone Solr server in the background of your shell, listening on port 8983.
Alternatively, you can launch Solr in “cloud” mode, which allows you to scale out using sharding and replication.
To launch Solr in cloud mode with embedded ZooKeeper ensemble, do:
bin/solr start -cloud
To launch Solr in cloud mode with external ZooKeeper ensemble, do:
bin/solr start -cloud -z zk1:2181,zk2:2181,zk3:2181
To see all available options for starting Solr, please do:
bin/solr start -help
You can also install Solr as a Windows or Linux service.
To see the available options for installing Solr as a service, do:
bin/install_solr_service -help
After starting Solr, follow the instructions depending on whether Solr is running in server or cloud mode.
Server mode
Create SICS Operational Reporting cores, do:
bin/configure create_cores -p 8983
Cloud mode
If your ZooKeeper ensemble is or will be shared among other systems besides Solr, you should consider defining application-specific znodes, or a hierarchical namespace that will only include Solr’s files.
Once you create a znode for each application, you add it’s name, also called a chroot, to the end of your connect string whenever you tell Solr where to access ZooKeeper.
Creating a chroot is done with a bin/solr command:
bin/solr zk mkroot /solr -z localhost:2181
Upload SICS Operational Reporting configuration to ZooKeeper (i.e. ZooKeeper running at localhost:2181), do:
bin/configure upconfig -z localhost:2181
Create SICS Operational Reporting collections, do:
bin/configure create_collections -p 8983
To see available options for create_collections, please do:
bin/configure create_collections -help
Post SICS Operational Reporting Solr Installation
After starting Solr, direct your Web browser to the Solr Admin Console at:
http://localhost:8983/solr/
When finished with your Solr installation, shut it down by executing:
bin/solr stop -all
The -p PORT option can also be used to identify the Solr instance to shutdown,
where more than one Solr is running on the machine.
Configuring SICS Desktop Application
Connect SICS Desktop Application to Solr for Operational Reporting
To connect SICS Desktop Application to Operational Reporting, SicsOperationalReportingMode and SicsOperationalReportingUrl properties must be configured in conf/sics.global.resources.registry.propeties.
#   SICS Operational Reporting Mode
#
#   Defaults to disabled
#
#   disable - Disable logging to Operational Reporting
#   cloud - Apache Solr Cloud Mode
#   server - Apache Solr Server Mode
SicsOperationalReportingMode=cloud

#   SICS Operational Reporting URL
#
#   This setting is required to connect SICS to SICS Operational Reporting.
#   If not set, SICS is not able to configure or log any information to SICS Operational Reporting.
SicsOperationalReportingUrl=localhost:2181/solr
Upload Walkback files to Operational Reporting
To upload Walkback files to Solr for Operational Reporting, SICS Desktop Application must be connected to Solr for Operational Reporting and the WalkbackMode property value must be set to 2, 3 or 4 in conf/sics.global.resources.registry.propeties.
#   In the event of an unexpected error in SICS, the detailed information about the problem is written to a walkback file.
#   The walkback file could be stored in a folder and/or uploaded to Operational Reporting.
#
#   0 - Disabled
#   1 - Folder Mode (default)
#   2 - Operational Reporting Mode
#   3 - Operational Reporting Mode and Folder Mode
#   4 - Operational Reporting Mode and Folder Mode on failure
WalkbackMode=3
Configuring SICS Servers
SICS ADH Server Configuration
Connect SICS ADH Server to Solr for Operational Reporting
To connect SICS ADH Server to Operational Reporting, SicsOperationalReportingMode and SicsOperationalReportingUrl context parameter must be configured in WEB-INF/web.xml.
<context-param>
	<description>
		SICS Operational Reporting Mode
		Defaults to disabled

      	disable - Disable logging to Operational Reporting
      	cloud - Apache Solr Cloud Mode
      	server - Apache Solr Server Mode
	</description>
	<param-name>SicsOperationalReportingMode</param-name>
	<param-value>cloud</param-value>
</context-param>

<context-param>
	<description>
		SICS Operational Reporting URL

		This setting is required to connect SICS to SICS Operational Reporting.

		If not set, SICS is not able to configure or log
		any information to SICS Operational Reporting.
	</description>

	<param-name>SicsOperationalReportingUrl</param-name>
	<param-value>localhost:2181/solr</param-value>
</context-param>
Upload Walkback files to Operational Reporting
To upload Walkback files to Solr for Operational Reporting, SICS ADH Server must be connected to Solr for Operational Reporting and the WalkbackMode context parameter value must be set to 2, 3 or 4 in WEB-INF/web.xml.
<context-param>
	<description>
        In the event of an unexpected error in SICS,
        the detailed information about the problem is written to a walkback file.

        The walkback file could be stored in a folder and/or uploaded to Operational Reporting.

        0 - Disabled
        1 - Folder Mode (default)
        2 - Operational Reporting Mode
        3 - Operational Reporting Mode and Folder Mode
        4 - Operational Reporting Mode and Folder Mode on failure
	</description>

	<param-name>WalkbackMode</param-name>
	<param-value>3</param-value>
</context-param>
SICS Batch Server Configuration
Connect SICS Batch Server to Solr for Operational Reporting
To connect SICS Batch Server to Operational Reporting, SicsOperationalReportingMode and SicsOperationalReportingUrl context parameter must be configured in WEB-INF/web.xml.
<context-param>
	<description>
		SICS Operational Reporting Mode
		Defaults to disabled

      	disable - Disable logging to Operational Reporting
      	cloud - Apache Solr Cloud Mode
      	server - Apache Solr Server Mode
	</description>
	<param-name>SicsOperationalReportingMode</param-name>
	<param-value>cloud</param-value>
</context-param>

<context-param>
	<description>
		SICS Operational Reporting URL

		This setting is required to connect SICS to SICS Operational Reporting.

		If not set, SICS is not able to configure or log
		any information to SICS Operational Reporting.
	</description>

	<param-name>SicsOperationalReportingUrl</param-name>
	<param-value>localhost:2181/solr</param-value>
</context-param>
Upload Walkback files to Operational Reporting
To upload Walkback files to Solr for Operational Reporting, SICS Batch Server must be connected to Solr for Operational Reporting and the WalkbackMode context parameter value must be set to 2, 3 or 4 in WEB-INF/web.xml.
<context-param>
	<description>
        In the event of an unexpected error in SICS,
        the detailed information about the problem is written to a walkback file.

        The walkback file could be stored in a folder and/or uploaded to Operational Reporting.

        0 - Disabled
        1 - Folder Mode (default)
        2 - Operational Reporting Mode
        3 - Operational Reporting Mode and Folder Mode
        4 - Operational Reporting Mode and Folder Mode on failure
	</description>

	<param-name>WalkbackMode</param-name>
	<param-value>3</param-value>
</context-param>
SICS eMessaging Server Configuration
Connect SICS eMessaging Server to Solr for Operational Reporting
To connect SICS eMessaging Server to Operational Reporting, SicsOperationalReportingMode and SicsOperationalReportingUrl init parameter must be configured in WEB-INF/web.xml.
<init-param>
	<description>
		SICS Operational Reporting Mode
		Defaults to disabled

      	disable - Disable logging to Operational Reporting
      	cloud - Apache Solr Cloud Mode
      	server - Apache Solr Server Mode
	</description>
	<param-name>SicsOperationalReportingMode</param-name>
	<param-value>cloud</param-value>
</init-param>

<init-param>
	<description>
		SICS Operational Reporting URL

		This setting is required to connect SICS to SICS Operational Reporting.

		If not set, SICS is not able to configure or log
		any information to SICS Operational Reporting.
	</description>

	<param-name>SicsOperationalReportingUrl</param-name>
	<param-value>localhost:2181/solr</param-value>
</init-param>
Upload Walkback files to Operational Reporting
To upload Walkback files to Solr for Operational Reporting, SICS eMessaging Server must be connected to Solr for Operational Reporting and the WalkbackMode init parameter value must be set to 2, 3 or 4 in WEB-INF/web.xml.
<init-param>
	<description>
        In the event of an unexpected error in SICS,
        the detailed information about the problem is written to a walkback file.

        The walkback file could be stored in a folder and/or uploaded to Operational Reporting.

        0 - Disabled
        1 - Folder Mode (default)
        2 - Operational Reporting Mode
        3 - Operational Reporting Mode and Folder Mode
        4 - Operational Reporting Mode and Folder Mode on failure
	</description>

	<param-name>WalkbackMode</param-name>
	<param-value>3</param-value>
</init-param>
SICS API Server Configuration
Connect SICS API Server to Solr for Operational Reporting
To connect SICS API Server to Operational Reporting, SicsOperationalReportingMode and SicsOperationalReportingUrl init parameter must be configured in WEB-INF/web.xml.
<init-param>
	<description>
		SICS Operational Reporting Mode
		Defaults to disabled

      	disable - Disable logging to Operational Reporting
      	cloud - Apache Solr Cloud Mode
      	server - Apache Solr Server Mode
	</description>
	<param-name>SicsOperationalReportingMode</param-name>
	<param-value>cloud</param-value>
</init-param>

<init-param>
	<description>
		SICS Operational Reporting URL

		This setting is required to connect SICS to SICS Operational Reporting.

		If not set, SICS is not able to configure or log
		any information to SICS Operational Reporting.
	</description>

	<param-name>SicsOperationalReportingUrl</param-name>
	<param-value>localhost:2181/solr</param-value>
</init-param>
Upload Walkback files to Operational Reporting
To upload Walkback files to Solr for Operational Reporting, SICS API Server must be connected to Solr for Operational Reporting and the WalkbackMode init parameter value must be set to 2, 3 or 4 in WEB-INF/web.xml.
<init-param>
	<description>
        In the event of an unexpected error in SICS,
        the detailed information about the problem is written to a walkback file.

        The walkback file could be stored in a folder and/or uploaded to Operational Reporting.

        0 - Disabled
        1 - Folder Mode (default)
        2 - Operational Reporting Mode
        3 - Operational Reporting Mode and Folder Mode
        4 - Operational Reporting Mode and Folder Mode on failure
	</description>

	<param-name>WalkbackMode</param-name>
	<param-value>3</param-value>
</init-param>
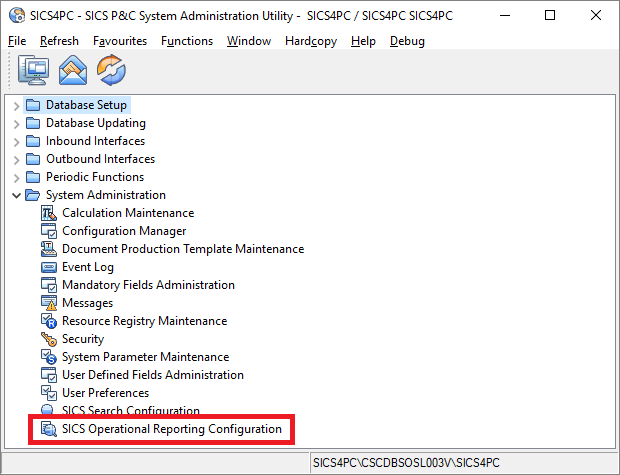
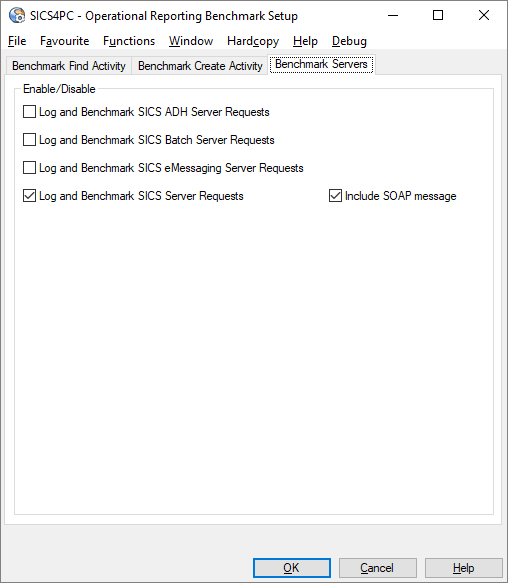
View/Edit SICS Operational Reporting Configuration
SICS Operational Reporting Configuration can be found in SICS System Administration Utility. It is located under System Administration.
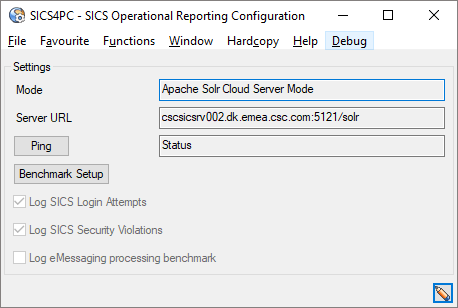
All configurations for SICS Operational Reporting are stored in the Operational Reporting Solr nodes.
In the configuration, you can enable/disable logging for the following:
- Login Attempts
- Security Violations
- eMessaging processing benchmark
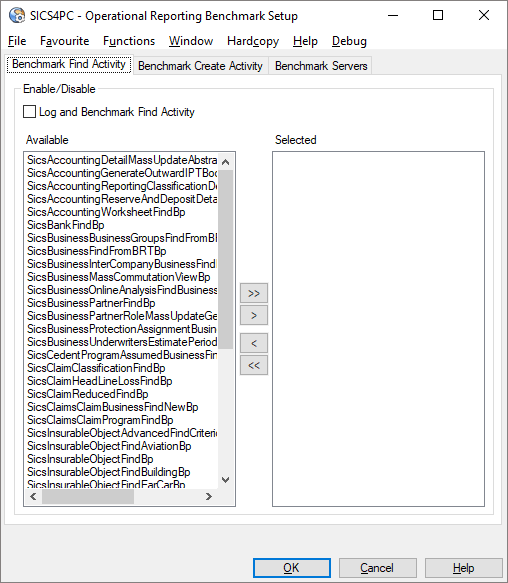
- Find activity benchmark
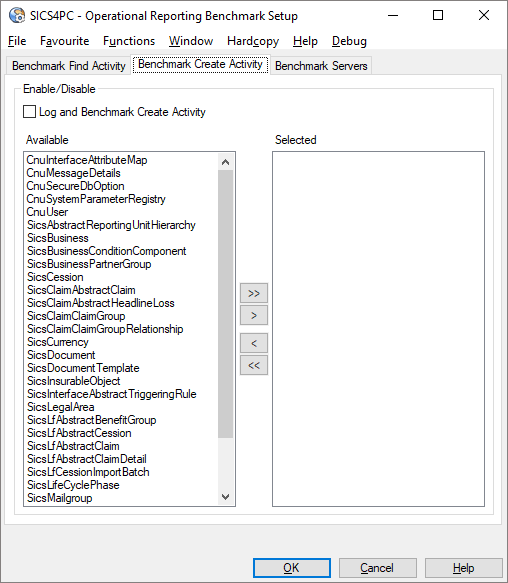
- Create activity benchmark
- SICS ADH Server request benchmark
- SICS Batch Server request benchmark / batch processing benchmark
- SICS eMessaging Server request benchmark
- SICS API Server request benchmark
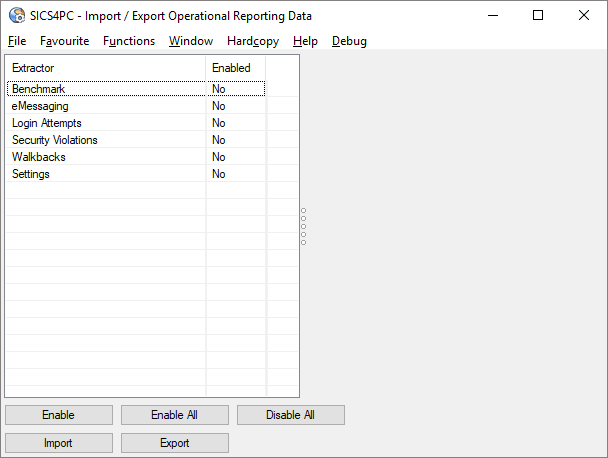
Import / Export Operational Reporting Data
The Import / Export Import / Export Operational Reporting Data facility can be found in SICS System Administration Utility. It is located under Database Updating.
It facilitates:
- Easy upgrade of underlying product without losing any data
- Ability to export and send data to DXC for analysis
- Backup / Restore
Note that the security use case Import / Export Operational Reporting Data must be assigned to the user role to access the functionality.

In the Import / Export Operational Reporting Data, you can configure what type of data you want to import or export.
You can import/export data to/from a subset of the Operational Reporting Solr collections by enabling a subset of the extractors.
To enable all extractors, click the Enable All button.
To disable all extractors, click the Disable All button.
To enable a selective extractor, first select the extractor that you want to enable and click the Enable button.
To disable a selective extractor, first select the extractor that you want to disable and click the Disable button.
Note that the Enable and Disable button are basically the same button, the button text toggle between Enable and Disable based on the selected extractor.
Date Time Filter
- All extractors besides Settings have a Date Time Filter.
- If From and To date/time are not set, all documents for that collection are imported/exported.
- If only From data/time is set, all documents after and including the From date/time for that collection are imported/exported.
- If only To data/time is set, all documents before and including the To date/time for that collection are imported/exported.
Type Filter
Only the Benchmark extractor have a Type Filter.
With the Type Filter you can for example configure the extractor to only include benchmark logs from SICS ADH Server on import/export.

| Location | About DXC Technology |
| 1775 Tysons Blvd Tysons, VA 22102 |
DXC Technology (DXC: NYSE) is the world's leading independent, end-to-end IT services company, helping clients harness the power of innovation to thrive on change. Created by the merger of CSC and the Enterprise Services business of Hewlett Packard Enterprise, DXC Technology serves nearly 6,000 private and public sector clients across 70 countries. The company's technology independence, global talent and extensive partner network combine to deliver powerful next-generation IT services and solutions. DXC Technology is recognized among the best corporate citizens globally. For more information, visit www.dxc.technology. |
| www.dxc.technology | © 2021 DXC Technology Company. All rights reserved. |