Database Setup
In the Database Setup folder you find functions helping you to set up a database for the first time. This section gives an overview of the different icons in the folder. For more detailed information about the database setup, refer to the SICS Installation Guide.
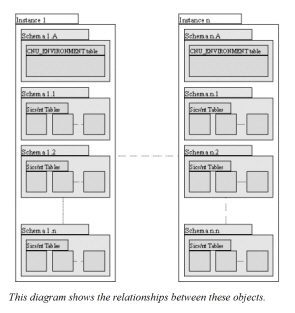
4.3.1 Configuration Overview
Each SICS Database has a number of object types to consider. The Database Instance contains the SICS environments, which contain the SICS tables.
4.3.2 Database Access
Access to the database is through JDBC, which allows for multiple DBMS support. The DBMS’s currently supported by SICS are listed in a separate document called Hardware and Software Requirements.
4.3.3 SICS Instances
Each Instance in the diagram shown in Configuration Overview may contain one or many databases, depending on your DBMS. The performance of the system is generally better and administration easier if there is only one database in each instance.
It may be required to have two or more databases on your DBMS, where, for example, one may be for production and one for testing. In this case, it may be preferable to create the two databases in two separate instances. These instances would be accessed through separate JDBC connections.
4.3.4 Manage SICS Environments
Each Database instance can contain multiple SICS environments. An environment is a container, which holds the SICS tables and data, and is specified by a particular schema. There can be as many different environments in the instance as required and these might correlate with the P&C and Life installations of SICS, for example.
The list of environments is held in a unique table within the instance, called CNU_ENVIRONMENT, under its own schema. This table defines the schema names of the SICS environments, and whether they are for P&C or Life, plus a description.
For example, you could be running different versions of SICS, with one release in production and another in testing.
Note! Security Information! To be able to access the Manage Environments function, the users (usually only the Sys.Admin.) must be logged in as schema owner on the schema holding CNU_ENVIRONMENT (e.g. SICS). There is no security usecase for this function, it’s not needed.
Click the Manage Environments icon in the Database Setup folder.
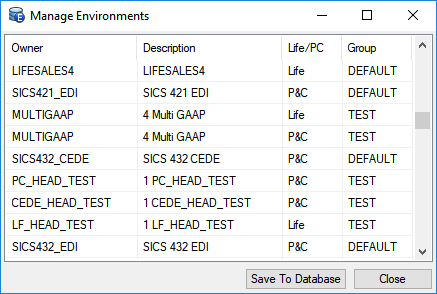
Use the popup (context) menu to add and remove entries.
The ‘Group’ attribute can be used to do further filtering of environments displayed to an end-user during login, over and above that of Life/PC filtering. During login, the user enters user name, password and Database :
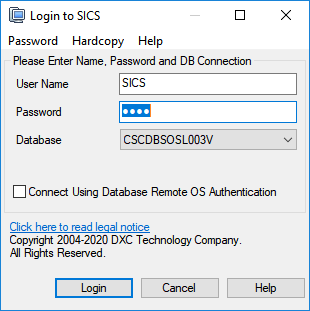
The available Database values shown in the dropdown are taken from the SICS configuration file runtime/conf/sics-database-sources.xml. If the selected Database contains an <environmentGroup> tag in the configuration file, the value of that tag will be used for filtering as follows (unless the value is empty or missing, in which case no filtering takes place):
- Environments with a non-null ‘Group’ value will be excluded if the value does not match the
<environmentGroup>value - Environments with a null/empty ‘Group’ value will always be included
- Value matching is case insensitive.
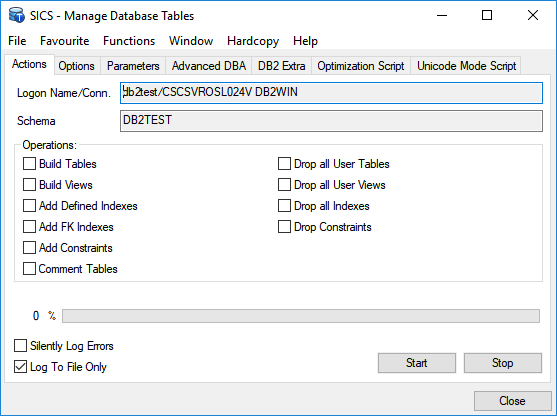
4.3.5 Manage Tables
Manage Tables handles the process of setting up the database portion of SICS. It lets you selectively create or drop tables, constraints, indexes and table comments. This tool only creates empty tables without any data. If you create tables using this option, you must also create base data and sample reference data.
WARNING: When you select Drop All User Tables, you lose all data in the current environment. Make sure that you have made a backup of all existing databases before selecting this option.
Note! Security Information! To be able to access the Manage table Function and change data in the tables, the users (usually only the Sys.Admin.) must be logged in as schema owner on the schema holding CNU_ENVIRONMENT (e.g. SICS). Therefore no security for this function is needed.
4.3.6 Create Base Data
This option lets you create all the initial data necessary to run the SICS system. This includes reference data (system defined values only), countries, states, currencies, users, EDI, system messages, and security information.
Note! This function cannot be run on a database where base data have previously been loaded. Since base data must be created when installing SICS, no SICS security covers this function.
4.3.7 Create Sample Reference Data
This option creates additional reference data values(in addition to the system defined values). If the sample values are not created, many of the reference data types will not contain any values, or only a limited set of system defined values. This limits the usage in the system, and you will have to go through Reference Data Types and add your own values.
Examples of the reference data added by Sample Reference Data are the values “Earthquake”, “Wind Storm”, “Flood”, “Hurricane” for Peril Type.
4.3.8 Create Sample Data
This option loads the SICS development team sample data into the database. It is only a relevant option if you want to create a test database. This option should not be used when setting up the production environment. Some sample business partners, reporting units, entry codes etc. will be created.
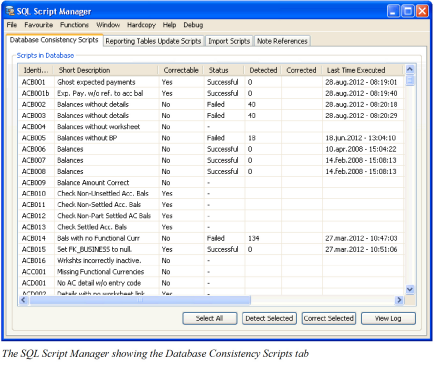
4.3.9 SQL Script Manager
The SQL Script Manager manages scripts that check the consistency of the SICS database. The scripts check for inconsistent or missing data, and will sometimes also contain logic to correct problems. It also contains scripts to update the Business Objects reporting tables (BOAC tables). Finally, it contains functionality to check for, and optionally correct, Note field references. Refer to Using the SQL Script Manager on page 4-38in this chapter for more information.
4.3.10 The SQL Utility
The SQL utility allows the user to make ad hoc queries of the SICS and interface databases using SQL statements.
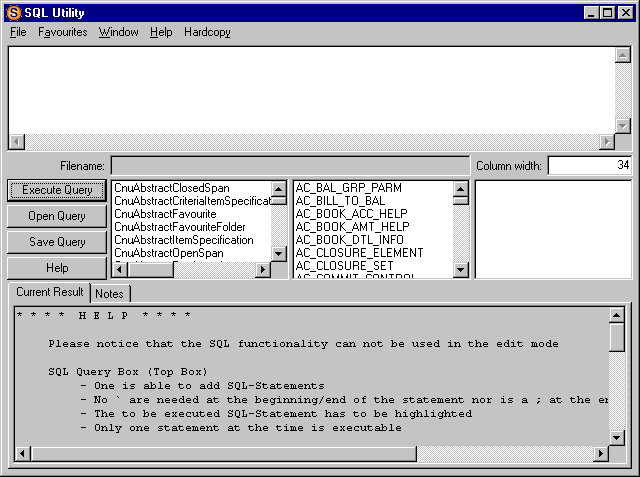
Only SELECT SQL-Statements can be executed.
SQL Query Box (Top Box)
SQL-Statements can be typed and executed.
Quotes are not required at the beginning/end of the statement.
The SQL-Statement to be executed must be highlighted.
Only one statement at a time is executable.
Filename Box
Shows the full path and the filename of a saved SQL.
Column Width Box
The width of the columns for the output of the SQL in the Output Box can be defined. The default is 34 characters.
Column width should not be less than 18 characters.
SicsClass Box (middle left Box)
Table and column names will be displayed for the selected class.
SicsTableName Box (middle middle Box)
Column names but no SicsClass name will be displayed for the selected table (could be several classes).
Clicking the right mouse button will move the selected table name to the cursor position in the SQL Query Box.
Double-clicking the left mouse button will insert a comma at the cursor position in the SQL Query Box.
SicsColumnName Box (middle right Box)
Clicking the right mouse button will move the selected column name to the cursor position in the SQL Query Box.
Double-clicking the left mouse button will insert a comma at the cursor position in the SQL Query Box.
Sql Output Box (bottom box)
Displays the result of the executed SQL-Statement
The column size can be adjusted in the Column Width Box.