Automatic Premium Accounting
Automatic premium accounting in SICS lets you do automatic booking of instalment premiums and adjustment premiums on the following businesses:
Proportional and Non-Proportional Facultative, both inward and outward business
Proportional and Non-Proportional Direct business
Non-Proportional Treaty businesses, both inward and outward business.
There are two ways to make an automatic booking of instalments and adjustments:
From the Premium Accounting window on the Premium/Limit conditions per section or for all sections of a business
Or by creating and running Instalment and Adjustment orders, for all sections for businesses.
Define Preconditions #
Before the booking of instalments, you must define the pre_conditions_:
Define Entry Codes #
Define entry codes in the System Parameter Maintenance window, in the page Accounting, Entry Codes. There are several Accounting Functions to be defined including mappings to entry codes for different calculation of premium and deductions. Below you will find a list of Accounting Functions and what businesses are related to the different functions:
Instalment Premium, Fac
Proportional and Non-Proportional Facultative business, both inward and outward
Proportional and Non-Proportional Direct business
Instalment Premium, Treaty Inward
Non-Proportional Treaty business, inward
Instalment Premium, Outward
Non-Proportional Treaty business, outward
Adjustment Premium, Fac
Proportional and Non-Proportional Facultative business, both inward and outwardProportional and Non-Proportional Direct business
Adjustment Premium, Treaty
Non-Proportional Treaty business, both inward and outward
Define Instalments #
Define instalments on the Limitsand Premium Conditions window. (Refer to Enter Premium Instalment Conditionsin the Business Conditions Handling chapter for more information about the Premium Conditions and creating new instalments.)
Define Adjustment Premium #
Refer to the chapter Calculate Adjustment Premiums on page 11-169for more information.
Maintain Classification Distribution for Premiums #
Define the Accounting Classification Split percentage to be used in the automatic premium booking, if you want the system to use another split percentage than the one defined on the Accounting Classification Condition.
Depending on the set up of your system adminstrator, you may define a separate Accounting Classification (AC) allocation on the Limit and Premium Condition, which applies to the automatic premium accounting.
You can have one AC allocation linked to the M & D Premium and one linked to each and every Premium Adjustment.
Defining the AC allocation can either be done manually or by attaching a Lookup Table.
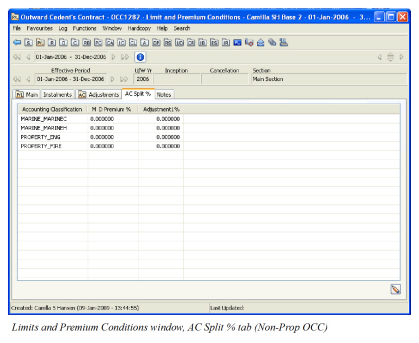
Record Accounting Classificatiom Allocation Manually
- Open your business and click the Limit and Premium Condition (P/L) button in the Navigation bar.
- Click the AC Split % tab.
- Enter your AC allocation for the M&D Premium and for each of the Adjustments.
- Press Save.
Note! The total sum for each column must equal 100%.
| Field | Description |
|---|---|
| Accounting Classification | Equals the number of Accounting Classifications defined on the AC Condition. Values: The name given to the accounting classification. This name is generated by SICS/nt. Mandatory: Yes |
| M&D Premium % | The percentage applying to the Instalment Premium. Values: Minimum: 0 and Maximum: 100 Number of decimal places: 6 Validations: The system validates that the total sum of all percentages entered equals 100% Functional impact: If the System Parameter ‘Premium bookings to be split per Accounting Classification Percent defined on the Premium Condition’ is activated, the system will use this AC split percentage when booking the Instalment Premium. See the Automatic Premium Accounting chapter for more details. |
| Adjustment1 % | The percentage applying to the Adjustment Premium. The system automatically adds a new row for each Adjustment No defined on the Adjustment Condition. Values: Minimum: 0 and Maximum: 100 Number of decimal places: 6 Validations: The system validates that the total sum of all percentages entered equals 100% Functional impact: If the System Parameter ‘Premium bookings to be split per Accounting Classification Percent defined on the Premium Condition’ is activated, the system will use this AC split percentage when booking the Adjustment Premium. See the Automatic Premium Accounting chapter for more details. |
Attach Pre-Defined Table of Distribution
Record the real distribution of classifications based on the subject premium income of the treaty. This can be used for automatic distribution at booking of the deposit premium or adjustment premium. This table of distribution is only available for Outward Cedent’s Contract.
You can attach different tables for the deposit premium and for each adjustment premium.
To attach an already imported ESPID (Estimated Subject Premium Income Distribution)table:
- From the AC Split % tab, click the Edit button.
- The system opens the Edit Split % window
- In the M & D Premium % or Adjustment % column, select Attach Table from the pop-up menu. This brings you to the Find Lookup Table window.
- From the Find Lookup Table window, select an ESPID Table and press OK.
| Field | Description |
|---|---|
| Table Type | Finds tables by where they may be used and for what purpose. Values: Estimated Subject Premium Income Distribution. Mandatory: Yes |
| Table Name | The name of the table you want to find Values: Free Text Mandatory: No. |
| Currency | Only available for Life. |
| Amount Type | The financial measure of the table(s) for which you are searching. Values: Fixed Monetary Amount Percent None: Searches on all Mandatory: No |
| Created by User | Finds tables created by the name of this person Values: Users set up by your system administrator. Mandatory: No |
| Status | Searches on the status of the tables Values: - Active: Searches only on tables that may be attached to a business - Inactive: Searches only on tables that may already be attached but may not be attached to new business - All: Finds both active and inactive tables Default: All Mandatory: Yes |
| Table Source | Finds tables by the method in which they were entered into SICS. Values: Imported Mandatory: Yes |
View Pre-Defined Table of Distribution
To view an ESPID Table:
- From the AC Split % tab, click on the M & D Premium % or AdjustmentX % heading and right-mouse click and then select View Table.
- The system opens the View Lookup Table window.
- Click the Display button to see the table details.
Detach Pre-Defined Table of Distribution
To detach an ESPID Table:
- From the AC Split % tab, click the Edit button.
- The system opens the Edit Split % window.
- From the Edit Split % window, click on the M & D Premium % or Adjustment % heading and right-mouse click and then select Detach.
- Click OK.
Note! The system does not allow you to detach an ESPID Table that has been used in automatic premium accounting
Generate Accounting Classification’s Automatically
The system allows you to automatically generate accounting classifications, based on the data from the ESPID Table.
To generate AC’s from an ESPID Table:
- From the AC Split % tab, click the Edit button.
- The system opens the Edit Split % window.
- From the Edit Split % window, click on the M & D Premium % or AdjustmentX % heading and right-mouse click and then select Generate AC.
- Click OK.
Maintain AC Allocation when split into combinations of AC and parameters representing the source booking
Applies to Non Prop OCC only.
Bookings made on the outward businesses may originate from various assumed businesses with different cedents and also different reinsurers if the Outward Cedent’s Contract covers more than one base company.
If your company requires to trace this information from outward bookings SICS offers a possibility to distribute the premium AC allocation for Non Prop OCC’s accordingly.
In that case the Accounting Classification Split % can be defined as a combination of Accounting Classification and the applicable original Base Company and /or Original Responsible Partner and/or Inward Treaty.
When Trace option applies for an OCC (either for Base Company and/or Original Responsible Partner and/or Source Business) a corresponding column will be displayed on the AC Split% condition.
The definition of a combined AC Split% can either be done manually or by ESPID table.
Note! This option is only supported for Non Prop OCC’s with the relevant trace options selected or the corresponding global system parameter is selected.
Refer to chapter Maintain System Parameters/Accounting/Miscellaneous in Sys Admin Guide

Record Accounting Classification Allocation Manually with AC Split combinations
-
Open your business and click the Limit and Premium Condition (P/L) button in the Navigation bar.
-
Click the AC Split % tab.
-
You see the Accounting classifications and the applicable additional columns.
-
Highlight the Accounting Classification you want to split and select Copy Accounting Classification from menu.
-
You see the AC Split Parameters.
-
Select the appropriate Base Company if you want to establish link to a specific Base Company for part of the booked premium of this Accounting Classification.
-
Find and select the appropriate SICS Business Partner if you want to establish link to a specific Original Responsible Partner for part of the booked premium of this Accounting Classification.
-
Find and select the appropriate SICS Inward Treaty if you want to establish link to a specific Original Responsible Partner for part of the booked premium of this Accounting Classification.
-
Save your selections. You see the copied Accounting Classification with the selected split parameters.
-
Redo the process (from step 4) until you have all the necessary split parameters defined.
-
Enter the AC allocation % for M&D Premium and Adjustments
-
Press Save.
Note! The total sum for each column must equal 100%.
Note! This option is only supported for OCC’s with the relevant trace options selected or the corresponding global system parameter is selected

Delete a manually recorded AC Split combination
A copied Accounting Classification with a combined split may be deleted as long as premium has not been booked.
- Open the Limit and Premium Condition (P/L) of your business and click the AC Split % tab.
- Highlight the copied Accounting Classification you want to remove and select Delete Row from menu.
- Click OK
Generate Accounting Classifications Automatically with combinations of AC Split
When Accounting Classifications are generated automatically from the AC Split % condition the system will populate each defined combination of Accounting Classification Split along with the appropriate percentage.
This is providing the attached ESPID is based on a pre-defined table of distribution including split parameters to be combined with the AC Split Allocation.
The split parameters (Base Company and/or Original Resp. Partner and/or Inward Treaty) are displayed with SICS Business Partner name and Business Id/Year.
- From the AC Split % tab, click the Edit button.
- The system opens the Edit Split % window.
- Select Generate AC from menu
- Select from available options M&D Premium or Adjustment
- Click OK
- See that the system has populated from the ESPID table each defined combination of Accounting Classification Split %.
Note! This option is only supported for OCC’s with the relevant trace options selected or the corresponding global system parameter is selected
Book Instalment and Adjustment Premium #
After you have recorded the pre_conditions_, you can book the instalment premium automatically following the already recorded information from the Limits and Premium _Conditions_ window and the Deduction _Conditions_ window (if any).
Book Instalments from Instalment Schedule #
- Select the Limit and Premium Conditions button in the Navigation bar.
- Select the Instalments tab.
- Select the Accounting button.
- Select the Instalments tab on the Premium Accounting window.
- Highlight the instalment(s) to be booked.
- From the pop-up menu you can select different booking options;
- Book Selected Instalment; creates an open worksheet with only selected instalment present
- Book and Close Selected Instalment; creates a closed worksheet with only selected instalment present
- Book Instalments on all Sections; creates an open worksheet with all instalments not yet booked from all sections on this insured period
- Create Booking Order; creates an open instalment order with the present business included and with the Due Date From - To matching the Due Dates on the highlighted instalments
- If any deduction percentage is defined on the Deduction Conditions, these are calculated and booked together with each premium instalment.
- If an AC Split % has been linked to the selected Instalment and the System Parameter Premium booking to be split per Accounting Classification Percent defined on Premium Condition is activated, the system uses this percentage split in the calculation of instalment premium
Book Instalments Automatically upon Registration Complete #
If your system administration has set up the system for it, it will check if there are any instalment amounts in the premium instalment schedule of the assumed business when you select the Registration Complete. If the system finds them ready to be booked, it will book all instalments on all sections and close the worksheet automatically. An exception is if this business is excluded from automatic booking of instalments or if the worksheet cannot be closed e.g. because of missing Accounting Classification. If the worksheet cannot be closed, the worksheet is not created and the user is back on the Registration Complete without being able to select the flag.

| Field | Description |
|---|---|
| No. | Sequential number to identify the instalment. Values: A number from 0 to 99 Functional Impact: Search criterion in the Title field in the Find: Accounting Order window Mandatory: Yes |
| Due Date | The due date of a specific instalment. Values: Date Functional Impact: None Mandatory: Yes |
| Accounting Period From - To | The Accounting Period from and to dates to be set on the worksheet when the specific instalment is booked. Only visible when the system parameter Accounting Period defined within Instalments and Adjustments conditions is selected. It is defaulted when the instalments are created and can be edited on the instalment conditions, see chapter Maintain Premium Instalment Conditions Values: Date span Functional Impact: Sets the Accounting Period From - To on the worksheet when the instalment is booked. Mandatory: Yes |
| Payment Date | The payment date of a specific instalment. Values: Date Functional Impact: Sets the Due Date on the worksheet when the specific instalment is booked. Mandatory: Yes |
| Currency | The currency in which the instalment is to be booked. Values: ISO standard (Currency short name). Only currencies defined in Currency table Mandatory: Yes |
| Premium | Gross Premium for a specific instalment. Values: An amount with 2 decimals Functional Impact: Booked as instalment premium on the worksheet. Mandatory: Yes |
| Net Premium | Net Premium for a specific instalment. Values: An amount with 2 decimals Calculations: Gross premium less the sum of deductions from the deduction conditions. In case deduction is defined as Amount this amount is divided by number of instalments and deducted from the gross premium on each instalment. Mandatory: Yes |
| Autom. Booked | Shows if a specific instalment is automatically booked or not Values: Yes / No Mandatory: Yes |
| Man. Booked | Shows if a specific instalment is manually booked or not Values: Yes / No Mandatory: Yes |
| Auto Book | Shows if a specific instalment is allowed for automatic booking or not Values: Yes / No Default: Dependent of system parameter Instalment - Auto Book default value ‘No’. When parameter is Off the default is Yes, when parameter is On the default is No. Can be changed manually in Edit mode. Mandatory: Yes |
| Booked Premium | Shows how much is booked of the Gross Premium amount for a specific instalment. Values: An amount with 2 decimals Calculations: The sum of premium bookings from the business ledger linked to this specific instalment (only on closed worksheets). Mandatory: Yes |
| Remain to book | Shows how much is left remain to be booked of the Gross Premium amount for a specific instalment. Values: An amount with 2 decimals Calculations: The gross premium in the Premium column less the sum of premium bookings from the business ledger linked to this specific instalment (only on closed worksheets). Mandatory: Yes |
| Paid | Shows if a specific instalment has been settled or not. Values: Yes / No / Partially Calculations: If the specific instalment is booked but not yet settled the value is No. If the specific instalment is booked and fully settled by remittance(s) the value is Yes. If the specific instalment is booked and partially settled by remittance(s) the value is Partially. NB! If an instalment is settled (paired) with another technical balance this is not reflected in the Paid column. It is only settlement pairings with remittances that will be reflected in the Paid column. Mandatory: Yes |
| Paid% | Shows how much of a specific instalment has been settled. Values: A percentage between 0 and 100 Calculations: If the specific instalment is settled by remittance(s) (in a settlement pairing) the system calculates how much the sum of these remittances is in percent of the instalment’s net balance. Mandatory: Yes |
| Remark | Free text comments. Values: Free text of max 30 characters Mandatory: No |
| Total Amount Booked - Gross | Sum of Booked Premium column for all instalment. Values: An amount with 2 decimals Mandatory: Yes |
| Total Amount Booked - Net | Sum of Booked Premium column for all instalment less the sum of deductions from the deduction conditions. Values: An amount with 2 decimals Mandatory: Yes |
| Total Amount Not Booked - Gross | Sum of Remain to book column for all instalment. Values: An amount with 2 decimals Mandatory: Yes |
| Total Amount Not Booked - Net | Sum of Remain to book column for all instalment less the sum of deductions from the deduction conditions. Values: An amount with 2 decimals Mandatory: Yes |
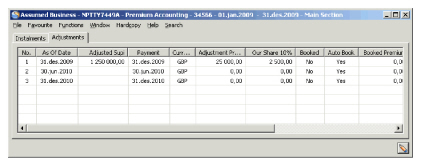
Book Adjustment Premium #
- Select the Limit and Premium Conditions button in the Navigation bar.
- Select the Instalments or_Adjustments_ tab.
- Select the Accounting button.
- Select the Adjustments tab on the Premium Accounting window.
- Highlight the adjustment(s) to be booked.
- From the pop-up menu you can select different booking options;
- Book Selected Items; creates an open worksheet with only selected adjustmet present
- Book and Close Selected Items; creates a closed worksheet with only selected adjustments present
- Create Booking Order; creates an open adjustment order with the present business included and with the As Of Date Up To matching the As Of Date on the highlighted adjustment
- If any deduction percentage is defined on the Deduction Conditions, these are calculated and booked together with each premium adjustment.
- If an AC Split % has been linked to the selected Adjustment and the System Parameter Premium booking to be split per Accounting Classification Percent defined on Premium Condition is activated, the system uses this percentage split in the calculation of adjustment premium
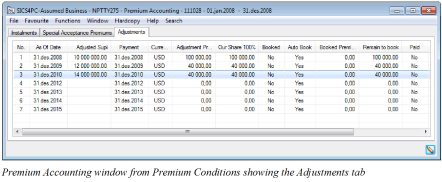
| Field | Description |
|---|---|
| No. | Sequential number to identify the adjustment. Values: A number from 0 to 99 Functional Impact: Search criterion in the Title field in the Find: Accounting Order window Mandatory: Yes |
| As Of Date | The as of date of a specific instalment. Values: Date Functional Impact: None Mandatory: Yes |
| Accounting Period From - To | The Accounting Period from and to dates to be set on the worksheet when the specific adjustment is booked. Only visible when the system parameter Accounting Period defined within Instalments and Adjustments conditions is selected. It is defaulted when the adjustments are created and can be edited on the adjustment conditions. Values: Date span Functional Impact: Sets the Accounting Period From - To on the worksheet when the adjustment is booked. Mandatory: No |
| Adjusted Supi | The adjusted subject premium income for 100%. Values: An amount with 2 decimals Functional Impact: Basis for calculation of the Adjustment Premium. Mandatory: No |
| Payment Date | The payment date of a specific adjustment. Values: Date Functional Impact: Sets the Due Date on the worksheet when the specific adjustment is booked. Mandatory: Yes |
| Currency | The currency in which the adjustment is to be booked. Values: ISO standard (Currency short name). Only currencies defined in Currency table Mandatory: Yes |
| Adjustment Premium | Gross Premium for a specific adjustment for 100% Values: An amount with 2 decimals Functional Impact: Basis for calculation of the adjustment premium for our share. Mandatory: Yes |
| Our Shre 100% | Gross Premium for a specific adjustment for our share Values: An amount with 2 decimals Functional Impact: Booked as adjustment premium on the worksheet for our share. Mandatory: Yes |
| Booked | Shows if a specific adjustment is automatically booked or not Values: Yes / No Mandatory: Yes |
| Auto Book | Shows if a specific adjustment is allowed for automatic booking or not Values: Yes / No Default: Dependent of system parameter Instalment - Auto Book default value ‘No’. When parameter is Off the default is Yes, when parameter is On the default is No. Can be changed manually in Edit mode. Mandatory: Yes |
| Booked Premium | Shows how much is booked of the Gross Premium amount for a specific adjustment. Values: An amount with 2 decimals Calculations: The sum of premium bookings from the business ledger linked to this specific adjustment (only on closed worksheets). Mandatory: Yes |
| Remain to book | Shows how much is left remain to be booked of the Gross Premium amount for a specific adjustment. Values: An amount with 2 decimals Calculations: The gross premium in the Our Share 100% column less the sum of premium bookings from the business ledger linked to this specific adjustment (only on closed worksheets). Mandatory: Yes |
| Paid | Shows if a specific adjustment has been settled or not. Values: Yes / No Calculations: If the specific adjustment is booked but not yet settled the value is No. If the specific instalment is booked and has been settled, fully or partially the value is Yes. Mandatory: Yes |
| Adjusted Premium | Sum of the value in the Deposit 100% in the Deposit Premium Conditions and the value in the Adjustment Premium column for the specific adjustment. Values: An amount with 2 decimals Mandatory: Yes |
| Our Share 100% | Our share of the Adjusted Premium. Values: An amount with 2 decimals Mandatory: Yes |
A Worksheet is Created #
Before booking, the system performs a series of validations. The system validates the Agreement Basic Status for the Insured Period and makes sure it is Definite before allowing booking. It also checks that the booking is not already booked, and that the premium can be booked automatically according to what was set in the premium conditions.
A worksheet is automatically created and default values are recorded. You must manually close the worksheet. (Refer to Create a New Worksheet on page 11-133in this chapter for more information on worksheet s.)
When creating a worksheet for a business with children (for example a Non Proportional Outward Cedent’s Contract with placements), the closing of this worksheet at OCC level triggers closing of the corresponding worksheets at child level, considering signed share and some local conditions depending on Type of Business.
When Special Premium is activated for a Non Proportional OCC, it enables a possibility to create deferring conditions for one (or a number of) retrocessionaire(s). These conditions are considered when booking Installments, Adjustments and Reinstatement Premium for these OCCs (Refer to Premium and Limit Condition for more detailed information about Special Premium.)
Automatic Calculation of Value Added Tax #
For an assumed business that is subject to Value Added Tax (VAT), SICS calculates VAT automatically on automatic booked premium and deductions if they are applicable to VAT. The VAT is calculated on gross basis.
If in addition, the system parameter VAT Calculation based on EC Groups is activated; the system will calculate VAT on both assumed and outward business, as long as it is applicable for VAT. The VAT calculation based on Entry Code Groups is always on net basis.
Refer to Calculate and Book Value Added Tax Automatically on page 11-57on a Worksheet, Accounting Chapter.
Reverse Booked Instalments #
Instalments can only be reversed from Premium Accounting window. You can reverse single instalments or all instalments on all sections.
Instalment bookings cannot be reversed from the Business Ledger, Business Partner Ledger or Find worksheet.
Reverse Single Instalments #
For some reason you may find it necessary to reverse already booked instalment(s).
-
Open business' Premium and Limit Condition and then open Premium Accounting
-
Highlight instalment(s) to be reversed
-
Select option Auto Reverse Selected Instalments from the pop-up menu.
All details from the selected instalment(s) are copied with the amounts reversed in a new worksheet.
The new worksheet (the reversal) is closed and its balances are automatically paired with the original instalment balances.
Both the original booking and the reversal are settled on the Business Ledger. -
Open the Instalment Schedule in view mode. Reversed instalment is still displayed and the booked indicator is changed to “No”.
Reverse All instalments on All Sections #
In some cases you may find it necessary to reverse all booked instalments on all sections.
- Open business' Premium and Limit Condition and then open Premium Accounting
- Select option Auto Reverse all Instalments on All Sections from the pop-up menu.
All details on the instalments are copied with the amounts reversed in a new worksheet. The new worksheet (the reversal) is closed and its balances are automatically paired with the original instalment balances. Both the original bookings and the reversals are settled on the Business Ledger. 3. Open the Instalment Schedule in view mode. Reversed instalments are still displayed and the booked indicator is changed to “No”.
Note! Settled or partially settled Instalments can be reversed but will not be automatically paired with the reversal. Instalment included in a Settlement Balance Group can be reversed, but will not be automatically paired with the reversal unless you also delete the Settlement Balance Group
Note! In case the user is not allowed to directly close a reversed instalment and therefore is informed that the worksheet for the reversed instalment cannot be closed but is stored in status Open, then this user is assigned to a special domain restriction. A reversed instalment stored on an Open worksheet is fully protected and cannot be updated by any user other than the Booking Year/Period, Booking Date and status set to Closed.
Automatic Book Instalment and Adjustment Premium by Order #
From the Find: Accounting Order window, click the display list, click the right-mouse button, and select New. You see the Order Type Selection window where you select the type that you want to create.

Click OK, and you see the New Accounting Order window, where you can create a new accounting order, and specify your selection criteria for the business to be booked.

The order is automatically set in Edit mode. It is divided into several sections as follows:
Order Information #
The check boxes that appear in this section depend on the order type that you are creating.
Title: Type in the title of the order you are creating.
Copied From: This is an output only field and shows you the Order ID from the order it copied.
WS Per Business : Select this box if you want to create a worksheet ID for each separate business of the order. The default is “off” (not selected). That is, you get one Worksheet ID for all businesses unless you select WS Per Business. If your order is for outward business, the worksheets are separate per retrocessionaire if the box is selected.
Close Worksheet: When you select this box the system automatically closes the worksheet after an order is executed.
Brokerage Balance Split: Select this box if you want to split the brokerage into separate balances on the Business Ledger.
Registration Information #
Order Type: This field shows the accounting order type.
Created: This field shows the date that the order was created. It is output only, so you cannot change this date.
-by: This field shows who created the order. It is output only, so you cannot make changes to this name.
Actual and Planned Runs #
Actual run information does not apply to the creation of an order. It shows when the order was run (processed).
The Planned run date is the date in the future that you want the order to be run. Enter the date and the system automatically updates the order for that date and time.
Order Selections #
The Order Selections section on the Premium Order window is divided in two parts; one for the instalment/adjustment extraction and one for the business extraction. The first part is where you select which of the Instalments/Adjustments from the extracted business should be booked and the second part is where you extract the actual businesses to be included in the order. When any of these options are left blank, the system considers all valid criteria.
The order selection information that you see depends on the type of order that you are creating.
Due Date: For an Instalment Premium, you can indicate the due date for instalments for which you want to do an order. If, for example, you type 01.07.98 in both the From and the To fields, you indicate that you only want to book for Instalment Premiums with due date 01.07.98.
Date Included in Insured Period: When you indicate a specific insured period date, you indicate that you want to include businesses within the date included in the insured period.
Premium Currency/Amount: When you indicate a specific Premium Currency and Amount, SICS searches for premiums within the Premium Conditions.
Underwriting Year: You can indicate the underwriting year range for which you want to do an order. The default is the last underwriting year for the business.
Exclude Business with Bureau Indicator On: This check box is relevant only if you have selected the Bureau Indicator check box on the Insured Period EDI Details window. See EDI Information on Insured Periods in Handle Business Life Span for further details.
Exclude Business without Signed Share: This check box is relevant if you only want to list businesses/make bookings for businesses having a Signed Share.
BusinessTypes and Classifications: You can select classifications that you want to include in the order. Double-click the Type (such as Main Class of Business) to see a window where you can include items by moving them from the Available to the Selected columns by clicking the right arrow button (or by double-clicking). For example, if you click Main Class of Business, you see the Edit Main Class of Business window.

It is mandatory to have at least one level of business and one type of business.
Business Display List #
|

Edit Menu button | The Business display list at the bottom of the Order Selection section of the window shows all businesses with Premiums that meet the criteria you selected for the order. In order to see the list, you must click the Edit Menu button in the right-hand corner and select List Business. You must list businesses before you can process an order. |
Processing Accounting Order #
When you click OK, the Accounting order you created is saved, but it is not yet processed. To process it and create a technical worksheet, you must click the Edit Menu button and select Run Now.
If deduction conditions are defined for businesses as a percentage for brokerage, commissions, overriding commissions, tax on premium, or fire brigade charges to be deducted, then the system calculates figures as own entry codes like Instalment Premium. Entry Codes need to be specified for deductions, within the System Parameters for each order type.
If an AC Split % has been linked to the selected Instalment or Adjustment, and the System Parameter Premium booking to be split per Accounting Classification Percent defined on Premium Condition is activated, the system uses this percentage split in the calculation of instalment and adjustment premium.
The system always books premiums at the lowest level. When a B_usiness has Premium Conditions at sub-section level the_ system automatically performs booking on the lowest _section_ of the Business.
Produce an Instalment-/Adjustment Premium Closing #
After having processed an order for premium accounting, it is possible to have a document produced and printed out. From the Edit Menu button for each individual order you can select Produce Document. The system produces one or more documents following your template defined within System Administration (refer to Document Production Template Maintenance in the System Administrator’s Guide). To see and print the produced documents, select List Documents from the Edit Menu. The system presents a list of all produced documents for the present order. You can select one document at a time, click the right-mouse button, and select Open, Create New, or Properties.
View and Maintain Accounting Order Properties for Automatic Premium Accounting #
When you open the Accounting Order window (by double-clicking an item in the Find: Accounting Order display list, or by selecting an item in the list and selecting Properties from the pop-up menu), you see the View Accounting Order window.

The Classifications for premium business enables you to select Level of Business, Type of Business, MCoB, CoB, Cedent, Broker, Type of Participation, Base Company, Reporting Unit, Master Agreement and Account Group.
In addition to selecting classifications as described in Order Selections on page 11-163, when you double-click Cedent, you access the Find Business Partner window. You can select the business partner and transfer it back to the order. SICS then searches for the specified business partner with the role of Cedent.
The Business display list shows a list of all of the businesses included in the order. Here you see whether or not that business is included or excluded in the order and the details for each business.
To make changes to businesses on an order, you must click the Edit Menu button and select Edit. You can then select an item in the Business display list, click the right-mouse button and see the following options from the pop-up menu:
- Properties, which opens up the Properties window for the selected business. From there you can open the Business Ledger and the Premium Conditions to see more detailed information about bookings and premiums.
- List Business, lists all businesses that match the business classifications for the order.
- List Premiums, lists all businesses with Instalment-/Adjustment Premiums due for booking. You must first list businesses before you can list premiums.
- Undo List Premiums, reverses the search for businesses with premiums due for booking and list all businesses.
- Clear List, clears the list of all businesses.
- Exclude, which excludes the selected business from the accounting order. This must be done before an order is processed.
- Revoke Exclusion, which lets you include a selected business that was previously excluded from the accounting order. This must be done before an order is processed.
- Add Business, which lets you include a business you selected from the Find: Business window (which must be done before an order is processed.)
When you open the View Accounting Order window, you can do the following:
- Copy To: You can copy the order to be used as a template for another order. You can only copy from accounting orders that have been saved and given an Order ID.
- Run the Order: Select Run Now from the Edit Menu button to run (process) the order. This creates one or more technical worksheet s, which show all the bookings for the businesses in the Business display list. (This worksheet opens automatically after you select Run Now.) Run Order is not available after the order has been processed.
- Open the Worksheet: Select Worksheet from the Edit Menu button to see the Technical Worksheet that was created for the order when it was run.
- Produce Documents: By selecting this option you produce documents for this order.
- List Documents: Shows you a list of existing documents for this order.
Calculate Adjustment Premiums #
You can have the system automatically calculate the Adjustment Premium following the premium conditions already recorded on the business. (This is possible when the premium type is Fixed Rate, Proportional Rate, or Sliding Rate.)
Before you can calculate adjustment premiums, you must have registered the premium rate, minimum premium, and deposit premium in the Limit and Premium Conditions window. (Refer to Limit and Premium Conditions in the Business Conditions Handling chapter.) If the premium type is Sliding Rate, you also need to specify loading, minimum and maximum rates.
To calculate adjustment premiums within Limit and Premium Conditions:
- Open the business and find the right scope of cover.
- Click the Limit and Premium Conditions button to open the Limit and Premium Conditions window.
- Click the Accounting button in the bottom right-hand corner of the window. You see the Accounting Conditions window. Click the Edit button and then on the Adjustment tab.
- Enter the Adjusted SUPI (for Non-Prop Treaty) or the Adjusted Calculation Basis (for other than Non-Prop Treaty). For Non-prop treaties with a sliding rate, you must enter the Incurred Losses as well.
Adjustment Premiums are automatically calculated. From View Accounting you can book the Adjustment Premium. Additional to the Adjustment Premium and possible related Deductions, the system will also book the Adjusted SUPI multiplied with Our Share if this is defined in the system parameters. This is done by mapping an Entry Code in the Accounting Function Adjustment Premium, Fac and Adjustment Premium, Treaty for the Adjusted SUPI.
Adjustment Premium Calculation for Non-Proportional Treaty Business #
Minimum and Deposit premium and Adjustment premium are often paid in multiple currencies.
Adjustment premiums for non-proportional treaty premiums are calculated according to the consolidated minimum premium (consolidated minimum premium is the total sum of each individual minimum premium. Each minimum premium has first been converted into a main currency by applying a fixed exchange rate for premiums.)
This means that you can pay less than the minimum premium in one or more currencies as long as the consolidated adjusted premium (consolidated adjusted premium is the total sum of each individual adjusted premium. Each adjusted premium has first been converted into a main currency by applying a fixed exchange rate for premiums) is equal to or greater than consolidated minimum premium.
If the consolidated adjusted premium is less than the consolidated minimum premium, all currencies will be adjusted to reflect the minimum premium in each currency.
When the Premium Type is Sliding Rate or Sliding Amount, SICS also considers Minimum Rate/ Amount when calculating Adjustment Premium.
Handle Special Acceptance Premiums Accounting #
This section is only relevant for you when your system administrator has activated this function and even then only when your business is an Assumed non-proportional treaty.
For details about the Special Acceptance Premiums and how to record these premiums, refer to the Maintain Special Acceptance Premiums section of the Handle Agreement Terms and Conditions chapter.
Define Preconditions for Special Acceptance Premium #
Before you can book a Special Acceptance Premium, your system administrator needs to set up SICS to handle this; the Entry Codes must be defined and assigned to the Accounting Function Special Acceptance Premium, Treaty Inward.
Deductions are calculated and booked according to the Deduction Condition on the same sections as the Special Acceptance Premiums.
Book Special Acceptance Premium #
You book a Special Acceptance Premium from the Premium Accounting window.
-
Select the Limit and Premium Conditions button in the Navigation bar.
-
Select the Special Acceptance Premiums tab.
-
Select the Accounting button.
-
Select the Special Acceptance Premiums tab on the Premium Accounting
window. -
Select the Special Acceptance Premium(s) which you want to book.
-
From the popup menu, select one of the booking options.
You use the Book Selected Special Acceptance Premiums option when you want the system to create an open technical worksheet.
You use the Book and Close Selected Special Acceptance Premiums option when you want the system to close the technical worksheet automatically.

Field description for Premium Accounting, Special Acceptance Premiums tab refer to the Field description for Premium Accounting, Instalments tab earlier in this chapter.
Reverse Special Acceptance Premium #
If you need to reverse an already booked Special Acceptance Premium, you do that from the Premium Accounting window. You cannot reverse a Special Acceptance Premium from any other places.
To reverse a Special Acceptance Premium:
-
Select the Limit and Premium Conditions button in the Navigation bar.
-
Select the Special Acceptance Premiums tab.
-
Select the Accounting button.
-
Select the Special Acceptance Premiums tab on the Premium Accounting
window. -
Select the Special Acceptance Premium(s) which you want to reverse.
-
From the popup menu, select the option Auto Reverse Selected Special
Acceptance Premiums.
When you use the Auto Reverse Selected Special Acceptance Premiums option:
- The technical worksheet is closed automatically.
- If the source balance is not yet paired, the source balance and the target (reversed) balance are paired, and both the source balance(s) and the target balance(s) get the settlement indicator Settled, and Unsettled Amount is set to zero.
- A reversed Special Acceptance Premium remains on the Premium Accounting window, but it can also be inspected on the Special Acceptance History window. Note! In case the user is not allowed to directly close a reversed special acceptance premium worksheet and therefore is informed that the worksheet for this reversal cannot be closed but is stored in status Open, then this user is assigned to a special domain restriction. A reversed special acceptance premium stored on an Open worksheet is fully protected and cannot be updated by any user other than the Booking Year/Period, Booking Date and status set to Closed.
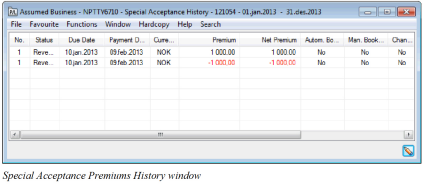
Special Acceptance History window #
When a Special Acceptance Premium is reversed, it is listed in the Special Acceptance History window.
To see if any of the Special Acceptance Premiums has been reversed:
- Select the Limit and Premium Conditions button in the Navigation bar.
- Select the Special Acceptance Premiums tab.
- From the popup menu select the Show Special Acceptance Premium History option.
Or you can open the Special Acceptance Premium History window from the Premium Accounting window by continue from step 2 above:
-
Select the Accounting button.
-
Select the Special Acceptance Premiums tab on the Premium Accounting
window. -
From the popup menu, select the Show Special Acceptance Premium History option.