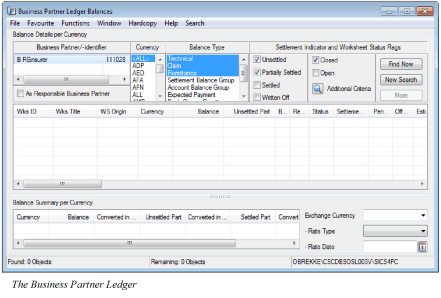
The Business Partner Ledger
The Business Partner Ledger lets you search for, inspect and analyse information pertaining to liquid balances, i.e. account balances and payments, to and from business partners.
You can group balances by creating Settlement Balance Groups and Account Balance Groups. Worksheets such as Remittance - and Technical Worksheets may be created from the Business Partner Ledger. These and other functions are described in the further documentation.
Open a Business Partner Ledger #
|

Business Partner Ledger button | To open a Business Partner Ledger, click the Business Partner Ledger button in the Navigation bar on the Business Properties window or on the Business Partner Properties window. Or, you can click the Business Partner Ledger icon in the Accounting folder on the SICS desktop. |
The Business Partner Ledger opens automatically upon selection. You have to Define Business Partner Ledger Extraction Criteria on page 11-495in order to retrieve balances.
Open the Business Partner Ledger from the Accounting Folder #
When you do not have to inspect other information, e.g. Business properties, Business Partner properties etc., you can navigate directly to a Business Partner Ledger.
- Click the Business Partner Ledger icon in the Accounting folder on the SICS desktop.
- Search for and find the Business Partner you want to inspect the liquid balances for.
- Select the Business Partner.
Open the Business Partner Ledger from the Business Partner Properties #
When you are inspecting information pertaining to a Business Partner you can navigate directly to this Business Partners Ledger.
- Open the Partners folders from the SICS desktop and select the Business Partner button.
- Find and open the properties of the Business Partner you want to have information about.
- On the Main Info tab of the View Business Partner window, click the Business Partner Ledger button.
Open the Business Partner Ledger from the Business Properties #
When you are inspecting the properties of a Business you can navigate directly to the Business Partner Ledger of the partner having the payment task defined.
- Open the Business folder from the SICS desktop and click the Business button.
- Find and open the Business you want to inspect the details for.
- Click the Business Partner Ledger button from the Navigation bar.
Open an Empty Business Partner Ledger from the Business Partner Properties #
When you want to open the Business Partner ledger with empty Business Partner container, without selecting any business partner, you can navigate directly from Business Partner Properties.
- Open the Partner folders from the SICS desktop and select the Business Partner button.
- Select checkbox field ‘Base’ and without highlighting any single or multiple BP’s, Right click and Select new option ‘Open Empty BPL’.
- An Empty Business Partner Ledger opens with empty Business Partner Container section, with As BC field selected by default (this is not selected by default if Base is not selected in step 2 above).
Open Business Partner Ledger from a Business Partner Group #
- Open an existing Business Partner Group, Main Info tab, from either the Business Partner Group option or from the Details tab, Groups, of a Business Partner
- Click on the Business Partner Ledger Icon
- The Business Partner Ledger for all the members of the Business Partner Group opens
Define Business Partner Ledger Extraction Criteria #
When you have opened a Business Partner Ledger, the Balance display list is empty. You may be interested in viewing, inspecting or handling only a limited number of the available balances. You define extraction criteria to list the limited number of balances in the Balance display list.
Business Partner Ledger Extraction Criteria for retrieving balances to be shown in the Balance display list can be defined:
- In the top part of the Business Partner Ledger. Some of the extraction criteria are predefined when the Business Partner Ledger is first opened.
- In the Additional Find Criteria window.
- Using the pop-up in the Balance table header on the Business Partner Ledger’s Balance Display list. NB!The result from this search is not automatically reflected in the Balance Summary per Currency display list, the user must select the popup menu option ‘Recalculate based on listed balances’ in the summary container to have this reflected.
Maintain Business Partners as Extraction Criterion #
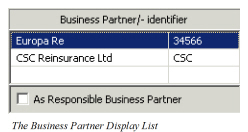
When the Business Partner Ledger is opened, a Business Partner/Business Partner identifieris transferred to and selected by default in the Business Partner list. If the ledger is opened from the Business Partner properties or via the Accounting folder, the Business Partner you searched for is selected by default. If the ledger is opened from a business, all Business Partners/Business Partner identifiersdefined on the business, e.g. Cedent, Broker, Reinsurer, etc. are shown in the Business Partner list. Among these, the partner with the Payment task is selected by default. Also, any business partners belong to a Merged Business Partner Group, all other members within the merged business partner group will be added to the list of Business Partners automatically.
You can select one or more Business Partners from the display list when you define the extraction criteria.
Add a Business Partner: #
When you have opened the Business Partner Ledger and you want to inspect the Balances of a Business Partner that is not already defined in the Business Partners list, you can select to add one or more partners.
- Select Add from the pop-up menu in the Business Partner Ledger’s Business Partner list. You see the Find: Business Partner window.
- Find and select the Business Partner(s) you want to add.
- Transfer the selected Business Partner(s)
The Business Partner name(s)/Business Partner identifier(s) is transferred to the Business Partner Ledger and added to the list of Business Partners.
Remove Business Partners #
You can remove Business Partners from the list.
- Select one or more Business Partners from the list in the Business Partner Ledger.
- Select Remove from the pop-up menu. The Business Partner(s) are deleted from the list.
Note! You are not allowed to remove all partners from the Business Partner list.
Add Subsidiaries #
There may be links between Business Partners and/or Third Parties that decide the hierarchy-level for each partner (Owner or Subsidiary). When a Business Partner is defined as Owner having one or more subsidiaries linked, these subsidiaries may be added to the list of partners in the Business Partner Ledger.
- Select a Business Partner in the Business Partner list. The partner has to be defined as an Owner.
- Select Add Subsidiaries of type > from the pop-up menu.
- Select all types of subsidiaries or a specific type, e.g. Branch, Affiliate, etc., from the list. (Your System Administrator defines the types.)
- The Subsidiaries that match the selected type is added to the list of Business Partners.
By selecting the Owner and its Subsidiaries from the Business Partner list all balances pertaining this hierarchy will be displayed once Find Now is selected.
Add Business Partner Group #
When you have opened the Business Partner Ledger and you want to inspect the balances of all the partners in a Business Partner Group, you can add one or more Business Partner Groups that will list all the members in the group and their balances in the Business Partner Ledger
- Select Add Business Partner Group from the pop-up menu in the Business Partner Ledger’s Business Partner list. You see the Find: Business Partner Group window.
- Find and select the Business Partner Group(s) you want to add.
- Transfer the selected Business Partner Group(s)
Display the Business Partner Hierarchy #
You can display the hierarchy for a selected Business Partner. This may be relevant e.g. if you want to verify where in a hierarchy the Business Partner is located.
- Select a Business Partner from the Business Partner list in the Business Partner Ledger.
- Select Hierarchy from the pop-up menu. You see the Organisation Hierarchy window.
If the Business Partner is an owner, its subsidiary/ies is/are displayed. If the Subsidiary itself is an owner and has its own subsidiary, also this level is displayed. If the Business Partner is a subsidiary, the text Has Owner is displayed next to the Business Partner name in the Organisation Hierarchy window.
View Business Partner Properties #
When you want to get more information about a Business Partners in the Business Partner list, you can access the Business Partner properties directly from the Business Partner Ledger.
- Select the Business Partner you want to have more information about.
- Select Properties from the pop-up menu. You see the View Business Partner window.
Extract Balances for Responsible Business Partner #
The balances displayed for a Business Partner in the Business Partner Ledger are balances booked on businesses where the partner is defined with the Payment task. For a balance this Business Partner acts as the Expected Payment Partner.
As an alternative to this you can select to display the balances for businesses where the selected Business Partner is defined as the legal Responsible Business Partner. Which Business Partner role is defined as responsible for a business depends on the Level- and Type of Business, e.g. the Cedent on an Assumed Proportional Treaty
- Select one or more Business Partners from the Business Partner list in the Business Partner Ledger
- Select the As Responsible Business Partner check box
| Field | Description |
|---|---|
| Business Partner/Identifier | The name of the Business Partners/identifieryou have included in the list. You can search for and display balances for one or more of these Business Partners Values: Business Partner name/Business Partner identifier. Default: The Business Partner from where you opened the Business Partner Ledger. (I.e. the Business Partner properties, the Find Business Partner or the Business properties). Functional Impact: The Balance display list Mandatory: Yes |
| As Responsible Business Partner | Selected: Balances for businesses where the selected Business Partner is defined as Responsible Business Partner are included in the Balance Display list. Balances booked on e.g. an Assumed Business will get the Cedent as Responsible Partner. This is independent if a broker with a payment task exists or not. Cleared: Only balances booked on businesses where the selected Business Partner is the Payment partner on the balances displayed in the Balance Display list. The check box is cleared by default Relevant when: You want to see all balances for e.g. a Cedent independent if this Business Partner has the Payment Task on the Business or not. A Liquid Balance has both a payment partner and a responsible partner. These can be the same partner, e.g. if no broker is involved, or the responsible is different from the payment parties, normally when a broker is involved. Mandatory: No |
| As BC | Selected: Balances for businesses where the selected Business Partner acts as Base company are included in the Balance Display list. Balances booked on e.g. an Assumed Business will get the Reinsurer as Base Company. Cleared: Only balances booked on businesses where the selected Business Partner is the Payment partner on the balances displayed in the Balance Display list. The check box is cleared by default. Relevant when: You want to see all balances for Business Partner who acts as the Base Company (if this box is selected), the Payment Partner (if none of the boxes are selected) or the Responsible Business Partner (if the As Responsible BP is selected, see above). Mandatory: No |
Define Currency #
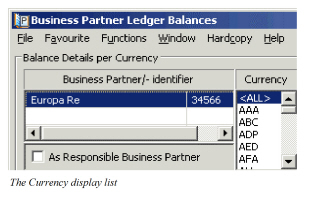
When the Business Partner Ledger is opened, all currencies for which bookings have been made on the selected Business Partner are displayed in the Currency display list.
- Open a Business Partner Ledger. None of the listed currencies are selected.
- Select the currency or currencies for which you want to display balances.
- Make further extraction criteria definitions and click Find Now
Balances according to the selected currencies are displayed in the Balance display list.
When you want to select all currencies you can either select <ALL> or not select any value. In both situation balances for all currencies will be displayed.
Note! For Retrocessionaire Participation (RP) Proportional Treaty businesses the as Account balances applies for the Business Partner Ledger. For the RP Facultative business your System Administrator decides if the as Booking balances or the as Account balances applies for the Business Partner Ledger.
| Field | Description |
|---|---|
| Currency | All currencies booked on the selected Business Partner Values: <ALL> and the Currency names according to ISO, e.g. USD, GBP, CHF, etc Functional Impact: The Balance display list Mandatory: No |
Define Balance Type #
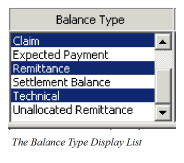
Each balance in the Business Partner Ledger refers to a Balance Type. When the Business Partner Ledger is opened, the balance types Technical, Claim, Cession(only in Life) and Remittance are selected by default.
- Open the Business Partner Ledger.
- Select the Balance Types for which you want to extract balances in the Balance Display list.
- Make further definitions of extraction criteria and click Find Now
Balances according to your extracted balance types are displayed in the Balance Display list.
Some balances may refer to more than one Balance Type. If you extract Expected Payment and/or Settlement Balance together with other balance types, e.g. Technical, the Balance Display list shows each balance only once. For example, if a Technical Balance of NOK 7.000 has an expected payment of USD 1.000, only USD 1.000 is shown in the Balance Display list. To see the original technical balance amount you must clear Expected Payment in the Balance Type list.
| Field | Description |
|---|---|
| Balance Type | Indicates the different types a balance can apply to Values: Account, Bank Charge Remittance, Cession (Life specific), Claim (P&C specific), Expected Payment, Remittance, Settlement Balance, Technical and Unallocated Remittance. Functional Impact: The Balance display list Mandatory: Yes |
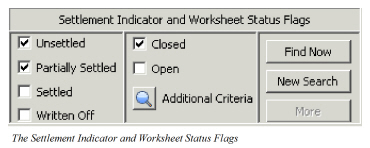
Define Settlement Indicator #
The Settlement Indicator makes it possible to extract on Unsettled, Partially Settled and/or Unsettled balances in addition to balances that are Written off.
- Open the Business Partner Ledger.
- Define which Settlement Indicator(s) you want to extract balances on.
- Define your other extraction criteria and click Find Now.
| Field | Description |
|---|---|
| Unsettled | Indicates that the balance is not yet Settled, i.e. included in a pairing process or written off. Values: Selected, Cleared Default: Selected Functional Impact: It decides if Unsettled balances s hould be included in t he Balance display list or not. Mandatory: No |
| Partially Settled | Indicates that the balance has been included in a pairing process but has not been fully settled. The partially settled balance has an Unsettled Part that differs from the Balance and Balance Paring Properties linked Values: Selected, Cleared Default: Selected Functional Impact: It decides if Partially Settled should be included in the Balance display list or not. Mandatory: No |
| Settled | Indicates that the balance has been fully settled. The Settled balance has an Unsettled Part that is zero and Balance Pairing Properties linked Values: Selected, Cleared Default: Cleared Functional Impact: It decides if Settled should be included in the Balance display list or not. Mandatory: No |
| Written Off | Indicates that a balance has been written off, i.e. being paired with a Remittance having Payment Type Write Off Values: Selected, Cleared Default: Cleared Functional Impact: It decides if Written off should be included in the Balance display list or not. Mandatory: No |
Define Worksheet Status Flag #
You can have Technical- and Claim Worksheets that are stored with the status Open in the Business Partner Ledger. An open worksheet is considered unfinished until it is completed and the Status changed to Closed.
- Open the Business Partner Ledger.
- Select worksheet statuses for which you want display balances.
- Define your other extraction criteria and click Find Now.
Balances are displayed in the Balance Display list according to your defined extraction criteria.
Note! The Remittance balances are not affected by this extraction. All Statuses for Remittance balances are displayed independent of this extraction.
| Field | Description |
|---|---|
| Closed | Balances from Technical- and Claim Worksheets with status closed are displayed in the Balance display list upon selection of this check box Values: Selected, Cleared Default: Selected Functional Impact: The Balance display list Mandatory: No |
| Open | Balances from Technical- and Claim Worksheets with status other than Closed and_Inactivated_ are displayed in the Balance display list upon selection of this check box _Values:_ Selected, Cleared _Default:_ Cleared _Functional Impact:_ The Balance display list _Mandatory:_ No |
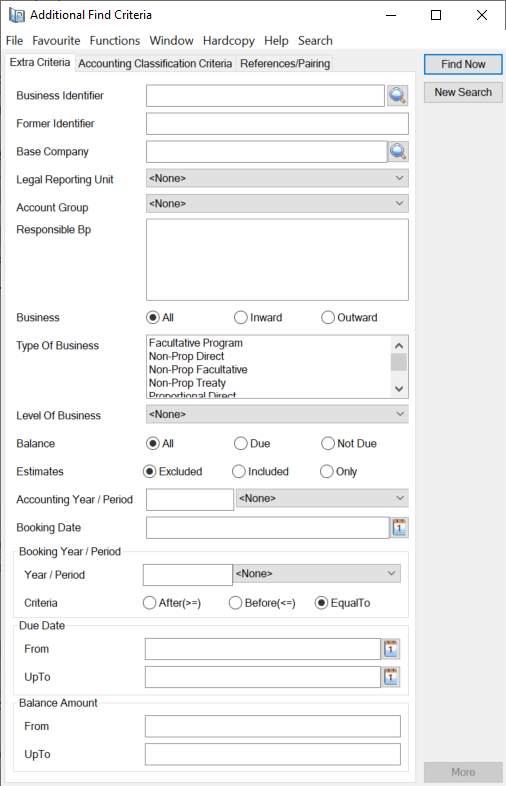
Define Additional Criteria #
You have more possibilities to define extraction criteria using the Additional Find Criteria window.
- Open the Business Partner Ledger.
- Define the extraction criteria, for example, currencies, balance types etc., in the top area of the ledger.
- Click the Additional Criteria button to define further extraction criteria. You see the Additional Find Criteria window.
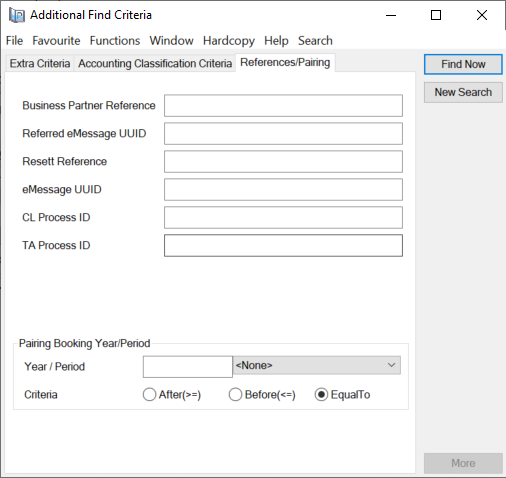
- Define your extraction criteria on the three tabs; Extra Criteria, Accounting Classification Criteria and References/Pairing.
- Click Find Now.
The balances are displayed in the Balance Display list according to your defined search criteria both in the Business Partner Ledger window itself and in the Additional Find Criteria window. The Additional Criteria window remains opened with the defined search criteria even after Find Now is clicked. The defined criteria are kept until the New Search button is selected.
Note! The Accounting Classification Criteria tab is available only when activated in the System Parameters. (See your System Administrator for further information.)
| Field | Description |
|---|---|
| Business Identifier | Enter one or more Business Identifier(s) for which balances you want to display. You can either enter the Business Identifier manually or you can button beside the field to open the Find Business window from where to can transfer one or more Business Identifier(s). Values: One or more complete Business Identifier(s), e.g. PTTY2, OCC100, OCC100-1, etc, separated with a comma. Functional Impact: Balance display list Mandatory: No |
| Former Identifier | Enter the Former Identifier which balances you want to display. The value can be defined on the business properties in SICS Values: Any identifier value Functional Impact: Balance display list Mandatory: No |
| Base Company | Select Base Company by using the Find facility or you can type in the Base Company name or part of it directly into the field and receive possible matches for the text. If you know the Business Partner ID, you can also type this. Values: Business Partner name Functional Impact: Balance display list Mandatory: No |
| Legal Reporting Unit | Select a Legal Reporting Unit from the Drop-down list, for which balances you want to display Values: The reporting Unit Name and Code, e.g. Reporting Unit 1 (CL1), Reporting Unit 2 (CL2), etc. Default: <None>, i.e all values Functional Impact: Balance display list Mandatory: Yes |
| Account Group | Select an Account Group from the drop-down list. All balances booked on businesses having the selected Account Group defined among their Business Properties are displayed in the Balance Display list Values: Account Group Name. The values are defined and maintained by your System Administrator Default: <None>, i.e all values Functional Impact: Balance display list Mandatory: Yes |
| Responsible BP | Select one or more Responsible Business Partner from the list. The available Responsible Business Partner’s are the ones that apply for the selected Business Partner’s balances. You select Add Responsible BP from the pop-up menu to access the Find: Business Partner window, from where you can transfer additional Business Partners. All balances that apply for the selected Responsible Business Partner in combination with the selected payment partners are displayed in the Balance Display list Values: Business Partner name(s) Functional Impact: Balance display list Mandatory: No, meaning if none is selected, balances from all Responsible Business Partner are displayed. |
| Business | You can define if you want to search for and display balances for Inward businesses only, Outward business only or All businesses Values: All, Inward or Outward Default: All Functional Impact: Balance display list Mandatory: Yes, one of the values has to be selected |
| Type of Business | Select one or more Types of Business values. Balances booked on businesses with the selected type(s) of business are displayed in the Balance display list Values: Non-Prop Direct, Non- Prop Facultative, Non-Prop Treaty, Proportional Direct, Proportional Facultative and Proportional Treaty, Other values in Life. Functional Impact: Balance display list Mandatory: No, meaning if none is selected, balances from all types of business are displayed. |
| Level of Business | Select a Level of Business. Balances booked on the selected level of business are displayed in the Balance display list Values: <None>, Administrative Business, Assumed Business, etc. Default: <None>, i.e. all values Functional Impact: Balance display list Mandatory: Yes |
| Balance | You can define if you want to search for and display only due balances, only balances that are notdue or all balances (due + not due). Each balance’s Due Date is compared with today’s date in the search. Values: All, Due and Not Due Default: All Functional Impact: Balance display list Mandatory: Yes, one of the values has to be selected |
| Estimates | You can define if the extracted balances to be displayed in the Balance display list should include estimates, exclude estimates or be estimates only Values: Excluded, Included or Only Default: Excluded Functional Impact: Balance display list Mandatory: Yes, one of the values has to be selected |
| Accounting Year/-Period | Enter Accounting Year and/or select Accounting Period from the drop-down list. The balances having values that match this/these defined values are listed in the Balance Display list Values: Year: Free input (yyyy), Period: <None>, 1st of 12, 2ndof 4, 3rd of 3, Yearly, etc. Default: Year: blank. Period: <None>, i.e. all periods, Meaning all Accounting Year / Periods are extracted. Functional Impact: Balance display list Mandatory: No |
| Booking Date: | Enter or select from the calendar the booking date for which you want to extract and display balances in the Balance display list Values: Date Functional Impact: Balance display list Mandatory: No |
| Booking Year/-Period | Define the Booking Year and/or select the Booking Period for which you want to extract balances to be display in the Balance display list. It must be used together with the above Booking Search Criteria. Values: Year: Free input (yyyy), Period: <None>, 1st Half, 2ndQuarter, 5th Month, etc Default: Period: <None>, i.e. all periods Functional Impact: Balance display list Mandatory: No |
| Booking Search Criteria | Used in combination with the search criteria Booking Year/Period. Define if you want to search for bookings made After, Before or Equal to the specified Booking Year/Period values Values: ‘After (>=)’, ‘Before (<=)’ or ‘Equal To’ Default: Equal To_ _Functional Impact:_ Balance display list _Mandatory:_ Yes, one of the values has to be selected |
| Due Date | Enter or select from the calendar the Due Date for which you want to extract and display balances in the Balance display list. You can enter both the From and Up To date or you can just enter one of them Values: a From Date and/or an Up To Date Default: blank Functional Impact: Balance display list Mandatory: No |
| Balance Amount: | Enter Balance Amounts From the lowest Up To the highest for which you want to extract balances to be displayed in the Balance display list. You can either use From/To together or only limit one side. An amount in From will only display balances with an amount higher than this amount. An amount in Up To will only display balances with an amount smaller than this amount. This is independent of currency selected. Values: a From Amount and/or an Up To Amount Default: blank Functional Impact: Balance display list Mandatory: No |
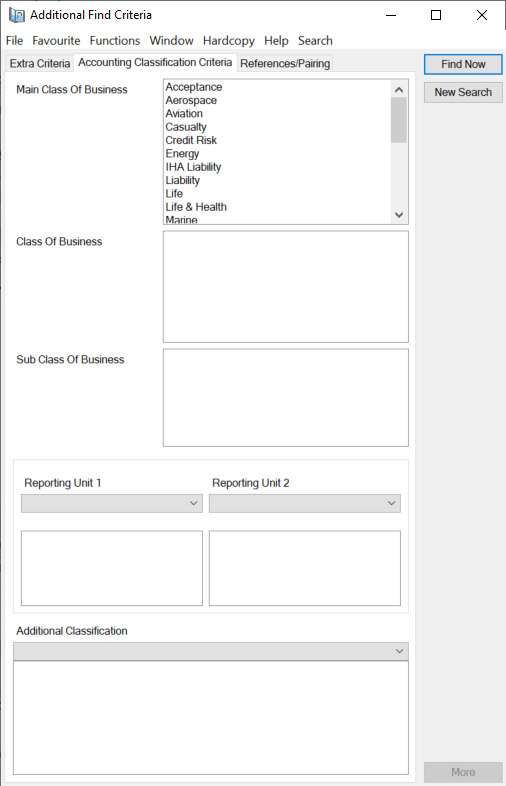
Note! A System Parameter activates this tab. (Contact your System Administrator for further information.)
| Field | Description |
|---|---|
| Main Class of Business | A Classification defined as part of the Accounting Classification for each detail belonging to the balances. If at least one detail in a balance has the selected Main Class of Business then the balance will be listed. Enabling you to search for and identify balances. Select one or more of the values in the list. Values: E.g. Aviation, Casualty, Marine, Property, etc. (Maintained by your System Administrator.) Functional Impact: Balance display list (none selected means all) Mandatory: No |
| Class of Business | A Classification defined as part of the Accounting Classification for each detail belonging to the balances. If at least one detail in a balance has the selected Class of Business then the balance will be listed. Enabling you to search for and identify balances. Select one or more of the values in the list. Values: Dependent on the selection of Main Class of Business. When e.g. Property is selected the values can be; Fire, Business Interruption, Engineering, etc. (Maintained by your System Administrator). Derived from: Main Class of Business Functional Impact: Balance display list Mandatory: No |
| Sub Class of Business | A Classification defined as part of the Accounting Classification for each detail belonging to the balances. If at least one detail in a balance has the selected Sub Class of Business then the balance will be listed. Select one or more classification to narrow your search for balances. Values: Dependent on the selection of Class of Business. When i.e. Engineering is selected the values can be; Machinery, CAR and EAR, Boiler, etc. Derived from: Class of Business Functional Impact: Balance display list Mandatory: No |
| Reporting Unit 1 | A Reporting Unit Category defined for detail belonging to the balances. If at least one detail in a balance has the selected Reporting Unit 1 then the balance will be listed. (Your System Administrator decides if the Reporting Unit is to be included in the Accounting Classifications). Upon selection of category one or more values defined for the category appear. (These values are defined by your system administrator.) Values: Category: Profit Centre, Segment Code, Person, etc. (Values are system defined, but your System Administrator may create new values.) Functional Impact: Balance display list Mandatory: No |
| Reporting Unit 2 | A Reporting Unit Category defined for each detail belonging to the balances. If at least one detail in a balance has the selected Reporting Unit 2 then the balance will be listed. (Your System Administrator decides if the Reporting Unit is to be included in the Accounting Classifications). Upon selection of category one or more values defined for the category appear. (These values are defined by your system administrator.) Values: Category: Profit Centre, Segment Code, Person, etc. (Values are system defined, but your System Administrator may create new values.) Functional Impact: Balance display list Mandatory: No |
| Additional Classification | A Classification defined as part of the Accounting Classification for each detail belonging to the balances. If at least one detail in a balance has the selected Main Class of Business then the balance will be listed. Additional classification categories to further narrow the search for balances. Upon selection of the category one or more values defined for the category appear. (Your system administrator maintains Values.) Values: Category: E.g. Additional 1, Type of Risk, Add.2, etc. Functional Impact: Balance display list Mandatory: No |
| Field | Description | Location |
|---|---|---|
| Business Partner Reference | A unique reference attached to each Balance. Enabling you to search for and identify balances. Values: Numbers, Letters of a combination. No limitation of characters. Function Impact: Balance display list Mandatory: No |
|
| Referred eMessage UUID | A unique reference attached to each Rebord message enabling you to search for and identify balances. Values: Numbers, Letters or a combination. No limitations of characters. Functional Impact: Balance display list Mandatory: |
|
| Resett Reference | A unique reference attached to each Resett message enabling you to search for and identify balances. Values: Numbers, Letters or a combination. No limitations of characters. Functional Impact: Balance display list Mandatory: No |
|
| eMessage UUID | A unique reference attached to each Retacc message enabling you to search and identify balances. Values: Numbers, Letters or a combination. No limitations of characters. Functional Impact: Balance display list Mandatory: No |
|
| TA Process ID |
A reference that helps you identify the balance. Please refer to the Process ID chapter of the Handle Reference Items chapter in the System Administration Guide for more details about the Process ID. Values: Free-text, maximum 30 characters Mandatory: No Functional Impact : if the System Parameter Enable Accounting Worksheet Process ID Validation is activated, the Process ID must exist in the Process ID table and the Status must be either Open or Re-Open when Worksheet has Status ‘Closed’. |
More Information view |
| CL Process ID |
A reference that helps you identify the balance. Please refer to the Process ID chapter of the Handle Reference Items chapter in the System Administration Guide for more details about the Process ID. Values: Free-text, maximum 30 characters Mandatory: No Functional Impact : if the System Parameter Enable Accounting Worksheet Process ID Validation is activated, the Process ID must exist in the Process ID table and the Status must be either Open or Re-Open when Worksheet has Status ‘Closed’. |
More Information view |
| Pairing Booking Year/-Period | Enter a Pairing Booking Year and/or select a Pairing Booking Period for which you want to extract balances to be display in the Balance display list. Balances with active pairings, annuled pairings are not relevant, will be extracted based on the Pairing Booking Year/Period they have. It must be used together with the below Pairing Booking Search Criteria. Values: Year: Free input (yyyy), Period: <None>, 1st Half, 2ndQuarter, 5th Month, etc Default: Period: <None>, i.e. all periods Functional Impact: Balance display list Mandatory: No |
|
| Pairing Booking Search Criteria | Used in combination with the above search criteria Pairing Booking Year/Period. Define if you want to search for balances with active pairings made After, Before or Equal to the specified Pairing Booking Year/Period values Values: ‘After (>=)’, ‘Before (<=)’ or ‘Equal To’ Default: Equal To_ _Functional Impact:_ Balance display list _Mandatory:_ Yes, one of the values has to be selected |
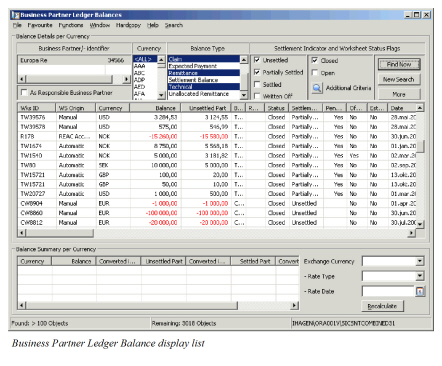
Retrieve Business Partner Ledger Balances #
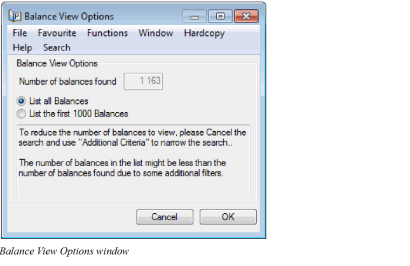
When you click the Find Now button in the Business Partner Ledger the system finds and counts all balances to be retrieved according to your selection criteria. If less than 1000 balances are found, they are presented in the Business Partner Ledger display list directly. When more than 1000 balances are found a dialog window appears telling you how many balances that are found. You must then select to display all balances or only the first 1000 balances, or cancel in case you want to change the extraction criteria to retrieve fewer balances.
Note! The number of 1000 balances is hard coded and not user defined. The number of balance retrieved in the Balance display list is not necessarily the number of balances found. The Column Header Extraction may have excluded some of the found balances.
List all Balances #
- Open a Business Partner Ledger.
- Define extraction criteria.
- Click the Find Now button.
- The system finds and counts all balances. If less than 1000balances are found, they are presented in the Business Partner Ledger display list.
- If more than 1000 balances are found, the Balance View Options window appears. The system informs you about the total number of balances found.
- Select List all balances and click OK.
All balances are displayed in the Business Partner Ledger balance display list.
List the First 1000 Balances #
When your search in the Business Partner Ledger results in a large number of balances to be displayed this function should be used to increase the systems performance.
- Open a Business Partner Ledger.
- Define extraction criteria.
- Click the Find Now button. The system finds more than 1000 balances.
- Select List the 1000 first balances and click OK.
The 1000 first balances are display in the Business Partner Ledger balance display list. The More button is enabled in the display list enabling you to retrieve the remaining balances in the display list. You can click the More button as long as there is more balances to retrieve. When the button is disabled, no further balances exist.
On the status bar at the bottom of the Business Partner Ledger window you can see the number of retrieved balances and the number of balances remaining to be retrieved.
Note! The number of balances in the status bar indicates the number of balances found according to the extraction criteria but it might be that the number of balances in the display list is less than this number.
| Field | Description |
|---|---|
| Number of balances found | The number of balances found as result of your defined search criteria when more than 1000 balances are found. Values: A number (>1000 ) Mandatory: Yes Functional Impact: None |
| List all Balances | Indicate if all balances are to be displayed Values: Selected or Cleared Default: Selected Mandatory: No Functional Impact: Business Partner Ledger balance display list |
| List the first 1000 Balances | Indicate if only the first 1000 of the found balances are to be displayed Values: Selected or Cleared Default: Cleared Mandatory: No Functional Impact: Business Partner Ledger balance display list |
| Field | Description | Location |
|---|---|---|
| Wks ID | The worksheet identifier Values: A prefix + a number, e.g. TW1235, R'2004'316, CW5687, etc. (Depends on the type of worksheet) Mandatory: Yes |
|
| Wks Title |
The Worksheet Title from the associated worksheet for balance types Technical, Claim and Cession. For other Balances Types the field is empty. Values: Text Functional Impact: None Mandatory: No |
|
| WS Origin | Describes how/from where the worksheet is created Values: E.g. Automatic, Automatic Claim, Claim From Ground Up, Manual, REAC Account, REAC Preliminary, Reverse, etc. Mandatory: Yes (Except from Remittance worksheets) |
|
| Currency | The balance’s original currency. For bookings made through the Proportional Retrocession Accounting, only the balances in Accounting Currencies are displayed on the Business Partner Ledger. Values: The Currency names according to ISO, e.g. USD, CHF, GBP, etc. Mandatory: Yes |
|
| Balance | The original balance. If Expected Payment, Account Balance or Settlement Balance is extracted, then these balances are displayed instead of the original balance. Values: Amount Mandatory: Yes |
|
| Unsettled Part | The part of the original balance that is unsettled Values: Amount Mandatory: Yes |
|
| Payable Part | Reflects how much of the associated balance that is settled. E.g. if the associated Assumed Business balance for a Facultative Retrocessionaire Participation (RP) balance is settled, then the payable part of the RP balance is equal the balance amount of the RP balance. Only updated on negative balances, i.e. in your disfavour.) Values: Amount Mandatory: No. (Column exists only if activated by system parameter.) |
|
| Original RP | Displays the original responsible partner on outward business from original Assumed Business Values: The Business Partner Short Name Mandatory: No |
|
| Balance Type | Identifies the nature of the Balance Values: Technical, Remittance, Claim, (P&C) Settlement Balance, Account, Expected Payment, Bank Charge Remittance and Cession (Life) Mandatory: Yes |
|
| UwYR | The Underwriting Year of the balance if it contains only one Underwriting Year Values: A Year Mandatory: No |
|
| Remittance Type | Identifies the type of Remittance/Bank Charge Values: Bank Charge, Wire, Check, Group Wire, Group Reversal, etc. Mandatory: Yes, for the Balance Types Remittance and Bank Charge |
|
| Status | The status of the worksheet. (To find worksheets with status open, the status flag Open has to be selected.) Remittance balances are not dependent of the status flag. All statuses are displayed. Values: Depends on the balance type. E.g. Technical and Claim: Open, Closed, Remittance: Final, In Progress, etc. Mandatory: Yes |
|
| Settlement Indicator | Indicates the settlement status of the balance (The selected settlement indicators is reflected in the balance display list.) Values: Unsettled, Partially Settled, Settled or Written Off Mandatory: Yes |
|
| Last Pairing Date | Shows the last pairing date for balances with at least one active balance pairing Values: Date (dd/mm/yyyy) Functional Impact: None Mandatory: Yes, if the balance has at least one active balance pairing |
|
| Pending | Shows whether the balance is included in a Pending Balance Pairing or not. Is only visible if Pending Status in Balance Pairing is in use in your system. Values: Yes or No Mandatory: Yes |
|
| Offset Balance | Indicate if a balance, should not be settled as a separate balance but rather be offset with other balances. Impact: If value is Yes the Generate Payment Request function is not enabled. Values: Yes or No Mandatory: Yes |
|
| Estimated | Indicates if the balance is booked as estimate or actual Values: Yes (estimate) or No (actual) Mandatory: Yes |
|
| Date | The balance’s Due Date or Value Date (depends on the balance type). (Ref. Type of Date column). Values: A date (dd.mm.yyyy) Mandatory: Yes |
|
| Type of Date | Identifies the type of date displayed in the Date column. (Depends on the balance type). Values: Value Date for a Remittance/Bank Charge or Due Date for other balances. Mandatory: Yes |
|
| Account Group | Shows the Account Group copied from the business for which the balance is booked. Values: Maintained by your System Administrator Mandatory: No |
|
| Business ID | The identifier of the business for which the balance is booked. (Applies for the balance types Technical, Claim, Cession and Expected Payment) Values: E.g. Ptty103a, OCC53, OCC69-2, etc. Mandatory: No |
|
| Former ID | The former identifier of the business for which the balance is booked, if defined. Values: The value defined on the business Mandatory: No |
|
| Level of Business | The level of the business for which the balance is booked. Applies for Technical, Claim and Cession balances. Values: E.g. Assumed Business, Retrocessionaire Participation’s, etc. Mandatory: Yes, for Technical- and Claim balances |
|
| Business Title | The title of the business the balance applies for Values: The title defined on the business Mandatory: No |
|
| Claim Name |
The name of the claim the balance applies for Values: Free-text - maximum 60 characters Mandatory: For Claim Worksheets |
|
| Loss Start Date |
The start date of the loss occurrence Values: A date DD/MM/YYYY Mandatory: For Claims |
|
| Loss End Date |
The end date of the loss occurrence Values: A date DD/MM/YYYY Mandatory: For Claims |
|
| Claim ID | The identifier of the claim the balance applies for Values: Numeric value with 10 digits. (E.g. 0000001234) Mandatory: For Claim Worksheets. Only one Claim ID is displayed if balances created through a Treaty Outward Fac on a retrocessionaire participation, contain more than one claim. |
|
| Claim Name | The name of the claim the balance applies for Values: Free-text - maximum 60 characters Mandatory: For Claim Worksheets |
|
| Loss Start Date | The start date of the loss occurrence Values: A date DD/MM/YYYY Mandatory: For Claims |
|
| Loss End Date | The end date of the loss occurrence Values: A date DD/MM/YYYY Mandatory: For Claims |
|
| Headline Loss ID |
The identifier of the Headline Loss to which the claim balance is linked Values: Free text, maximum 20 characters Mandatory: For Headline Loss balances |
|
| Bank Charge CCY | The Currency of the Bank Charge in case of received remittances. Values: E.g. USD, GBP, CHF, etc. Mandatory: Yes, for Remittances |
|
| Bank Charge Amt | The amount of the Bank Charge in case of received remittances. An amount different from zero applies only when the Bank Charge is booked on the same worksheet as the Remittance and not as a separate worksheet. Values: 0,00 or booked amount Mandatory: Yes, for Remittances |
|
| Booking Year | The financial year when the balance was booked Values: Year value (yyyy) Mandatory: Yes |
|
| Booking Period | The financial period within the financial year when the balance was booked Values: E.g. Month 03, 2nd Quarter, 1sthalf-year, etc. (Defined in the base company specific settings by your system administrator.) Mandatory: Yes |
|
| Booking Date | The Booking Date on the Balance Values: Date (dd/mm/yyyy) Functional Impact: None Mandatory: Yes (except from Account Balance, Settlement Balance and Expected Payments) |
|
| Registration Date |
The date when the Worksheet was registered Values: Date (dd/mm/yyyy) Functional Impact: None Mandatory: Yes (except from Account Balance, Settlement Balance and Expected Payments) |
|
| Closed Date | The date when the Worksheet was closed Values: Date (dd/mm/yyyy) Functional Impact: None Mandatory: Yes (except from Account Balance, Settlement Balance and Expected Payments) |
|
| Responsible BP | The legal responsible business partner of the business the balance applies for. E.g. if assumed business, the cedent is the responsible business partner. Values: The responsible Business Partner name Mandatory: Yes, for Technical-, Claim-, Cession- and Expected Payment balances |
|
| Included in Settlement Balance Group | Indicates if the Balance is included in a Settlement Balance Group Values: Yes or blank Mandatory: No |
|
| Settlement Balance Group ID | Displays the identifier (worksheet id) of the Settlement Balance Group the balance belongs to. Values: A prefix + a number, e.g. SB1324 or blank Functional Impact: None Mandatory: No |
|
| Included in Account Balance Group | Indicates if the Balance is included in an Account Balance Group Values: Yes or Blank Mandatory: No |
|
| Account Balance Group ID | Displays the identifier (worksheet id) of the Account Balance Group the balance belongs to. Values: A prefix + a number, e.g. AB1324 or blank Functional Impact: None Mandatory: No |
|
| Has Expected Payment | Indicates if the Balance is defined with expected payment Values: Yes or blank Mandatory: No |
|
| BP Reference | Display the Business Partner Reference entered on the balance, either on the balance’s property or on the worksheet. Values: Text Functional Impact: None Mandatory: No |
|
| Base Company | The Base Company the balance applies for taken from the Insured Period on the Business. Values: The Business Partner’s short name Mandatory: No |
|
| TA Process ID |
A reference that helps you identify the balance. Please refer to the Process ID chapter of the Handle Reference Items chapter in the System Administration Guide for more details about the Process ID. Values: Free-text, maximum 30 characters Mandatory: No Functional Impact : if the System Parameter Enable Accounting Worksheet Process ID Validation is activated, the Process ID must exist in the Process ID table and the Status must be either Open or Re-Open when Worksheet has Status ‘Closed’. |
More Information view |
| CL Process ID |
A reference that helps you identify the balance. Please refer to the Process ID chapter of the Handle Reference Items chapter in the System Administration Guide for more details about the Process ID. Values: Free-text, maximum 30 characters Mandatory: No Functional Impact : if the System Parameter Enable Accounting Worksheet Process ID Validation is activated, the Process ID must exist in the Process ID table and the Status must be either Open or Re-Open when Worksheet has Status ‘Closed’. |
More Information view |
| Due Date | The balance’s due date Values: Date value Mandatory: Yes |
|
| Accounting Classification | The Accounting Classification the balance applies for. The value is activated by a system parameter. (Contact your System Administrator for further information.) Values: A system defined combination of an agreement’s classifications. Your system administrator decides which classification components to be included and how the value is displayed. (Example: PROPERTY_BI_EU). The values are only shown if exactions are made on the Accounting Classification Criteria. Derived from: The Accounting Classification is selected on the Technical-/Claim Worksheet Functional Impact: None Mandatory: Yes, for Technical- and Claim balances |
|
| Section Name | The Section of a Business Agreement where the balance has been recorded. The value is activated by a system parameter. (Contact your System Administrator for further information.) Values: Text Derived from: The section is selected on the Technical-/Claim Worksheet Functional Impact: None Mandatory: Yes, for Technical-, Cession- and Claim balances |
|
| Classification | A Classification of a Remittance Balance or Unallocated Remittance Balance Values: None plus user defned values Mandatory: No |
|
| Classification 2 | A Classification of a Remittance Balance or Unallocated Remittance Balance Values: None plus user defned values Mandatory: No |
|
| Mass Paired |
Shows whether or not the balance is included in a Balance Pairing created by the Mass Pairing Order. Values: Yes or No Mandatory: Yes |
|
| London Reference | A London Market EDI (LIMNET) Reference Values: Text Derived from: The LM reference field can be updated in the Technical- and Claim Worksheet Closing window or the EDI Reference field can be updated in the More Balance Information window from the Business Ledger or Business Partner Ledger Functional Impact: None Mandatory: No |
|
| Bulk Reference | Reference of Bulk Claims messages sent by LIRMA (supported by LIMNET) Values: Text Functional Impact: None Mandatory: No |
|
| Referred eMessage UUID | A unique reference attached to each Rebord message (supported by JV) Values: Numbers, Letters or a combination Derived from: The JV EDI Rebord message manually or automatically Functional Impact: None Mandatory. No |
|
| eMessage UUID | A unique reference attached to each Retacc message (supported by JV) Values: Numbers, Letters or a combination. Derived from: The JV EDI Retacc message manually or automatically Functional Impact: None Mandatory: No |
|
| Resett Reference | A unique reference attached to each Resett message (supported by JV) Values: Numbers, Letters or a combination. Derived from: The JV EDI Resett message manually or automatically Functional Impact: None Mandatory: No |
|
| Notes | A note that applies for the balance Values: Text Derived from: The Note may be entered in the Technical- and Claim Worksheet Closing window or in the More Balance Information window from the Business Ledger or Business Partner Ledger. In case of Reversed- or Copied worksheets, the field is automatically updated for reference between the worksheets. Functional Impact: None Mandatory: No |
|
| Registered By | System displays the User name who have created respective worksheet listed in search results.. Values: Text Functional Impact: None Mandatory: Yes, for Technical-, Claim |
|
| BP Name | The Business Partner Name. Values: Free-text, maximum of 80 characters. Functional Impact: None Mandatory: Yes |
|
| BP Number | SICS Identifier of Business Partner. Values: SICS Identifier. Functional Impact: None Mandatory: Yes |
|
| Source Wks ID on ORP | Show the identifier (worksheet id) of the source detail on ORP when the balance comes from IGC IAB, and the booking details of this balance has a detail pairing link to the source ORP. Values: A prefix + a number Functional Impact: None Mandatory: No |
|
| Invoice No |
Unique identification number allocated to set of transactions in order to pay GST to the authorities. Values: Free-text, maximum 100 characters Mandatory: No |
|
| Government Invoice Ref No |
Unique identification number, post implementation of e-invoices as per GST notification. Values: Free-text, maximum 100 characters Mandatory: No |
|
| Invoice Date | The date of the Invoice. Values: Date (mm/dd/yy) Mandatory: No Functional Impact: None |
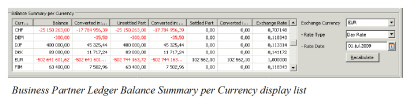
Display Balance Summary per Currency #
You can see a summary per currency of all balances selected and displayed in the Business Partner Ledger Balance display list. You can also specify a currency for which you want to see the converted balances converted.
- Open a Business Partner Ledger.
- Define extraction criteria.
- Click Find Now and select to list All Balances or the First 1000 Balances.
- Click the Recalculate button. All balances are included in the Summary even if you display only 1000. (If the total balance for a currency amounting to zero in all columns, the currency will be suppressed.)
- Define an Exchange Currency, Rate Type and Rate Date before you click Recalculate if you want to convert the balances and to see total for the converted balance.
 6. NB! If additional filtering in the balance container heading have been done it is necessary to select the popup menu option ‘Recalculate based on listed balances’ in the Balance Summary per Currency list to have the summary recalculated based on the listed balances.
| Field | Description |
|---|---|
| Currency | All selected Currencies in the Currency display list are listed in alphabetical order Values: Currency (E.g. GBP, CHF, NOK, USD, etc.) Functional Impact: None Mandatory: Yes |
| Balance | The total of original Balances for each currency. If further extraction in the column header of the Balance display list has been performed, the amount in this column may not be correct, you must select the popup menu option ‘Recalculate based on listed balances’ to have the summary recalculated based on the listed balances. Values: Amount Derived from: All original balances displayed Functional Impact: None Mandatory: Yes |
| Converted in: xxx | The total of original Balances for each currency converted into a specific currency (xxx). The bottom line shows the total of all converted currencies. Values: Amount Calculation: Balance multiplied with the selected Exchange Currency’s daily rate as per the defined Rate Date. If a daily rate is not defined at the specific day, the most recent daily rate prior to this date is used. Functional Impact: None Mandatory: No |
| Unsettled Part | The total of the Unsettled part of the Balances for each Currency Values: Amount Derived from: Unsettled-/Partially Settled balances in the balance display list Functional Impact: None Mandatory: Yes |
| Converted in: xxx | The total of the Unsettled part of the balances for each currency converted into a specific currency (xxx). The bottom line shows the total of all converted currencies. Values: Amount Calculation: Unsettled Part multiplied with the selected Exchange Currency’s daily rate as at the defined Rate Date. If a daily rate is not defined at the specific day, the most recent daily rate prior to this date is used. Functional Impact: None Mandatory: No |
| Settled Part | The total of the Settled part of the balances for each currency Values: Amount Derived from: Settled-/Partially Settled-/Written Off balances in the balance display list Functional Impact: None Mandatory: Yes |
| Converted in: xxx | The total of the Settled part of the balances for each currency converted into a specific currency (xxx).The bottom line shows the total of all converted currencies. Values: Amount Calculation: Settled Part multiplied with the selected Exchange Currency’s daily rate as at the defined Rate Date. If a daily rate is not defined at the specific day, the most recent daily rate prior to this date is used. Functional Impact: None Mandatory: No |
| Exchange Currency | The exchange rate used in the calculation when converting from the original currency to the selected currency in Exchange Currency according to the selected Rate Type and Rate Date. Values: Exchange Rate value. Calculation: The Balance amount for the currency divided by the corresponding Converted balance amount. (Balance Converted in currency yyy/Balance in currency xxx Functional Impact: None Mandatory: No |
| - Rate Type | The Type of Exchange Rate Values: Day Rate Functional Impact: The Converted in: xxx columns Mandatory: Only if Exchange Currency is selected |
| - Rate Date | The date the rate applies for or the rate at the mot recent date Values: Date value Functional Impact: The Converted in: xxx columns Mandatory: Only if Exchange Currency is selected |
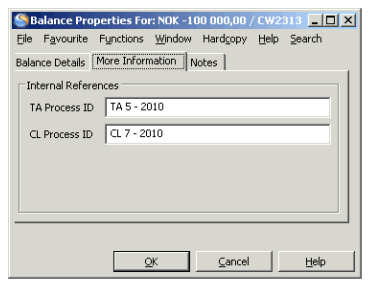
Open and Maintain the Balance Properties from Business Partner Ledger #
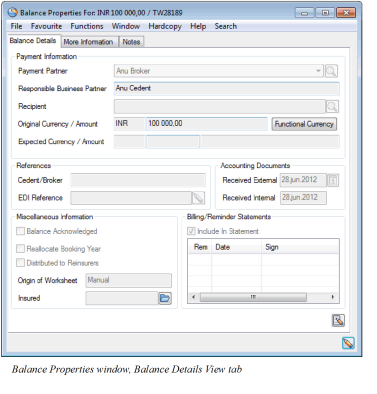
When balances are retrieved according to your selection criteria you may need more information about a Technical-, Claim-, Cession- or Expected Payment balance. You can view the balance property, change Business Partner when applicable, type a Cedent/Broker reference, type an EDI Reference, Account Documents Received Dates and/or create/edit/delete Expected Payment information.You can view the Functional Currencies for a balance from the Balance Property window by use of the option in the Menu button. You can also apply and/or change the Internal References in the More information tab.
- Select the Balance you want more information about from the Balance display list.
- Select ‘More Balance Information’from the pop-up menu. You see the Balance Properties window.
- Click the ‘Edit ‘button to change the business partner in the Payment Information section, and/or to type a reference in the Cedent Broker Reference field. You can change the business partner to another registered business partner on the business. If the ‘Allow Allocation of External Business Partner to Balance’ system parameter is in use, and the ‘External Business Partner’checkbox on the Business Properties window, Business tab has been selected, you can change the business partner to a business partner not registered on the business.
- If the ‘Recipient’checkbox on the Business Properties window, Business tab has been selected (available if the ‘Allow Allocation of External Business Partner to Balance ‘system parameter is in use), you see a new field on the Balance Details View window. You can register another business partner in this Recipient field. This business partner does not have to be a partner on the business.
- Clik the Edit button to change the Internal References TA Process ID and CL Procecc ID.
- Click the ‘OK’ button to save your changes.
Create/Edit Expected Payment Currency and Amount from Business Partner Ledger #
When a balance is to be settled in another currency than the original, you can create an Expected Payment Currency and Amount from the Balance Details View window. You can also modify already existing expected payment information.
The functionality only applies for Unsettled and Partially Settled Technical- Claim-, Cession- and Expected Payment balances.
- Select the balance you want to Create/Edit Expected Payment Currency and Amount for from the Balance display list.
- Select More Balance Information from the pop-up menu. You see the Balance Properties window.
- Click the Edit button to change to edit mode.
- Select the option Create/Edit Expected Payment from the Menu button. The selected balance in its original currency is displayed in an Expected payment for: xxx window.
- Select a Currency from the drop-down list. The rate of exchange between the selected currency and the original currency is defaulted and the converted balance is calculated.
- If required, change the rate of exchange or converted amount and click Save and OK.
- In case the exchange rate used exceeds the tolerance limits defined in your system parameters, a warning or even an error message will appear. If an error message appears you must correct the rate or amount before you can continue.
The Has Expected Payment field in the Balance display list is updated with the indictor Yes when the balance has an Expected
Payment Currency/Amount.
You can extract Expected Payment in the Balance Type list at the top of the Business Partner Ledger. All original Technical-, Cession- or Claim Balances with Expected Payments are now hidden and replaced by its Expected Payment Balance.
Delete Expected Payment from Business Partner Ledger #
You can delete the Expected Payment information from the balance.
- Select a balance that is updated with the indicator Yes in the Has Expected Payment field.
- Select More Balance Information from the pop-up menu. You see the Balance Properties window.
- Click the Edit button to change to edit mode.
- Select Delete Expected Payment from the Menu button and click OK.
The Currency, Exchange Rate and converted amount are removed. The Has Expected Payment indicator is also removed from the Balance display list.
| Field | Description |
|---|---|
| Business Partner | The expected payment partner of the balance. Values: Business Partner names Derived from: The agreements Business Partners with the Payment Task. Functional Impact: Business Partner Ledger Mandatory: Yes |
| Responsible Business Partner | The Legal Responsible Business Partner of the business, e.g. Cedent on Assumed Business and Reinsurer on Retrocessionaire Participation. Values: Business Partner name Derived from: The agreement’s Business Partners Functional Impact: None Mandatory: Yes |
| Original Currency/-Amount | The Currency and Amount of the selected balance Values: Currency and Amount Derived from: The Balance display list Functional Impact: None Mandatory: Yes |
| Functional Currency | Opens a window containing: - Original Currency/Amount: The booking details Currency and Amount. Values: Currency and amount Derived from: The details currency and amount entered in the Worksheet Mandatory: Yes Functional Impact: None - Functional Currency/Rate1/Amount1: A defined currency to be used transferring details to the General Ledger Values: Currency, Rate and Amount Derived from: System Parameter settings (Refer to Accounting System Parameters in the System Administrator’s Guide). The rate displayed is calculated by dividing the Functional Amount by the Original Amount. Mandatory: No Functional Impact: None - Functional Currency/Rate2/Amount2: A defined currency to be used transferring details to the General Ledger Values: Currency, Rate and amount Derived from: System Parameter settings (Refer to Accounting System Parameters in the System Administrator’s Guide). The rate displayed is calculated by dividing the Functional Amount by the Original Amount. Mandatory: No Functional Impact: None |
| Functional Currency | -FC Revaluations/Date: The date and time when the Functional Currency revaluations were booked. Values: Date and Time Derived from: Functional Currency Revaluation Order (Refer to Period Functions/Accounting Mass Update) or when the balance pairing took place if this is a FC Revaluation created by a balance pairing Mandatory: Yes Functional Impact: None -FC Revaluations/Booking Year: The Year when the Functional Currency Revaluations were booked or the Year from the Booking Year/Period on the balance itself if this is a FC Revaluation for a balance and created from a balance pairing. Values: Year Derived from: Functional Currency Revaluation Order (Refer to Period Functions/Account Mass Update) or the Year from the Booking Year/Period on the balance itself if this is a FC Revaluation for a balance and created from a balance pairing. Mandatory: Yes Functional Impact: None |
| Functional Currency | -FC Revaluations/Booking Period: The Period when the Functional Currency Revaluations were booked or the Period from the Booking Year/Period on the balance itself if this is a FC Revaluation for a balance and created from a balance pairing. Values: Period Derived from: Functional Currency Revaluation Order (Refer to Period Functions/Account Mass Update) or the Period from the Booking Year/Period on the balance itself if this is a FC Revaluation for a balance and created from a balance pairing. NB! If the Booking Year/Period on this balance is not open within the Booking Term for the Base Company on the balance, the system will set the Default Booking Year/Period from this Base Company’s Booking Term Mandatory: Yes Functional Impact: None -FC Revaluations/Current Amount 1: The Original Balance amount converted to Functional Currency 1 according to specified exchange rate. Values: Amount Derived from: Functional Currency 1 defined in system parameters (refer to Accounting/Currency) and the FC1 Exchange Rate defined on Functional Currency Revaluation Order. If created by a balance pairing the amount is taken from the FC1 on the other balance in the pairing, e.g. the remittance balance Mandatory: Yes Functional Impact: This amount, if it is set by the revaluation order, will be set as Previous Amount when running the next Functional Currency Revaluation Order. Current Amount is used in calculation of the value in field MvtUnrealizedGain/Loss1 and the field MvtRealizedGain/Loss1. |
| Functional Currency | -FC Revaluations/Previous Amount 1: The Functional Currency 1 amount (when no previous Functional Currency Revaluation Order has been run) or the amount in field Current Amount from previous Functional Currency Revaluation Order Values: Amount Derived from: Functional Currency 1 Amount (when no Functional Currency Revaluation Order has been run) or Current Amount set by the Functional Currency Revaluation Order from the previous run In case the previous row is from a balance pairing so that the balance is partially settled the Previous Amount 1 is calculated as follows; Functional Currency 1 amount / Original amount on the balance * current Unsettled Amount on the balance Mandatory: Yes Functional Impact: Previous Amount is used in calculation of the value in field MvtUnrealizedGain/Loss1 and the field MvtRealizedGain/Loss1 |
| Functional Currency | -Mvt Unrealized Gain/Loss 1: The difference between the Current Amount1 and the Previous Amount1 when running the Functional Currency Revaluation Order Values: Amount Derived from: Values in fields Current Amount and Previous Amount When balance pairing takes place the unrealized gain/loss will be “reversed” with the part that is settled, e.g. if the cumulative gain/loss is 10 and the settlement part is 40% in this pairing then the unrealized gain/loss is reduced with 4. Mandatory: Yes Functional Impact: None -Mvt Realized Gain/Loss 1: When a technical balance becomes Settled, the system will use the Functional Currency amount found on the remittance balance and enter this in the Current Amount column and enter the original calculated Functional Currency amount from the technical balance in the Previous Amount column. The difference will be entered in the Realized Gain/Loss column. At the same time the existing Unrealized Gain/Loss will be reversed and set to zero Values: Amount Derived from: FC in the Remittance Balance and the FC in the Technical Balance Mandatory: Yes Functional Impact: None |
| Functional Currency | -Cum Unrealized Gain/Loss 1: The accumulated Gain/Loss upto the previous revaluation from the column MvtUnrealizedGain/Loss1 Values: Amount Derived from: Values in field-Mvt Unrealized Gain/Loss 1 Mandatory: Yes Functional Impact: None -Cum Rrealized Gain/Loss 1: The accumulated Gain/Loss upto the previous revaluation from the column MvtRealizedGain/Loss1 Values: Amount Derived from: Values in field-MvtRealized Gain/Loss 1 Mandatory: Yes Functional Impact: None |
| Functional Currency | -FC Revaluations/Current Amount2: The Original Balance amount converted to Functional Currency 2 according to specified exchange rate. Values: Amount Derived from: Functional Currency 2 defined in system parameters (refer to Accounting/Currency) and the FC2 Exchange Rate defined on Functional Currency Revaluation Order. If created by a balance pairing the amount is taken from the FC2 on the other balance in the pairing, e.g. the remittance balance Mandatory: Yes Functional Impact: This amount, if it is set by the revaluation order, will be set as Previous Amount2 when running the next Functional Currency Revaluation Order. Current Amount2 is used in calculation of the value in field MvtUnrealizedGain/Loss2 and the field MvtRealizedGain/Loss2 |
| Functional Currency | -FC Revaluations/Previous Amount2: The Functional Currency 2 amount (when no previous Functional Currency Revaluation Order has been run) or the amount in field Current Amount2 from previous Functional Currency Revaluation Order Values: Amount Derived from: Functional Currency 2 Amount (when no Functional Currency Revaluation Order has been run) or Current Amount2 set by the Functional Currency Revaluation Order from the previous run In case the previous row is from a balance pairing so that the balance is partially settled the Previous Amount 2 is calculated as follows; Functional Currency 2 amount / Original amount on the balance * current Unsettled Amount on the balance Mandatory: Yes Functional Impact: Previous Amount2 is used in calculation of the value in field MvtUnrealizedGain/Loss2 and the field MvtRealizedGain/Loss2 |
| Functional Currency | -Mvt Unrealized Gain/Loss 2: The difference between the Current Amount2 and the Previous Amount2 when running the Functional Currency Revaluation Order Values: Amount Derived from: Values in fields Current Amount and Previous Amount When balance pairing takes place the unrealized gain/loss will be “reversed” with the part that is settled, e.g. if the cumulative gain/loss is 10 and the settlement part is 40% in this pairing then the unrealized gain/loss is reduced with 4. Mandatory: Yes Functional Impact: None |
| Functional Currency | -Mvt Realized Gain/Loss 2:: When a technical balance becomes Settled, the system will use the Functional Currency amount found on the remittance balance and enter this in the Current Amount column and enter the original calculated Functional Currency amount from the technical balance in the Previous Amount column. The difference will be entered in the Realized Gain/Loss column. At the same time the existing Unrealized Gain/Loss will be reversed and set to zero Values: Amount Derived from: FC in the Remittance Balance and the FC in the Technical Balance Mandatory: Yes Functional Impact: None -Cum Unrealized Gain/Loss 2: The accumulated Gain/Loss upto the previous revaluation from the column MvtUnrealizedGain/Loss2 Values: Amount Derived from: Values in field-Mvt Unrealized Gain/Loss 2 Mandatory: Yes Functional Impact: None |
| Functional Currency | -Cum Realized Gain/Loss 2: The accumulated Gain/Loss upto the previous revaluation from the column MvtRealizedGain/Loss2 Values: Amount Derived from: Values in field-MvtRealized Gain/Loss 2 Mandatory: Yes Functional Impact: None -FC Revaluation/Transferred to GL: field is not in use |
| Expected Currency/-Amount | The Currency, Exchange Rate and Amount you expect the balance to be settled in. Values: Currency and Amount Default: The Original Currency/-Amount Functional Impact: Business Partner Ledger, Business Ledger Mandatory: No |
| Cedent/Broker | A reference helping you to identify/verify balances in the Business Partner Ledger/Business Ledger Values: Free text, max 30 characters Derived from: A reference may already be entered in the Technical-/Claim Worksheet Closing window. Functional Impact: None Mandatory: No |
| EDI Reference | A London Market EDI (LIMNET) Reference Values: Free Text Derived from: A reference may have been entered in the LM reference field in the Technical- and Claim Worksheet Closing window. Functional Impact: None Mandatory: No |
| Accounting Documents Received (External/Internal) | The date(s) when the account of the booked balances was received. The Received External represents the date when the account arrived the company, while the Received Internal represents the date when the account arrived the actual department. The Received Internal field is visible only if the parameter “Is Received Internal Date On Worksheet In Use” is selected on the Base Company Specific Settings. Values: Date(s) Derived from: The date entered in the Received Date field(s) of the worksheet. Functional Impact: None Mandatory: No |
| Balance Acknowledged | The field is not in use |
| Reallocate Booking Year | The field is not in use |
| Distributed to Reinsurers | The field is not in use |
| Origin of Worksheet | Indicates from which type of Worksheet the balance origin Values: E.g. Manual, Migrated, REAC Preliminary, REAC Temporary, REAC Account, Automatic, Automatic Claim, Claim From Ground Up, Reverse, Post Balance, etc. Functional Impact: None Mandatory: Yes |
| Include in Statement | Indicates if the selected balance should be included in Billing/Reminder statements. Values: Selected or Cleared. Default: Selected |
| Include in Billing/Reminder Statement | A log of when the balance has been included in the statements, and by whom the balance has been included. Values: Dates and Names Derived from: Billing/Reminder statement orders Functional Impact: None Mandatory: No |
| TA Process ID |
A reference that helps you identify the balance. Please refer to the Process ID chapter of the Handle Reference Items chapter in the System Administration Guide for more details about the Process ID. Values: Free-text, maximum 30 characters Mandatory: No Functional Impact : if the System Parameter Enable Accounting Worksheet Process ID Validation is activated, the Process ID must exist in the Process ID table and the Status must be either Open or Re-Open when Worksheet has Status ‘Closed’. |
| CL Process ID |
A reference that helps you identify the balance. Please refer to the Process ID chapter of the Handle Reference Items chapter in the System Administration Guide for more details about the Process ID. Values: Free-text, maximum 30 characters Mandatory: No Functional Impact : if the System Parameter Enable Accounting Worksheet Process ID Validation is activated, the Process ID must exist in the Process ID table and the Status must be either Open or Re-Open when Worksheet has Status ‘Closed’. |
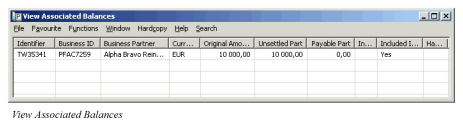
View Associated Balances #
From the Business Partner Ledger you can view the associated balances for a selected balance.
- Open the Business Partner Ledger
- Select one balance (technical or claim balance)
- Select View Associated Balances from the pop-up menu in the Balance display list.
Note! This option only exists if the Show Payable Amount in Business Partner Ledger is activated in the system parameters. (See your system administrator for further information.) Furthermore, the option is only enabled if the selected balance has associated balances.
The balances shown in the View Associated Balances window are either from the parent or the child business. If the selected balance belongs to an Assumed Business then the balances shown are from the associated Facultative Retrocessionaire Participations (Fac RP). And opposite, if the selected balance belongs to a Fac RP then the balance shown is from the associated Assumed Business.
| Field | Description |
|---|---|
| Identifier | The Worksheet Id of the worksheet belonging to the associated balance Values: : A prefix + a number, e.g. TW1235, R316, etc. (Depends on the type of worksheet) Mandatory: Yes |
| Business Id | The Business Id of the business belonging to the associated balance Values: E.g. Ptty103a, OCC69-2, etc. Mandatory: Yes |
| Business Partner | The Payment Partner of the associated balance Values: The Business Partner Name Mandatory: Yes |
| Currency | The associated balance’s Currency Values: USD, CHF, GBP, etc. Mandatory: Yes |
| Original Amount | The amount of the associated balance Values: Amount Mandatory: Yes |
| Unsettled Part | The unsettled amount of the associated balance Values: Amount Mandatory: Yes |
| Payable Part | Describes how much of the original amount of the associated balance is payable. This part is calculated only if the original amount is negative (in our disfavour) and the amount reflects how much of the selected balance is settled. If the selected balance is partially settled e.g. with 50% then the associated balance shows a Payable Part as 50% of its Original Balance Values: Amount (Negative) Mandatory: No |
| Included in Settlement Balance | Indicates if the associated balance is part of a Settlement Balance Group Values: Yes or blank Mandatory: No |
| Included in Account Balance | Indicates if the associated balance is part of an Account Balance Group Values: Yes or blank Mandatory: No |
| Has Expected Payment | Indicates if the associated balance has an Expected Payment Values: Yes or blank Mandatory: No |
To Generate Payment Request from Associated Balance:
You can select to generate a payment request from the View Associated Balances window. You can then select to pay the Payable Part or the Unsettled Part of the associated balance.
Refer to Auto Generate Payment Request in the Remittance Booking chapter for further information.
To navigate from the View Associated Balances window:
You can navigate from the View Associated Balances window to e.g. Worksheet properties or Business Ledger.
- Find and select a balance from the View Associated Balances window.
- Select one of the following options from the pop-up list.
-
More Balance Information: Opens the Balance Properties window for the selected balance.
-
Business Properties: Opens the latest Insured Period of the Business for the selected balance.
-
Business Ledger: Opens the Business Ledger for the selected balance.
Some of the options are only available for some types of balances, i.e. claim or technical:
-
Opens the claim worksheet properties.
-
Opens the technical worksheet properties.
Some of the options are only available if the balance is part of a group or has been included in a balance pairing
-
Opens the Account Balance Group Property for the selected balance.
-
Settlement Balance Properties: Opens the Settlement Balance Group Property for the selected balance.
-
This option is enabled if you select a balance that has been partially or fully settled (has pairing objects). Opens the Balance Pairing Property for the selected balance.
Offset Business Partner Ledger Balances #
You can indicate that a balance, should not be directly settled but rather be deducted from other balances settlement.
The functionality applies for Unsettled or Partially Settled Technical- and Claim balances.
- Select the balance you want to mark as Offset in the Balance display list.
- Select Offset Balance from the pop-up menu.
The selected balance is updated with the indicator Yes in the Offset Balance column in the balance display list.
You are not allowed to generate payment requests from balance being offset.
Navigate from the Business Partner Ledger #
You can navigate to other areas and functionalities from a Business Partner Ledger by using the pop-up menu within the Balance display list.
Open the Business Properties from the Business Partner Ledger #
You can open the business properties of a specific balance directly from the Business Partner Ledger.
- Select a Technical-, Claim-, Cession- or Expected Payment Balance from the Balance display list.
- Select Business Properties from the pop-up menu. The business is displayed with the properties of the Insured Period connected to the selected balance.
Open the Claim Properties from the Business Partner Ledger #
You can open the claim properties of a specific balance directly from the Business Partner Ledger.
- Select a Claim Balance from the Balance display list.
- Select Claim Properties from the pop-up menu. The claim properties is displayed for the claim connected to the selected balance.
Open the Cession Worksheet Properties from the Business Partner Ledger #
When a balance is booked in a Cession Worksheet, you can access the properties of the worksheet from the Business Partner Ledger.
- Select a Cession Balance from the Balance display list (only in Life).
- Select Cession Worksheet Properties from the pop-up menu. The Worksheet Closing window opens, from where you can also see More Balance Information, Balance Details and/or Business properties.
Open the Claim Worksheet Properties from the Business Partner Ledger #
When a balance is booked in a Claim Worksheet, you can access the properties of the worksheet from the Business Partner Ledger.
- Select a Claim Balance from the Balance display list.
- Select Claim Worksheet Properties from the pop-up menu. The Worksheet Closing window opens, from where you can also see More Balance Information, Balance Details and/or Business properties.
Open the Technical Worksheet Properties from the Business Partner Ledger #
When a balance is booked in a Technical Worksheet, you can access the properties of the worksheet from the Business Partner Ledger.
- Select a Technical Balance from the Balance display list.
- Select Technical Worksheet Properties from the pop-up menu. The Worksheet Closing window opens, from where you can also see More Balance Information, Balance Details and/or Business properties.
Open the Worksheet Closing Window from the Business Partner Ledger #
Open the Worksheet Closing Window from the Business Ledger. SICS allows you to inspect the open worksheet through the Change Worksheet Status option. This is an option you can use in case there are functional currency amounts already present on the worksheet so that you cannot open the worksheet in edit mode.
To inspect the open worksheet:
- Select a technical- or a claim balance from the Balance display list.
- Select’ Change Worksheet Status’ from the pop-up menu. You see the Worksheet Closing window.
- Change the worksheet status to ‘Closed’. In case the worksheet contains details with functional currency amounts present, SICS uses these functional currency exchange rates and amounts when saving the recorded functional currency amount.
Note! When a functional currency exchange rate is overruled and saved, you cannot change the original booking details. Therefore the Claim/Technical Worksheet Properties options are disabled.
Open the Financial Ledger from the Business Partner Ledger #
You can open the Financial Ledger for a specific Business Partner from the Business Partner Ledger.
- Select a Technical-, Claim-, Cession-, Remittance or Bank Charges Balance from the Balance display list.
- Select Financial Ledger from the pop-up menu. The Financial Ledger of the selected balance’s Responsible Business is opened.
View EDI message #
Opens the EDI view message window of the message that created the balance. Only enabled if the balance was created from an EDI message..
View eMessage #
Opens the eMessaging view message window of the message that created the balance. Only enabled if the balance was created from an eMessage.
Open the Source Settlement Status window from the Business Partner Ledger #
When looking at the balance of an IGC IAB, if the booking details of this balance has a detail pairing link to the source ORP, the system will enable an option on the popup menu when you select this balance. This is the option you can use to open the Source Settlement Status window to inspect the information about the source balance on ORP.
- Select a Balance of IGC IAB from the Balance display list.
- Select Source Settlement Status from the pop-up menu. The information about the source balance on ORP is displayed (e.g. Business Id, Worksheet Id, Currency, Balance Amount, Unsettled Amount and Settlement Indicator).
Make Technical Bookings from Business Partner Ledger #
When you are in a Business Partner Ledger and you are about to make Technical Bookings, you can access a Technical Worksheet for a Business from the Business Partner Ledger directly.
- Select a Technical-, Cession- or Claim Balance from the Balance display list
- Select Make Technical Booking from the pop-up menu. The Select Open Worksheet window is opened.
- Select an open worksheet or select Create New Worksheet to open a new Technical Worksheet.
The Technical Worksheet is opened for the Business ID of the balance you selected in the Business Partner Ledger. No currency is pre-selected if more than one ledger currency exists. If only one ledger currency exists, this currency is pre-selected.
Note! If the Automatically check for Open Worksheet when selecting Technical Worksheet check box is selected in your User Preference, open worksheets (if any) are listed. If the check box is cleared the window is opened leaving you a possibility to list the open worksheets.
Create a Post Balance from Business Partner Ledger #
This feature enables you to register the currency and total balance of a received account without linking the post balance to specific business. It is relevant to make a Post Balance, e.g. when you have to postpone the booking of the account details but want to book the balance.
- Open a Business Partner ledger.
- Select Post Balance and Create Post Balance from the pop-up menu in the Balance display list. You see the Create Post Balance Worksheet window.
- Select Add Post Balance Enter the Post Balance details, i.e. Currency, Post Balance, etc.
- Click OK to update the Post Balance worksheet.
The Post Balance Worksheet is stored as an Open worksheet and is displayed as a Technical Worksheet with Worksheet Origin Post Balance.
The Post Balance is assigned a Worksheet Id from the Worksheet Identifier Series defined for the Type of Worksheet Post Balance in the System Parameters.
View Post Balance Properties from the Business Partner Ledger #
When a Post Balance is booked in the Business Partner Ledger you can view the properties of the balance.
- Select the Post Balance from the Balance display list. (You have to search for Open balances to view the Post Balance).
- Select Post Balance and Post Balance Properties from the pop-up menu. You see the Post Balance Property window.
Edit the Post Balance Properties from the Business Partner Ledger #
When a Post Balance is booked in the Business Partner Ledger you can open the properties of the worksheet and make adjustments, add balances or remove balances.
- Select the Post Balance from the Balance display list. (You have to search for Open balances to view the Post Balance.)
- Select Post Balance and Post Balance Properties from the pop-up menu. You see the Post Balance Property window.
- Select Edit Post Balance Worksheet from the pop-up menu. You see the Edit Post Balance window.
- Make your adjustments to existing balances, add new balances or remove balances from the worksheet.
- Click OK to update your actions.
Open Worksheet for Post Balance from Business Partner Ledger #
You can enter the worksheet details for a balance booked as a Post Balance from the Business Partner Ledger.
- Select the Post Balance from the Balance display list. (You have to search for Open worksheets to view the Post Balance.)
- Select Post Balance and Open Worksheet for Post Balance from the pop-up menu. You see the Assign Business To Post Balance window. (You are also allowed to select Open Worksheet for Post Balance from the Post Balance Property window.)
- Select one or more balances and select Assign Business to Post Balance from the pop-up menu. You see the Find: Business window.
- Search for and transfer a business. The Business ID and Business Title are updated in the Assign Business To Post Balance window. The Business Partner on the selected business must equal the Business Partner on the Post Balance.
- When all balances have a business assigned, select Save to confirm your assignments. A Technical Worksheet is opened in Post Mode. The assigned businesses are listed in the worksheet display list. The Worksheet Control Amount is populated from the Post Balance.
- Release the worksheet from Post mode if you want to enter details into the worksheet. Or, keep the balance in Post Mode and select UNFI from the worksheet Menu button to keep the worksheet in Post Mode.
The Worksheet is updated with a Worksheet ID from the Technical Account Worksheet Identifier Series. In case the Balance is still in Post Mode, the Worksheet Origin is still Post Balance. In this case you have to select Make Technical Bookings from the pop-up menu, then select the open worksheet to release the worksheet from post mode, and enter worksheet details. Once details are entered into the Worksheet, the WS origin value is changed to Manual.
Note! When more than one balance is assigned to same business in same currency the balances acct.year, acct. period and due date have to be the same for all balances.
Refer to Enter Details on a Technical Worksheet in the Manual Bookings on a Worksheet chapter for further details.

| Field | Description |
|---|---|
| Responsible Business Partner | The Legal Responsible Business Partner of a business. Which Business Partner depends on the Level- and Type of Business. Values: Business Partner name Derived from: The selected Business Partner in the Business Partner Ledger Functional Impact: Business Partner Ledger, Business Ledger through business assignment Mandatory: Yes |
| Base Company | The Base Company the Post Balance apply for Values: Business Partner name Functional Impact: None Mandatory: Yes |
| Technical WS | The worksheet ID assigned to the Post Balance once a worksheet is created Values: Worksheet ID from the Technical Account Worksheet Identifier Series Functional Impact: Business Partner Ledger, Business Ledger Mandatory: Yes, when TW is created |
| Received | The date when the document being the basis for the post balance was received Values: Free input of Date Derived from: Today’s date Functional Impact: None Mandatory: Yes |
| Booked | The Post Balance’s booking date Values: Free input of Date Derived from: Today’s date Functional Impact: None Mandatory: Yes |
| Registered Date and - by | The date when and by whom the Post Balance is registered Values: Date and User Name/Short name Derived from: Today’s date and user Logon ID Functional Impact: None Mandatory: Yes (not editable) |
| Currency | The Post Balance Currency Values: Currency Functional Impact: Technical Worksheet, Business Partner Ledger, Business Ledger Mandatory: Yes |
| Post Balance | The Post Balance amount Values: Amount Functional Impact: Technical Worksheet, Business Partner Ledger, Business Ledger Mandatory: Yes |
| AccYr | The Post Balance’s Accounting Year Values: Free input of Year (yyyy) Functional Impact: Technical Worksheet, Business Partner Ledger, Business Ledger Mandatory: Yes |
| AccPeriod | The Post Balance’s Accounting Period Values: 1st of 2, 3rd of 4, Yearly, 5th of 12, <None>, 2nd of 3, etc. Functional Impact: Technical Worksheet, Business Partner Ledger, Business Ledger Mandatory: Yes |
| Due Date | The Post Balance’s Due Date Values: Date Default: Today’s Date Functional Impact: Technical Worksheet, Business Partner Ledger, Business Ledger Mandatory: Yes |
| Status | The Status of the Post Balance Worksheet. The status is Open until details have been entered in Technical Worksheet and the Worksheet is closed. Values: Open or Closed Functional Impact: Technical Worksheet, Business Partner Ledger, Business Ledger Mandatory: yes |
| Notes | A reference to identify the Post Balance while it is booked as a Post Balance. Values: Free input of text Functional Impact: None Mandatory: No |
Make New Remittance from the Business Partner Ledger #
For further information about this functionality, refer to the_Remittance Bookingon page 11-358_ section in this chapter.
Open New Remittance Worksheet from the Business Partner Ledger #
From the Balance display list in the Business Partner Ledger you can select Make New Remittance from the pop-up menu to select a pending remittance worksheet or create a new worksheet.
Refer to Open a New Remittance Worksheet Manually on page 11-360 for more information.
View Remittance Properties from the Business Partner Ledger #
From the Balance display list in the Business Partner Ledger you can select Remittance Properties from the pop-up menu to view the properties of a Remittance Worksheet.
Refer to Access an existing Remittance Worksheet on page 11-358 for more information.
Open an Existing Remittance Worksheet from the Business Partner Ledger #
From the Balance display list in the Business Partner Ledger, you can select Open Remittance Worksheet from the pop-up menu to view the properties of an open/pending Remittance Worksheet. This is relevant when you want to enter new data and/or change the status of the worksheet.
Reverse and Replace Remittances from the Business Partner Ledger #
From the Balance display list in the business partner ledger, you can select the Reverse and Replace Remittance option from the pop-up menu to move an unsettled remittance from one business partner or base company to another.
Refer to Reverse and Replace a Remittance for more information.
Generate Payment Request from the Business Partner Ledger #
From the Balance display list of the Business Partner Ledger, you can select Generate Payment Request from the pop-up menu to automatically generate a Remittance Worksheet from a balance due from you. Most of the generated worksheet’s fields are predefined with information from the balance due.
Refer to Auto Generate Payment Request for more information.
Book Bank Charges from the Business Partner Ledger #
From the Balance display list of the Business Partner Ledger, you can select Book Bank Charges from the pop-up menu when a received Remittance Balance is already booked as net and you want to book the Bank Charges.
Refer to Book Bank Charges on page 11-396 for more information.
Create Settlement Balance Group #
From the Business Partner Ledger you can start the process of grouping balances together in a Settlement Balance. A Settlement Balance group may include two or more technical-/claim balances. If activated by a System Parameter, Remittance Balances may also be included. (See your System Administrator for further information.)
You should consider this if you want to ease the balance pairing later when you know that you will receive settlement for a group of balances, e.g. listed in a broker statement.
- Open the Business Partner Ledger where you want to create a Settlement Balance Group.
- Select one or more balances from the balance display list.
- Select Create Settlement Balance from the pop-up menu. You see the Create Settlement Balance Group window.
- Select additional balances to be included in the group if applicable.
- Select Transfer from the pop-up menu or click the arrow to include selected balances in the group.
- Enter Due Date, Reference and Accounting Year/Period.
- Click Save when your Settlement Balance Group is complete
For each of the balances included in the Settlement Balance Group, the indicator Include in Settlement Balance Group is changed to Yes in the Business Ledger and Business Partner Ledger.
The new Settlement Balance Group can be found by selecting Settlement Balance in the Balance Type list at the top of the Business Partner Ledger.
The following balances cannot be included in a Settlement Balance Group:
- An other Settlement Balance Group
- Settled Balances
- Balances that are part of a Settlement Balance Group
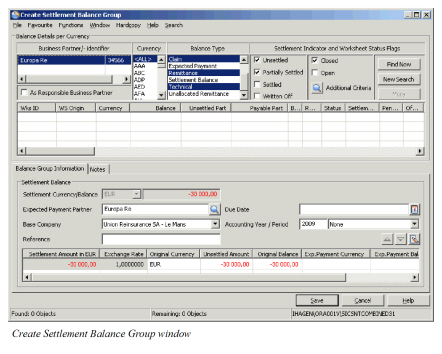
| Field | Description |
|---|---|
| Settlement Currency | The Currency of the first balance selected for creation of the Settlement Balance Group Values: Currency name according to ISO, e.g. USD, CHF, GBP Functional Impact: Currency booked as Balance Type Settlement Balance in the Business Partner Ledger Mandatory: Yes |
| Settlement Balance | The Settlement Balance Group’s total sum expressed in the value of the Settlement Currency Values: Amount Functional Impact: Amount booked as balance type Settlement Balance in Business Partner Ledger Mandatory: Yes |
| Expected Payment Partner | The Payment Partner of the first balance selected for creation of the Settlement Balance Group Values: Business Partner name Functional Impact: The Settlement Balance Group is booked in the Business Partner Ledger of the selected Expected Payment Partner. Mandatory: Yes |
| Base Company | The Base Company of the first balance selected for creation of the Settlement Balance Group Values: Business Partner name Functional Impact: None Mandatory: Yes |
| Reference | A text to make it easier for the user to identify the Settlement Balance Group Values: Free input of text, max 40 characters Functional Impact: None Mandatory: Yes |
| Due Date | Enter the date when the Settlement Balance Group is due for Settlement Values: Date (mm/dd/yy) Default: The Due Date is defaulted as the current date when a Settlement Balance Group is created if the system parameter named Set Due Date as Today’s Date for Account/Settlement Balance Group is activated, else it is blank. Mandatory: Yes |
| Accounting Year/Period | The Year and Period of the Account the Settlement Balance Group applies to. Values: Year value; e.g. ‘2004’ + Period Value; e.g. ‘1st of 2, 3rdof 4, Yearly Default: Year: Current Calendar Year + Period: <None> Functional Impact: None Mandatory: No |
| Settlement Amount in ‘xxx’ | The xxx is the currency of the settlement balance group. The Unsettled Part Amount of each balance transferred to the Settlement Balance Group, is converted to this currency unless the currency of the transferred balance is the same. It is possible to change the amount after transfer. The Exchange Rate value will then be recalculated. Values: Amount +/- Derived from: Unsettled Part of transferred balance Calculation: Settlement curr/Amount = NOK 100.000 Included balance = SEK 100.000 Most Recent Daily Rate SEK against NOK = 97,000 (Factor 100) Settlement amount in NOK = SEK 100.000 x 97/100 = 97.000 Mandatory: Yes |
| Exchange Rate | The Rate of Exchange used when Settlement amount in xxx is calculated. It is possible to change the calculated rate to have the Settlement Amount recalculated. Values: Max 9 d igits, e.g. 1,234560,5689236 etc. If currency of transferred balance and driving balance is the same, the value is 1,0000000 Derived from: Most Recent Daily Rate value Calculation: See example for calculation of Settlement Amount in xxx: 1/97 x 100 = 1,0309278 Mandatory: Yes |
| Original Currency | The Original Currency of the transferred balance. (If a balance with expected payment is transferred, the original currency/balance is displayed) Values: Currency, e.g. USD, GBP, CHF, etc. Mandatory: Yes |
| Unsettled Amount | The Unsettled Part of the balance transferred into the Settlement Balance Group. If the amount is different from the Original Balance it is partially settled. Values: Amount +/- Mandatory: Yes |
| Original Balance | The original Balance Amount of the balance transferred into the Settlement Balance Group Values: Amount +/- Mandatory: Yes |
| Exp. Payment Currency | If the balance transferred into the settlement balance group has an expected payment balance, the expected payment currency is shown in this column. Values: Currency, e.g. USD, GBP, CHF, etc. Mandatory: No |
| Exp. Payment Balance | If the balance transferred into the settlement balance group has an expected payment balance, the expected payment amount is shown in this column. When the Expected Payment Currency is the same as the Settlement Balance Currency, the Exp. Payment Balance amount is used as Settlement Amount. Otherwise the Original Balance amount is used. Values: Amount +/- Mandatory: No |
| Exchange Diff in ‘XXX’ | The xxx is the Settlement Balance Currency. When currency of transferred balance is different from Settlement Currency, and the Settlement Amount in xxx is changed, an Exchange diff. amount is calculated. Values: Amount +/- Calculation: Settlement Amount in xxx calculated when transferred less Settlement Amount in xxx calculated after transfer as result of change in the amount itself or Rate of Exchange Mandatory: No |
| UwYR | The Underwriting Year of the included balance if it contains only one Underwriting Year Values: A Year Mandatory: No |
Transfer Balances of Different Currencies to The Settlement Balance Group #
When you are creating a settlement balance group you know which balances from the business partner ledger you want to group together. You can transfer the balances one by one or many together. Balances of different currencies can be transferred to the group.
If one or more of the balances selected for transfer have other original currencies than the group currency; the system presents the currencies and the rate of exchange between each currency and the group currency.
If a balance has a different original currency than the group currency, but an expected payment currency that is the same as the group currency, the balance is transferred directly.
- Open the Business Partner Ledger where you want to create the Settlement Balance.
- Select one or more balances from the balance display list and select Create Settlement Balance from the pop-up menu. You see the Create Settlement Balance Group window.
- Select one or more balances from the balances display list and select Transfer from pop-up menu or click the arrow. If you have selected balances of different currencies than the group currency a currency dialog box is displayed.
- Enter a fixed exchange rate or accept the rate suggested by the system. The balances are transferred to the settlement balance group.
- Enter a due date, reference and accounting year/period.
- Click Save when you are finished creating your Settlement Balance Group.
Once a currency has been included in the group, the rate of exchange accepted is used when a balance of the same currency is again transferred into the same Settlement Balance group.
View Settlement Balance Group #
You can view the properties of Unsettled-/Partially Settled Settlement Balance Groups. A System Parameter determines if a Settlement Balance Group is to be kept after pairing. When being kept after pairing, you can view the properties of a Settled Settlement Balance as well. (See your System Administrator for further information.)
- Open the Business Partner Ledger where the Settlement Balance Group you want to inspect is booked.
- Select the Settlement Balance Group itself or one of the balances included in the Settlement Balance Group.
- Select Settlement Balance Properties from the pop-up menu. You see the View Settlement Balance Group window.
You can edit the Settlement Balance Group or link the group to a Remittance Balance. You can also navigate to different parts of SICS from the View Settlement Balance Group window.
Generate ACORD Settlement Message #
If the Settlement Balance group is not already linked to an outgoing ACORD Settlement message, you can create one by selecting ‘Generate ACORD Settlement Message’ from the View Settlement Balance Group menu. The option to create is only enabled if the Business partner has an outgoing default eMessaging membership defined. On selecting the option, a pop-up window is shown, showing suggested values for various message elements.
You can confirm the following elements of the outing message:
Financial Account Type - The reason for sending this message. The default value is set in eMessaging System parameters. Alternative ACORD financial account types may be selected
Payment Means - How this payment should be made. The default value is set in eMessaging System parameters. Alternative ACORD payment means may be selected.
As of date - Defaults to the current system date.
Sender Role - The suggested role is based on the type of business of the first item in the settlement balance. If this Direct, the sender role is ‘insurer’, otherwise it is ‘reinsurer’.
Receiver Role - The suggested role is specified in the outgoing default eMessaging membership.
On clicking OK, the new message is placed in the eMessaging archive with a status of ‘Created’. The ACORD version to be created is defined in eMessaging System parameters. For further details of Outgoing ACORD Settlements, see Chapter 16 eMessaging
View eMessage #
If the Settlement Balance group has previously been used to generate an outgoing ACORD Settlement message that has not been discarded, this can be viewed by selecting ‘view eMessage’ from the View Settlement Balance Group menu. SICS will open a new View message window. If the ACORD Settlement message is discarded, the link to the Settlement balance group is broken, and new message may be generated. View eMessage is also an option for Settlement balances created from an incoming Settlement message.
Edit the Settlement Balance Group #
You are allowed to make changes to an existing Settlement Balance Group.
- Open the Business Partner Ledger where the Settlement Balance Group you want to modify is booked.
- Select the Settlement Balance Group itself or one the balances included in the group.
- Select Settlement Balance Properties from the pop-up menu. You see the View Settlement Balance Group window.
- Select Edit from the Menu button. You see the Edit Settlement Balance Window.
- Make your adjustments and click OK to save your changes.
You are allowed to remove and/or include balances from and to the group if the group is not settled. You are able to navigate to different parts of SICS. The Settlement Amount may be recalculated if applicable. The Settlement Balance Currency can be changed. The currency may also be changed for one or all of the currencies included in the Settlement Balance Group.
Link Settlement Balance Group to Remittance #
When you have a Settlement Balance Group that you want to link to an either Paid or Received Remittance Balance, you follow the procedure below.
- Open a Business Partner Ledger where the Settlement Balance Group you want to link is booked.
- Search for and find the appropriate Settlement Balance Group.
- Open the Settlement Balance Group properties.
- Select Link to Remittance from the menu. The option is only enabled if the system parameter Is Group Remittance In Use is activated.
- Find the matching Remittance and select Link to Settlement Balance from the pop-up menu. The remittance is linked to the Settlement Balance. The remittance is either transformed to a Wire Group/Check Group, if the Settlement Balance Group contains of balances from different base companies, or remains a single Wire/Check.
- Maintain the Remittance Worksheet(s) and select Apply/OK to save the worksheet(s) when you are finished.
For more information about Remittance Groups, refer to Create a Remittance Group from a Single Remittance and Maintain a Remittance Group.
Remove Balances from the Settlement Balance Group #
A balance may have been included in a Settlement Balance Group by mistake, or a balance has to be removed from the group for some other reason. A balance cannot be removed from a settled settlement group.
You are in the Create- or Edit Settlement Balance Group window.
- Select the balance that is to be removed from the Settlement Balance Group
- Select Remove from the pop-up menu or select the arrow to delete the balance from the Settlement Balance Group.
The Settlement Balance amount is adjusted accordingly.
Change the Settlement Balance Group Currency #
You can change the currency of the Settlement Balance Group. This may be necessary if you receive a settlement in another currency than the Settlement Balance Group Currency and you want to link the Settlement Balance to the Remittance.
- Open the Business Partner Ledger where the Settlement Balance you want to modify is booked.
- Select the Settlement Balance Group itself or one the balances included in the group.
- Select Settlement Balance Properties from the pop-up menu. You see the View Settlement Balance Group window.
- Select Edit from the Menu button. You see the Edit Settlement Balance Window.
- Select Change Settlement Balance Currency from the pop-up menu. You see the Currency dialog box.
- Select a new Settlement Balance Group currency.
- The system presents all currencies different from the new group currency. Enter a fixed rate or accept the rate suggested by the system.
- Select Save when you are finished changing your Settlement Balance Group currency.
If applicable you can choose to change the Settlement Balance Group Currency during the creation of a group as well.
Change Exchange Rate for a Selected Currency #
You can change the rate of exchange for a specific currency that is part of a Settlement Balance Group.
- Open the Business Partner Ledger where the Settlement Balance you want to modify is booked.
- Select the Settlement Balance Group itself or one the balances included in the group.
- Select Settlement Balance Properties from the pop-up menu. You see the View Settlement Balance Group window.
- Select Edit from the Menu button. You see the Edit Settlement Balance window.
- Select a balance with the original currency for which you want to change the rate of exchange.
- Select Change Exchange Rate for Selected Currency from the pop-up menu. An Exchange Rate dialog window is opened.
- Enter a new Rate of Exchange for the selected currency and click Save. The new Rate of exchange is updated for all balances booked with the currency being changed.
- Select OK to update your changes.
If applicable you can choose to change the exchange rate for a specific currency during the creation of a group as well.
Change Exchange Rate for All Currencies #
You can change the rate of exchange for all currencies that are part of a Settlement Balance Group.
- Open the Business Partner Ledger where the Settlement Balance you want to modify is booked.
- Select the Settlement Balance Group itself or one the balances included in the group.
- Select Settlement Balance Properties from the pop-up menu. You see the View Settlement Balance Group window.
- Select Edit from the Menu button. You see the Edit Settlement Balance window.
- Select Change Exchange Rate for All Currencies from the pop-up menu. You see the Exchange Rate dialog box.
- Enter new Rates of Exchange for the different currencies and click Save. The new Rates of Exchange are updated for all balances booked with the currencies being changed.
- Select OK to update your changes.
If applicable you can choose to change the exchange rate for all currencies during the creation of a group as well.
Recalculate Settlement Amount for a Settlement Balance Group #
When the Settlement Amount for a balance has been changed after being transferred to the group, you may recalculate the Settlement Amount back to the balance’s system calculated value.
You are in the Create- or Edit Settlement Balance Group window.
- Select a balance that is included in the Group. The Settlement amount of the balance has been changed after transfer, e.g. due to changed rate of exchange.
- Select Recalculate Settlement Amount from the pop-up menu. The Settlement amount reverts to the amount initially calculated by the system during transfer.
Navigate from the Settlement Balance Group #
You can navigate from the Settlement Balance Group to e.g. worksheet properties and Business Ledger. This may be necessary if further information is needed for a balance that is part of a Settlement Balance Group.
You are in the Create-, Edit- or View Settlement Balance Group window.
- Select a Balance among the Settlement Balance Group balances
- Select one of the following options from the pop-up menu. Which option that is available depends on the selected type of balance, i.e. claim, technical or remittance.
- Claim Properties
- Claim Worksheet Properties
- Worksheet properties (Technical)
- Remittance Properties
- Business Ledger
- Business Partner Ledger
- The window that is opened depends on your selection.
- Close the window that is opened in order to revert to the Settlement Balance Group
Automatic Search for Settlement Balance Group #
From the Business Partner Ledger you can start the process of automatically grouping balances together in a Settlement Balance Group. This functionality requires that the balances to be included in the Settlement Balance Group are received electronically.
The electronic file to be imported must contain the following information per balance, in this sequence, separated by commas:
Identifier of the payment Business Partner
Currency
Amount e.g. 300 or 123.45
Due Date in format YYYYMMDD
Identifier of the responsible Business Partner
Business Partner Reference
Sequence number (each row in the file should be numbered from 1 upwards)
Example of a file to be used in this function:
BR123,USD,300,20160316,CE321,BP Reference abc,1
BR123,USD,123.45,20160316,CE322,BP Reference xyz,2
The automatic search of balances will ease the creation of Settlement Balance Groups when many balances are involved, e.g. on a broker statement.
- Open the Business Partner Ledger where you want to create a Settlement Balance Group.
- Select option Automatic Search for SBG from the pop-up menu. You see the Automatic Search for Settlement Balance Group window.
- Define necessary filter criteria and extract wanted balances on the Business Partner Ledger (Find Now).
Refer to chapter Define Business Partner Ledger Extraction Criteria 4. In the Input File Balances section, select Import record file from the pop-up menu.
Refer to System Administration Guide/ Business Partner to see default path to file folder
- Select the wanted file and the balances in the file are listed in the container.
- From pop-up menu in the Matched Balances container (the bottom container), select option Start Automatic Matching.
- System transfers all found balances to the Matched Balances container.
Balances with no match, remains in the upper container.
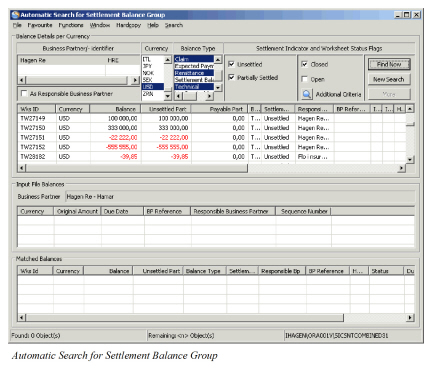
Remove Automatically Matched Balances #
You can remove automatically matched balances from the Matched balances container.
- Select balance(s) you want to remove from the Matched Balances container
- Select option Remove Selected Balances from the pop-up menu.
- Selected balance(s) are transferred to the upper container
Select Between Duplicate Balances #
When a balance from the imported file is matched to more than one balance on the Business Partner Ledger, you will have to select the correct balance to be include in the Settlement Balance Group
- Select a balance in the Matched Balances container that has
Status: Duplicate
Can be Included in SBG: Yes
- If the matched balance is the correct balance, you continue to the next duplicate balance.
- Select the next duplicate balance and select option Show Duplicates in current search result
- System opens Matched Balances for Selected Duplicate Balance in which the duplicate balance(s) are displayed
- Select correct balance and select option Replace the Selected Duplicate Balance
- The selected balance is displayed in the Matched Balances container:
Status: Duplicate
Can be Included in SBG: Yes
In a case where several balances from the imported file match several balances on the Business Partner Ledger, system will during the matching process recognize that a balance on the ledger is already matched and select the next balance.
Matched Balance Already Included in a Settlement Balance Group #
When a balance from the imported file is matched to a balance that already is included in a Settlement Balance Group, the matched balance cannot be included in a new Settlement Balance Group.
- Select a balance in the Matched Balances Container that has
Status: In SBG
Can be included in SBG: No
- Select option List existing SBG for Matched Balances…
- System opens Existing Settlement Balance Group window
- Select wanted Settlement Balance Group.
- System opens Edit Settlement Balance Group where the user can select to e.g. remove the matched balance from the existing Settlement Balance Group
Matched Balance Included in Account Balance Group #
When a balance from the imported file is matched to a balance that is included in an Account Balance Group, the matched balance can only be included in a Settlement Balance Group together with all balances belonging to the Account Balance Group
- One of the balances in the Matched Balances container that has
Status: In ABG
Can be included in SBG: Yes
- Select option Create Settlement Balance…
- All balances in the Account Balance Group (not only the matched balance) is included in the Settlement Balance Group
It is also possible to include Account Balance groups in the automatic matching process. If a balance in the imported file matches an Account Balance Group balance, the Account Balance Group balance is transferred to the Matched Balances container. (Make sure that Balance Type “Account” is selected as extraction criteria on the Business Partner Ledger.)
Disputed Balances #
Bookings made on e.g. a disputed claim cannot be included in a Settlement Balance Group. When a balance from the imported file is matched to a balance on a disputed claim, balances will be marked as “Disputed”.
Balances with Expected Currency/ Amount #
In some cases a balance has an original amount and an expected amount. Depending on which amount is included in the imported file, the user must make sure that the relevant Balance Type is selected.
Original amount is listed in the imported file.
Balance Type: Technical
The matched balance is displayed in the Matched Balances container and the container “Has Expected Payment” has value “Yes”
Expected Payment is listed in the imported file.
Balance Type: Expected Payment
The matched balance is displayed in the Matched Balances container and the container “Has Expected Payment” has no value.
Partially Settled Balances #
Balances are not always completely settled. The Business Partner Ledger indicates that a balance is partially settled and there will be a difference between the Balance and the Unsettled Part.
The system will match against the unsettled part of any balance. Both Balance and Unsettled Part are displayed in the Matched Balances container.
Several Searches from Same Imported File #
After having run the matching process once, several balances may not have found a match. These balances remain in the upper container.
- Change e.g. the search criteria to make more balances from the Business Partner Ledger available
- Select option Start Automatic Matching to run the matching process once more for the same imported file
- More balances are transferred to the Matched Balances container.
- The second search may have found a duplicate to a balance that had status OK from the first search. To make sure that all statuses are correct after the second search, select option Update all Matching Status according to current search result
Create Settlement Balance Group from Automatically Matched Balances #
Creation of a Settlement Balance Group from the Automatic Search for Settlement Balance Group window is similar to the creation of Settlement Balance Group from the Business Partner Ledger. Refer to chapter Create Settlement Balance Group
- From the Matched Balances container, select option Create Settlement Balance
- System opens the Create Settlement Balance Group window.
Depending on the balances currencies to be included in the Settlement Balance Group, the system may return a currency Exchange Rate dialog box where the user can accept or change the exchange rate. How to manually include/ exclude balances in the Settlement Balance Group and how to enter settlement Balance Group details, refer to chapter Create Settlement Balance Group .
Include Matched Balances in Existing Settlement Balance Group #
An imported file may include many hundred balances. It is therefore not always possible to finish the entire matching process and creation of a Settlement Balance group at the same time. If the match process is started for the second time you might want to include the matched balances in an existing SBG.
- A Settlement Balance group has already been created for some of the balances in the file
- Import the same file again, set proper selection criteria and start the matching process
- Select option List existing SBG for Matched Balances"
- System opens Existing Settlement Balance Group window.
- Select wanted Settlement Balance group and press “OK”
- System opens Edit Settlement Balance group. All approved balances from the matching process are included in the selected Settlement Balance Group
The field description will only describe fields specific for the Automatic Search for Settlement Balance Group window, in the Input File Balances section and in the Matched Balances section.
For other fields, refer to Field description - Business Partner Ledger Balance Display Listand Field descriptions in chapter Create Settlement Balance Group
| Field | Description |
|---|---|
| Business Partner | Name of the Business Partner with who the balances are to be settled Values: Business Partner Name Mandatory: Yes |
| Currency | The currency in which the Original Amount is to be settled Values: Currency name according to ISO Mandatory: Yes |
| Original Amount | Balance to be settled Values: Amount Mandatory: Yes |
| Due Date | The Original Balance’s due date Values: Date field Mandatory: No |
| BP Reference: | Business Partner’s reference on the specific balance Values: Text Mandatory: No |
| Responsible Business Partner | The legal responsible business partner of the business the balance applies for. Values: Business partner’s name Mandatory: No |
| Sequence | Number the balance is given in the imported record file Values: Number Mandatory: No |
| Expected Balance | Indication whether the matched balance has an expected payment amount/ currency Values: Yes/ “blank” Mandatory: No |
| Status | Matching status indicating if a matched balance is Ok, should be rejected or if the user must select between duplicate balances. Values: OK - single match found In SBG - balance already Included in Settlement Balance Group In ABG - balance included in Account Balance Group Duplicate - more than one match found Alert - one of the business partners has alert status Dispute - Balance is disputed Mandatory: Yes |
| Can Be Included in SBG | Indication if balance is allowed to be included in a Settlement Balance Group Values: Yes/ No Mandatory: Yes |
Create Account Balance Group #
You can also group Business Partner Ledger balances in Account Balance Groups. The balance type Account Balance is similar to the Settlement Balance and has the same attributes, functions and restriction.
- Open the Business Partner Ledger where you want to create an Account Balance Group.
- Select one or more balances from the balance display list.
- Select Create Account Balance Group from the pop-up menu. You see the Create Account Balance Group.
- Select additional balances to be included in the group, if applicable.
- Enter Due Date, Reference and Accounting Year/Period.
- Click Save when your Account Balance Group is complete.
When a balance with different currency than the Account Balance currency (driving currency) is transferred, the Settlement Amount in xxx (driving currency) and Exchange Rate can be changed. If however the currency of the transferred balance is the same as driving, the Settlement Amount in xxx and Exchange Rate fields are disabled.
For each of the balances being included in the Account Balance Group, the indicator Included in Account Balance Group is changed to Yes in the Business Ledger and the Business Partner Ledger.
The new Account Balance Group can be searched for and found by selecting Account in the Balance Type list at the top of the Business Partner Ledger.
The following balances cannot be included in the Account Balance Group:
- Settlement Balance Group or another Account Balance Group
- Balances that are part of a Settlement Balance Group or another Account Balance Group
Account Balance Groups can also be created from the Closing Window on Technical Worksheet, Cession Worksheet and Claim Worksheet or from the Business Ledger.

| Field | Description | Location |
|---|---|---|
| Account Currency/ Balance | The Currency of the account balance group. The total amount of the balances included in the group, i.e. original and converted balances. Values: Currency/Amount Derived from: Currency is taken from the first included balance and the Amount is the total of all included balances. Mandatory: Yes |
Create Account Balance Group window/Balance Group Information tab |
| Unsettled Amount | The total amount Unsettled Part of the balances included in the group. When partially settled balances are included in the account balance group, the unsettled amount and the Account Balance amount will differ. Values: Amount Mandatory: Yes |
Create Account Balance Group window/Balance Group Information tab |
| Expected Payment Partner | The Business Partner to/from whom the Account Balance Group is to be settled. Values: Business Partner name Mandatory: Yes |
Create Account Balance Group window/Balance Group Information tab |
| Due Date | Enter the date when the Account Balance Group is due for Settlement Values: Date (mm/dd/yy) Default: The Due Date is defaulted as the current date when an Account Balance Group is created if the system parameter named Set Due Date as Today’s Date for Account/Settlement Balance Group is activated, else it is blank. Mandatory: Yes |
Create Account Balance Group window/Balance Group Information tab |
| Base Company | The Base Company connected to the Account Balance Group Values: Business Partner name Default: Empty Mandatory: No |
Create Account Balance Group window/Balance Group Information tab |
| Accounting Year/Period | The Year and period of the year to which the Account Balance Group applies. Values: Year (yyyy) and Period, i.e. 1stof 12, 4th of 4, 1st of 2, Yearly, None, etc. Default: Current Year and Period = None Mandatory: No |
Create Account Balance Group window/Balance Group Information tab |
| Reference | A text helping you to identify/verify the Account Balance Group in the Business Partner Ledger Values: Free-text, maximum 40 characters Mandatory: Yes |
Create Account Balance Group window/Balance Group Information tab |
| Settlement Amount in XXX | The Amount per included balance converted to the Currency of the Account Balance Group. Values: Amount Mandatory: Yes |
Create Account Balance Group window/Balance Group Information tab |
| Exchange Rate | The exchange rate between the original currency of the included balance and the currency of the account balance. Values: Rate of Exchange with 7 decimals Mandatory: Yes |
Create Account Balance Group window/Balance Group Information tab |
| Original Currency | The original currency of the balance included in the group. Values: Currency Mandatory: Yes |
Create Account Balance Group window/Balance Group Information tab |
| Unsettled Amount | The Unsettled part of the included balance. Values: Amount Mandatory: Yes |
Create Account Balance Group window/Balance Group Information tab |
| Original Balance | The Original amount of the included balance. Values: Amount Mandatory: Yes |
Create Account Balance Group window/Balance Group Information tab |
| Expected Payment Currency | If the included balance has an Expected Payment Currency defined, the currency is displayed in this field. (Refer to the chapters Open and maintain More Balance Information from Business Ledger and Open and Maintain More Balance Information from Worksheet Closing window.) Values: Currency Derived from: Balance Details view window Mandatory: No |
Create Account Balance Group window/Balance Group Information tab |
| Expected Payment Balance | If the included balance has an expected payment amount defined, the amount is displayed in this field. (Refer to the chapters Open and maintain More Balance Information from Business Ledger and Open and Maintain More Balance Information from Worksheet Closing window.) Values: Amount Derived from: Balance Details view window Mandatory: No |
Create Account Balance Group window/Balance Group Information tab |
| Exchange Diff in XXX | The XXX is the Account Currency. When currency of transferred balance is different from Account Currency, and the Settlement Amount in XXX amount value and or Exchange Rate value is changed, an Exchange diff. amount is calculated. Values: Amount +/- Calculation: Settlement Amount in XXX calculated when transferred less Settlement Amount in XXX calculated as result of change in the amount itself or Rate of Exchange Mandatory: No |
Create Account Balance Group window/Balance Group Information tab |
| UwYR | The Underwriting Year of the included balance if it contains only one Underwriting Year Values: A Year Mandatory: No |
Create Account Balance Group window/Balance Group Information tab |
View Account Balance Group #
You can view the properties of an Account Balance Group.
- Open the Business Partner Ledger where the Account Balance Group you want to inspect is booked.
- Select the Account Balance Group itself or one of the balances included in the group.
- Select Account Balance Group Properties from the pop-up menu. You see the View Account Balance Group window.
You can select to edit the Account Balance Group from the Menu button. You can also select to navigate to Business Ledger, Business Partner Ledger or Business Properties.
Edit the Account Balance Group #
You are allowed to make changes to an existing Account Balance Group.
- Open the Business Partner Ledger where the Account Balance Group you want to inspect is booked.
- Select the Account Balance Group itself or one of the balances included in the group.
- Select Account Balance Group Properties from the pop-up menu. You see the View Account Balance Group window.
- Select Edit from the Menu button. You see the Edit Account Balance Group window.
- Make your adjustments and click OK to save your changes.
You are allowed to remove and/or include balances from and to the group if the group is not settled. You can navigate to other parts of SICS. The Settlement amount can be recalculated if applicable.
Recalculate Settlement Amount for an Account Balance Group #
When the Settlement Amount for a balance has been changed after being transferred to the group, you may recalculate the Settlement Amount back to the balance’s system calculated value.
- You are in the Create-, Edit or View Account Balance Group window.
- Select a balance that is included in the Group and for which the Settlement amount has been changed after transfer, e.g. due to changed rate of exchange.
- Select Recalculate Settlement Amount from the pop-up menu. The Settlement amount reverts to the amount initially calculated by the system during transfer.
Navigate from the Account Balance Group #
You can navigate from the Account Balance Group to e.g. worksheet properties and Business Ledger. This may be necessary if further information is needed for a balance that is part of an Account Balance Group.
You are in the Create-, Edit- or View Account Balance Group window.
- Select a Balance among the Account Balance Group balances
- Select one of the following options from the pop-up menu. Which option that is available depends on the selected type (claim, technical or remittance of balance).
- Claim Properties
- Claim Worksheet Properties
- Worksheet properties (Technical)
- Remittance Properties
- Business Ledger
- Business Partner Ledger
- The window that opens depends on your selection.
- Close the window that is opened in order to revert to the Settlement Balance Group.
Create Balance Pairing #
From the Business Partner Ledger you can start the process of linking (pairing) balances together. The Create Balance Pairing functionality enables you to settle your balances. Balance Pairing can be created between:
- Remittance Balance and Technical Balance (Technical-, Claim- or Cession Balance)
- Remittance Balance and Remittance Balance
- Technical Balances and Technical Balance
Your System Administrator decides if the balance you select to start the Balance Pairing process with (further referred to as Driving Balance) can be another balances than a Remittance Balance, i.e. Technical-/Claim Balance. You are not allowed to select a balance that is part of a Settlement Balance Group, or the Settlement Balance Group balance itself, as driving balance.
- Select one Unsettled or Partially Settled balance from the balance display list of the Business Partner Ledger as driving balance.
- Select Create Balance Pairing from the pop-up menu. You see the Ledger Balance Pairing window.
 3. Define your search criteria in the upper part of the window if applicable and click Find Now.
4. Select one or more balances from the Balance display list above the Settlement Pairing section
5. Select Transfer for Pairing from the pop-up menu or use the arrow to transfer balances to the Settlement Pairing.
6. Complete your pairing by clicking OK.
3. Define your search criteria in the upper part of the window if applicable and click Find Now.
4. Select one or more balances from the Balance display list above the Settlement Pairing section
5. Select Transfer for Pairing from the pop-up menu or use the arrow to transfer balances to the Settlement Pairing.
6. Complete your pairing by clicking OK.
Currency Validation in Balance Pairing:
When a Technical-/Claim Balance is included in a Balance Pairing and the currency of the driving balance is different from the Technical-/Claim Balance, the driving balance currency is validated against the Business’ Main Currency and the Payment Currency on the Administration Conditions/ Currency Transformation Terms. If the driving balance currency is not found, a warning message appears. (The currency validation is activated by a system parameter. See your System Administrator for further information.)
Partial Settlement:
The Settlement Indicator value for all the balances included in the Balance Pairing is updated in the Business Partner Ledger.
If the driving balance is fully settled, i.e. (0,00) in the Outstanding field, the settlement indicator on this balance is updated as Settled. If however an amount is remaining as Outstanding, the driving balance’s settlement indicator is updated as Partially Settled.
On the other hand, when a driving balance not fully settles the included balances, you can select to partially settle either the driving balance or the included balances. When the driving balance is selected for partial settlement, the included balances become fully settles and vice versa.
Proportional Split
Proportional Split is relevant when a driving remittance balance not fully settles the Technical-/Claim balances included in the pairing. (The functionality is activated by System Parameters) When proportional split is selected, the included balances are split in a Settled part and an Unsettled part. Partially Settled Technical-/Claim balances are consequently avoided.
Keep Settlement Balance Groups after pairing
A System Parameter determines if Settlement Balance Groups are to be kept after pairing and updated as Settled Groups in the Business Partner Ledger. If kept as group the group’s individual settled balances will keep the Included in Settlement Balance indicator as Yes. If not kept as a group, the Included in Settlement Balance indicator is removed for each individual balance. (Account Balance Groups are always kept after pairing.)
(Contact your System Administrator for further information.)
Base Companies/Legal Reporting Units
Your System Administrator decides if you are allowed to do balance pairing/annulling between balances of different Base Companies and/or Legal Reporting Units.
When Balance Pairing/Annulling between different Base Companies is allowed in general according to the system parameter, restrictions can be defined in the Business Partner properties. A Base Company may be restricted only to perform balance pairing/annulling with its own balances, or with balances for a few other base companies listed in the business partner’s properties window.
Responsible Business Partners
Your System Administrator decides if you are allowed to do balance pairing between Technical-, Claim-, Cession balances of different Responsible Business Partners (There is no check against the Responsible Business Partners when the pairing includes a remittance).
Restrictions when pairing Write Off Remittances
Your System Administrator may decide some extra restrictions if a Balance Pairing contains one or several Remittance balances with Type = Write Off:
a) The system does not allow the pairing if it contains different currencies
b) The system does not allow the pairing if any of the included technical or claim balances contains details linked to insured period with different Base Company than the one on the Write Off remittance
c) You are not allowed to create a Write Off amount in the Pairing process when a Remittance balance with Type = Write Off is part of the Balance Pairing
Level of Business
Pairing between balances of different level, i.e. Inward and Outward, may also be restricted.
(Contact your System Administrator for further information.)
Exchange Rate
Which Exchange Rate that is used when balance of different currency than driving balance is included in the pairing, is decided by your system administrator. If the driving balance is a Remittance Balance the system may find the most recent daily rate registered prior to the Value Date of the driving balance. If the driving balance is a Technical-/Claim-/Cession (life) balance, the system may find the most recent daily rate registered prior to the Due Date of the driving balance. Alternatively, the system finds the most recent daily rate registered prior to current date regardless of type of balance being used as driving.
(Contact your System Administrator for further information.)
Functional currency Revaluation for settled and partially settled balance - Realized Gain / Loss
When balance pairings are made either manually or automatically where remittance balances are the basis for the pairings, the balances become either Settled or Partially Settled. When the system parameter Include Realized Loss/Gain in FC revaluation is activated (Contact your System Administrator for further details), the functional currency revaluation takes place at the moment of balance pairing and a new row is created in the FC revaluation window.
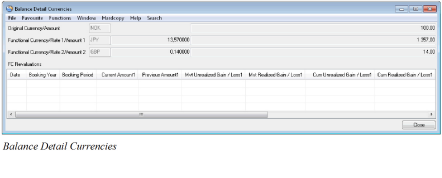
For detailed description of the fields see Chapter 11, Field Description 68-Functional Currency. The following description is related both to Functional Currency 1 and Functional Currency 2.
When a technical balance becomes Settled in the balance pairing process the system will create a new row in the revaluation table for this technical balance. The system will use the Functional Currency amount found on the remittance balance and enter this in the Current Amount column and enter the original calculated Functional Currency amount from the technical balance in the Previous Amount column. The difference will be entered in the Realized Gain/Loss column. At the same time the existing Unrealized Gain/Loss will be reversed and set to zero.
In case the technical balance becomes Partially Settled in the balance pairing process the system will create a new row in the revaluation table for this technical balance. The system will use the Functional Currency amount found on the remittance balance and enter this in the Current Amount column and use the original calculated Functional Currency amount from the technical balance, multiply it with the settled portion, e.g. 40% if the remittance is 40% of the technical balance, and enter this in the Previous Amount column. The difference will be entered in the Realized Gain/Loss column. At the same time a similar part of the existing Unrealized Gain/Loss will be reversed.
When a technical balance becomes Settled by use of another technical/claim balance the system will reverse the existing Unrealized Gain/Loss and set it to zero for both balances. In this case the realized gain/loss is to be calculated for each of the technical balances by use of the original Functional Currency amount from the other technical balance
When the pairing happens between two remittance balances, since there is no unrealized gain/loss for a remittance balance nothing happens in this process.
When the relevant system parameter is switched off, FC revaluation does not take place at the moment of balance pairing
| Field | Description |
|---|---|
| Currency | The Currency of the Driving Balance. Values: Currency, e.g. USD, GBP, CHF, etc. Derived from: The Balance selected in the Business Partner Ledger Balance display list. Mandatory: Yes |
| Worksheet ID | The Worksheet ID of the Driving Balance. Values: Worksheet ID Derived from: The Balance selected in the Business Partner Ledger Balance display list. Mandatory: Yes |
| Original XXX Balance | The Amount of the Driving Balance where XXX is the balance type. Values: Amount Derived from: The Balance selected in the Business Partner Ledger Balance display list Mandatory: Yes |
| Unsettled Amount | The Unsettled amount of the driving balance before the current pairing process. Values: Amount Derived from: The Balance selected in the Business Partner Ledger Balance display list Mandatory: Yes |
| Outstanding Amount | The part of the Unsettled Amount that is still outstanding after balances have been included in the Settlement Pairing. Updated for each new balance transferred to the pairing group. Values: Amount (+/-) Functional Impact: Business Partner Ledger Mandatory: Yes |
| Settlement Amount in xxx | The xxx is the driving balance currency. The Unsettled Part Amount of each balance transferred to the settlement pairing, is converted to this currency unless the currency of the transferred balance is the same. It is possible to change the amount after transfer. The Exchange rate is then recalculated if currency differs from driving. Values: Amount +/- Derived from: Unsettled Part of transferred balance Calculation: Driving curr/Amount = NOK 100.000 Included balance = SEK 100.000 Most Recent Daily Rate SEK against NOK = 97,000 (Factor 100) Settlement amount in NOK = SEK 100.000 x 97/100 = 97.000 Functional Impact: The outstanding amount for the driving balance. Mandatory: Yes |
| Exchange Rate | The Rate of Exchange used when Settlement amount in xxx is calculated. It is possible to change the calculated rate to have the Settlement Amount recalculated. Values: Digits (max 9), e.g. 1,2345678 0,5689236 etc. If currency of transferred balance and driving balance is the same, the value is 1,0000000 Derived from: Most Recent Daily Rate Calculation: See example for calculation of Settlement Amount in xxx: 1/97 x 100 = 1,0309278 Functional Impact: Settlement Amount in XXX. Mandatory: Yes |
| Original Currency | The Original Currency of the transferred balance. (If a balance with expected payment is transferred, the expected payment is removed and the original currency/balance transferred.) Values: Currency, e.g. USD, GBP, CHF, etc. Mandatory: Yes |
| Amount to Settle | The Unsettled Part of the balance transferred for pairing. It is possible to change this balance if you want to partially settle the transferred balance. Values: Amount +/- Functional Impact: The included balance’s unsettled part. Mandatory: Yes |
| Amount Unsettled | The unsettled part of the included balance before the current pairing process. Values: Amount +/- Mandatory: Yes |
| Original Balance | The Original Balance of the transferred balance Values: Amount +/- Mandatory: Yes |
| Balance Type | The Type of Balance transferred Values: Technical-, Claim- or Remittance Balance Mandatory: Yes |
| UwYR | The Underwriting Year of the included balance if it contains only one Underwriting Year Values: A year Mandatory: No |
| Business Id | The Business Id the included balance belongs to Values: Business Id Mandatory: Yes, if the balance belongs to a business. Will be blank if the included balance is a remittance. |
| Wks ID | The Worksheet Identifier of the transferred balance Values: Worksheet Identifier, e.g. TW105, R'2004'65, CW9956, etc. Mandatory: Yes |
| Responsible BP | The Responsible Business Partner for the included balance. This is e.g. the Cedent for a balance on an Assumed business. Values: The Name and Location of a business partner Mandatory: Yes, if the balance belongs to a business. Will be blank if the included balance is a remittance - unless a responsible partner is given on the remittance. |
| Business Title | The Title of the Business the included balance belongs to.. Values: Business Title characters Mandatory: Yes, if the balance belongs to a business. Will be blank if the included balance is a remittance. |
| Driving | Only visible if the system parameters When Pairing, always use Remittances as the driving Balance and Pending Status for Balance Pairing in Use are both selected. Values: It shows Yes if the included balance actually is the driving balance in another balance pairing, else it shows blank Mandatory: No |
| BP Reference | Business Partner Reference of the included balance. This is the BP reference that is stored on the Technical/Claim/Remittance Balances. It is the Business Partner reference that helps to identify/verify the balances and pertains to the Cedent or the Broker reference on the balances. Values: Text, maximum 40 characters Mandatory: No |
| Exchange Diff. XXX (XXX = Base Currency) |
When currency of transferred balance is different from driving currency, and the Settlement Amount in xxx is changed, an Exchange diff. amount in base currency is calculated. Values: Amount +/- Calculation: Settlement Amount in xxx calculated when transferred less Settlement Amount in xxx calculated after transfer as result of change in the amount itself or Rate of Exchange Functional Impact: Mandatory: No |
| XXX Write Off (XXX = Driving Balance Currency) |
When currency of the transferred balance and the Driving Balance is the same and the amounts in the Settlement Amount in XXX field differs from the Amount to Settle field, a Write off amount is calculated. Values: Amount +/- Calculation: Settlement Amount in XXX less Amount to Settle Mandatory: No |
| XXX Write Off (XXX = Base Currency) |
When currency of the transferred balance and the Driving Balance currency differ, a Write Off amount in base currency can be entered. The Write Off amount is deducted from the Exchange Diff. in XXX amount. In case an Exchange Diff. in XXX amount is calculated, the amount can be split between an Exchange diff. amount and a Write Off amount. Values: Amount +/- Mandatory: No |
| Pending | Only visible if the system parameters Pending Status for Balance Pairing in Use is selected. See the section Using Pending Status in Balance Pairing for more information Values: It shows Yes if the actual pairing is in pending status, else it shows No Mandatory: No |
| Pairing ID | It shows the Pairing ID of the actual pairing, i.e. the pairing between the included balance and the driving balance Values: Pairing ID Mandatory: No. It is dependent of a defined pairing id series |
| Classification | The Classification of the Unallocated Remittance Balance Values: If the included balance is an Unallocated Remittance Balance it shows the value from the Rem Class 1 field on the Unallocated Remittance Mandatory: No |
| Pairing Date | The date when the pairing took place Values: Date. Mandatory: Yes |
| Paired by | The user that created the pairing Values: User name Mandatory: Yes |
| Annulling Date | The date when the pairing was annulled Values: Date. Mandatory: No, only for annulled pairings |
| Annulled by | The user that annulled the pairing Values: User name Mandatory: No, only for annulled pairings |
| Pairing BYR | The Booking Year of the pairing Values: Year (yyyy) Default value: The booking year defined in Booking Rules for Balance Pairing if defined, else the Default booking year in the Base Company Specific Settings’ Booking Terms. The Base Company on the driving balance is used. Mandatory: Yes |
| Pairing BP | The Booking Period of the pairing Values: Booking Period, e.g. Month 05, 1st half year, 3rd quarter, etc. Default value: The booking period defined in Booking Rules for Balance Pairing if defined, else the Default booking period in the Base Company Specific Settings’ Booking Terms. The Base Company on the driving balance is used. Mandatory: Yes |
| Included in Settlement Balance Group | Indicates if the included balance is part of a Settlement Balance Group Values: Shows Yes if the included balance is part of a SBG and No if not. Mandatory: Yes |
| Included in Account Balance Group | Indicates if the included balance is part of an Account Balance Group Values: Shows Yes if the included balance is part of a SAG and No if not. Mandatory: Yes |
| Base Company | The short name of the base company for which the included balance is booked Values: Text, maximum 10 characters Mandatory: No |
| Mass Paired | Indicates if this pairing was created by a mass pairing function or not Values: Yes or No Mandatory: Yes |
| Unsettled Amt Bal1 | The current Unsettled Amount on the driving balance at the time when the pairing took place Values: Amount (+/-) Mandatory: Yes |
| Settlement Ind Bal1 | The current Settlement Indicator on the driving balance at the time when the pairing took place Values: Settled, Partially Settled, Unsettled (the latter only when previous pairing has been annulled) Mandatory: Yes |
| Unsettled Amt Bal2 | The current Unsettled Amount on the included balance at the time when the pairing took place Values: Amount (+/-) Mandatory: Yes |
| Settlement Ind Bal2 | The current Settlement Indicator on the included balance at the time when the pairing took place Values: Settled, Partially Settled, Unsettled (the latter only when previous pairing has been annulled) Mandatory: Yes |
| Account Number BS | The mapped General Ledger account are stored in this column Values: General Leger Account Number in BS Mandatory: No |
| Account Number PL | The mapped General Ledger account are stored in this column Values: General Leger Account Number in PL Mandatory: No |
| Treaty/Non-Treaty | The Type of Business each included balance belongs to. If the Type of Business for the business is Proportional Treaty or Non-Prop Treaty, the system shows Treaty. If the Type of Business for the business is none of the two mentioned types (e.g. Facultative or Direct), then the system shows Non-Treaty Values: Treaty, Non-Treaty Mandatory: No |
Remove a Balance Transferred for Pairing #
In case you have transferred a balance for pairing and you fins that is included by mistake, you can remove the balance.
- You are in the pairing process and have transferred one or more balances for pairing that you want to remove.
- Select a balance to be removed.
- Select Remove from the pop-up menu or click the arrow.
- If necessary select a new balance and Remove/arrow again until all balances to be removed are handled.
The balances are transferred back to the Business Partner Ledger’s Balance display list with the Unsettled Part and the Settlement Indicator updated.
Calculate Settlement Amount #
When you have transferred balances for pairing in different currency than the driving balance and you have adjusted one or more of the amounts in the Amount to Settle column you can use this function. You adjust an Amount to Settle amount when the balance is to be partially settled.
- You are in the pairing process and have transferred one or more balances for pairing.
- Adjusted the amount in the Amount to Settle column for a balance.
- In the small pop-up window select Adjust Exchange Rate.
- It is now a difference between the amounts in the Settlement Amount in xxx column and the Amount to Settle column.
- Select the adjusted balance and Calculate Settlement Amount from the pop-up menu. The Amount in th_e Settlement amount in xxx_ is calculated to be equal to the adjusted amount in Amount to Settle column.
- Complete your pairing.
This functionality is used when no Exchange Difference-and/or Write Off amounts are to be calculated.
Calculate Amount to Settle #
When you have transferred balances for pairing and you have adjusted one or more of the amounts in the Settlement Amount in XXX column you can use this function.
- You are in the pairing process and have transferred one or more balances for pairing.
- Adjusted the amount in the_Settlement Amount in XXX_ column for a balance.
- In the small pop-up window select Adjust Exchange Rate.
- It is now a difference between the amounts in the Settlement Amount in xxx column and the Amount to Settle column.
- Select the adjusted balance and Calculate Amount to Settle from the pop-up menu. The Amount in the Amount to Settle column is calculated to be equal to the adjusted amount in Settlement Amount in XXX column.
- Complete your pairing.
This functionality is used when no Exchange Difference-and/or Write Off amounts are to be calculated.
Create a Write Off Balance #
In cases where the payment does not fully settle the included balances but the difference is minor, this different can be booked as a Write Off and reflected in the balance pairing object. This is done by updating the Settlement Amount in xxx.
If the system parameter Include Realized Loss/Gains in FC revaluation is selected and a Write Off entry code has been defined ( Contact System Admin for further information. System Admin user guide Section 8.2.13) then the Write Off amount will be treated in the following way:
When a balance pairing process including a Write Off amount is completed the system removes the Write Off amount from the pairing object and replaces it as a technical booking and handles it as another technical balance in the balance pairing.
The functional currency amount for the Write Off amount will be calculated by use of the same rate as found in the corresponding technical/claim balance it derived from.
When the above system parameter is not activated, the Write off amount remains as part of the pairing object and no separate worksheet is created
Create an Exchange Difference Remittance #
The Exchange Difference Remittance functionality is activated by a system parameter. (Contact your system administrator for further information.)
The Exchange Difference Remittance can be created when:
- The Create Balance Pairing process ends up with an outstanding amount for the driving balance and,
- One or more of the included balances are in another currency than the driving balance.
The outstanding amount for the driving balance is used as basis creating a new Remittance Balance in the pairing process.
- You are finished including balances in your Create Balance Pairing process. You recognise that the driving balance has an outstanding amount and that one or more of the included balance currencies differ from the driving balance currency.
- Select Create Exchange Difference Remittance from the pop-up menu.
- The system creates a new Remittance Balance and adds it to the Settlement Pairing.
- Complete your pairing. The new Remittance Balance is paired with the driving remittance balance together with other balances included in the pairing process.
Which type of Remittance Balance that is created depends on the system parameter C_reate exchange difference remittances as zero amount_ being activated or not. (Contact your System Administrator for further information.)
If this parameter is selected the Exchange Difference Remittance Balance has:
- An Exchange difference amount in Base Currency. The amount is based on the Outstanding Amount in driving balance currency converted to base currency.
- Remittance Type = Exchange Difference.
- Currency = one of the included balances currencies other than the driving.
- Amount to Settle = 0 (Zero)
If this parameter is cleared, the Exchange Difference Remittance Balance has:
- Exchange difference amount = 0 (zero)
- Remittance Type = Exchange Difference
- Currency = driving balance currency
- Amount to Settle = the outstanding amount
Summary per Base Company #
When balances of more than one Base Company are transferred for balance pairing, it might be useful to summarize the balances per base company.
- You are in the pairing process and have transferred one or more balances for pairing or you are viewing the properties of a Balance Pairing.
- Select Summary per Base Company from the pop-up menu. You see the Settlement Pairing Summary window.
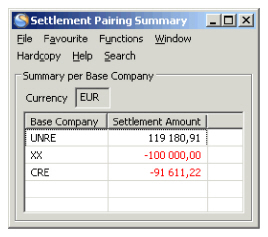 The Settlement amount of the balances transferred for balance pairing is summarized and displayed per base company.
Create Unallocated Remittance Balances #
A Remittance Balance booked on a Business Partner Ledger might contain a part for which Technical-/Claim Balances are not yet booked. In the pairing process you are offered the possibility to assign this part of unapplied cash to the businesses it applies to.
- Open the Business Partner Ledger where the Unsettled/Partially Settled Remittance Balance is booked.
- Select the remittance balance. (Driving Balance).
- Select Create Balance Pairing from the pop-up menu. You see the Balance Pairing window.
- Include balances in the Balance Pairing, if required.
- Select Create Unallocated Remittance Balance from the pop-up menu in the upper balance display list to link a part of the Remittance Balance to businesses. You see the Create Unallocated Remittance Balance window, which allows you to apply cash to businesses.
- Enter a Business ID. Alternatively, you can use the “typeahead” facility. Type in the business title or part of the title in the field, and you will receive possible matches for the text. You can also search for and find a business by clicking the magnifying glass.
The default value in the currency column is the currency of the Driving Balance in the Pairing. The default value in the Unallocated Balance column is the outstanding amount from the Balance Pairing. - If we select a currency different from the Driving Balance currency, the amount in the Unallocated Balance column is converted to the selected currency using the most recent Daily Rate. This amount can be overwritten as per requirement.
- If applicable, right click and select Add Balance to add one more row. The currency of the new row will default to the currency of the previous row. The Unalloacted Balance amount will default to 0.
- The above step can be repeated many times to add as many URBs as necessary, in same or in different currencies. The default currency in the new row will always be the currency of the previous row. The default Unallocated Balance amount will always be 0. Both Currency and Unallocated Balance amount can be overwritten on all rows.
- Click Save to indicate that you are finished creating Unallocated Remittance Balances. The Create Balance Pairing window appears again with the Unallocated Remittance Balances listed among the balances included for pairing and Worksheet Id is allocated to each of them. For the URBs being in different currency than the Driving Balance currency, the Settlement Amount will be calculated using the most recent Daily Rate. The Settlement Amount can be overwritten. (See Calculate Settlement Amount).
- Click OK to update your pairings. A pairing between the Driving Remittance Balance and each Unallocated Remittance Balance is created. In the Create Balance Pairing window, the system calculates and displays how much of the Driving Remittance Balance is allocated per Base Company. The Unallocated Remittance Balances are also included in this allocation.
The Unallocated Remittance Balances created in the pairing process update the Driving Balance’s outstanding amount. When the pairing process is completed, the Driving Remittance Balance may be fully settled or partially settled. In case of partially settlement, the Balance Pairing is updated according to the settings of the parameter Enable Proportional Split. Note!
- The Unallocated Remittance Balances are never proportionally split or partially settled.
- The Unallocated Remittance Balances are displayed in the Business Partner Ledger under a separate Balance Type: Unallocated Remittance.
- The Unallocated Remittance Balances are updated in the Business Ledgers on a separate tab for each business assigned. The balances are however not displayed as Account Balances. Refer to the Business Ledger chapter for further information.
- If an URB is created in a currency which is not already present in either the Business Ledger or the Business Partner Ledger, then after step-11 above, it is displayed in the concerned ledger(s).
- You are not allowed to delete an Unallocated Remittance Balance having a Worksheet Identifier assigned already.
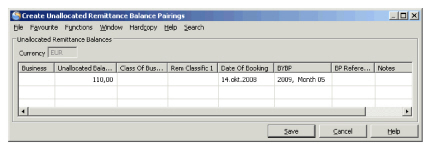 12. Enter a Business ID. Alternatively, you can use the “typeahead” facility. Type in the business title or part of the title in the field, and you will receive possible matches for the text.You can also search for and find a business by clicking the magnifying glass.Enter amount. (=> Unallocated Remittance Balance). The currency of the Unallocated Remittance Balance has to be the same as driving balance currency.
- If applicable, select business again (same or new) and enter amount. Do this process as many times as necessary to assign the unapplied cash to businesses.
- It is possible to select one Class of Business defined on the last IP of the assigned business. It is also possible to select a remittance classification and enter a note on each Unallocated Remittance Balance. A system parameter decides if the Class of Business and Classfications is mandatory or optional information.
- Click OK to indicate that you are finished creating Unallocated Remittance Balances. The Create Balance Pairing window appears again with the Unallocated Remittance Balances listed among the balances included for pairing.
- Click Save to update your pairings.
A pairing between the Driving Remittance Balance and each Unallocated Remittance Balance is created.
In the Create Balance Pairing window, the system calculates and displays how much of the Driving Remittance Balance is allocated per Base Company. The Unallocated Remittance Balances are included in this allocation.
The Unallocated Remittance Balances created in the pairing process update the driving balance’s Outstanding Amount.
When the Pairing process is completed the driving remittance balance may be fully settled or partially settled. In case of partially settlement, the Balance Pairing is updated according to the settings of the parameter Enable Proportional Split.
Note! The Unallocated Remittance Balances are never proportionally split nor partially
settled.
The Unallocated Remittance Balances are displayed in the Business Partner Ledger by selecting it under Balance Type. When this type is selected in combination with Settlement Indicator Settled, then the Unsettled Unallocated Remittances are shown with value Allocated in the column Settlement Indicator. When this type is selected in combination with Settlement Indicator Unsettled, then the Settled Unallocated Remittances are shown with value Unallocated in the column with Settlement Indicator. This to make the matching of unallocated remittances and unsettled technical balances easier.
The Unallocated Remittance Balances are updated in the Business Ledgers on a separate tab for each business assigned.
Maintain Unallocated Remittance Balances in the Balance Pairing Process #
When you are in a balance pairing process that is not yet completed, you can maintain Unallocated Remittance Balances already created. This may be relevant e.g. when pairing process has been stopped due to Base Company restrictions, or if one of the Unallocated Remittance Balances is assigned to incorrect business or created in wrong currency.
- You are in the Ledger Balances Pairing window and Unallocated Remittance balances are created.
- Select Create Unallocated Remittance Balances from pop-up menu. The Create Unallocated Remittance Balance window opens displaying the Unallocated Remittance Balances in edit mode.
- Make your changes:
- If an Unallocated Remittance Balance is assigned to wrong business, you may change the Business ID entering the correct business ID or use the Find Business function Alternatively, you can use the “typeahead” facility. Type in the business title or part of the title in the field, and you will receive possible matches for the text.
- Change the currency and/or adjust the amount for one of the existing Unallocated Remittance Balance.
- on right click.
- Click Save to indicate that you are finished maintaining Unallocated Remittance Balances. The Create Balance Pairing window appears again.
- Click OK to update your pairings.
You are not allowed to delete an Unallocated Remittance Balance having a Worksheet Identifier assigned already, i.e. when the Unallocated Remittance Balance window is reopened.
Include an existing Unallocated Remittance Balances in a Balance Pairing #
It is possible to include an Unallocated Remittance Balance (URB) that has a settlement indicator of ‘Unallocated’ on the Business Partner Ledger, as an included balance (follower) in an ongoing Balance Pairing process. When a balance of type Unallocated Remittance Balance is included in a balance pairing as a follower, the balance will be transferred to the Settlement Pairing container as an unallocated remittance balance, but with the opposite sign. A column will display the identifier of the Remittance Balance linked to the included URB in the Balance Pairing window.
On saving the balance pairing the following will happen:
The unallocated remittance balance that was included in the pairing will be annulled from the remittance it is paired with and will get a status of Allocated. Another pairing with the opposite sign of this unallocated remittance balance will be created and both these pairings will be listed as annulled pairings in the Balance Pairing Properties of the original remittance balance which the URB was part of.
The first remittance balance from which this unallocated remittance balance was created from, will now become an included balance in the current pairing for the amount equal to the amount of the now annulled unallocated remittance balance.
The settlement indicator of this remittance balance will remain as it was, either settled or partially settled.
A new Pairing Id will be generated for the new pairing that has been created and the original remittance balance will now have been settled with two different Pairing Ids.
The Unallocated Remittance Balance that was set to an Allocated Status has played its role and will not be reusable.
Create Balance Pairing Group #
Your system can be set up to use Balance Pairing Group. This may be useful if you want to be able to use more than one driving remittance balance as settlement for one or many technical/claim/cession balances. The Balance Pairing Group makes it possible to do the above pairing in one operation to prevent partial settled balances in the system and to prevent that remittances are used as included balances (Balance 2 in the pairing object).
- From the Business Partner Ledger you can start the Balance Pairing Group by selecting one or more balances:
Unsettled or partially settled remittance balances
Settled remittance balances already paired with Unallocated Remittances
Settled Unallocated Remittances
Unsettled or partially settled technical, claim or cession balances
- Select Create Balance Pairing Group from the pop-up menu.
 3. The selected remittances are shown in the Driving Balances container while the selected technical, claim and cession balances are shown in the Included Balances container. To include more balances as part of this pairing group you can define your search criteria in the upper part of the window and click Find Now.
Note! The currency of the driving balances (remittances) in a balance pairing group is shown above the Driving Balances container and all driving balances must be in the same currency. In case you start the pairing group with a technical balance you must define the pairing currency.
- Select one or more balances from the upper balance container and select Transfer for Pairing from the pop-up menu or use the arrow to transfer balances to the Driving or Included Balances container.
- Complete your pairing group by clicking OK.
Note! A pairing group can only be completed when the sum of the driving balances match exactly the sum of included balances, i.e. the Outstanding field shows zero. In case the outstanding amount is not zero you can change the Settlement Amount for one or more of the included balances so that it becomes zero. By doing thisthe system will use this discrepancy either as Exchange Diff or Write Off for the actual included balance, dependent if the included balance is in different or same currency as the driving balances.
| Field | Description |
|---|---|
| Currency | The Currency of the Driving Balances. Values: Currency, e.g. USD, GBP, CHF, etc. Derived from: The Remittance Balance selected to start the Balance Pairing Group process or the currency given by the user if the process is started with a technical or claim balance Mandatory: Yes |
| Original Amount | The sum of the original balances of the remittances in the pairing group. Derived from: The original balance amounts from each of the remittances in the Driving Balances container. Value: Amount +/- Mandatory: Yes |
| Unsettled Amount | The sum of the unsettled amount of the remittances in the pairing group. Derived from: The unsettled amounts from each of the remittances in the Driving Balances container. Value: Amount +/- Mandatory: Yes |
| Outstanding | Shows the remaining amount to make the balance pairing group complete. Can only be completed when this is zero. Derived from: The total Unsettled amount for the driving balances less the total Settlement Amounts in pairing currency for the included balances. Value: Amount +/- Functional Impact: The Balance Pairing Group can only be finalized when the Outstanding amount is zero. Mandatory: Yes |
| Unsettled Amount | The unsettled amount of the remittance at the time it is included in the pairing group. Value: Amount +/- Mandatory: Yes |
| Original Balance | The original balance of the remittance included in the pairing group. Value: Amount +/- Mandatory: Yes |
| Wks ID | The Worksheet Identifier of the remittance included in the pairing group Value: Worksheet Identifier, e.g. R'2010'923 Mandatory: Yes |
| BP Reference | Business Partner Reference of the Driving Remittance Balance. Values: Text, maximum 40 characters Mandatory: No |
| Business Partner | The Name of the business partner assigned to the remittance included in the pairing group Value: Text, maximum 45 characters Mandatory: Yes |
| Balance Type | Type of balance included in the pairing group Value: Remittance Mandatory: Yes |
| Base Company | The Name and Location of the base company assigned to the remittance included in the pairing group Value: Text string, maximum 45 + 45 characters Mandatory: Yes |
| Has URB | Indicates if the remittance included in the pairing group has been annulled from an Unallocated Remittance Balance in the pairing group process. Value: Yes if the remittance has a URB linked and No if not Functional impact: For the selected remittance balance with Yes in this field it is possible to open the URB Properties window (pop-up menu option) Mandatory: Yes |
| Field | Description |
|---|---|
| Settlement Amount in xxx | The xxx is the pairing currency. The Amount Unsettled of each balance included in the balance pairing group, is converted to this currency unless the currency of the included balance is the same. It is possible to change the amount after it has been included. The Exchange rate is then recalculated and a discrepancy amount is shown either in the Exchange Diff or Write Off column. Values: Amount +/- Derived from: The unsettled amount of the included balance converted to the pairing currency by the most recent daily rate in the system. Functional Impact: The total Outstanding amount for the driving balances. Mandatory: Yes |
| Exchange Rate | The Rate of Exchange used when Settlement Amount in xxx is calculated. It is possible to change the calculated rate to have the Settlement Amount recalculated Values: Digits (max 9), e.g. 1,2345678 0,5689236 etc. If currency of transferred balance and driving balance is the same, the value is 1,0000000 Derived from: Most Recent Daily Rate Functional Impact: Calculation of Settlement Amount in xxx. Mandatory: Yes |
| Original Currency | The Original Currency of the included balance. Values: Currency, e.g. USD, GBP, CHF, etc. Mandatory: Yes |
| Amount to Settle | The Unsettled Part of the balance included in the pairing. It is NOT possible to change this amount because it is not allowed to create partially settled balance in the Balance Pairing Group function. Value: Amount +/- Mandatory: Yes |
| Amount Unsettled | The unsettled part of the included balance before the current pairing process. Value: Amount +/- Mandatory: Yes |
| Original Balance | The original balance of the included balance in the pairing group. Value: Amount +/- Mandatory: Yes |
| Business Id | The Identifier of the business the included balance belongs to. Value: Business Identifier Mandatory: Yes |
| Business Title | The Title of the business the included balance belongs to. Value: Business Title characters Mandatory: Yes |
| Balance Type | Type of balance included in the pairing group Value: Technical-, Claim- or Cession Balance Mandatory: Yes |
| Wks ID | The Worksheet Identifier of the included balance in the pairing group Value: Worksheet Identifier, e.g. TW105, CW9956, etc. Mandatory: Yes |
| BP Reference | Business Partner Reference of the included balance. This is the BP reference that is stored on the Technical/Claim/Remittance Balances. It is the Business Partner reference that helps to identify/verify the balances and pertains to the Cedent or the Broker reference on the balances. Values: Text, maximum 40 characters Mandatory: No |
| Exchange Diff. xxx | The xxx is the Base Currency. When currency of the included balance is different from pairing currency, and the Settlement Amount in xxx is changed, an Exchange Diff amount in base currency is calculated Calculation: Settlement Amount in xxx calculated when transferred less Settlement Amount in xxx calculated after transfer as result of change in the amount itself or Exchange Rate Value: Amount +/- Mandatory: No |
| xxx Write Off | The xxx is the pairing currency. When currency of the transferred balance and the Driving Balance is the same and the amounts in the Settlement Amount in xxx field differs from the Amount to Settle field, a Write Off amount is calculated Calculation: Settlement Amount in xxx less Amount to Settled Value: Amount +/- Mandatory: No |
| xxx Write Off | The xxx is the Base Currency. When currency of the included balance is different from the pairing currency, a Write Off amount in base currency can be entered. The Write Off amount is deducted from the Exchange Diff. xxx amount. In case an Exchange Diff. xxx amount is calculated, the amount can be split between an Exchange Diff. xxx amount and a Write Off amount Value: Amount +/- Mandatory: No |
| Pairing BYR | The Booking Year of the pairing Value: Year (yyyy) Default value: The initial value is taken from the included balance but is reset to the below when the balance pairing group is saved. The booking year defined in Booking Rules for Balance Pairing if defined, else the Default booking year in the Base Company Specific Settings’ Booking Terms. The Base Company on each of the driving balances are used. Mandatory: Yes |
| Pairing BP | The Booking Period of the pairing Values: Booking Period, e.g. Month 05, 1st half year, 3rd quarter, etc. Default value: Default value: The initial value is taken from the included balance but is reset to the below when the balance pairing group is saved. The booking period defined in Booking Rules for Balance Pairing if defined, else the Default booking period in the Base Company Specific Settings’ Booking Terms. The Base Company on each of the driving balances are used. Mandatory: Yes |
| Base Company | The Short Name of the base company assigned to the included balance in the pairing group Value: Text, maximum 10 characters Mandatory: Yes |
| Business Partner | The Name of the business partner assigned to the included balance in the pairing group Value: Text, maximum 45 characters Mandatory: Yes |
| Treaty/Non-Treaty | The Type of Business each included balance belongs to. If the Type of Business for the business is Proportional Treaty or Non-Prop Treaty, the system should show Treaty. If the Type of Business for the business in none of the two mentioned types (e.g. Facultative or Direct), then the system should show Non-Treaty Values: Treaty, Non-Treaty Mandatory: No |
| UwYR | The Underwriting Year of the included balance if it contains only one Underwriting Year Values: A Year Mandatory: No |
| Responsible BP | The Responsible Business Partner for the included balance. This is e.g. the Cedent for a balance on an Assumed business. Values: The Name and Location of a business partner Mandatory: Yes, if the balance belongs to a business. Will be blank if the included balance is a remittance - unless a responsible partner is given on the remittance. |
Use Unallocated Remittances in the Balance Pairing Group:
When a Remittance balance has been paired with an Unallocated Remittance (URB) as a replacement for a missing technical or claim balance the URB becomes Settled. The URB is now playing an active role. You can include an active URB in a Balance Pairing Group in two ways:
- Either by selecting a Settled URB in the Business Ledger or in the BP Ledger and start the Balance Pairing Group function, or include it in an already started Balance Pairing Group function.
- Or by selecting a Settled or Partially Settled Remittance balance that is paired with an active URB and start the Balance Pairing Group function or include this Remittance in an already started Balance Pairing Group function
When either of the above two processes have been performed it is only the Remittance balance you will see on the Balance Pairing Group window. The pairing between the actual URB and the Remittance has now been annulled and the Remittance is shown with the URB amount added to the Outstanding Amount in the Balance Pairing Group window.
The Remittance will be shown with a Yes in the column Has URB, and for this Remittance it is possible to open the URB Properties window (pop-up menu option) where you can inspect the following information for the URB: Is Allocated (see below), Identifier, Currency, Amount, the Business it belongs to, the classification of the URB, the Date of Booking, BYRP, BP Reference and Notes.
If a Remittance is paired with several URBs, it is possible to specify that only some of the URBs should be annulled (allocated) in the current Pairing Group process. The Is Allocated column in the URB Properties window specifies whether or not this URB should be allocated.
The default value in the Is Allocated column depends on how the Pairing Group process was started:
- When the Pairing Group process is started from an URB, only this URB is set to Yes
- When the Pairing Group process is started from a Remittance, all URBs paired with this Remittance are set to Yes.
The values in the Is Allocated column can be changed before you continue the Pairing Group process. Right mouse click gives you the following options:
- Include: Include the selected URB
- Exclude: Exclude the selected URB
- Include All: Include all URBs
- Exclude All: Exclude all URBs
Only the URBs with Yes in the Is Allocated column are reflected in the Unsettled Amount/Outstanding fields in the Ledger Balance Pairing Group window. Also note that at least one URB for each of the involved remittances must be marked with Yes in the Is Allocated column.
View the Balance Pairing Group properties:
When a Settled balance that has been settled in the Balance Pairing Group process is selected, you can open up the View Ledger Balance Pairing Group window. This is useful if you need to inspect the individual pairing objects that have been created in the process.
- From the Business Partner Ledger you can open the View Ledger Balance Pairing Group by selecting a Settled balance that has been settled in the Balance Pairing Group process.
- Select Balance Pairing Group Properties from the pop-up menu. If a balance is Settled but this option is not enabled it means that the balance is settled via the normal Balance Pairing process.
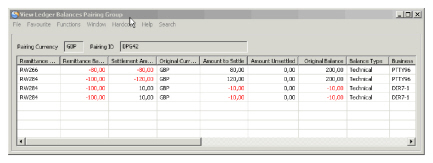 3. Each row in the View Ledger Balances Pairing Group window represents one pairing object in the Balance Pairing Group, showing the two balances in the pairing object and how much of each balance is used in the pairing object.
4. From the balances on each row, it is possible to navigate to the Worksheet
3. Each row in the View Ledger Balances Pairing Group window represents one pairing object in the Balance Pairing Group, showing the two balances in the pairing object and how much of each balance is used in the pairing object.
4. From the balances on each row, it is possible to navigate to the Worksheet
(Claim, Technical or Remittance) properties. If the balances are part of a Settlement Balance Group or an Account Balance Group, then it is possible to navigate to the respective Balance Group from the listed balances
| Field | Description |
|---|---|
| Pairing Currency | The common Currency for all the Driving Balances in the pairing group. Values: Currency, e.g. USD, GBP, CHF, etc. Mandatory: Yes |
| Pairing ID | The common Pairing Id for all the pairing objects created in this pairing group. Values: Pairing identifier, e.g. GP125. Mandatory: Yes |
| Remittance ID | The Worksheet Identifier of the remittance included in the pairing group Value: Worksheet Identifier, e.g. R'2010'923 Mandatory: Yes |
| Remittance Balance | The original balance of the Remittance included in the pairing group. Represents the Balance 1 in the pairing object. Value: Amount +/- Mandatory: Yes |
| Settlement Amount | Shows how much of the Remittance balance is used in this pairing object. Values: Amount +/- Mandatory: Yes |
| Original Currency | The Currency for the included balances in the pairing group. Values: Currency, e.g. USD, GBP, CHF, etc. Mandatory: Yes |
| Amount to Settle | Shows how much of the included balance is used in this pairing object. Represented in the Original Currency for the included balance. Value: Amount +/- Mandatory: Yes |
| Amount Unsettled | Shows how much is left as unsettled for the included balance after it has been included in this pairing group. Represented in the Original Currency for the included balance. Value: Amount +/- Mandatory: Yes |
| Original Balance | The original balance of the included balance in the pairing group. Value: Amount +/- Mandatory: Yes |
| Balance Type | Type of the balance included in the pairing group Value: Technical-, Claim- or Cession Balance Mandatory: Yes |
| Business Id | The Identifier of the business the included balance belongs to. Value: Business Identifier Mandatory: Yes |
| Business Title | The Title of the business the included balance belongs to. Value: Business Title characters Mandatory: Yes |
| Wks ID | The Worksheet Identifier of the included balance in the pairing group Value: Worksheet Identifier, e.g. TW105, CW9956, etc. Mandatory: Yes |
| BP Reference |
Business Partner Reference of the included balance. This is the BP reference that is stored on the Technical/Claim/Remittance Balances. It is the Business Partner reference that helps to identify/verify the balances and pertains to the Cedent or the Broker reference on the balances. Values: Text, maximum 40 characters Mandatory: No |
| Exchange Diff. | When currency of the included balance is different from pairing currency and an Exchange Diff amount in base currency has been calculated during the pairing group process this amount is shown here. Value: Amount +/- Mandatory: No |
| Write Off | When a Write Off amount is calculated during the pairing group process because the Settlement Amount was changed you might see an amount in this column. Either if the included balance is in same currency as the pairing currency, then Write Off was automatically calculated. Or if the included balance is in a different currency than the pairing currency AND an Exchange Difference is calculated the user might have manually defined some of the exchange diff as Write Off Value: Amount +/- Mandatory: No |
| Diff. Curr | The Currency of the Exchange Diff. amount or the Write Off amount. In case the original currency of the included balance is different from the pairing currency then this currency is the Base Currency. But if the original currency of the included balance is the same as the pairing currency then this currency is the same as the Pairing Currency. Values: Currency, e.g. USD, GBP, CHF, etc. Mandatory: Yes |
| Pending | Indicates if the pairing objects are still in status pending or definite. Values: Yes, if the pairing is still pending. No, if the pairing has been made definite. Mandatory: Yes |
| Pairing Date | The date when the balance pairing group was created. Value: A date in format DD.MM.YYYY Mandatory: Yes |
| Paired by | The user who created the balance pairing group. Value: Name of the user. Mandatory: Yes |
| Paired BYR | The booking year the balance pairing group took place. Value: A year in format YYYY Mandatory: Yes |
| Pairing BP | The booking period the balance pairing group took place. Value: A booking period, e.g. Months 03, Quarter 1 Mandatory: Yes |
| Included in Settlement Balance Group | Indicates if the included balance is part of a Settlement Balance Group. Value: Yes, the included balance is part of a Settlement Balance Group. No, the included balance is not part of a Settlement Balance Group. Mandatory: Yes |
| Included in Account Balance Group | Indicates if the included balance is part of an Account Balance Group. Value: Yes, the included balance is part of an Account Balance Group. No, the included balance is not part of an Account Balance Group. Mandatory: Yes |
| Base Company | The Short Name of the base company assigned to the included balance in the pairing group Value: Text, maximum 10 characters Mandatory: Yes |
| Treaty/Non-Treaty | The Type of Business each included balance belongs to. If the Type of Business for the business is Proportional Treaty or Non-Prop Treaty, the system should show Treaty. If the Type of Business for the business in none of the two mentioned types (e.g. Facultative or Direct), then the system should show Non-Treaty Values: Treaty, Non-Treaty Mandatory: No |
| UwYR | The Underwriting Year of the balance if it contains only one Underwriting Year Values: A Year Mandatory: No |
| Responsible BP | The Responsible Business Partner for the included balance. This is e.g. the Cedent for a balance on an Assumed business. Values: The Name and Location of a business partner Mandatory: Yes, if the balance belongs to a business. Will be blank if the included balance is a remittance - unless a responsible partner is given on the remittance. |
Annul Balance Pairing Group:
From the View Ledger Balance Pairing Group window you can annul all balance pairings in one operation. It is not possible to annul some of the pairings in one pairing group. All pairings with the same Pairing Id must be annulled together.
- From the Business Partner Ledger you can open the View Ledger Balance Pairing Group window by selecting a Settled balance that has been settled in the Balance Pairing Group process.
- Select Balance Pairing Group Properties from the pop-up menu. If a balance is Settled but this option is not enabled it means that the balance is settled via the normal Balance Pairing process.
- In the View Ledger Balance Pairing Group window right mouse click and select the option Annulling…
- Answer Yes on the message saying that All pairings with pairing ID: xxx will be annulled. If you answer No the annulling will be interrupted.
Create Automatic Balance Pairing #
Automatic Balance Pairing Settlement Groups #
Whenever a Remittance Group or a Single Remittance has been linked to a Settlement Balance, you are offered to automatically settle all the balances belonging to the settlement balance against members of the remittance group or the single remittance. (Refer to the chapter Automatically Create Remittance Group for further information about Remittance Grouping).
- From a Business Partner Ledger Balance display list, select a Group Owner from a Remittance Group or select a Single Remittance.
- Select Automatic Balance Pairing from the pop-up menu. The option is only available if the selected Remittance is already linked to a Settlement Balance.
- The system pairs and settles all the members of the linked settlement balance with the members of the remittance group/single remittance.
In case of a Remittance Group, the following pairing operations take place:
- The Group Owner is paired with the Group Reversal.
- In case of Received payments the remaining Group Owner is paired with Bank Charges and/or Exchange difference (if any).
- Group Externals are paired with Group External Reversals.
- Group Internals are paired with members of the Settlement Balance group. In order to pair each Group Internal with the linked Settlement Balance, the Base Company and Direction of Business (Inward/Outward) have to be the same.
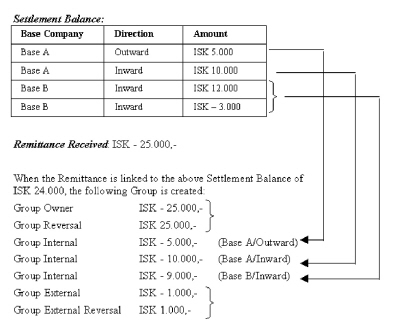
Upon selection of Automatic Balance Pairing, the system pairs and settles the balances as described above.
In case of Single Remittances being linked to a Settlement Balance, the settlement balance will only include balances from one Base Company and one Direction. Otherwise the pairing process is the same as for Group Remittances.
Automatic Balance Pairing Technical Balances not Part of Settlement Group #
When a link between a technical balance (claim or technical worksheet) that is not member of a settlement group and a remittance balance has been created, you can create an automatic pairing by selecting one of the balances, provided your system administrator has activated this functionality.
To pair and settle technical- and remittance balances:
- From a Business Partner Ledger Balance display list, select a remittance balance.
- Select Automatic Balance Pairing from the pop-up menu. The option is only available if the selected remittance balance has a link to a technical balance.
The system pairs and settles both the technical and the remittance balances. Note! Note that this functionality is not enabled for “open” remittances, unless your System Administrator has allowed this.
Automatic Balance Pairing when change of Remittance Status #
When a link between a technical balance (claim or technical worksheet)/settlement balance group and a remittance has been created and you change the status on the remittance worksheet, SICS makes an automatic balance pairing provided that your System Administrator has activated this functionality. (Refer to system parameter Accounting/Remittance ‘Automatic Balance Pairing when change of Remittance Status’).
To change the status and make a balance pairing:
- From a Business Partner Ledger Balance display list open a paid remittance linked, but not paired to a balance.
- Change status of the remittance to ‘Final’.
SICS pairs and settles both the technical and the remittance balances. Note! This functionality is also enabled for pending remittance status ‘Authorized’ also if your System Administrator has allowed this. (Refer to system parameter Accounting/Remittance ‘Pairing Allowed on Open Status Authorized only’ ) .
View Balance Pairing Properties #
From the Business Partner Ledger you can view an existing balance pairing.
- Select a Settled or Partially Settled balance (Remittance-, Technical- or Claim balance, or Account- or Settlement Balance Group if the balance group has been settled by a single driving balance) from the Balance display list.
- Select Balance Pairing Properties from the pop-up menu. You see the View Ledger Balance Pairing window.
When a balance has been included in a balance pairing by mistake or it for some other reason should be removed from the balance pairing, you are allowed to annul the process.
- Select the Settled or Partially Settled driving balance, with which the balance(s) you want to annul is paired, from the Business Partner Ledger.
- Select Balance Pairing Properties from the pop-up menu. The View Ledger Balance Pairing window appears and the balance(s) you want to annul is included.
- Select the balance(s) you want to annul and further select Annul from the pop-up menu.
The Settlement Indicator and Unsettled Part amount of the driving balance and annulled balance is updated. An Annulling date is added to the annulled balance in the Balance Pairing properties window.
For each of the balances annulled from the pairing another pairing with between the driving and the included balance is created, but with opposite sign. This is to annual the pairing effect in SICS and the records sent to general ledger.
The Booking Year and Booking Period for the balance pairing created by the Annul Balance Pairing function is set from the Default Booking Year and Period in the Booking Terms in the special rules for Balance Pairing, if defined, else the general Default values are used. The system will first check if Booking Terms have been defined for the Base Company on the included balance involved, else the Booking Terms for <Defaults Settings> are used.
If the ‘Pairing Allowed on open Status Authorized only ‘is in use, SICS does not let you annull the balances unless the remittance status is ‘Final’.
The System Administrator may decide that you are not allowed to annul a Balance Pairing if the Pairing contains balances where the balance Base Company is not equal to the Base Company on the Insured Period(s) the balance belongs to. This situation can occur if the Base Company on the Insured Period is changed after balances related to this Insured Period are paired
To Annul Unallocated Remittance Balance from Balance Pairing:
You can annul Unallocated Remittance Balances when you have opened the Pairing Properties from a Business Partner Ledger. This is relevant if an Unallocated Remittance Balance is created by mistake.
- Find and select the Driving Remittance Balance the Unallocated Remittance Balance you want to annul is paired with from the Business Partner Ledger.
- Select Balance Pairing Properties from the pop-up list. You see the View Ledger Balances Pairing window.
- Find and select the Unallocated Remittance Balance you want to annul.
- Select Annul from the pop-up list
The balance is ‘removed’ from the pairing, see the above section Annul Balance Pairing on page 11-640. The balance is updated with the status Allocated in the Unallocated Remittance Balances tab of the Business Ledger. In addition, the Driving Remittance Balance’s Unsettled Amount and Status fields are updated in the Business Partner Ledger.
From the Business Partner Ledger you can also choose to select a Technical-/Claim Balance from the same Balance Pairing as the Unallocated Remittance Balance you want to annul. In this case you have to further select the More Pairing information option from the pop-up list in the View Ledger Balances Pairing window.
You can also select to annul Unallocated Remittance Balances from the Business Ledger. (See the Business Ledger chapter for further information.)
View Annulled Pairing Information #
You have different options how to view the Balance Pairing Properties. This may be relevant e.g. when balances have been annulled from the pairing before and you want to see the total pairing history.
- Find and select a balance being included in a balance pairing from the Business Partner Ledger
- Select Balance Pairing Properties from the pop-up list. The View Ledger Balances Pairing window appears
- Select one of the following options from the pop-up list:
- Active pairings: The default view that is already displayed by opening the balance pairing properties.
- Inactive pairings: Only the inactivated/annulled pairings is shown in the display list
- All Pairings: Both active and inactive pairings are shown in the display list. The inactive pairings are shown with an Annulling Date
View More Pairing Information #
- Find and select a balance being included in a balance pairing from the Business Partner Ledger
- Select Balance Pairing Properties from the pop-up list. The View Ledger Balances Pairing window appears
- Select one of the balances from the display list
- Select the More Balance Information option from the pop-up list
It opens a new instance of the View Balance Pairing and shows the selected balance as the header balance with all other balances directly linked to this balance. This is useful when a balance has balance pairings with more than one balance, like if a technical balance (A1) is settled against two remittances (R1 and R2). If you look at the Balance Pairing for R1 you see A1 in the display list and you see that A1 is not fully settled with R1. When you use the More Pairing Information option, you see A1 in the header and R1 and R2 in the list box of the other View Balance Pairing window.
Navigate from the Balance Pairing Properties window #
You can navigate from the Balance Pairing properties window to e.g. Worksheet properties or Business Ledger. This may be necessary if further information is needed for a balance that has been paired.
- Find and select a balance being included in a balance pairing from the Business Partner Ledger
- Select Balance Pairing Properties from the pop-up list. The View Ledger Balances Pairing window appears
- Select a balance among the Pairing properties
- Select one of the following options from the pop-up list. Which options that are available depends on the selected type of balance, i.e. claim, technical or remittance
- Claim properties
- Claim Worksheet properties
- Worksheet properties (Technical)
- Remittance properties
- Business Ledger
- Business Partner Ledger
Which window that is opened depends on your selection.
- Settlement Balance Group Properties
- Account Balance Group Properties
The window displaying the SBG or ABG properties opens if the selected balance is part of the respective Balance Group
Using Pending Status in Balance Pairing #
Your system can be set up to use Pending Status in Balance Pairing. This may be useful if you want to make sure that two persons are required to complete a Balance Pairing. When this function is in use, the Balance Pairing is completed in two steps
- When creating a Balance Pairing, the Pairing Status will be set to Pending.
- The Status can be changed from Pending to Definite either manually from the Business Partner Ledger, on the pairing properties window or through an Accounting Mass Update function.
A balance which is included in a Balance Pairing with Pending status are shown with Yes in the Pending column on the Business Ledger, on the Business Partner Ledger and in the Find Accounting Worksheet window.
Change the status of a Pending Pairing to Definite. #
A Pending Pairing can be changed to Definite manually or through the Accounting Balance Pairing Status Mass Update function.
To change the status of a Pending Pairing to Definite manually for a pairing created in the normal pairing process:
- Open the Business Partner Ledger
- Select the Driving Balance in the Balance Pairing with Pending status
- Right mouse click and select Balance Pairing Properties from the menu
- This will open the View Ledger Balance Pairing window
- Select one or several pairings, right mouse click and select Change Selected Pairing(s) to Definite to change the pairing status to Definite for the selected pairing(s), or
- Right mouse click and select Change All Pairings to Definite to change the pairing status to Definite for all involved active pairings.
To change the status of a Pending Pairing to Definite manually for a pairing created in the pairing group process:
- Open the Business Partner Ledger
- Select one of the Settled balances in the Balance Pairing Group with Pending status
- Right mouse click and select Balance Pairing Properties Group from the menu
- This will open the View Ledger Balance Pairing window
- Right mouse click and select
- Pairing ID drop down, or
- Change Pairings to Definite for all Pairing Ids to change the pairing status to Definite for all pairing Ids available in the Pairing ID drop down.
To change the status of a Pending Pairing to Definite by Mass Update see the chapter Change Balance Pairing Status by Mass Update
The following should be noted when using Pending Status in Balance Pairing:
- The Pairing Booking Year Period is set when a pairing is created in Pending status, but will be updated to the current default period when the pairing status is changed to Definite.
- If the driving balance in a Balance Pairing is partially settled, the status of the pairing cannot be set to Definite.
- Users can be restricted from annulling a Definite Pairing and/or a Definite Pairing transferred to the General Ledger by way of Domain Restrictions. See your System Administrator for further information.
- Pairings with a Pending status will not be transferred to the General Ledger.
Split Balances into Details from Business Partner Ledger #
You have entered a Business Partner Ledger and find, for instance that one or more details in a balance are settled separately. Splitting the balance into details will enable you to pair the remittance with the technical booking detail and thereby get a better overview in the Business Partner Ledger.
- Open the Business Partner Ledger where the balance to be split is booked.
- Select an Unsettled balance with more than one booking detail, i.e. Premium, commission, etc.
- Select Split Balance into Details from the pop-up menu. SICS asks you if you want to split the balance into details. Confirm Yes or select No to revert to the Business Partner Ledger.
- Click Find Now once more in order to view the new balances created per detail.
When you split the balance into details the system copies the selected balance with the opposite sign and creates a new worksheet. Both of these balances become paired and settled.
The system also creates a new worksheet with a balance for each detail from the selected balance. These balances are unsettled and the notes field is updated with a reference to the divided source balance’s Worksheet ID.
The Split Balance into Details option is only enabled from the menu list when the selected balance is Unsettled and has more than one booking detail.
Copy Worksheet from Business Partner Ledger #
SICS lets you copy Worksheet from the Business Partner Ledger. If for instance the details of two accounts are almost the same, and you already have made bookings on the first account, the copy worksheet option enables you in a quick and easy way to book the second account.
- Open the Business Partner Ledger
- Find and select the worksheet that you want to copy.
- Select Copy and Worksheet from the pop-up menu. The entire worksheet of the selected balance is copied.
- If required, exclude Businesses and/or Currencies from the Copy Technical Worksheet window and click OK.
- If required, make changes to the Technical Worksheet and close the worksheet.
The Notes field of the newly copied worksheet refers to the Worksheet ID of the source worksheet.
You are allowed to copy worksheets for Technical-, Claim- and Remittance Worksheets.
Copy Balance from Business Partner Ledger #
You can copy single balances from the Business Partner Ledger. When a worksheet includes several balances and you only want to copy one of these, you should select this option rather than copying the entire worksheet.
- Open the Business Partner Ledger.
- Find and select what balance that you want to copy.
- If, required, make changes to the Technical Worksheet and close the worksheet.
- The Notes field of the newly copied balance refers to the Worksheet ID of the source balance.
You can copy balances for Technical- and Remittance Worksheets. For Claim Worksheets this options is disabled since you can only copy the whole worksheet.
Reverse Worksheet from Business Partner Ledger #
You are verifying a Business Partner Ledger and for some reason you find it necessary to reverse a worksheet. If for instance an account has been booked twice, the reversal option makes it easy to correct this error.
- Open the Business Partner Ledger.
- Find and select the Worksheet that you want to reverse.
- Select Reverse and Worksheet from the pop-up menu. The entire worksheet of the selected balance is copied with all the detail amounts reversed
- If required, exclude Businesses and/or Currencies from the Reverse Technical Worksheet window and click OK.
- Edit the Booking Year/Period of the reversed worksheet if required. You can also add new bookings to the Technical Worksheet.
- Close the worksheet.
When the Reverse option is selected and the new worksheet is closed, the reversed booking is paired and settled automatically. The Settlement indicator is changed from Unsettled to Settled.
When a reversed detail in the Worksheet is made with an Entry Code within one of the Entry Code Categories ‘Deposit’, ‘Non-Liquid Deposit’, ‘Cash Claim’ or ‘Premium Due Later’, a detail pairing may be created between the source detail and the reversed detail. The Released indicator ‘Released’ will be set on the source and the reversed detail when closing Worksheet and answering ‘Yes’ to the message asking to set the Released indicator to ‘Released’. (No pairing will be created when answering ‘No’).
The notes field of the reverse worksheet is updated with the worksheet id of the source worksheet. In the Business Ledger, the Target WS and Source WS fields are updated accordingly.
You can reverse worksheets for Technical-, Claim and Remittance Balances.
Reverse Balance from Business Partner Ledger #
You are verifying a Business Ledger and for some reason you find it necessary to reverse a balance. For instance in case of duplicate bookings, this option makes it easy to make a correction to the Business Partner Ledger.
- Open the Business Partner Ledger.
- Find and select the Balance that you want to reverse
- Select Reverse and Balance from the pop-up menu. All details from the selected balance are copied with reversed signs in a new worksheet that is created automatically.
- Edit the Booking Year/Period of the reversed balance, if required, you can also add new bookings to the Technical Worksheet.
- Close the worksheet.
When a reversed detail from the Balance is made with an Entry Code within one of the Entry Code Categories ‘Deposit’, ‘Non-Liquid Deposit’, ‘Cash Claim’ or ‘Premium Due Later’, a detail pairing may be created between the source detail and the reversed detail. The Released indicator ‘Released’ will be set on the source and the reversed detail when closing Worksheet and answering ‘Yes’ to the message to set the released indicator to ‘Released’. (No pairing will be created when answering ‘No’).
When the Reverse option is selected and the new worksheet is closed, the reversed booking is paired and settled automatically. The Settlement indicator is changed from Unsettled to Settled.
The notes field of the reverse balance is updated with the worksheet id of the source balance. In the Business Ledger, the Target WS and Source WS fields are updated accordingly.
You can reverse balances for Technical- and Remittance Worksheets. For Claim Worksheets this options is disabled since you can only reverse the whole worksheet.
Create Billing Statement from Business Partner Ledger #
The Billing Statement function lets you extract unsettled overdue balances on a Business Partner Ledger. You can further create Billing Statement documents including the extracted balances. Your system administrator decides if the Billing Statement should include all outstanding balances or only the balances added since the previous Billing Statement was produced.
-
Open the Business Partner Ledger for the Business Partner for which you want to create a Billing Statement.
-
Select create Billing Statement from the pop-up menu .
-
Then select: All balances.
-
The Create Billing Statement order appears.
-
Confirm the extraction or close the order and revert to the Business Partner
Ledger. -
When order is confirmed, select Produce Documents from the Menu button.
-
Further select List Documents to view/print the Billing Statement document.
The Billing/Reminder Statements section of the More Balance Information window is updated for each balance included in the Billing Statement. (Refer to the More Balance Information window.)
For further information about the Billing Statement order, refer to the Billing/Reminder Statement chapter.
Create Billing Statement for Selected Balances #
You use this function when you only want to include some specific Balances in the Billing Statement Document. The system creates a Billing Statement for Selected Balances order.
- Open the Business Partner Ledger for the Business Partner for which you want to create a Billing Statement for Selected Balances.
- Select the Balances that shall be included in the document, alternatively use the Additional Find Criteria.
- Select Create Billing Statement from the pop-up menu
- Then select: Selected Balances
- The Create Billing Statement for Selected Balances order appears.
- Confirm the extraction or close the order and revert to the Business Partner Ledger.
- When the order is confirmed, select Produce Documents from the menu button, and then the option Billing Statement for Selected Balances.
- On the Document Template List, select the template to be used for the document to be produced. All active templates for the document Billing Statement For Selected Balances appears, unless you have entered a Base Company on the order. In that case only active templates assigned to this Base Company will appear in the list.
- Select the OK button.
- Select OK again when the document has been produced.
- Select List Documents from the menu button to view/print the Billing Statement for Selected Balances document.
When the document is produced, the Billing/Reminder Statements section of the More Balance Information window is updated for each balance included in the Billing Statement for Selected Balances order. (Refer to the More Balance Information window.)
For field description of the Billing Statement for Selected Balances order, refer to the Billing/Reminder Statement chapter. The Billing Statement of Selected Balances order is similar to the Billing Statement order.
Create Statement of Account for Selected Balances #
The Balances included in this document are not shown in the document as they appear on the order. The Balances are regrouped across the Balances into Entry Code Groups, and shown in the document for example as Premium, Claims, etc.
The Entry Code Groups must be predefined within the system defined Entry Code Group Category Statement of Account for Selected Balances. This is typically done by your System Administrator.
To create the Statement of Account for Selected Balances document, you start with creating a Billing Statement for Selected Balances order. Refer to the chapter Create Billing Statement for Selected Balances.
In step 7, after having selected Produce Document, select the option Statement of Account for Selected Balances, and select a template from the list.
Create Statement of Account for Outward Selected Balances #
For some outward portfolios there is a need to include multiple Businesses and Balances from multiple Accounting Periods in the same Statement of Account. When this is the case, you can use the Statement of Account for Outward Selected Balances instead of the Statement of Account that is produced from the Retrocession Account order.
To create the Statement of Account for Outward Selected Balances document, you start with creating a Billing Statement for Selected Balances order. Refer to the chapter Create Billing Statement for Selected Balances.
In step 7, after having selected Produce Document, select the option Statement of Account for O/W Selected Balances, and select a template from the list.
Create Reminder Statement from Business Partner Ledger #
The Reminder Statement function lets you extract unsettled overdue balances. You can further create Reminder Statement documents including the extracted balances. The balances that are extracted have previously been included in a Billing- or Reminder Statement.
- Open the Business Partner Ledger for the Business Partner for which you want to create a Reminder Statement.
- Select Create Reminder Statement from the pup up menu
- The Create Reminder Statement order appears.
- Confirm the extraction or close the order and revert to the Business Partner Ledger.
- When order is confirmed, select Produce Documents from the Menu button
- Further select List Documents to view/print the Reminder Statement documents
The Billing/Reminder Statements section of the More Balance Information window is updated for each balance included in the Reminder Statement. (Refer to the More Balance Information window.)
For further information about the Reminder Statement order, refer to the Billing/Reminder Statement chapter.
Produce Documents from Business Partner Ledger #
In SICS different Document Types may be produced from the Business Partner Ledger. A Document Template has to be created for each of these Document Types. (See your System Administrator for further information.)
- Open the Business Partner Ledger from which you want to produce a document
- Select the applicable balances, e.g. a Settlement Balance Group in our favour
- Select the Produce Documents options from the pop-up menu. The Document List window appears
- Select New from the pop-up menu. You see the Select Document Template window.
- Select the applicable template, e.g. Request for Payment
- The system reverts to the Document List window. The Document Type, Document Id, Document Title and Document Date fields are updated accordingly.
- From the Document List window you can further select to view or print the document.
Business Partner Claim List from Business Partner Ledger #
The Business Partner Claims List displays all claims and their bookings linked to a business partner. If the business partner is an owner of one or more subsidiaries, you can select to include all claims linked to the subsidiaries’ businesses in the claims list.
For further information about this option, refer to the Business Partner Claims List chapter in the Handle Business Partner documentation.
Open and Maintain Unallocated Remittance from Business Partner Ledger #
When Unallocated Remittance Balances are retrieved according to your selection criteria you may need more information about a specific balance.
You can view the unallocated remittance properties; change the Partner’s reference or the classification when applicable. You can view and calculate the Functional Currencies for a balance from the Unallocated Remittance Properties window by use of the option in the Menu button.
- Select the Unallocated Remittance Balance you want more information about from the Balance display list.
- Select More Balance Information from the pop-up menu. You see the Unallocated Remittance Properties window.
- Select Edit from the pop-up menu to change the Partner’s Reference, the Remittance Classification, the Class of Business and/or the Notes. If the Settlement Indicator for the Unallocated Remittance is Unsettled, meaning it has been replaced and annulled from the balance pairing, the Edit option is disabled.
- Click the OK button to save your changes.
- Select the View Functional Currencies from the pop-up menu to view the Functional Currency/Amount 1 and 2 on the Balance Detail Currencies window
- Click the Close button to close the window
- Select the Calculate Functional Currencies from the pop-up menu if you want to change the Functional Currency Exchange Rates before the Unallocated Remittance is replaced by a technical/claim booking, i.e. the option becomes disabled when the Settlement Indicator becomes Unsettled.The defaulted exchange rates can be overruled depending on system parameter settings. See Currency under Accounting chapter of Maintain System Parameters in the System Administrator Guide for more details.
How to maintain the Functional Currencies for Unallocated Remittances see Enter Details in the Remittance Worksheet, sub chapter_Figure, “Maintain Functional Currency for the Remittance Group,” on page 407_