Find a Worksheet
|

Worksheet icon | You can search for Technical, Remittance, and Claim worksheets in addition to Unallocated Remittance Balance, Account and Settlement Balances on the SICS desktop. |
This opens the Find: Accounting Worksheet window.
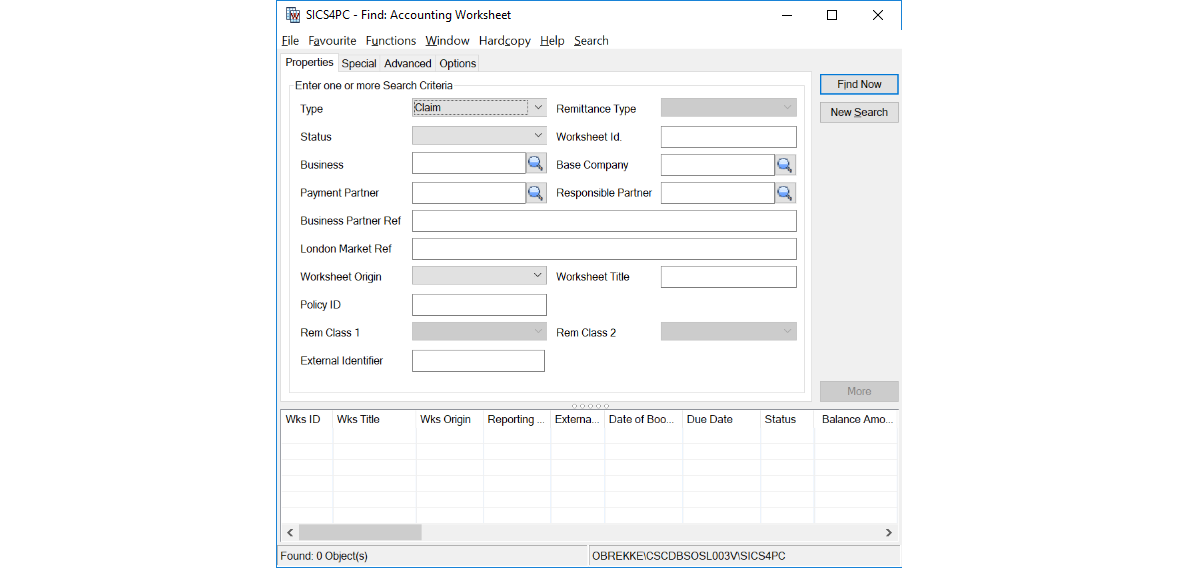
The window is divided into four tabs: Properties, Special, Advanced, and Options. You input your main search criteria on the Properties tab.
Type: Use the drop-down list to select the type of worksheet you are looking for. Options include Technical, Remittance, Claim and Unallocated Remittance, Account and Settlement Balance.
Status: Use the drop-down list to select the worksheet status. The options that you see depend on the type of worksheet. For Technical and Claim worksheet s, the options are, depending upon the settings of your system parameters: <None>, Authorised, Closed, Corrected, Inactivated, Open, Rejected, Suspended and Unfinished. For Remittance worksheet s, options include: Authorised, Final, In Execution, In Progress, Inactive, and Planned. If you select None, you are not specifying a status and your search results therefore show worksheets of all statuses. If you select Unallocated Remittance, Account or Settlement Balance it is not possible to select a Status.
|

Find button | Business: You can specify the business to which the worksheet you are looking for is attached. To do so, click the Find button, which brings you to the Find: Business window. There you can do a search for the business and when you see it in the display list, you can transfer it back by either double-clicking it, or by selecting it and selecting Transfer from the pop-up menu.The field is disabled for type Account and Settlement Balance. |
Payment Partner: You can specify the business partner to whom the worksheet you are looking for is attached. If you know the Business Partner ID, you can enter it directly in the field. Or you can type in the Business Partner name or part of it and receive possible matches for the text. Find button for search for the business partner is also a possibility. Click the Find button, which brings you to the Find: Business Partner window. There you can do a search for the business partner, and when you see it in the display list, you can transfer it back by either double-clicking it, or by selecting it and selecting Transfer from the pop-up menu. If the business partner belongs to a merger group and system parameter ‘Include merged companies and merge parent at search by business partner’ is selected, all other members of this business partner’s merger group will be added automatically to this field also.
Business Partner Ref: If you know the Business Partner Reference you can type that in this field.
You can also use wildcards here.
- Means “any sequence of characters”
? Means “any single character”
For example, if you write Re under Name, the search combination matches all business partners that have a name that includes the letters Re (such as Nordic Re, Alpha Reinsurance, Retro Professionals, etc.). If you type CS? under short name, all businesses that have a short name that starts with CS, plus one additional letter (such as CSC) appear. If you ask the system to search for both criteria, they are added together, which further restricts the search, and the information that appears must satisfy both of those search requirements. The field is disabled for type Unallocated Remittance.
London Market Reference: You can search by London Market Reference, if there is one and you know what it is. Used for EDI business only. The field is disabled for type Unallocated Remittance, Account and Settlement Balance.
Worksheet Origin: Use the drop-down list to select the origin of the worksheet(such as automatic, or balance split, for example.) The field is disabled for type Unallocated Remittance, Account and Settlement Balance.
Remittance Type: Use the drop-down list to select the reference type of the worksheet you are looking for. Options are: Auto-check, Bank charges, Check, Check 2, EDI, Exchange difference, External, Group check, Group check 2, Group External, Group External, Group External Reversal, Group Internal, Group Reversal, GroupWire, Group Wire 2, Internal, Void P-Auto-Check, Void P-Check, Void P-Wire, Void R-check, Void R-Wire, Wire, Wire 2, Write Off. Only enabled for type Remittance.
Worksheet ID: If you know the ID of the worksheet you are looking for, you can type it in this field. Or, you can use wildcards to help you search for the worksheet ID.
Base Company: You can extract worksheet balances belonging to a specific base company. Enter the Business Partner ID in this field or click the Find button, which brings you to the Find Business Partner window. There you can do a search for the base company and transfer it back to the Find Accounting Worksheet window. If the business partner belongs to a merger group and system parameter ‘Include merged companies and merge parent at search by business partner’ is selected, all other members being base company of this business partner’s merger group will be automatically added to this field also.
Responsible Partner: You can extract worksheet balances belonging to a specific responsible partner. Enter the Business Partner ID in this field or click the Find button, which brings you to the Find Business Partner window. There you can do a search for the business partner and transfer it back to the Find Accounting Worksheet window. If the business partner belongs to a merger group and system parameter ‘Include merged companies and merge parent at search by business partner’ is selected, all other members of this business partner’s merger group will be added automatically to this field also. The field is disabled for type Account and Settlement Balance.
Worksheet Title: If you know the title of the worksheet, you can type it in here. The field is disabled for type Unallocated Remittance, Account and Settlement Balance.
Policy ID:The identifier of the prime insurance policy. The field only appears as a searching criterion if you are using the Life and Health functionality and is enabled for type Technical and Claim.
Values: Free-text field
You can click Find Now to activate your search and see the results in the Worksheet display list at the bottom of the window. Or, you can click the Advanced tab to enter more specific details to further narrow your search.
Classification:Use the drop-down list to select a classification of the Remittance or Unallocated Remittance.
Classification 2: Use the drop-down list to select a classification of the Remittance.
Special Search for Worksheets #
The Special tab allows you to enter search criteria for TA Process ID and/or CL Process ID. The fields are only enabled when you are searching for Technical or Claim worksheets.
Note! The fields are case sensitive.
The IDs are also displayed in the corresponding columns on the display list.
On the Special tab it is also possible to search for open Claim Worksheets that are either marked In Review or not marked In Review by selecting the corresponding check boxes. Only enabled for Claim worksheet and only relevant for Open worksheets. The value is also displayed in the corresponding column on the display list.

The Special tab also allows you to enter search criteria for Additional Classification and Reporting Units.
Under Additional Classification search criteria - the drop-down box will list all the available Additional Classifications (e.g. Business Origin). If one of them is selected, the system will list all the corresponding values for the selected Additional Classification type. Multi-selection for the values is supported.
Under Reporting Units search criteria, you can select report unit category from the drop-down list. Once a category is selected, the corresponding reporting units will be displayed in the list box. The system can support the multi-selection for reporting units.
The tick box From Business under the Reporting Unit search criteria gives you the option to search the balances from the businesses on which at least one of the selected Reporting Units exists on any of the Sections. If you untick this function, system only retrieve balances with the selected Reporting Unit found on the Balance. This tick box is enabled only when one of the following Type of worksheets is selected on the Properties tab; Claim, Technical or Unallocated Remittance.
When you use the From Business function to search the balances, the tick box Show Business RU beside it can populate the reporting unit(s) from business for the listed balances.
Advanced Search for Worksheets #
The Advanced tab is where you can specify dates and cessions of the worksheet you are looking for. The dates include Registration From and To date, Date of Booking From and To, Document Received From and To and Due Date From and To. For type Account and Settlement Balance, only the Due Date fields are enabled. The Registered By field enables you to select the person who registered the worksheet.
The Current Status Date and Current Status Set By labels are dynamically changed based on the Status you set on the Properties tab. For example, if you have searched for suspended worksheets, the labels are changed to Suspended Date and Suspended By.
You can extract worksheets including estimates. By selecting the Estimates only box, you only see balances that are marked as estimates.
You can also extract worksheets excluding estimates. By selecting the Estimates exclude box, you only see the actual accounting bookings.
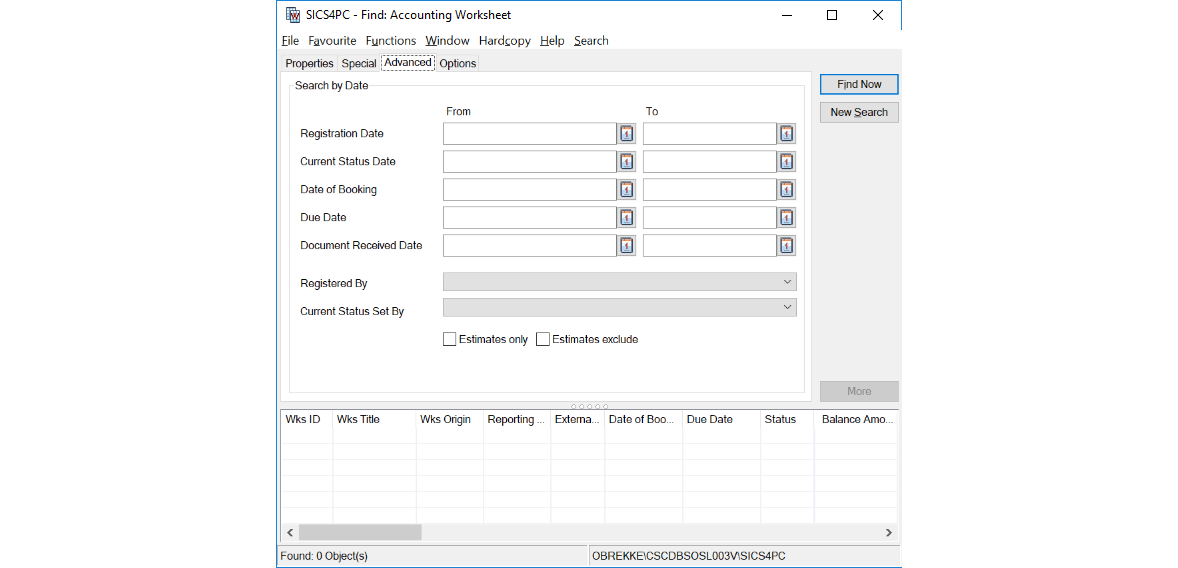
| When you type in a date directly, you can type in the last two digits of the year and the system computes the year for you. Numbers from 00-19 are automatically calculated as 2000. Anything else is automatically calculated as 1900. For example, if you type in 010105, the system reads it as 01.01.2005. | If you know, for example, that you want to find a worksheet that was booked on 06/06/98, you put that date in both the From and To fields next to Date of Booking.
If you want all worksheets within a date range, you can enter dates in the From and To fields and you get a list of all worksheets in the system that were booked between those dates.
You can type a date directly into the date field, or you can click the Calendar button to see a Calendar from which you can select a date. |
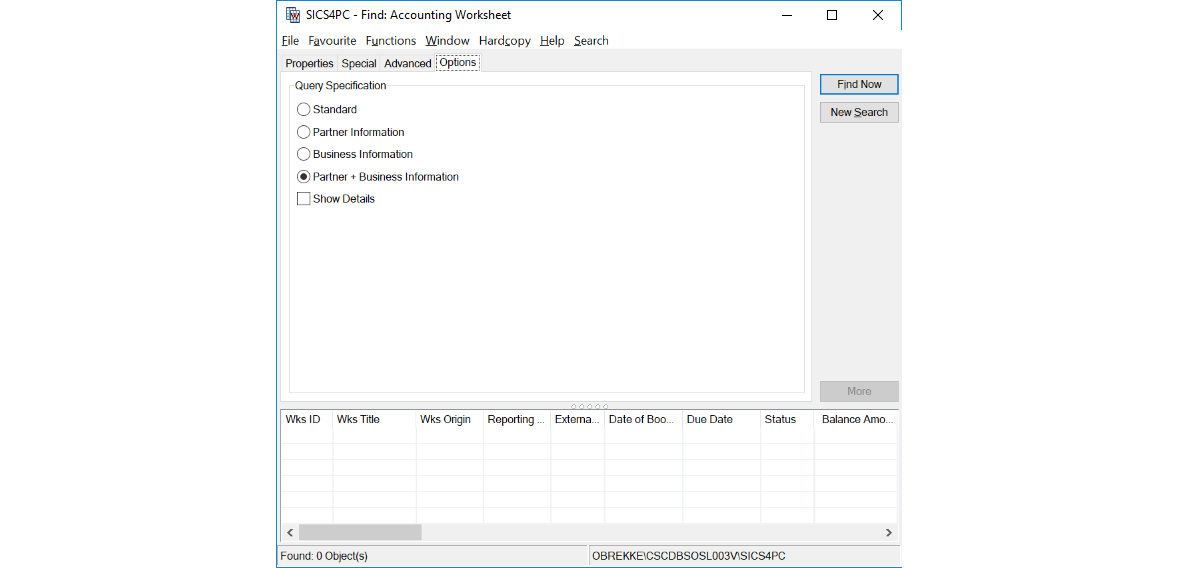
Sorting and Query Options #
The Options tab of the Find: Worksheet window lets you specify whether or not the list should be sorted on the worksheet identifier. You can also indicate how much detail you would like to see in the list by selecting another query specification.
SICS lets you choose between the following options: Standard, Partner Information, Business Information and Partner + Business Information.
If you select the Show Details check box, you will see Insured Period and Accounting Classification details in the display list.
If the Accounting Classification/Insured Period fields in the worksheet contain more than one detail and the worksheet balance has not been split by these details, the balance of the worksheet will be displayed in without any Accounting Classification/Insured Period.
If you want to see details in these fields, you must split the worksheet balances by Accounting Classification/Insured Period.
Click Find Now to activate your search. The New Search button clears the display list and resets the window.
Click More to see more data in the list. If the list is complete, the More button is disabled.
Create a New Worksheet #
You can create a new worksheet from the Find: Worksheet window in one of two ways.
To create a new worksheet:
- Click the display list.
- Click the right-mouse button.
- Select New Technical Worksheet, New Remittance Worksheet, or New Claims Worksheet, de_pending_ on the type of _worksheet_ you want to create.
You see a new window where you can input information to create a new worksheet. The window varies de_pending_ on the type of _worksheet_ you are creating. **To create a new worksheet based on an existing worksheet:**
- Select one of the worksheets in the display list.
- Click the right-mouse button.
- Select Copy/Reverse.
You see the Copy Technical Worksheet window where you can exclude businesses and currencies included in the selected worksheet. When the necessary businesses and currencies have been excluded, you must either copy or reverse by selecting or clearing the Reverse Sign of Balances box at the bottom of the window. If you select the box, all arithmetic signs on all detail amounts are reversed on the copied worksheet. By clicking OK, the copy function is processed. By clicking Cancel Copy, from the Edit Menu button, the whole process is cancelled. When you copy or reverse a balance that has either TA Process ID and/or CL Process ID registered, the orginal ID(s) are copied to the copied reversed balance, but can be cleared or changed if required. You can also Create Worksheets by doing the following:
- You can create a Technical worksheet from the Business Ledger by clicking the Account Balances tab, and then selecting Make New Booking from the pop-up menu.
- You can create a Technical worksheet from the Business Partner Ledger by selecting Make Technical Booking from the pop-up menu.
- You can create a Remittance worksheet from the Business Partner Ledger by selecting Make New Remittance from the pop-up menu, and then clicking the right-mouse button again and selecting New.
- You can create a Remittance worksheet from the Business Partner Properties window by clicking the Remittance Worksheet button.
- You can create a Technical worksheet by clicking the Worksheet button on the Navigation bar of the Business Properties window.
- You can create Claims worksheets by clicking the Adjustment button on the Claim Ledger(from the Claim Properties window); or by clicking the Worksheet button on the Navigation bar of the Business Properties window.
Import Worksheet Details #
You can create a new worksheet from the Find: Accounting Worksheet window by importing an external spreadsheet in the following way. The spreadsheet must be defined in a certain format and contain a few mandatory columns, see further down.
To create a new worksheet from an external spreadsheet file:
- Click the display list.
- Click the right-mouse button.
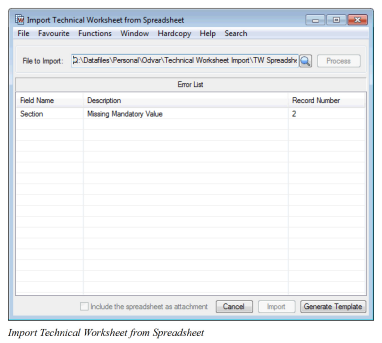
- Select the option Import Technical Worksheet from Spreadsheet
You see the window where you can select a file to be imported.
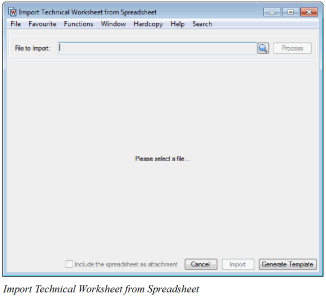
- Click the Find button.
- Navigate to the wanted folder and Open the actual file.
- Click the Process button.
If the process validation is successful a small dialogue box appear with the number of details found.
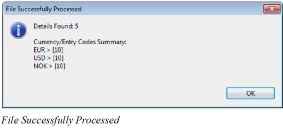
- Click the OK button.
- Back on the Import Technical Worksheet from Spreadsheet window, click the Import button.
The Technical Worksheet is now opened with all the details from the spreadsheet.
If the process validation failed then an Error List appears on the Import Technical Worksheet from Spreadsheet window with a description of the problem. This problem must be solved before the spreadsheet can be imported to a Technical Worksheet
For the mandatory columns in the spreadsheet valid data must be entered and the column header must be named like this:
- Business ID
- Currency
- Insured Period From
- Insured Period To
- Section
- Entry Code
- Amount
You can refer to multiple businesses, currencies, insured periods, sections, accounting classifications, etc. in any order in the spreadsheet, and the system will group the data according to how the technical worksheet is built up; highest level is the business, then the currency, insured period, etc.
For the optional columns in the spreadsheet data can be entered and the column header must be named like this:
- Accounting Classification
- New Amount
- Booking YR
- Booking Period
- AccYR
- AccPeriod
- Description of Account
- Original UwYR
- OccYR
- Orig Class Of Bus
- Accounting Period From
- Accounting Period To
- Due Date
- Amendment
- To be Split
- Headline Loss
- Tax Country
- Tax %
- Notes
- Is Estimate
- Received Date
If an optional column is not present or not filled in the system will set the value according to the online defaulting rules. Reference Data can be given as either the Code or the Name, e.g. Booking Period can be given as M09 or Month 09. Amounts are given without arithmetic sign, i.e. the system will set the arithmetic sign according to the definition of the entry code in SICS, just follow the same principle as when amounts are given directly in the technical worksheet.
The New Amount is an optional column and will activate the replacement value function on the worksheet, i.e. the Replacement Values box is ticked, and the Previous Amount and New Amount columns are displayed. The New Amount given in the spreadsheet will be set in the New Amount column for this detail and the Amount column will be calculated according to existing online functionality. Normally the Amount is mandatory when the spreadsheet is validated, but if the Amount column in empty for a detail in the spreadsheet the system should still accept this detail as long as the New Amount is present, i.e. either Amount or New Amount is mandatory. Exceptions when a spreadsheet is imported: If both the Amount and the New Amount is given in the spreadsheet, the system will ignore the New Amount value. If the Entry Code on the actual detail does not allow Replacement Value, the system will not use the New Amount value given in the soap which is also according to online functionality, i.e. the user can give the New Amount in the worksheet but the system will just ignore it.
It is not allowed to enter information both in the Accounting Classification column and in the To be Split column. If the column To be Split is set to Yes the system will prepare the worksheet to be split but the user must execute the split on the worksheet.
If the column ‘Is Estimate’ is set to Yes, the bookings are made on the Estimates tab, else the bookings are made on the Actual tab of the Worksheet.
The option described above, each upload line of the spreadsheet only includes one entry code and its corresponding amount. And, only one worksheet ID can be generated through the external spreadsheet.
The system has provided another option ‘Import Technical Worksheet from Column Spreadsheet’, which can generate multiple worksheets from one file, and one worksheet ID can be generated for each line of the upload file.
The mandatory column header should be named like this:
-
Business ID
-
Currency
-
Insured Period From
-
Insured Period To
-
Section
-
Entry Code 1 (the name of entry code)
-
Entry Code 2
-
Entry Code 3
…..
-
Entry Code XX
With this setting, you can define multiple entry codes in the column header which type should be decimal(22,2), here using entry codes as column header is just for informational, and the sequence of columns ‘Entry Code’ should have been predifined. In each line, you enter the amount of the entry code in the corresponding column
In the screen for function ‘Import Technical Worksheet from Column Spreadsheet’, you can click the ‘Menu’ button beside the ‘Mapping’ field and select menu option ‘Create Mapping’ to create new mapping. Firstly, you need to select a Output Pattern. After output patter is selected, SICS will open a new window ‘Edit Mapping’ to show new created mapping, including a group (named ‘Group’), which can be repeatabled (you can select Copy Group from the pop up menu - if you have 2 entry code columns in the spreadsheet you should copy the Group once) and includes two member fields: one is ‘Entry Code’ with type string(4), the other one is ‘Amount’ with type decimal(22,2). New mapping has linked most input fields to output fields already but has not linked the Entry Code columns (names given in the spreadsheet are shown under Input Pattern) to output fields. As each entry code column matching which entry code has been predefined, so in mapping for each Entry Code’s amount, you link it to the field ‘Amount’ of the output group ‘Group’. You also need to assign correpsonding ‘Entry Code Constant’ to the outfield ‘Entry Code’ of the same group ‘Group’. You create a Constant for each Groupby selecting Constant under the Data Generation Blocks in the Palette and define the entry code value in it and connect it to the ‘Entry Code’ of the output group ‘Group’. When mapping done, you can click button ‘OK’ to save the mapping. SICS will automatically take this new mapping as selected mapping for the dropdown list of ‘Mapping’ in the screen ‘Import Technical Worksheet from Column Spreadsheet’.
Once the user has finished the mapping, done the Validate and process Input File and pressed the Import button, each line of the spreadsheet will generate a separate technical worksheet, with one booking detail for each entry code and amount defined in the columns. If the worksheet title has value in the input line, it also can be brought to the output worksheet. The user is automatically navigated to the Select Import Worksheet window where all the processed worksheets are shown. To inspect and close the worksheet the user has to double click on each of the open worksheets in the Select import Worksheet window.
Navigation from the Find Worksheet Window #
When you have found the required worksheet balance, you can select it and access the pop-up menu. You can select one of the following options:
- Properties opens the worksheet properties. This option is disabled if the functional currency exchange rates have been manually overruled on the worksheet.
- View Account Balance Group Properties opens the ‘View Account Balance Group’ properties. This option is enabled only when the selected balance, e.g. Technical, Claim, Cession (Life), is included in an Account Balance Group.
- View Settlement Balance Group Properties opens the ‘View Settlement Balance Group’ properties. This option is enabled only when the selected balance, e.g. Technical, Claim, Cession (Life), is included in a Settlement Balance Group.
- View Business Ledger (available for Technical and Claims Worksheets) opens the Business Ledger.
- Change Worksheet Status takes you directly to the Worksheet Closing window. This option is needed when the functional currency exchange rates for the selected worksheet have manually been overruled and saved. Since SICS does not allow you to change the original booking details for a worksheet where the funcional exchange rates have been overruled, the Properties option is disabled. Can also be used even if there are no functional currency present on the worksheet.
- View Claim Ledger (available for Claims Worksheets) opens the Claim Ledger.
- View Business Partner Ledger opens the Business Partner Ledger.