Introduction to SICS Accounting
The accounting functionality in SICS lets you enter, store and retrieve relevant accounting information. All accounting information related directly to agreements (business), such as premium, commission, losses, reserves, deposits, are entered on Technical Worksheets. All accounting information directly related to a claim is entered on a Claim Worksheet. All payments between you and your partners are entered on Remittance Worksheets.
To retrieve and view existing accounting information for a business you can open the Business Ledger. The Business Ledger contains information booked on both Technical Worksheets and Claim Worksheets. The Claim Worksheet information can also be inspected directly on the Claim Ledger. Balances and Details from the worksheets are shown on both the Business Ledger and on the Claim Ledger.
All Balances from Technical and Claim Worksheets and from Remittance Worksheets are connected to business partners. All these Balances can be viewed on the Business Partner Ledger.
Technical Worksheets can be produced in different ways (Origin of Worksheet), manually and automatically. Manually, Automatic Premium Accounting and various Reserve Orders are described later in this chapter. Retrocession Accounting is described in the next chapter.
In SICS you can use worksheet Statuses and Security active in the workflow. It is also possible to use the worksheets for more than one business/currency to make the workflow more effective.
The accounting functionality can be started from several places:
- On the SICS desktop, you can double-click the Accounting icon.
- From the Business properties, the Business Partner properties, Business Ledger and Business Partner Ledger. You can use buttons in the Navigation bar, Edit Menu options or pop-up menu option.
You can save your personal settings for different display lists in SICS accounting. Using the display list settings you can hide columns, change sequence of the columns and sort values in columns. You activate the display list settings by clicking the right-mouse button in the display lists heading. See Layout and Organization of Display Lists in the Getting Started chapter. Save settings is available on Business Ledger, Business Partner Ledger and Technical Worksheet.
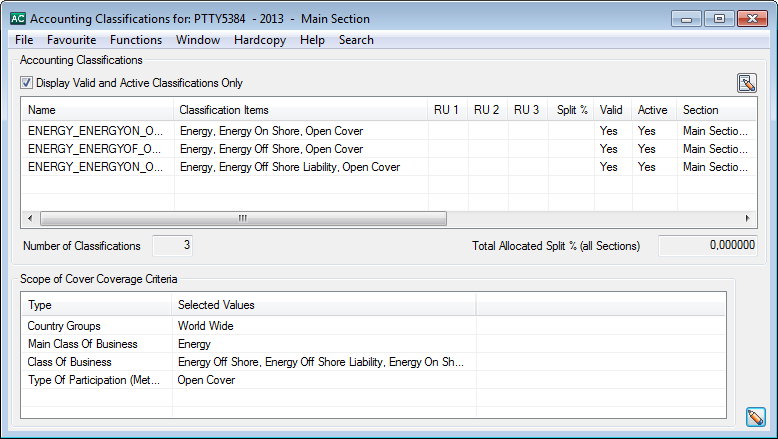
Maintain Accounting Classifications #
|

Accounting Classifications button | To maintain the accounting classifications for the current section, click the Accounting Classifications button. |
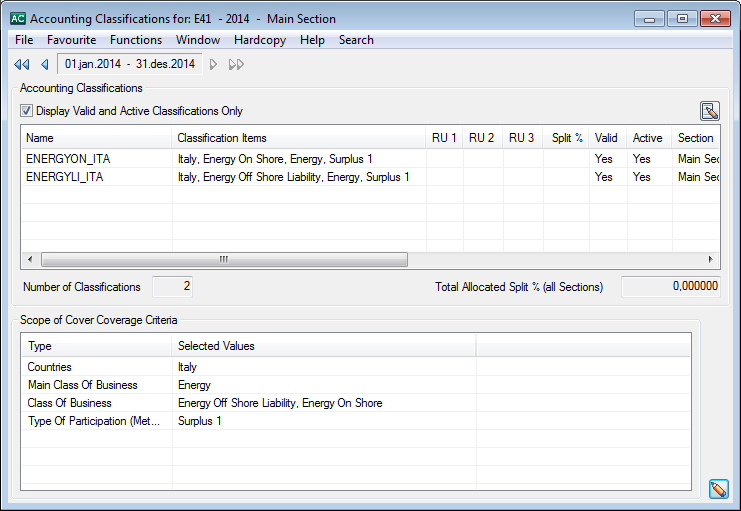
You see the Accounting Classifications window that displays the details of the
classification in the selected section.
By using the Insured Period navigator, you can navigate directly to the Accounting Classifications for Main section of a selected Insured Period.
Name: The name given to this accounting classification. This name is generated by SICS, but can be changed.
Classification Items: Depending on you system set up, the items in the accounting classification may include Legal Areas, Residence Areas and Reference Data items.
RU 1, RU 2, and RU 3: These fields refer to Reporting Unit 1, 2, and 3. What is mandatory for input here in maintaining the accounting classification depends on what your SICS System Administrator has input as mandatory (in the System Parameters window, Base Company Specific Settings tab).
Split %: The percentage of the booking that will be used for this Accounting Classification, if the automatic split feature is used when creating a booking on this section.
Note! The automatic split feature will only be used if the total allocated percentage is equal to 100.
Valid: Indicates whether the accounting classification is valid. The AC is created and attached to a section, either the main section or a sub section, and must contain a unique combination of element values, i.e. you cannot define two ACs with the same combination of values. Independent of the section the AC is attached, it will be shown as Valid on any section when the classification values in the AC is a subset of the classification values on the section.
Active: Indicates whether the accounting classification is active. For example, if you have used an accounting classification and do not want to use it any further, you can inactivate it. If a classification is not valid, you can get an explanation for why it is invalid by selecting Show invalid reason from the pop-up menu.
Section: The section of the business to which this accounting classification is attached.
EDI Reference: Indicates the EDI reference for the Accounting Classification.
eMessaging Description:
High Level Reference:
Default: indicates whether the accounting classification is the default classification.
Saved: Indicates whether the accounting classification has been saved.
Has Bookings: If the Menu option Check for Bookings has been selected this column will indicate that the Accounting Classification has been used in booking (both actual and estimates) and assigned to a booking detail (Yes) or not (No). All worksheets in any Status, also pending and inactivated, are checked.
Has Estimate Bookings: If the Menu option Check for Estimate Bookings has been selected this column will indicate that the Accounting Classification has been used in booking of estimates detail (Yes) or not (No). All worksheets in any Status, also pending and inactivated, are checked.
Valid per Sys Params: If the Menu option Validate Against System Parameters has been selected this column will indicate that the Accounting Classification is valid compared with the classification rules in system parameters (Yes) or not (No).
Error Message: If the Menu option Validate Against System Parameters has been selected and the column Valid per Sys Params displays No, this column will indicate the reason why the Accounting Classification is not valid compared with the classification rules in system parameters.
Between the Accounting Classification and the Scope of Cover Coverage Criteria there are two fields. On the left is a field that displays the number of available accounting classifications in this section. The total allocated split percentage of all sections is shown on the right.
In the bottom right corner of the window, there is one edit button. The edit button opens the window in edit mode which allows you to e.g. delete an Accounting Classification or change the split percentages. It is also used for generating accounting classifications automatically based on the section (Scope of Cover) classification. See the Classify Business chapter. You can also use the pop-up menu to Clear (reset) the split-percentage for all selected Accounting Classifications. If you want to allocate the remaining (unallocated) split-percentage to a number of classifications, you select the classifications and then select Allocate Split Percentage from the pop-up menu.
From the pop-up menu you can also select Add, Edit, View or Delete a classification.
When you close the Accounting Classifications window, the system gives you a warning message if the total allocated split-percentage exceeds 100.
Generate Accounting Classifications Automatically
SICS enables you to automatically generate all the accounting classification combinations from a selected set of classification items.
To open this window, click the Edit button from the Accounting Classification window.
This window is split into two sections, the Accounting Classification list in the upper part and the Coverage Criteria for Automatic Creation of Accounting Classifications at the bottom.
The Coverage Criteria for Automatic Creation of Accounting Classifications are shown by type and selected values. Initially, this list shows the Scope of Cover (section) classification.
If you want to exclude some classification items from the generated Accounting Classifications, you must remove the item before clicking the Generate button. You can remove items by double-clicking a row.
When you click the Add States button, SICS automatically divides the selected country value into states. These states appear in the row under Countries. You can select states in the same way as selecting the other Selected Values.
When you click the Generate button the system automatically generates the accounting classifications based on the selected criteria.
After the classifications have been generated, you can continue to add, edit and delete classifications until you are satisfied with the result. You can, for example, assign Split Percentage values or assign the new classifications to child-sections (if relevant).
Note! If you try to add a classification that exists already, the system will ignore this classification.
When you click OK to save the classifications, you will see a warning message if the total allocated percentage exceeds 100.
Note! This total sum includes percentages allocated to all classifications. If you view classifications for a child-section, you see only the classifications that are available for this child-section (not the classifications that are available only for other child-sections). The total allocated percentage does not necessarily match the sum of the displayed (available) classifications.
Note! Your system administrator may have decided to set the system so that all Accounting Classifications should be created automatically when the business is created through the ‘Create New Business’ wizard or when copied from another business. This feature only applies for Assumed Businesses. Ask your business administrator for further information.
Require Accounting Classification for Registration Complete
Depending on the set up of your system administrator, if your business at the lowest level of the section hierarchy (Leaf section) will have a section with no valid and active accounting classification, the system will stop you if trying to mark the contract as ‘registration complete’.
Add Accounting Information on Business #
Certain information must be present before you can book. Which ones depends on your company’s guidelines and type booking.
To add accounting information:
- Open your business
- Select the Business tab
- Select the Accounting Info sub tab
- Make your selections as you require

Functional Currency The following fields are enabled when the system parameter ‘Allow override of FC in business’ is selected ( For details, contact your System Administrator)
- Functional Currency 1
- Functional Currency 2
The user is allowed to override the functional currencies defined on the system parameters and select a functional currency specific to the business and all functional currency calculations will be made based on these currencies FC1 and/or FC2 wherever applicable on the business
Functional Currency Calculation Rules The following fields are available when the system parameter “Allow Override FC calc rule in Business” is activated ( For details, contact your System Administrator)
- Special FC Calculation Rule for Premium Bookings
- Special FC Calculation Rule for Claim Bookings
The above fields make it possible to override the functional currency calculation defined on the system parameters and define specific functional currency calculation rules for the specific business
Special FC calculation rules can be defined for Premium Bookings, Claim Bookings or both.
The system enables a drop down field with the following values:
- <None>
- Booking Date - Daily Rate
- Booking Year/Period - Period End Rate
- Inception Rate - Daily Rate
- Inception Rate - Period End Rate
- Most Recent Day Rate
- Period End Rate
Whenever premium related (Entry Code is flagged as Premium Related) booking take place on a business with a special functional currency calculation rule defined for premium bookings, the system will use this rule for the functional currency calculation for these bookings
Whenever claim related (Entry Code is flagged as Claim Related) booking take place on a business with a special functional currency calculation rule defined for claim bookings, the system will use this rule for the functional currency calculation for these bookings.
Exception: #
If this type of business has a specific conversion rule defined in the system parameter for bookings linked to Headline Loss then the system will use this rule for all bookings on this business that is linked to a Headline Loss (See Chapter 10 Field Description 2: FX Date of Loss)
Whenever booking takes place on a business without any value in the two new fields on the business the system will do the conversion and calculation of the FC amounts based on the conversion rules found in the system parameters for this type of business.
Non-Liquid Tax on Interest Percentage: #
This field is visible on Assumed Business only.
Enter a percentage in this field if you want to the system to calculate a non-liquid tax on every interest bookings on technical worksheets.
To have this non-liquid tax automatically calculated when the worksheet is applied/saved to the database some preconditions must be fulfilled:
- There must be a result entry code defined in the calculation Non-Liquid Tax on Interest in the Accounting Function Automatic Booking in the system parameters under Accounting, Entry Codes.
- The worksheet must contain source interest entry codes defined in an Entry Code Group within the Entry Code Group Category Basis for Non-Liquid Tax On Interest
- The source interest booking must be positive amount, but when a worksheet with a positive interest and a calculated non-liquid tax is reversed, then the system keep the reversed non-liquid tax without any recalculate even if the worksheet does not contain a positive interest anymore.
The non-liquid tax on interest is calculated additional to and independent of the tax on interest defined on the deposit conditions.
The non-liquid tax on interest amount will be part of the balance where the source interest detail is but do not have any effect on the balance.
An automatic calculated non-liquid tax on interest detail cannot be deleted and cannot be changed. The only way it can be changed is to have the source interest amount changed (or deleted)
Include in Billing Statements: #
Select this check box to include the business in billing statements.
External Business Partner: #
Select this checkbox if you want to be able to assign a business partner, which is not registered on the business to the balance booking.
Refer to Open and Maintain More Balance Information from the Business Ledger
Recipient: #
Select this checkbox if you want to be able to assign an additional business partner to the balance bookings. The additional business partner must be taken from the business partners registered in SICS, but it is not required that the business partner is registered on the business.
Note! These checkboxes are only enabled when the Allow Allocation of External Business Partner to Balance system parameter is in use.
EDI General Cover: #
Select this check box to inhibit all business conditions dependent validations on incoming EDI JV RETACC messages (technical accounts). The inactivation is effective regardless of the insured period involved.
In principle, any assumed business can be flagged as an “EDI General Cover” - a very interesting feature for testing purposes. In actual practice, however, this functionality is originally intended for “fictitious” treaty agreements, proportional or not, that are created by the assuming reinsurer only for the purpose of “bulky” booking of technical operations (totals of premiums, commissions,) on assumed facultative business. For these fictitious treaties indeed, no meaningful business conditions can be defined that could be used in technical account validation.
Calculate based on Quota Share Percentage: #
This is only enabled if your business is with Level of Business ‘Outward Cedent’s Contract’, with Type of Business ‘Proportional Treaty’ and with Type of Participation ‘Quota Share’. When selected, the percentage entered for the Limit ‘Quota Share Percent’ (Premium/Limit Conditions) is considered for some calculations performed when running the Retrocession Calculation Order.
Automatically booked figures on section level: #
This is only enabled if your System Administrator has allowed for this functionality to be used. When selected, automatic bookings on the OCC business ledger ‘As Original’ will be done on section level. When running the Retrocession Calculation Order, conditions on Section level will be used to calculate bookings to be made on the Retrocessionaires' ledgers.
Automatic Bookings on OCC_ORP: #
This is only available on Proportional Treaty Outward Cedent’s Contracts, which can be selected only if OCC protects one Assumed Business. When booked on IAB or OCC, if this parameter is ticked, SICS will automatically generate As Booking/As Account on OCC/ORP. Refer to the Automatic generation of Retrocession Calculation/Account Order chapter in Proportional Retrocession Accounting for more information how the orders are created and how these bookings will take place.
Account Group: #
In some cases your company wants to give its businesses an overall category for internal reasons. In such cases, the account group can be used. The account group will, in addition to appearing on all periods of the business, also appear on the business partner ledger at balance level.
To add an account group:
- Select the General tab
- Select the Edit Account Group option from the Menu button.
- Select a group from the drop-down list. The groups available depend on what your system administrator has set up. Your system administrator may also have defined that this group is mandatory when your agreement becomes ‘definite’.
View Premium Basis: #
Sometimes your company needs to register how the ceding company cedes the premium to the Outward Cedent’s Contract. The premium basis option allows your company to distinguish between original paid premium and flat premium. This option is available for proportional Outward Cedent’s Contract only.
To indicate a premium basis:
- Select the General tab
- Select the View Premium Basis option from the Menu button. You see the Premium Basis selected.
- Select Edit button to be able to change current Premium Basis.
- The available choices are Proportional Based Premium, which is the default value, then Cash Based Premium and Flat Based Premium.
The premium basis allows your company to distinguish between original paid premium and flat premium. This is available only for Outward Cedent’s Contracts of type Proportional Facultative and Proportional Treaty._
- Proportional Based Premium: The system generates as booking details automatically on the business ledger of the proportional facultative OCC and its placements upon closing a worksheet. If this is defined on a proportional treaty OCC it will have no functional impact.
- Cash Based Premium: The system generates as booking details with worksheet status ‘Open’ on the proportional facultative OCC and its placements. If this is defined on a proportional treaty OCC it will have the following functional impact; When the Retrocession Calculation order runs, the system will include the As Original bookings on the OCC if the source details they belong to on the IAB is in a balance that is Settled. If the source detail’s balance on the IAB is Unsettled or Partially Settled then it will NOT be included in the order. If the As Original details does not have a source detail, e.g. because it is manually booked on the OCC, it will always be included in the Retrocession Calculation order.
The system may also generate As Informational details on OCC and its placements for details where the source detail’s balance on the IAB is Unsettled or Partially Settled if the Generate As Information field on the Retrocession Calculation order is selected, following “As Account” calculation logic basing on premium basis “Proportional Based Premium”. All the As Informational details are much like Estimation bookings, which will be automatically set as Settled, also they won’t be transferred to GL. One point to be noticed that Manual Booking on OCC or ORP won’t be transferred to “As Informational” Ledger when the Retrocession Calculation Order run.
The Retrocession Calculation order should run successfully and update the Retroceded flag to Yes on the As Original ledger for the details that are included and booked on the As Booking ledger. For all details that are excluded from the order, oro booked on the As Informational ledger, because the source detail on the IAB belongs to an Unsettled/Partially Settled balance, the Retroceded flag is NOT updated.
- Flat Based Premium: The system generates no bookings on the business ledger of the proportional facultative OCC and its placements. If this is defined on a proportional treaty OCC it will have no functional impact.
You can search for the businesses in an account group using the ‘Find Business’function.
Cease Accounting: #
When you set the Cease Accounting flag on a business, it will be set automatically on all insured periods of the business. If Cease Accounting is set, you are prevented from doing any bookings on techincal and claim worksheets. The system will validate that no open claim or techincal- and claim worksheet exist wehn setting the flag.
The Cease description field lets you to enter reason for the ceased accounting.
Trace Options: #
The following trace options are available on Outward Cedent’s Contracts:
- Source Business:
Proportional: Click this checkbox if you want to create a link between each outward booking detail and the Insured Period of the source business. Information about the source business is transferred to the OCC-and ORP business ledgers by running the Retrocession Calculation -/Account orders or when you manually book on the Technical Worksheet for the OCC/ORP and using the option Link Insured Period from protected business. (Refer to Link Bookings on Outward Business to Insured Period from a Protected Business_)._ A column called _Source Business_ appears in the Business Ledger’s booking details display list (booking details on the Account Balances, Cash Claims, Premiums Due Later, Deposits, Non-Liquid Deposits and Reserves tab).
Non Proportional: Select this option if you want to create a link between the outward booking detail and the source business (Inward Treaty) through Automatic Premium Accounting for Non Prop OCC. This is provided the Premium/Limit conditions are set up to support the trace and the Accounting Classification Split % is defined as a combination of Accounting Classification and the applicable inward business either manually or by ESPID table.
Refer to ‘Maintain AC Allocation when split into combinations of AC and parameters representing the source bookings’ in Automatic Premium Accounting chapter for more details. The activation of this check-box has an impact when running the Recovery Calculation Order for Protection Program and for Single OCC/XL CA of Outward. Refer to the Calculate Recoveries considering System Parameter Settings section of the Non-Proportional Retrocession Accounting chapter for more details
Note! The field is enabled only when the corresponding global system parameter is not activated.
- Claim:
Proportional: Click this checkbox if you want to create a link between the outward booking detail and a Claim on the source business. Information about the original claim is transferred to the OCC-and ORP business ledgers by running the Retrocession Calculation -/Account orders or when you manually book on the Technical Worksheet for the OCC/ORP and using the option Link Claim. (Refer toLink Bookings on Outward Business to Claim from a Technical Worksheet_)._ A column called Claim ID appears in the Business Ledger’s booking details display list.
Note! The field is enabled only when the corresponding global system parameter is not activated.
- Headline Loss:
Proportional: Click this checkbox if you want to create a link between the outward booking detail and the Headline Loss assignment of a Claim on the source business. The identifier of the linked Headline Loss is displayed in the Detail Properties, More Information tab accessed from the Business Ledger of the outward business.
Note! The field is enabled only when the corresponding global system parameter is not activated.
-
Base Company:
Proportional: If you select this option, you create a link between the outward booking detail and the Base Company of the source business (original base company) through: -
Preliminary bookings and by running the Retrocession Calculation -/Account orders. Information about the original base company is transferred to the OCC-and ORP business ledgers.
-
Manual booking on the Technical Worksheet for the OCC/ORP with option Link Base Company. (Refer to Link Base Company)
The name of the Base Company is displayed for the ledger details in the Original Base Company column of the OCC and ORP Business Ledgers and in the Detail Properties, More Information tab.
Note! The field is enabled only when the corresponding global system parameter is not activated.
Note! Independent of the trace Base Company check box being selected or not a link can always be created when manually booking a Technical/Claim worksheet on OCC by the option Link OCC Base Company. Refer to Maintain Bookings on a Technical Worksheet and Link Bookings to Original Base Company from Claim worksheet in_Accounting_ chapter for more details
Non Proportional: If you select this option, you can create a link between the outward booking detail and the Base Company of the source business through Automatic Premium Accounting on Non Prop OCC. This is provided the Premium/Limit conditions are set up to support the trace and the Accounting Classification Split % is defined as a combination of Accounting Classification and the applicable Base Company either manually or by ESPID table. Refer to ‘Maintain AC Allocation when split into combinations of AC and parameters representing the source bookings’ in Automatic Premium Accounting chapter for more details.
The activation of this check-box has an impact when running the Recovery Calculation Order for Protection Program and for Single OCC/XL CA of Outward. Refer to the Calculate Recoveries considering System Parameter Settings section of the Non-Proportional Retrocession Accounting chapter for more details.
Note! The field is enabled only when the corresponding global system parameter is not activated.
Note! Independent of the trace Base Company check box being selected or not a link can always be created when manually booking a Technical/Claim worksheet on OCC by the option Link OCC Base Company. Refer to Maintain Bookings on a Technical Worksheet and Link Bookings to Original Base Company from Claim worksheet in Accounting chapter for more details.
-
Responsible Partner:
Proportional: If you select this option, you create a link between the outward booking detail and the Responsible Partner of the source business (original responsible partner) through: -
Preliminary bookings and by running the Retrocession Calculation -/Account orders. The information about the original responsible partner is transferred to the OCC-and ORP business ledgers.
-
Manual booking on the Technical Worksheet for the OCC/ORP with option Link Original Responsible Partner. (Refer to Maintain Bookings on a Technical Worksheet in Accounting chapter for more details)
A column for Original Responsible Partner on Technical Worksheet (manual booking) and Business Ledger is enabled for the OCC and ORP where the name of the linked Original Responsible Partner is displayed for the ledger details. The name and identifier of the linked Original Responsible Partner can also be inspected in the Detail Properties, More Information tab. Note! The field is enabled only when the corresponding global system parameter is not activated.
Non Proportional: If you select this option, you can create a link between the outward booking detail and the Responsible Partner of the source business (original responsible partner) through:
- Automatic Premium Accounting on Non Prop OCC. This is provided the Premium/Limit conditions are set up to support the trace and the Accounting Classification Split % is defined as a combination of Accounting Classification and the applicable Original Responsible Partner either manually or by ESPID table. Refer to Maintain AC Allocation when split into combinations of AC and parameters representing the source bookings in Automatic Premium Accounting chapter for more details.
- Manual booking on the Technical Worksheet for the OCC/ORP with option Link Original Responsible Partner. (Refer to Maintain Bookings on a Technical Worksheet in Accounting chapter for more details)
A column for Original Responsible Partner on Technical Worksheet (manual booking) and Business Ledger is enabled for the OCC and ORP where the name of the linked Original Responsible Partner is displayed for the ledger details. The name and identifier of the linked Original Responsible Partner can also be inspected in the Detail Properties, More Information tab.
The activation of this check-box has an impact when running the Recovery Calculation Order for Protection Program and for Single OCC/XL CA of Outward. Refer to the Calculate Recoveries considering System Parameter Settings section of the Non-Proportional Retrocession Accounting chapter for more details. Note! The field is enabled only when the corresponding global system parameter is not activated.
Add Accounting Validation Information #

The Validation indicators are used together with other items on the insured period to match Accuracy Template to the Insured Period or to define that Worksheet must be validated against the Government Tax Table/Automatic Booked or not for the Insured Period.
Register Technical Validation Indicator:
- From the Business Insured Period, Validation tab, select the menu
- Select Edit Technical Validation Indicator
- Select the required Validation Indicator from drop-down and press OK
| Field | Description |
|---|---|
| Seq.no | The seqence number generated for the validation indicator. Output field only. Values: Integer |
| Date | The date the Technical validation indicator was defined. Output field only. Values: Date field. |
| Validation Indicator | The name of the validation indicator. Values: Customised by your System Administrator. Mandatory: Yes Functional impact: Used when finding which Technical Accuracy Template applies. |
| Updated By | User who updated the indicator - output field only |
Activate Government Tax Validation:
This field is visible on Assumed Business only.
Select the checkbox Government Tax Validation Active if you want the system to perform the Government Tax Validation for the Business Insured Period.
From the Business Insured Period, Validation tab, select the menu option Edit Government Tax Valiation Active. This will enable the checkbox in a small window. The menu option is disabled if the Registration Complete is set on the Business, Life Cycle, Registration Complete tab.
Register Government Tax Validation Indicator:
- From the Business Insured Period, Validation tab, select the menu
- Select Edit Government Tax Validation Indicator
- Select the required Government Validation Indicator from drop-down and press OK
| Field | Description |
|---|---|
| Seq.no | The seqence number generated for the validation indicator. Output field only. Values: Integer |
| Date | The date the Government Tax validation indicator was defined. Output field only. Values: Date field. |
| Validation Indicator | The name of the validation indicator. Values: Customised by your System Administrator. Mandatory: Yes Functional impact: Used to define if the Worksheet (Technical and/or Claim) if any, must be validated against the Government Tax Table or not and if ‘Automatic Booking’ of Government Taxes is possible or not. |
| Updated By | User who updated the indicator - output field only |