Mass Update Balances, Pairings and Worksheets
SICS lets you update many balances or worksheets at once by using the mass update facility. You can access this from the Periodic Functions folder on the SICS desktop. In that folder is a folder called Accounting Mass Update. Click this folder and you see seven (or eight) icons : ‘Business Partner Mass Update on Balances, Closed Balances, Last Completed Booking Year, Open Balances, Open Worksheets’, ‘Reporting Classification Detail Mass Update’ and ‘Reserve and Deposit Detail Mass Update and Accounting Balance Pairing Status Mass Update..’
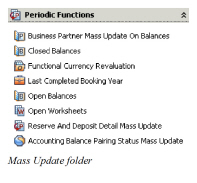
Note! TheReporting Classification Detail Mass Update option is visible if Reporting Classification is in use on your system). The Accounting Balance Pairing Status Mass Update is visible if Pending Status for Balance Pairing is in use in your system. .
When you update balances using the mass update functionality, those balances are automatically updated on their corresponding worksheet s.
When you use the mass update functionality on open worksheet s, you are given the option to close or inactivate worksheet s. Because closing a worksheet often results in the creation of a new worksheet, the response time for this action may take longer than for updating balances.
Update Balances #
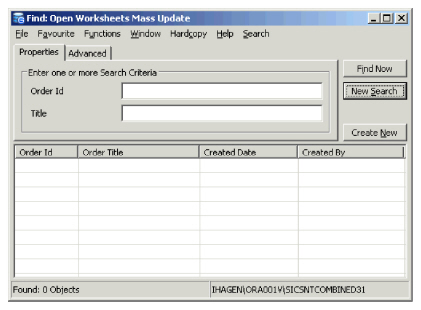
The Closed Balances icon and the Open Balances icon in the Mass Update folder have similar functionality, but the main difference is that one lets you update balances on open worksheets and the other on closed worksheets. See Update Worksheets on page 11-658for a definition of an ‘open worksheet’.
In this example, we have used the Closed Balances to demonstrate the feature. Click the Closed Balances icon to see the Find: Closed Balances Mass Update window.
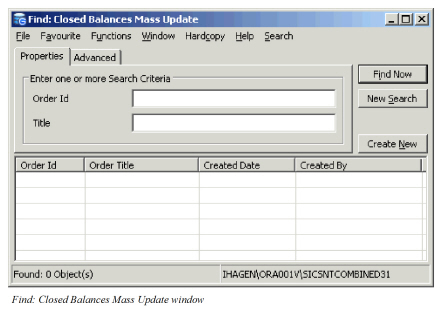
Here you can search for orders that have been created in order to do mass updates on closed balances. (You cannot tell from the list whether or not the order has been run, but you can open the order by double-clicking it, which lets you view its properties.)
To do a mass update, you must first create a new order:
- Click the display list and click the right-mouse button.
- Select New from the pop-up menu. You see the Closed Balances Mass Update Order window.
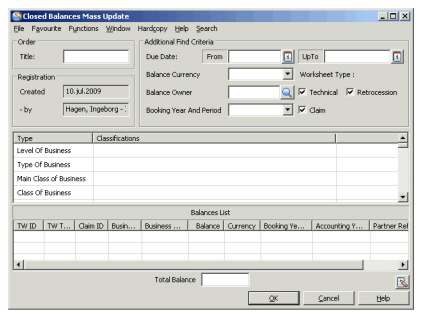 3. Input an Order title and specify filters to narrow the results in the Balance List at the bottom of the window. After you have entered the information, click the OK button. The order appears in the Find window when you click the Find Now button.
4. Double-click the order in the Find window to open it.
5. Click the Edit Menu button and select List Closed Balances to see a list of balances that meet the filter criteria you entered. (This process takes a few minutes.)
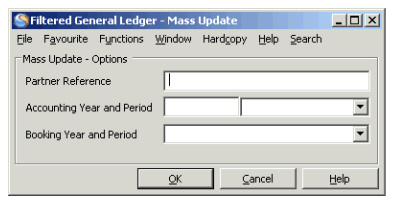
6. Click the Edit Menu button again and select Mass Update. You see a new window where you can change information that applies to all the balances in the list.
3. Input an Order title and specify filters to narrow the results in the Balance List at the bottom of the window. After you have entered the information, click the OK button. The order appears in the Find window when you click the Find Now button.
4. Double-click the order in the Find window to open it.
5. Click the Edit Menu button and select List Closed Balances to see a list of balances that meet the filter criteria you entered. (This process takes a few minutes.)
6. Click the Edit Menu button again and select Mass Update. You see a new window where you can change information that applies to all the balances in the list.
 If you select Edit from the Edit Menu button, you can edit the Order window and input new filter criteria in order to produce a new list of balances.
Note! DXC recommends that you do not update the Booking Year and Period on Closed Balances.
Update Worksheets #
Using the mass update facility in SICS, you can close or inactivate ‘open worksheets’.
The definition of ‘Open Worksheets’ in relation to the mass update functionality is:
-
If the system parameter Advanced Use of Worksheet Status is in use:
- Technical Worksheets with the worksheet status: Open, Unfinished or Corrected.
- Claim Worksheets with the status Unfinished, Corrected or Authorized.
-
If the system parameter Advanced Use of Worksheet Status is NOT in use:
- Technical and Claim Worksheets with the worksheet status Open, Unfinished. Click the Periodic Functions folder on the desktop and then click the Accounting Mass Update folder. Open the Find: Open Worksheet Mass Update window by clicking the Open Worksheets icon.
Here you can search for orders that have been created for open worksheet s. You can select an item in the list to open that order and see its properties and to see whether or not it has been updated.
To update worksheets using the mass update functionality, you must first create an order:
- Click the display list in the Find window.
- Click the right-mouse button and select ‘New’ from the pop-up menu.
You see the Open Worksheet Mass Update window.
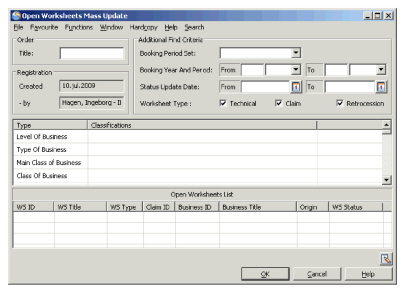
- Enter an order title and filter criteria to narrow the open worksheet list results, (which appears at the bottom of the page).
- Click OK to return to the Find window. Click ‘Find Now’to refresh the list and you see the order you just created.
- Double-click the order to open it.
- From the ‘Edit Menu’button, select the update option that you want. You can close and inactivate selected items in the list by selecting ‘Close Selected’ or ‘Inactivate Selected’, or you can close or inactivate all items in the list at the same time by selecting ‘Close’ or ‘Inactivate’.
| Field | Description |
|---|---|
| Order Title | A text to identify the order, for example in the ‘Find: Open Worksheet Mass Update’ window. Values: Free Text - maximum 40 characters. Mandatory: No Functional Impact: None |
| Created/-by | The date when and by whom the order was created. Values: Date and SICS user name. Mandatory: Yes Functional Impact: None |
| Booking Period Set | Defines a group of booking periods. Determines the available Booking Periods in the Period field below. Values: Half Years, Months or Quarters. Mandatory: No Functional Impact: By selecting a Period Set it will populate values to the below Period From - To. |
| Booking Year And Period - From | To be used to limit the listed worksheets based on the Booking Year and Period. Values: Year: Free input of Year value, Period: A set of periods according to definition in Period Set above, e.g. 1st Quarter, 2nd half year, Month 09, etc. Mandatory: No Functional Impact: All worksheets with a Booking Year and Period equal or higher than the given Year and Period are listed. Worksheets with Booking Periods other than the given Period Sets me will not be listed. |
| Booking Period And Period - To | To be used to limit the listed worksheets based on the Booking Year and Period. Values: Year: Free input of Year value, Period: A set of periods according to definition in Period Set above, e.g. 1st Quarter, 2nd half year, Month 09, etc. Mandatory: No Functional Impact: All worksheets with a Booking Year and Period equal or less than the given Year and Period are listed. Worksheets with Booking Periods other than the given Period Sets me will not be listed. |
| Status Update Date - From | To be used to limit the listed worksheets based on the date for the last status change. Values: A valid date. Mandatory: No Functional Impact: All worksheets with a Date for the last status change equal to or higher than the given Date are listed. |
| Status Update Date - To | To be used to limit the listed worksheets based on the date for the last status change. Values: A valid date. Mandatory: No Functional Impact: All worksheets with a Date for the last status change less than or equal to the given Date are listed. |
| Worksheet Type | To be used to set the type of worksheets to be updated by the order. Values: One or more of the worksheet types must be selected. Mandatory: Yes Functional Impact: Only worksheets of selected type(s) are listed. |
Business Partner Mass Update on Balances #
In case of mergers and acquisitions, a transfer from one business partner to another may affect your portfolio and require that several businesses and their belonging balances get updated. Using the mass update facility in SICS, you can transfer the payment task on balances to another business partner. You can also update the current responsible business partner on the balances with a new partner.
You can also use this function to reverse balances with the current responsible business partner and replace them with new balances with a new responsible partner. This option should be used if you need to keep track of the shift of the partner and would like the changes to be reflected in the general ledger.
Mass Update Expected (Payment Partner) BP #
Depending on your system parameter settings, you can update the expected payment partner on all balances or on only unsettled and partially settled balances with a new business partner. If your system administrator has selected the system parameter Include Settled Balances on Payment Partner Mass Update, you will be able to update all balances. If not, you can only update outstanding balances. (For further information contact your system administrator.)
|

Business Partner Mass Update icon | 1. Click the Business Partner Mass Update on Balances icon in the Periodic Functions /Accounting Mass Update folder on the desktop. You see the Business Partner Balance Mass Update window. |
- Click the Expected BP Update tab.
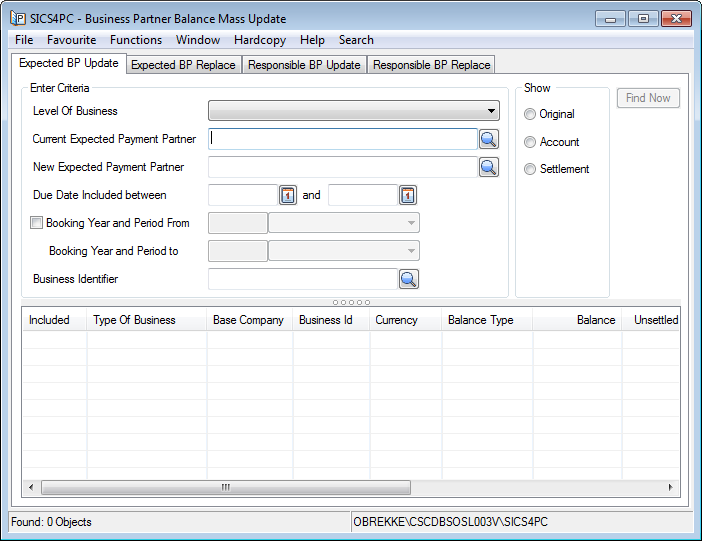
- Select the Level of Business; Assumed Business or Retrocessionaire Participation.
- Select Current Expected Payment Partner by using the Find Business Partner function.
- Select New Expected Payment Partner by using the Find Business Partner function.
- Select which worksheets that should be included in this update by either:
- Entering a Due Date From and To; and/or
- Selecting Booking Year and Period From and To
- Click Find Now to show the balances.
View Balances: You can inspect the balances in three different views:
- Original (default view).
- Account (if any of the balances are part of an Account Balance).
- Settlement (if any of the balances are part of a Settlement Balance).
- Select the balances you want to include in the mass update by selecting Exclude/Include from the pop-up menu.
- Select Mass Update from the pop-up menu. The system then replaces the current business partner with the new business partner as expected payment partner for all included balances.
Mass Update Reverse and Replace Expected Payment Partner #
If the expected payment partner has merged with another business partner, you can chose to reverse the necessary balances on the old partner and replace them with new balances on the new partner.
Note! I t is a requirement that the new partner is present on the affected businesses before you make the necessary change of the balances.
To reverse and replace the expected Business Partners using the mass update function: #
- Click the Business Partner Mass Update on Balances icon in the Periodic Functions on the desktop. You see the Business Partner Balance Mass Update window.
- Click the Expected BP Replace tab
- Select the Level of Business; Assumed Business or Retrocessionaire Participation.
- Specify the Current Payment Partner.
- Specify the New Payment Partner.
- To make limitation to the number of involved businesses and balances enter the necessary extraction criteria, e.g. by entering one or more Business Identifiers the balances belongs to, entering a span of Due Dates the balances should be within and/or entering a span of Booking Year and Period the balances should be within.
- Click Find Now. You see all balances on which the selected business partner is Payment Partner .For a highlighted balance you can open the Business Ledger or the Business properties in case you need to investigate further before executing the mass update.
- Highlight the balances you want to include in the mass update by selecting Exclude/Include option from the pop-up menu.
- Select Mass Update from the pop-up menu. The system make reversal bookings of the included balances with the current payment partner and replacement bookings of the included balances with the new payment partner.
- You can inspect the created bookings by selecting View Technical Worksheet/ View Claim Worksheet from the pop-up menu. Note! The new worksheets are automatically set to Closed so it is important that you pay attention to the above points 7 and 8.
Execute the Mass Update #
When the actual balances have been found and included in the Business Partner Balance Mass Update balance list, and a New Expected Payment Partner is defined the user can select the option Mass Update from the pop-up menu in the balance list.
Dependent on the Settlement Indicator of the selected balances the system do the following:
Unsettled #
- A reversal balance is booked for each of the balances included in the list
- The Expected Payment Partner linked to the reversal balance is the Business Partner in the field Current Payment Partner
- The reversal balance is paired with the source balance so that both the source and the reversal balance are marked Settled
- A replacement balance is booked for each of the balances included in the list
- The Payment Partner linked to the replacement balance is the Business Partner in the field New Payment Partner
- The replacement balance is marked Unsettled
Exceptions #
In case the Unsettled balance is part of either a Settlement Balance Group or an Account Balance Group both the source balance, the reversal balance and the replacement balance becomes Unsettled
Partially Settled #
- A reversal balance is booked for each of the balances included in the list
- The Payment Partner linked to the reversal balance is the Business Partner in the field Current Payment Partner
- The source balance Remains Partially Settled
- The reversal balance is marked Unsettled
- A replacement balance is booked for each of the balances included in the list
- The Payment Partner linked to the replacement balance is the Business Partner in the field New Payment Partner
- The replacement balance is marked Unsettled
Other special rules: #
Extraction of one Insured Period when included in a balance containing more than one Insured Period
- Payment Partner is according to above
- All details with the extracted Insured Period within the listed balance are reversed.
- The balance amount of the reversals/replacements will be different from the source balance
- The source balance remains unchanged
- The reversed balance is marked Unsettled
- The replacement balance is marked Unsettled
- No pairing is created between the reversed balance and the replacement balance
Booking Period #
System assigns a Booking Year and Period according to the Booking Year and Period of the source details. If this Booking Year and Period is closed, the system assigns the default Booking Year and Period defined for the Base Company of the reversal/replacement balance.
Due Date #
The Due Date of the individual reversal/replacement balance is set equal the Due Date of source balance.
Worksheet Origin #
A special Worksheet Origin is assigned to the reversal/replacement balances created by the Business Partner Balance Mass Update, named Bp Balance Mass Update.
Release Indicator #
If some of the details are within the Entry Code Categories;
- Cash Claim
- Deposit
- Non-Liquid Deposit
- Premium Due Later
The Released indicator of the reversal/replacement detail is set to the same value as the source detail and if it is set to Released, no detail pairing is created
Booking on Retrocessionaire’s Participations #
Additional to the above description of the bookings created by the Business Partner Balance Mass Update there is one special rule for bookings on Retrocessionaire’s Participations. The booking detail included in the reversal/replacement balance has a Retro Detail Pairing to the same detail as the details in the (source) balance being reversed and replaced. #
Replace Expected Payment Partner #
Mass Update Reverse and Replace Expected Payment Partner #
If the expected payment partner has merged with another business partner, you can chose to reverse the necessary balances on the old partner and replace them with new balances on the new partner.
Note! I t is a requirement that the new partner is present on the affected businesses before you make the necessary change of the balances.
To reverse and replace the expected Business Partners using the mass update function: #
- Click the Business Partner Mass Update on Balances icon in the Periodic Functions on the desktop. You see the Business Partner Balance Mass Update window.
- Click the Expected BP Replace tab
- Select the Level of Business; Assumed Business or Retrocessionaire Participation.
- Specify the Current Payment Partner.
- Specify the New Payment Partner.
- To make limitation to the number of involved balances enter the necessary extraction criteria
- Click Find Now. You see all balances on which the selected business partner is Payment Partner .For a highlighted balance you can open the Business Ledger or the Business properties in case you need to investigate further before executing the mass update.
- Highlight the balances you want to include in the mass update by selecting Exclude/Include option from the pop-up menu.
- Select Mass Update from the pop-up menu. The system make reversal bookings of the included balances with the current payment partner and replacement bookings of the included balances with the new payment partner.
- You can inspect the created bookings by selecting View Technical Worksheet/ View Claim Worksheet from the pop-up menu. Note! The new worksheets are automatically set to Closed so it is important that you pay attention to the above points 7 and 8.
Execute the Mass Update #
When the actual balances have been found and included in the Business Partner Balance Mass Update balance list, and a New Expected Payment Partner is defined the user can select the option Mass Update from the pop-up menu in the balance list.
Dependent on the Settlement Indicator of the selected balances the system do the following:
Unsettled #
- A reversal balance is booked for each of the balances included in the list
- The Expected Payment Partner linked to the reversal balance is the Business Partner in the field Current Payment Partner
- The reversal balance is paired with the source balance so that both the source and the reversal balance are marked Settled
- A replacement balance is booked for each of the balances included in the list
- The Payment Partner linked to the replacement balance is the Business Partner in the field New Payment Partner
- The replacement balance is marked Unsettled
Exceptions #
In case the Unsettled balance is part of either a Settlement Balance Group or an Account Balance Group both the source balance, the reversal balance and the replacement balance becomes Unsettled
Partially Settled #
- A reversal balance is booked for each of the balances included in the list
- The Payment Partner linked to the reversal balance is the Business Partner in the field Current Payment Partner
- The source balance Remains Partially Settled
- The reversal balance is marked Unsettled
- A replacement balance is booked for each of the balances included in the list
- The Payment Partner linked to the replacement balance is the Business Partner in the field New Payment Partner
- The replacement balance is marked Unsettled
Other special rules: #
Extraction of one Insured Period when included in a balance containing more than one Insured Period
- Payment Partner is according to above
- All details with the extracted Insured Period within the listed balance are reversed.
- The balance amount of the reversals/replacements will be different from the source balance
- The source balance remains unchanged
- The reversed balance is marked Unsettled
- The replacement balance is marked Unsettled
- No pairing is created between the reversed balance and the replacement balance
Booking Period #
System assigns a Booking Year and Period according to the Booking Year and Period of the source details. If this Booking Year and Period is closed, the system assigns the default Booking Year and Period defined for the Base Company of the reversal/replacement balance.
Due Date #
The Due Date of the individual reversal/replacement balance is set equal the Due Date of source balance.
Worksheet Origin #
A special Worksheet Origin is assigned to the reversal/replacement balances created by the Business Partner Balance Mass Update, named Bp Balance Mass Update.
Release Indicator #
If some of the details are within the Entry Code Categories;
- Cash Claim
- Deposit
- Non-Liquid Deposit
- Premium Due Later
The Released indicator of the reversal/replacement detail is set to the same value as the source detail and if it is set to Released, no detail pairing is created
Booking on Retrocessionaire’s Participations #
Additional to the above description of the bookings created by the Business Partner Balance Mass Update there is one special rule for bookings on Retrocessionaire’s Participations. The booking detail included in the reversal/replacement balance has a Retro Detail Pairing to the same detail as the details in the (source) balance being reversed and replaced.
Mass Update of Responsible Business Partner #
If a business partner acting as Cedent on your Assumed Businesses and/or as Retrocessionaire on your outward protections has merged with another business partner, you must change the affected businesses and their balances.
Note! DXC recommends that you update the Business Partner Roles on the affected businesses before you update the Responsible Business Partner on balances.
In case it is important to keep track of these change on the balances it is recommended to make the mass update from the Responsible BP Replace tab where the system will reverse balances with the old responsible partner and replace them with the new responsible partner
To change the responsibility of a Business Partner using the mass update function:
|

Business Partner Mass Update icon | 1. Click the Business Partner Mass Update on Balances icon in the Periodic Functions /Accounting Mass Update folder on the desktop. You see the Business Partner Balance Mass Update window. |
- Click the Responsible BP Update tab.
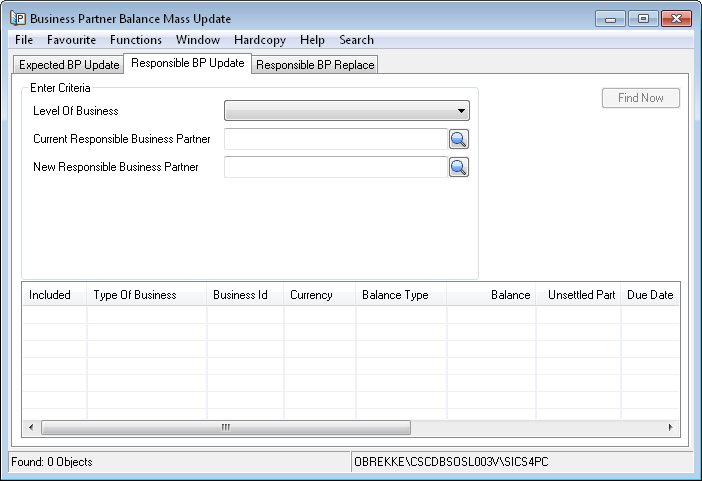
- Select the Level of Business; Assumed Business or Retrocessionaire Participation.
- Specify the Current Responsible Partner.
- Click Find Now. You see all balances on which the selected business partner is Responsible Business Partner.
- Specify the new Responsible Partner.
- Select the balances you want to in the mass update by selecting Exclude/Include option from the pop-up menu.
- Select Mass Update from the pop-up menu. The system replaces the current business partner with the new business partner as Responsible Business Partner for all included balances.
Reverse and Replace Responsible Business Partner #
If a business partner acting as Cedent on your Assumed Businesses and/or as Retrocessionaire on your outward protections has merged with another business partner, you can chose to reverse the necessary balances on the old partner and replace them with new balances on the new partner.
Note! It is a requirement that you update the Business Partner Roles on the affected businesses before you make the necessary change of the balances.
To reverse and replace the responsibility of Business Partners using the mass update function: #
- Click the Business Partner Mass Update on Balances icon in the Periodic Functions on the desktop. You see the Business Partner Balance Mass Update window.
- Click the Responsible BP Replace tab
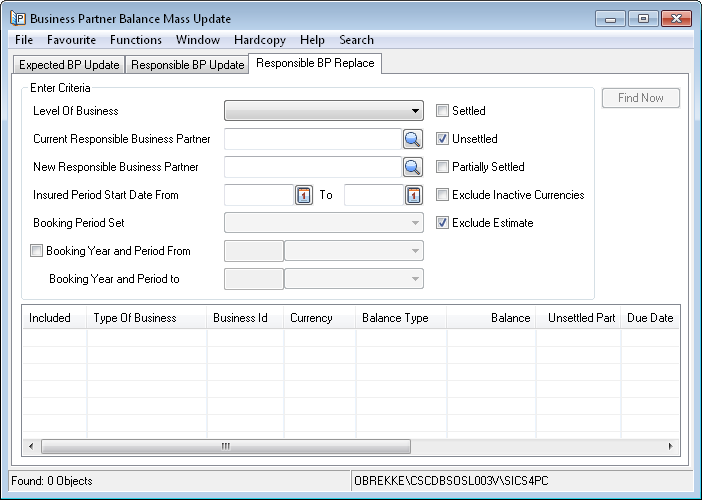
- Select the Level of Business; Assumed Business or Retrocessionaire Participation.
- Specify the Current Responsible Business Partner.
- Specify the New Responsible Business Partner.
- To make limitation to the number of involved balances enter the necessary extraction criteria
- Click Find Now. You see all balances on which the selected business partner is Responsible Business Partner.
For all the businesses included in the list the business partner defined in the field New Responsible Business Partner is registered on the Assumed Business as Cedent and on the Retrocessionaire’s Participation’ as Retrocessionaire.
For a highlighted balance you can open the Business Ledger or the Business properties in case you need to investigate further before executing the mass update. - Highlight the balances you want to include in the mass update by selecting Exclude/Include option from the pop-up menu.
- Select Mass Update from the pop-up menu. The system make reversal bookings of the included balances with the current business partner and replacement bookings of the included balances with the new business partner as Responsible Business Partner.
- You can inspect the created bookings by selecting View Technical Worksheet/View Claim Worksheet from the pop-up menu. Note! The new worksheets are automatically set to Closed so it is important that you make attention to the above points 7 and 8.
| Field | Description |
|---|---|
| Level of Business | Here you decide what level of business you want to run the mass update of the responsible business partner for. In case the shift of business partner is done both on inward and outward business you must do the operation two times. Values: Assumed Business and Retrocessionaire’s Participation Functional Impact: Decides which balances to be listed on the Business Partner Balance Mass Update when the Find Now is executed, either balances belonging to Assumed Businesses OR balances belonging to Retrocessionarire’s Participations Mandatory: Yes |
| Current Responsible Business Partner | The business partner that acts as responsible partner on the existing balances to be reversed. Values: Any business partner either by entering the identifier directly or via the Find Business Partner function. Functional impact: Decides which balances to be listed on the Business Partner Balance Mass Update when the Find Now is executed. Mandatory: Yes |
| New Responsible Business Partner | The business partner that you wants to act as responsible partner on the new replacement balances. Note! It is a requirement that the business partner in the this field has already been entered on the business before system can make reversal/replacement bookings. Values: Any business partner either by entering the identifier directly or via the Find Business Partner function. Functional impact: Will be set as responsible partner on the replacement balances when the Find Now is executed Mandatory: Yes. |
| Insured Period Start Date From - To | To limit the insured periods the responsible partner should be changed for Values: A valid date in both fields. Functional impact: Will limit the balances shown in the list according to the Insured Periods they belongs to because these must match the extracted dates, when the Find Now is executed. If only a From date is given the system will only match on the Insured Period From date. If both the From and the To date is given the system will list the a balance if its details belongs to an Insured Period that match exactly these dates. If only one Insured Period is extracted, and this Insured Period is included in a balance containing more than one Insured Period, the whole balance is listed, but only details for the extracted Insured Period are reversed/replaced. Mandatory: No, either one, both or none is acceptable. |
| Booking Period Set | In case you want to limit the booking year and periods the responsible partner should be changed for you must enter a Booking Period Set in this field. Note! The field is enabled when the check box beside the Booking Year and Period From is selected. Values: Half Years, Quarters and Months. Functional impact: Will determine which values are displayed in the Booking Period From - To fields. Mandatory: No. |
| Booking Year and Period From/To | In case you want to limit the booking year and periods the responsible partner should be changed for you can enter a Booking Year and/or a Booking Period in this field. Note! The field is enabled when the check box beside the Booking Year and Period From is selected. Values: Free input of a year in the Year part and in the Period part you can enter: 1st Half Year, 2nd Half Year if Half Years is selected in Booking Period Set. 1st Quarter to 4th Quarter if Quarters is selected in Booking Period Set. 1st Month to 12th Month if Months is selected in Booking Period Set. Functional impact: System gives all balances with a Booking Year and Period equal to or higher (newer) than the Booking Year and Period given in the From field and up to and including the Booking Year and Period given in the To field. Note! Only booking details with the same Period Set as defined in the above field will be extracted. Mandatory: No. |
| Settled/Unsettled/Partially Settled | Extraction based on the Settlement Indicator on the balances can be done by selecting any combination of these three check boxes Values: Selected or deselected Default: The Unsettled box is checked, the Settled and Partially Settled is unchecked. Functional Impact: When Find Now is executed the system will extract the actual balances based on the value in the Settlement Indicator and only list balances with matching value. When the Mass Update is executed see further functional impact in the ‘Execute the Mass Update of the responsibility of Business Partners’ part further down in this chapter. Mandatory: Yes in the sense that if none is checked it means that Unsettled balances are extracted |
| Exclude Inactivate Currencies | In case you want to limit the mass update to involve Active currencies only you should select this check box. Values: Selected or deselected Default: Not selected Functional Impact I: f selected the system will ignore balances on inactivated currencies Mandatory: Yes, it is either selected or deselected |
| Excluded Estimate | In case you want to limit the mass update to involve estimate booking also you should deselect this check box Values: Selected or deselected Default: Selected Functional Impact: If deselected the system will also include estimate bookings. Estimate bookings will be excluded if the box is selected when the Find Now is executed. Mandatory: Yes, it is either selected or deselected |
| as Account/as Booking | When selecting Level of Business Retrocessionaire’s Participation you must consider if balances shown on the Business Ledger’s As Booking view or the Business Ledger’s As Account view should be extracted. Note! Only visible if Retrocessionaire’s Participation is selected in Level of Business Values: Either as Account or asBooking is Selected Default: The radio button as Account is selected Functional Impact: If as Account is selected the system will make the change of the responsible partner on the balances found on the Business Ledger’s As Account view. If as Booking is selected the system will make the change of the responsible partner on the balances found on the Business Ledger’s As Booking view. Note! On Proportional Treaty Retrocessionaire’s Participations - the ‘As Booking’ and ‘As Account’ are two different balances. On Non-Proportional Treaty Retrocessionaire’s Participations - the ‘As Booking’ and ‘As Account’ are the SAME balance so these bookings are extracted independent of this extraction. On Facultative Retrocessionaire’s Participations - the ‘As Booking’ and ‘As Account’ are the same balances when system parameter ‘Maintain Balances for Fac. Retro Participations via TOF Order’ is not active. This means that the Facultative Retrocessionaire’s Participations balances are extracted independent this extraction. If this system parameter is active, two different balances (‘As Booking’ and ‘As Account) are created also for the Facultative Retrocessionaire’s Participations. Mandatory: Yes, one of the values as Account or as Booking must be selected |
Execute the Mass Update of the responsibility of Business Partners #
When the actual balances have been found and included in the Business Partner Balance Mass Update balance list, and a New Responsible Business Partner is defined the user can select the option Mass Update from the pop-up menu in the balance list.
Dependent on the Settlement Indicator of the selected balances the system will do the following:
Unsettled #
- A reversal balance is booked for each of the balances included in the list
- The Responsible Business Partner linked to the reversal balance is the Business Partner in the field Current Responsible Business Partner
- The reversal balance is paired with the source balance so that both the source and the reversal balance are marked Settled
- A replacement balance is booked for each of the balances included in the list
- The Responsible Business Partner linked to the replacement balance is the Business Partner in the field New Responsible Business Partner
- The replacement balance is marked Unsettled
Exceptions #
In case the Unsettled balance is part of either a Settlement Balance Group or an Account Balance Group both the source balance, the reversal balance and the replacement balance becomes Unsettled
Partially Settled #
- A reversal balance is booked for each of the balances included in the list
- The Responsible Business Partner linked to the reversal balance is the Business Partner in the field Current Responsible Business Partner
- The source balance Remains Partially Settled
- The reversal balance is marked Unsettled
- A replacement balance is booked for each of the balances included in the list
- The Responsible Business Partner linked to the replacement balance is the Business Partner in the field New Responsible Business Partner
- The replacement balance is marked Unsettled
Settled #
- A reversal balance is booked for each of the balances included in the list
- The Responsible Business Partner linked to the reversal balance is the Business Partner in the field Current Responsible Business Partner
- The Responsible Business Partner linked to the replacement balance is the Business Partner in the field New Responsible Business Partner
- Balance Pairing is created between the reversed balance and the replacement balance so that both becomes Settled
Other special rules: #
Extraction of one Insured Period when included in a balance containing more than one Insured Period
- Responsible Business Partner is according to above
- All details with the extracted Insured Period within the listed balance are reversed.
- The balance amount of the reversals/replacements will be different from the source balance
- The source balance remains unchanged
- The reversed balance is marked Unsettled
- The replacement balance is marked Unsettled
- No pairing is created between the reversed balance and the replacement balance
Booking Period #
System assigns a Booking Year and Period according to the Booking Year and Period of the source details. If this Booking Year and Period is closed, the system assigns the default Booking Year and Period defined for the Base Company of the reversal/replacement balance.
Due Date #
The Due Date of the individual reversal/replacement balance is set equal the Due Date of source balance.
Worksheet Origin #
A special Worksheet Origin is assigned to the reversal/replacement balances created by the Business Partner Balance Mass Update, named Bp Balance Mass Update
Release Indicator #
If some of the details are within the Entry Code Categories;
- Cash Claim
- Deposit
- Non-Liquid Deposit
- Premium Due Later
The Released indicator of the reversal/replacement detail is set to the same value as the source detail and if it is set to Released, no detail pairing is created
Booking on Retrocessionaire’s Participations #
Additional to the above description of the bookings created by the Business Partner Balance Mass Update there is one special rule for bookings on Retrocessionaire’s Participations. The booking detail included in the reversal/replacement balance has a Retro Detail Pairing to the same detail as the details in the (source) balance being reversed and replaced.
Update Last Completed Booking Year #
When you double-click the Last Completed Booking Year icon, you can select one or more businesses (from the Find Business window), and enter a year for which the Last Completed Booking Year on the business should be updated.
When you click the OK button, the Last Completed Booking Year is updated on the selected businesses and is shown in the Business Ledger and the Online Statistics windows.
Replace Business Partner on Open Reserves and Deposits #
Sometimes one business partner takes over businesses and their balances from other business partners, for example, after a company merger. The new business partner can then acts as an administrator for these businesses or take over the complete responsibility for the businesses and balances from the old business partner from a specified date. When the latter is the case, also open historical reserves and deposits balances should sometimes be transferred to the new business partner.
SICS has the functionality to replace the old business partner with the new business partner on the business and to transfer all the administration tasks, including the payment task to the new business partner. Functionality also exists to replace the old business partner with the new business partner both as responsible business partner and expected payment business partner on balances. This can be done for both unsettled, partially settled and settled balances for defined booking periods and/or due dates.
This mass update is used to transfer open historical reserves and deposits details from the old business partner to the new business partner after a company merger for level of businesses: ‘Assumed Business and ‘Retrocessionaire Participation’.
Running the Reserve and Deposit Detail Mass Update #
Note! Note! DXC recommends that you update the Business Partners on the relevant Businesses and related Balances before the business partner shift takes place on open reserves and deposit.
See the Business Partner Roles Mass Update section in the Periodic Function chapter in the System Administration Guide for more information.
See also the Business Partner Mass Update on Balances earlier in this chapter.
Note! Note! Also note that businesses with open worksheets will be excluded from the mass update order. Businesses with open worksheets will be listed when the mass order is finished. To be able to have these businesses included the user must either Close or Inactivate the open worksheets and then run the order again.
To run the mass update:
- Click the Reserve And Deposit Detail Mass Update icon in the Periodic Functions /Accounting Mass Update folder on the desktop. You see the Reserve And Deposit Detail Mass Update window.
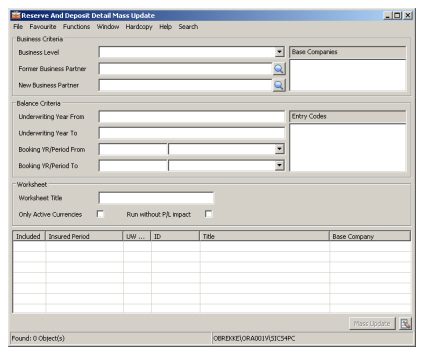 2. Define the business and balances filter criteria by entering the required data in the fields.
3. Add the businesses to the display list.
2. Define the business and balances filter criteria by entering the required data in the fields.
3. Add the businesses to the display list.
-
- Select the Add New Business option from the Menu button.
- option from the Menu button to let SICS find and display the business.
- Exclude/include businesses from the list by using the Exclude/Include or_Exclude All/Include All_ options on the pop-up menu. The status ‘Yes’ in ‘Included’ column on the display list tells you which businesses are included.
- Click the Mass Update button or select the Run Mass Update/Run Mass Update For Selected option from the Menu button.
- Inspect the Claim- or Technical worksheet which SICS has created. To view either: Select View Technical Worksheet or View Claim Worksheet from the Menu button and then select View Worksheet.
- From the View Worksheet window select Close Remaining Open Worksheets or Inactivate Selected Open Worksheets.
Re-running the Mass Update #
If you are not satisfied with the results of the mass update and you want to include/exclude more businesses you can re-run your mass update.
To re-run your mass update:
- Select and inactivate the Selected Open Worksheets from the View Worksheet window.
- Remove worksheets from the Reserve And Deposit Detail Mass Update by selecting the Remove All Worksheets from the Menu button.
- Change the actual Business or Balance Criteria and follow the above “To Run the Mass Update” description from point 3.
Note! Note! If you remove the worksheet before it is inactivated it remains in the database as an open worksheet. An open worksheet must either be Closed or Inactivated before the involved business again can be included in another mass update.
| Field | Description |
|---|---|
| Business Level | The Business Level for the businesses where the new business partner has been changed Values: Assumed Business or Retrocessionaire’s Participation Mandatory: Yes Functional Impact: When selecting a value the options in the Partner Role field is set. If Assumed Business is selected the options are Cedent and Broker and if Retrocessionaire’s Participation is selected the options are Reinsurer and Broker |
| Former Business Partner | The former Cedent/Retrocessionaire or Broker on the business (after running the Business Partner Roles Mass Update on the business). This business partner might be assigned to some balances with open reserves and deposits Values: A business partner name and code (cedent/retrocessionaire or broker) Mandatory: Yes Functional Impact: When running the mass update the system will search for balances with this partner as Business Partner and where open Reserves and Deposits exists, regardless if the balance is Settled/Unsettled. The total Deposit and/or Reserves (if it is not zero) will be booked as an OUT position on this business partner. The OUT position for each selected Entry Code will be calculated per Currency, Underwriting Year, Original Underwriting Year, Occurrence Year, Section, Accounting Classification, Assumed Business Information (Id, IP and Claim) when exist on the Retrocessionaire’s detail and Reporting Classification/Reinsurance Category when exist on the detail. The arithmetic sign will be the opposite of the calculated amount so that the new position for the former business partner becomes zero. In other words, the open reserves and deposits will be reversed with the former business partner and replaced with the new business partner. The balances for both the OUT and the IN bookings will get the Base Company’s default booking year and period (if it is not closed in the Closing Booking Terms - then the first open will be used) and the highest Accounting Year and Period among the source bookings. |
| New Business Partner | The current Cedent/Retrocessionaire or Broker on the business. This business partner might have been assigned to some balances through the Business Partner Mass Update On Balances. Values: A business partner name and code (cedent/retrocessionaire or broker) Mandatory: Yes Functional Impact: When running the mass update the system will reverse the OUT position for the former business partner and book the reversal as an IN position for the new business partner. By doing this all the balances with the IN positions will have this partner as Business Partner. This is independent if the mass update has been run for cedent/retrocessionaire or broker. |
| Base Company | Base Company on the actual businesses to be candidate for the mass update Values: A business partner name and code (base company) Mandatory: No Functional Impact: When searching for businesses the selected Base Company must be the Reinsurer (when Business Level is Assumed Business) or Cedent (when Business Level is Retrocessionaire’s Participation) on the business to be extracted |
| Underwriting Year From | In case the mass update should be limited by underwriting year on the detail enter a year Values: A valid Year less than or equal the To Year Mandatory: No Functional Impact: When running the mass update, the details with an underwriting year equal or higher than this year will be extracted |
| Underwriting Year To | In case the mass update should be limited by underwriting year on the detail enter a year Values: A valid Year higher than or equal the From Year Mandatory: No Functional Impact: When running the mass update, the details with an underwriting year less than or equal this year will be extracted |
| Booking YR/Period From | In case the mass update should be limited by booking period on the balance enter a From and/or To Booking Year and Period Values: 1stfield: A valid Year less than or equal the Year in the Booking YR/Period To. 2ndfield: Month 1 to Month 12 plus <None>. <None> is the same as blank. If the From Year and To Year is the same the From Period must be less than or equal the To Period. Mandatory: No Functional Impact: When running the mass update, the details in balances with a booking year/period equal or higher than this period will be extracted |
| Booking YR/Period To | In case the mass update should be limited by booking period on the balance enter a From and/or To Booking Year and Period Values: 1stfield: A valid Year higher than or equal the Year in the Booking YR/Period From. 2ndfield: Month 1 to Month 12 plus <None>. <None> is the same as blank. If the From Year and To Year is the same the From Period must be higher than or equal the To Period. Mandatory: No Functional Impact: When running the mass update, the details in balances with a booking year/period less than or equal this period will be extracted |
| Entry Code | The entry codes to be used as candidates for the IN and OUT positions must be defined here Values: All Entry Codes within any EC Sub Categories (system defined and user defined) within the EC Category Reserve, Deposit and Non-Liquid Deposits Mandatory: Yes Functional Impact: When running the Mass Update, the details with the selected entry codes will be added together for the given underwriting year(s) and booking year/period(s). Then booked as OUT position with the former business partner and as IN position with the new business partner. |
| Worksheet Title |
Gives the user a possibility to set a worksheet title on all worksheets created by the mass update. Values: Free text field for up to 30 characters Mandatory: No Functional Impact: On all worksheets created when running the Reserve and Deposit Detail Mass Update will have this value set in the Worksheet Title field. |
| Only Active Currencies | Gives the user an option to run the mass update for either all currencies or for active currencies only. Values: Selected or not selected Default: Not selected Mandatory: No Functional Impact: When running the Mass Update, if you select this option, the system will consider active currencies only, but by leaving the option not selected the system will include all currencies with open reserved and deposits- |
| Run without P/L impact | When running the Mass Update the worksheets created will be given an Origin of Worksheet. With this option the user can decide which of the two possible Origins of Worksheet they will get. Values: Selected or not selected Default: Not selected Mandatory: No Functional Impact: By selecting this option the system will assign the origin Res and Dep Mass Update without P/L impact and by leaving the option not selected the system will assign the origin Res and Dep Mass Update. There are no further impacts other than the possibility later to use this information in reports or outbound interfaces to decide if the bookings should have impact on the Profit and Loss or not. |
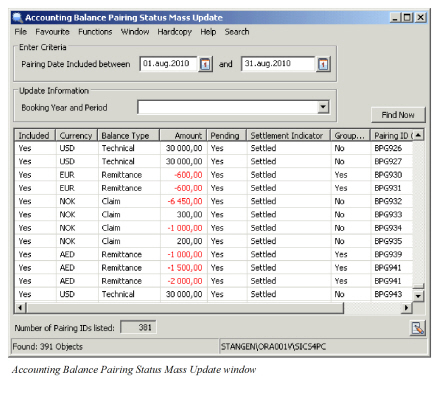
Change Balance Pairing Status by Mass Update #
When Pending Status for Balance Pairing is in use in your system, the pairing status can be changed to Definite either manually from the Business Partner ledger, or through the Accounting Balance Pairing Status Mass Update function.
To change the status on a Pending Pairing to Definite by Mass Update:
- Click on the Accounting Balance Pairing Status Mass Update icon in the Periodic Functions / Accounting Mass Update folder on the desktop. You see the Accounting Balance Pairing Status Mass Update window.
- Click on Find Now to list all Pending Pairings, represented by their driving balance. You can limit the list by entering From and/or To dates in the Pairing Date Included between fields.
- From the menu you have the option to include/exclude selected Pairings or include/exclude all Pairings. All Balance Pairings with Yes in the Included column will be included in the Mass Update.
- Enter the Booking Year and Period to be used on the Balance Pairings.
- Select Run Mass Update from the menu to change the status on all included Balance Pairings to Definite.
If your system has been set up to use Balance Pairing Group, each Balance Pairing will get a Pairing Id. In the Accounting Balance Pairing Status Mass Update window, this Id is shown in the Pairing ID column. Included Yes/No to specify whether or not to include in Mass Update is selected per Pairing Id. If a Pairing Id has more than one driving balance (i.e. it is created in the Pairing Group process), the Yes/No indicator must be the same for all driving balances. If a driving balance has more than one pairing Ids, these pairing Ids are shown one by one in separate rows, and it is possible to select per Pairing Id whether or not to include in Mass Update.
The number of Pairing Ids listed within the specified pairing period is shown in a field below the container.
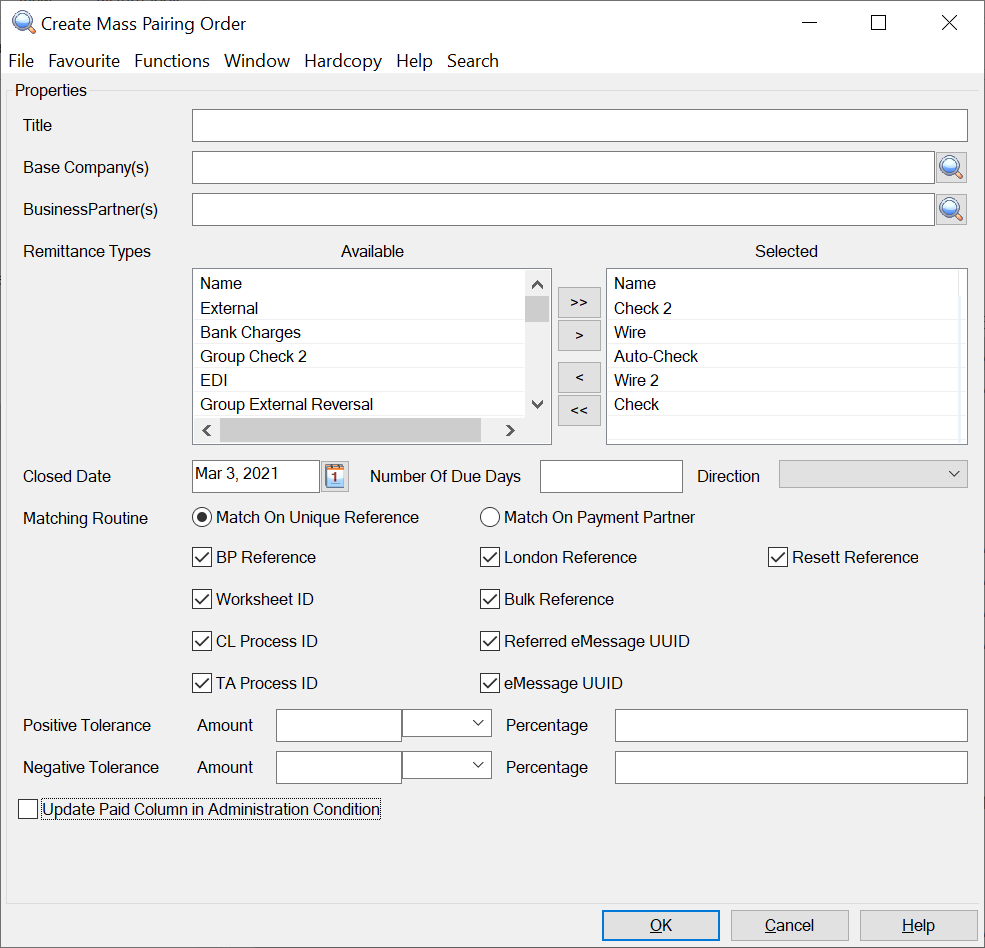
Mass Pairing #
The Mass Pairing Order matches Unsettled Received Remittances with Unsettled and Partially Settled balances of type Technical, Claim, Cession, Expected Payment, Account Balance and Settlement Balance (later in this chapter referred to as Included Balances). When a match is made, system automatically creates a Balance Pairing between the Remittance (as the Driving Balance) and the Included Balance.
When the Mass Pairing Order is run, it goes through 5 different processes:
- Extract Remittances to be included
The Order selects Unsettled Received Remittances with specified Base Company/Companies, Payment Partner(s), Remittance Type(s), Direction and with Final Date equal to or later than the specified date. If no extraction is made on the order, all Base Companies and/or Payment Partners and/or Remittance Types and/or Directions and/or Final Dates will be included. Only Unsettled, Received Remittances with status equal to Final are included, i.e. no Partially Settled Remittances are included. Remittances already linked to a single balance or a Balance Group are excluded. 2. Extract Included Balances to be matched with the Remittances
The Order selects unsettled or partially settled balances of type Technical, Claim, Cession, Account, Settlement Balance and Expected Payment. Balances which are included in Account- or Settlement Balances will NOT be included as such, but the relevant Account- or Settlement Balance will be included and the balances included in the matched groups will be paired. If a balance has an Expected Payment balance, system tries to match the currency and amount of the Expected Payment balance, not with the Original Balance. Balances already linked to a Remittance balance will be excluded. 3. Match extracted Remittance balances with extracted Included balances
The actual matching process depends on the Matching Routine defined on the Mass Pairing Order. a) When Match on Unique Reference is selected on the Order, the system enables some reference fields representing various fields on the Included Balances. By default all fields are selected. The user can select one or more of these fields, at least one must be selected. By limit the matching to only one reference field, e.g. BP Reference, this will increase the performance. The system reads the reference entered in the Partner’s Reference field on the Remittance and searches for matching references in all the selected fields on the Included Balances. For Technical-, Claim, and Cession balances, system searches through the following fields when they are selected: BP Reference, Worksheet Id, TA Process ID, CL Process ID, London Reference, Bulk Reference, Referred eMessage UUID, eMessage UUID and Resett Reference. For Expected Payment balances system searches through the same fields for the belonging original balance. For Settlement and Account balances, system searches for match by use of the Worksheet Id and the BP Reference and match it with the Balance Group Identifier and the Reference field. When match is found, system checks if the currency and amount of the Remittance matches the currency and amount of the Included balance. If a Tolerance Limit is defined on the Order, the amount is defined to match if the difference between the two amounts is within the defined Tolerance Limit. If no Tolerance Limit is defined, the amounts must have an exact match. In addition, system checks the Due Date on the Remittance against the Due Date on the Included Balances. Only Included Balances with a due date less than or equal to the Due Date on the Remittance + number of days defined in the Due Dates in future field on the Order are matched. b) When Match on Payment Partner is selected on the Order, the system matches the Payment Partner on the Remittance with the Payment Partner on the included balances. For Remittance Balances and Included balances with same Payment Partner, system checks if the currency and amount of the Remittance matches the currency and amount of the Included balance. If a Tolerance Limit is defined on the Order, the amount is defined to match if the difference between the two amounts is within the defined Tolerance Limit. If no Tolerance Limit is defined, the amounts must have an exact match. In addition, system checks the Due Date on the Remittance against the Due Date on the Included Balances. Only Included Balances with a due date less than or equal to the Due Date on the Remittance + number of days defined in the Due Dates in future field on the Order are matched. If a remittance balance matches more than one included balance, no pairing will take place. 4. Create Balance Pairing between Remittance and matched Included Balance
When the matching is complete, system automatically creates Balance Pairings for the matched balances, with the Remittance balance as the driving balance. If a Tolerance Limit has been defined on the Order and the Remittance amount is different from the amount of the Included Balance, a Write Off is created in the pairing. When the Remittance Balance is paired with more than one Included Balance (i.e. paired with a balance group) any Write Off is created on the pairing object with the largest balance (absolute amount). If the currency of the Remittance Balance is different from the currency of the Included Balance an exchange rate difference is created. If a match is found between the remittance balance and a balance group (SBG or ABG) the pairings are created between the remittance and the members of the group. 5. Create a log on Remittances included in the order
When the matching and pairing has taken place, system writes a log in the Notes field on each remittance Balance that was included in the order. This log includes the Order Id, date and time when it was run, whether or not the remittance was paired and the reason for not pairing if it was not paired.
Create and run the Mass Pairing Order #
- In the Periodic Functions folder, select Mass Pairing. This opens the Find: Mass Pairing Orders window.

- Press the Create New button or right click in the list and select New from the menu to create a new order
- Specify the different extract and matching criteria
- Select the option “Update Paid Column in Administration Condition” if wanted
- Press OK to save the Mass Pairing Order
- Press the menu button and select Run Now to run the Order
| Field | Description |
|---|---|
| Title | A Title for the order. This is shown in the Find: Mass Pairing Order window Default: Blank Values: Any text or numbers up to 40 characters Mandatory: No Functional Impact: None |
| Base Company(s) | The Base Company(ies) that should be included in the Order Default: none Values: One or several Base Companies Mandatory: No Functional Impact: Only balances with the selected Base Companies will be included when the Order is run. If no Base Company is selected all Base Companies will be included |
| Business Partner(s) | The Business Partner(s) that should be included in the Order Default: none Values: One or several Business Partners Mandatory: No Functional Impact: Only Remittances with the selected Business Partners will be included when the order is run. If none is selected, Remittances from all Business Partners will be selected |
| Remittance Types | The Remittance Type(s) that should be included in the Order Default: Wire, Wire2, Check, Check2, AutoCheck Values: One or several Remittance Types Mandatory: No Functional Impact: Only Remittances with the selected Remittance Types will be included when the Order is run. If none is selected, all Remittance types will be included |
| Closed Date | A Closed date (the date when the Remittance was set to Final) Default: Today’s date Values: A date Mandatory: Yes Functional Impact: Only Remittances with closed date equal to or later than the specified date will be included when the Order is run |
| Number of Due Days | The maximum number of days the Due Date on the Included Balance can be higher than the Due Date on the Remittance Default: Blank Values: Any number from 0 to 999 Mandatory: No Functional Impact: Only Balances with a Due Date equal to or this number of days higher than the Due Date on the Remittances will be matched with the Remittance when the Order is run. If blank the Due Date of the included balance cannot be higher than the Due Date of the Remittance. |
| Direction | The direction of the Remittance Default: Blank Values: None, Inward or Outward Mandatory: No Functional Impact: Only Remittances with the selected Direction will be included when the Order is run. If blank or <None> is selected, Remittances with all directions will be included |
| Matching Routine | The Matching Routine to be used by the Order. When the Match on Unique Reference is selected each of the reference fields can be deselected and selected according to the need. When the Match on Payment Partner is selected the reference fields are hidden. Default: Match On Unique Reference, with all the reference fields selected. Values: Match On Unique Identifier or Match On Payment Partner Mandatory: Yes Functional Impact: The selected Matching Routine will be used when the Order is run. See above for further description of the two Matching Routines. |
| Positive Tolerance Amount | The maximum allowed amount difference between the Remittance balance and the Included balance when the Remittance balance (without sign) is smaller than the Included Balance. Default: blank Values: An amount and a currency Mandatory: No Functional Impact: When the order is run, it will only create pairing between Remittance and Included balance if the difference between the two amounts are less than the specified amount converted to the specified currency. |
| Positive Tolerance Percentage | The maximum allowed percent difference between the Remittance Balance and the Included Balance when the Remittance Balance (without sign) is smaller than the Included Balance. Default: blank Values: Percentage Mandatory: No Functional Impact: When the order is run, it will only create pairing between Remittance and Included balance if difference between the two amounts are less than the specified percentage |
| Negative Tolerance Amount | The maximum allowed amount difference between the Remittance balance and the Included balance when the Remittance balance (without sign) is larger than the Included Balance. Default: blank Values: An amount and a currency Mandatory: No Functional Impact: When the order is run, it will only create pairing between Remittance and Included balance if the difference between the two amounts are less than the specified amount converted to the specified currency. |
| Negative Tolerance Percentage | The maximum allowed percent difference between the Remittance Balance and the Included Balance when the Remittance Balance (without sign) is larger than the Included Balance. Default: blank Values: Percentage Mandatory: No Functional Impact: When the order is run, it will only create pairing between Remittance and Included balance if difference between the two amounts are less than the specified percentage |
| Update Paid Column in Administration Condition | This option can be selected in the order. Default: No (not selected) Values: Yes or No Mandatory: No Functional Impact: This option enables the order to automatically update the Paid column in Administration condition when a match is found between the included balances in Pairing and the Single account in the administration condition (i.e Accounting Year and Period), else, it will not update. |
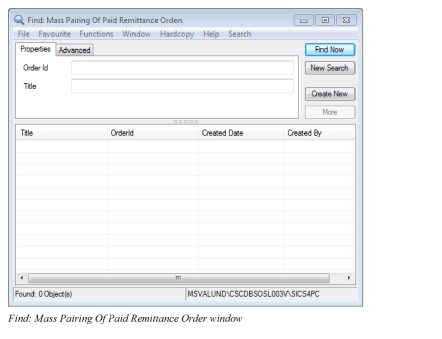
Mass Pairing of Paid Remittance #
The Mass Pairing Of Paid Remittance Order makes an Automatic Balance Pairing between a Paid Remittance with Status ‘Final’ and a linked Unsettled balance of type Technical, Claim, Cession, Expected Payment and Settlement Balance (later in this chapter referred to as Included Balances). Both the Remittance and the Included Balance are marked as Settled after the pairing.
When the Mass Pairing Order is run, it goes through 4 different processes:
-
Extract Remittances to be included
The Order selects Remittances with specified Base Company/Companies. If no extraction is made on the order, all Base Companies will be included. Only Unsettled, Paid Remittances with status equal to Final are included, i.e. no Partially Settled Remittances are included. The Remittance balance must have a link to an Included Balance. -
Extract Included Balances to be matched with the Remittances
The Order selects unsettled balances of type Technical, Claim, Cession, Settlement Balance and Expected Payment with a link to the extracted Remittance (refer to 1 above). Balances which are members of Settlement Balances will NOT be included as such, but the linked Settlement Balance will be included and the member of the Settlement Balance will be paired. -
Create Balance Pairing between Remittance and linked Included Balance
When the extraction is completed, system automatically creates Balance Pairing between the extracted Remittance balance and the linked Included Balance (for a linked balance group it is the members of the group that are paired with the remittance). Validations are performed according to online functionality ‘Automatic Balance Pairing’ (started from the Business Partner Ledger). -
Create a log on Remittances included in the order
When the pairing is completed, system writes a log in the Notes field on each involved Remittance Balance. This log includes the Order Id, date and time when it was run. If no pairing took place, the reason for the failure (i.e. error message text/- id) is also written in the Notes field.
Create and run the Mass Pairing Of Paid Remittance Order #
- In the Periodic Functions folder, select Mass Pairing Of Paid Remittance. This opens the Find: Mass Pairing Of Paid Remittance Orders window.
- Press the Create New button or right click in the list and select New from the menu to create a new order
- Enter a title for the order if you want
- Specify the extract criteria (Base Company)
- Select the option “Update Paid Column in Administration Condition” if wanted
- Press OK to save the Mass Pairing Of Paid Remittance Order
- Press the menu button and select Run Now to run the Order
| Field | Description |
|---|---|
| Title | A Title for the order. This is shown in the Find: Mass Pairing Of Paid Remittance Order window Default: Blank Values: Any text or numbers up to 40 characters Mandatory: No Functional Impact: None |
| Base Company(-ies) | The Base Company(-ies) that should be included in the Order Default: none Values: One or several Base Companies Mandatory: No Functional Impact: Only balances with the selected Base Companies will be included when the Order is run. If no Base Company is selected, all Base Companies will be included |
| Update Paid Column in Administration Condition | This option can be selected in the order. Default: No (not selected) Values: Yes or No Mandatory: No Functional Impact: This option enables the order to automatically update the Paid column in Administration condition when a match is found between the included balances in Pairing and the Single account in the administration condition (i.e Accounting Year and Period), else, it will not update. |
Estimate Settlement Indicator Mass Update #
When booked, the Settlement Indicator on all non zero Estimate balances are set to Unsettled. Since Estimate balances cannot be included in balance pairing, the balances will always remain Unsettled. If you want to mark these balances as Settled when the estimation is complete and the accruals are reversed, this can be done with the Estimate Settlement Indicator Mass Update.
The Mass Update selects all Unsettled balances with details matching the criteria on the order. If option “Validate Complete Flag” is selected, the Period Estimates on each section will also be checked. For the Insured Period to be included, all Estimation items with a liquid Accrual Entry Code defined in the Period Estimation rules must be set to Complete. I option “Validate Complete Flag” is cleared, the Complete Flag in Period Estimates are not validated.
For all balances matching the above, the order will check if the liquid details sum up to zero on each Insured Period, Section and Currency. If this is the case, the Settlement Indicator on the balances will be changed to Settled. In addition, the Unsettled Amount on each balance is set to 0.
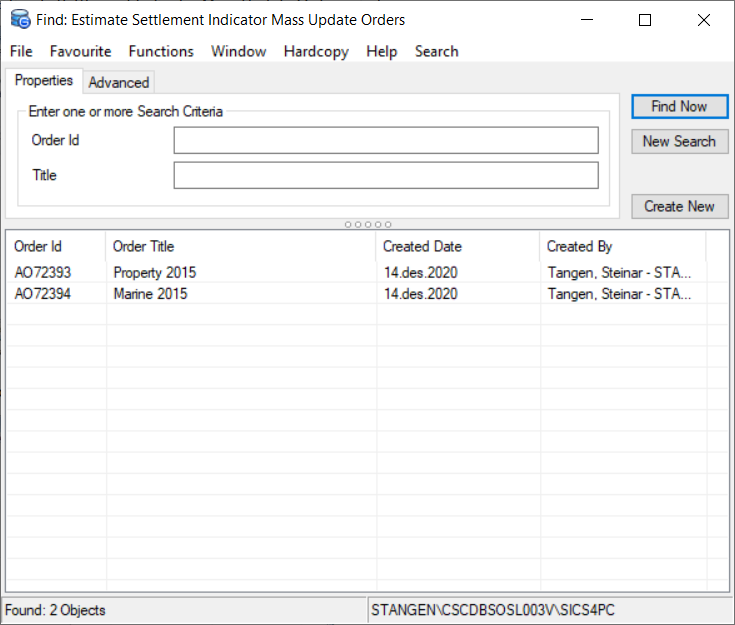
Create and run the Estimate Settlement Indicator Mass Update #
In the Periodic Functions folder, select Estimate Settlement Indicator Mass Update. This opens the Find: Estimate Settlement Indicator Mass Update Orders window.
Press the Create New button or right click in the list and select New from the menu to create a new order
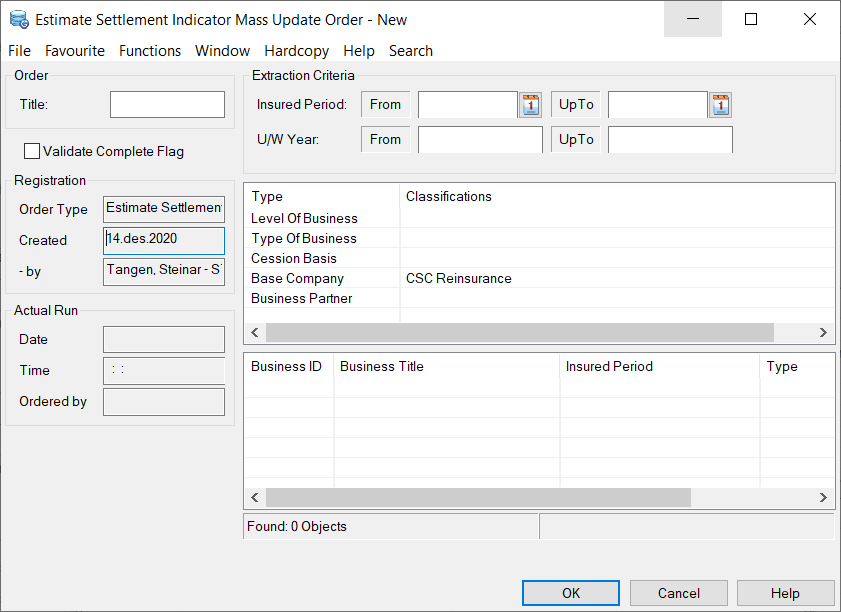
- Enter a title for the order if you want
- Specify the extract criteria. Mandatory criteria are U/W Year (both From and UpTo), Level of Business and Base Company
- Select option ‘Validate Complete Flag’ if you want the mass update only to include businesses where the Complete indicator is set in Period Estimates on all Estimation Items which is linked to liquid entry codes.
- Press OK to save the Estimate Settlement Indicator Mass Update Order
- Press the menu button and select Run Now to run the Order
| Field | Description |
|---|---|
| Title | A Title for the order. This is shown in the Find: Estimate Settlement Indicator Mass Update Order window Default: Blank Values: Any text or numbers up to 40 characters Mandatory: No Functional Impact: None |
| Validate Complete Flag | Default: Not selected Selected: For an Insured Period to be included in the Mass Update, all Estimation items with a liquid Accrual Entry Code defined in the Period Estimation rules must be set to Complete. Cleared: On all Insured Periods matching the extract criteria, the Mass Update will include all balances where the liquid details add up to zero, independent on whether the Complete flag has been set in Period Estimates |
| Insured Period (From and UpTo) | The range of Insured Period Start dates that should be included in the Order Default: none Values: Dates Mandatory: No, but if From is selected, also UpTo has to be selected and vice versa Functional Impact: Only balances where all details are linked to an Insured Period with start dates within the selected dates will be included |
| UW Year (From and UpTo) | The Underwriting Years that should be included in the Order Default: none Values: Years Mandatory: Yes Functional Impact: Only balances where all details are linked to an Insured Period with the selected Underwriting Years will be included |