Remittance Booking
Access an existing Remittance Worksheet #
You may want to access existing Remittance Worksheets in order to view existing details, record new information, or to make changes to the worksheet.
If a remittance is ‘In Progress’, ‘Planned’ or ‘Authorised’ (only for Paid Remittances), you can change existing information already recorded on the remittance. You can also change its status to ‘Inactive’, or you can close it, i.e. change the status to ‘Final’. A Final remittance cannot be changed except for a few fields like references and Notes. If Remittance system parameter ‘Validation of Value/Due Date on Remittance’ is activated, also the Value Date and the Due Date can be changed (refer to System Administrators Guide for more information). System supports to update remittance manually or via Web services. Same updating rules apply for both updating methods.
You can open existing Remittance Worksheets from different parts of SICS. In addition to the procedures described below, Remittance Worksheet properties may be accessed from Settlement Balances and Account Balances when Remittance worksheets are included in these groups.
To open a Remittance Worksheet from the Business Partner Ledger window:
- Open the Business Partner Ledger where the Remittance Worksheet is booked.
- Select Remittance among the Balance Types and if applicable specify further search criteria
- Select the Remittance Worksheet you are searching for and open it by double-clicking or selecting Open Remittance Properties from the menu.
(For further information about how to access and search for information in a Business Partner Ledger see chapter The Business Partner Ledger.)
To open a Remittance Worksheet from the Business Partner Properties window:
- Select the Business Partner for whom the Remittance Worksheet applies from the Find: Business Partner window.
- Select the Remittance Worksheet button from the Business Partner Properties window
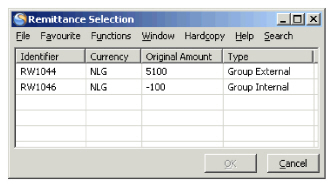
The Select Pending Remittances window appears if open remittances exist for the Business Partner
- Select the Remittance Worksheet you are searching for.
(For further information about how to access and search for Business Partner information, see chapter Find a Business Partner.)
To open a Remittance Worksheet from the ‘Find: Accounting Worksheet window’:
- Select Remittance as Worksheet Type from the Find: Accounting Worksheet window.
- Specify further search criteria if applicable
- Select the Remittance Worksheet you are searching for from the displayed worksheet list.
(For further information about how to access and search for worksheets, see chapter Find Worksheets.)
Open a New Remittance Worksheet Manually #
You can open New Remittance Worksheets when:
- Payments are received from Business Partners
- Account Balances are to be paid to Business Partners
- Paid Remittances are made to Business Partners
When opening a new remittance, ‘Received’ remittance is open by default. You can make ‘Paid’ remittance as default by selecting a parameter in System Parameter> Accounting >Remittance as ' Paid Remittance as Default'
To open a new Remittance Worksheet from the Business Partner Ledger window:
- Open the Business Partner Ledger for the Business Partner the new Remittance Worksheet is to be booked
- Select Make New Remittance from the pop-up menu.
If pending remittances exist, the Select Pending Remittances window appears. Select New from the menu in this window. (For further information about how to access and search for information in a Business Partner Ledger see chapter The Business Partner Ledger.)
To open a new Remittance Worksheet from the Business Partner Properties window:
- Select the Business Partner, for whom the Remittance Worksheet is to be booked, from the Business Partner display list.
- Select the Remittance Worksheet button from the Business Partner Properties window
- The Select Pending Remittances window appears if open remittances exist for the Business Partner. Select New from the menu in this window
(For further information about how to access and search for Business Partner information see the chapter Find a Business Partner.)
To open a new Remittance Worksheet from the ‘Find: Accounting Worksheet’ window:
- Select New Remittance Worksheet from the display list in the Find: Accounting Worksheet window. The Find: Business Partner window appears.
- Select the Business Partner, for whom the Remittance Worksheet is to be booked, from the Business Partner display list.
The Select Pending Remittances window appears if open remittances exist for the Business Partner. Select New from the menu in this window. (For further information about how to access and search for worksheets, see section Find a Worksheet on page 11-125.)
| Field | Description |
|---|---|
| (Unlabelled) Business Partner Name | The name of the Business Partner the Remittance Worksheet applies for. You can select another Business Partner by selecting the_Find_ button next to the field. The pending remittances for the new Business Partner are listed. _Values:_ Business Partner Name _Derived from:_ The Business Partner from the Business Partner Ledger, Business Partner Properties or the selected Business Partner in the _Find: Business Partner_ window. _Mandatory:_ Yes |
| Identifier | A unique identification of the Remittance Worksheet assigned when the worksheet is saved/applied. Values: Prefix + (‘booking year’) + number, e.g. R'2004'2000 Derived from: The Remittance Properties Mandatory: Yes |
| Currency | The Remittance Balance’s Payment Currency Values: ISO list of Currencies (ADP, AED, AFA, etc) Derived from: The Remittance Properties Functional Impact: Business Partner Ledger Mandatory: Yes |
| Original Amount | The Remittance Balance’s Payment Amount Values: Amount Derived from: The Remittance properties Functional Impact: Business Partner Ledger Mandatory: Yes |
| Status | A remittance progress through different statuses before it can be closed. Only worksheets with pending statuses are displayed in this window. Values: In Progress, Authorized, Planned, In Execution and Rejected. Derived from: The Remittance Properties Mandatory: Yes |
| Remittance Type | Describes the origin of the Remittance Worksheet Balance, e.g. payment via Wire or Check Values-Recieved Remittance: Check, Check 2, EDI, eMessaging, External, Internal, Void P-Auto-Check, Void P-Check, Void P-Wire, Wire, Wire 2 and Write Off Values-Paid Remittance: Auto-Check, Check, Check 2, EDI, eMessaging,External, Void R-Check, Void R-Wire, Wire, Wire 2 and Write Off Derived from: The Remittance Properties Mandatory: Yes |
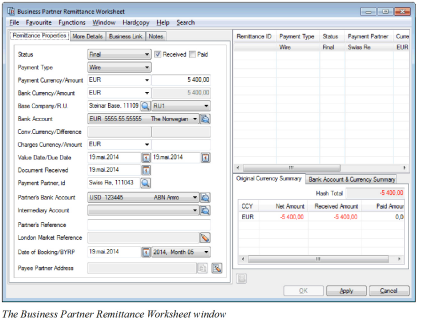
Enter Details in the Remittance Worksheet #
When a new Remittance worksheet is opened manually most fields are empty but some fields are defaulted by the system. Status, direction, payment type and system parameters determine the information required in the worksheet.
- Open a Remittance Worksheet manually. (See the chapter Open a New Remittance Worksheet Manually on page 11-360.)
- Select the Status(e.g. Planned, Final) of the worksheet, define the Direction(Paid/Received) and select the Payment Type (Check, Wire, etc.)
- Register the other details accordingly. Refer to the field descriptions below.
- Click Apply to save your worksheet. The system validates the details and makes sure that all mandatory information is entered. A Remittance ID is assigned.
- When all details are entered and the worksheet has gone through all necessary statuses, change the status to Final and click OK. It is no longer possible to modify the worksheet.
If the ‘Grouping of Internal Remittances’and the ‘Internal Remittances Equal Zero’ system parameters are set, SICS creates a link between the internal remittances forming the group that made the sum zero. Note! It is possible to restrict users from specific statuses. For example, a claim handler is only allowed to set the remittance to In Progress, while a claim manager is allowed to change it to Authorised. (See your System Administrator regarding the set up of System Parameters and Security.)
To copy a remittance in same worksheet:
More than one remittance can be created in the same worksheet. If most of the information for an existing remittance applies for a new remittance you can select to copy the existing remittance.
- Select one of the remittances already entered into the worksheet.
- Select Copy from the pop-up list in the Remittance display area. A new remittance appears. Several fields are copied from the source remittance to the new remittance.
- Make your adjustment to the new remittance.
- Click Apply to save the new remittance.
The new remittance is saved with a unique worksheet ID in addition to the existing remittance(s) in the worksheet.
To add a new remittance in same worksheet:
You can also create a new remittance in the same worksheet.
- Select one of the remittances already entered into the worksheet.
- Select New Remittance from the pop-up list in the Remittance display area. Most fields are empty but some fields are defaulted by the system in the new remittance.
- Make your adjustment to the new remittance.
- Click Apply to save the new remittance.
The new remittance is saved with unique worksheet ID in addition to the existing remittance(s) in the worksheet.
To include pending remittances in same worksheet:
You can also include Pending Balances (from the Pending Remittances window) in your worksheet.
- Select More Pending Balances from the pop-up menu in the Remittance display area. The Pending Remittances window appears.
- Select one or more of the pending balances and select Transfer Selected from the pop-up menu. The transferred balance is included in the worksheet with the worksheet ID’s previously assigned.
- Make adjustment to the pending remittance(s).
- Select Apply to update your changes to the worksheet.
To delete a remittance from worksheet:
When a remittance is incorrectly recorded you can remove all details entered if the remittance is not yet applied to the worksheet.
- Select a remittance from the worksheet. The worksheet cannot have a Worksheet ID.
- Select Delete from the pop-up menu in the Remittance display area.
The remittance is removed. Also note if you click the Cancel button, all changes done in the worksheet since ‘apply’ was last selected, are removed.
Maintain Functional Currency for the Remittance balance #
If you want to inspect or change the Functional Currency Exchange Rates before the remittance status is set to Final, you select the Calculate Functional Currencies option. This option is available in the Business Partner Remittance Worksheet window of an open Worksheet. The defaulted exchange rates can be overruled depending on system parameter settings. See Currency under Accounting chapter of Maintain System Parameters in the_System Administrator Guide_ for more details.
If the remittance is a reversal of another remittance the Functional Amount is copied from the source remittance if defined so in the system parameters, else the default exchange rate is the same as the general rule for all other new remittances; the current daily rate between the original currency and the functional currency.
If the pending remittance is a Group Remittance member the option is disabled. It is only possible to maintain the functional currency on the group owner itself and let the system recalculate the functional amount on the group members.
- Select Calculate Functional Currencies from the menu button on the Remittance Properties tab. You see the Calculate Functional Currency window.
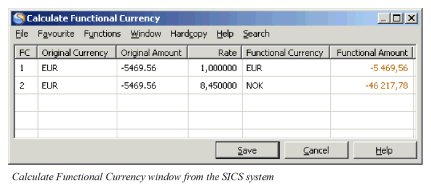 2. Manually overrule the given exchange rates in the Rate column for Functional Currency 1 (FC 1) and/or Functional Currency 2 (FC 2) and let the system calculate the Functional Amount.
3. Or manually overrule the calculated Functional Amount directly and let the system calculate and display the rate rounded to 6 decimals.
4. Save the input.
5. The saved functional currency amounts will be used when the remittance worksheet is saved to the database.
2. Manually overrule the given exchange rates in the Rate column for Functional Currency 1 (FC 1) and/or Functional Currency 2 (FC 2) and let the system calculate the Functional Amount.
3. Or manually overrule the calculated Functional Amount directly and let the system calculate and display the rate rounded to 6 decimals.
4. Save the input.
5. The saved functional currency amounts will be used when the remittance worksheet is saved to the database.
Note! If the remittance property is reopened before the status is set to Final it is possible to change the functional currency rate/amount again, but be aware that the displayed rates are not stored in the database but calculated by use of the functional currency amounts so they can vary from the entered rates.
Note! When the Functional Currency rate/amount is manually changed, the pop-up menu option flag Functional Currency is Manually Set by User is set to true. When a pending remittance is reopened, this flag remains true which means that the FC is not being recalculated. Furthermore, the FC is not being recalculated when changing e.g. the Partner’s Reference or when changing the Status to another pending remittance status or to Final. When changing the following information, the flag Functional Currency is Manually Set by User is set to False and the FC is recalculated; Received/Paid Indicator Payment Currency/Amount Bank Currency/Amount (but only if system parameter Use Bank Amount on Remittances in FC calculation is ON) Base Company, Reporting Unit (but only if special FC Currency is defined for the Reproting Unit) Value Date/Due Date (but only is special Functional Currency Exchange Rules are defined for Remittance) Date of Booking (but only is special Functional Currency Exchange Rules are defined for Remittance).
Note! This flag, Functional Currency is Manually Set by User, is also set to True when a reversal remittance is created and the system parameter Reverse with Re-Calculation is OFF, independent if the system parameter Change Functional Currency Rate For Pending Remittance is selected or not. This flag is used to keep the FC amounts also when status is changed on the remittance. This flag is visible on the remittance only if the system parameter Change Functional Currency Rate For Pending Remittance is ON, else it is hidden. If information on the remittance is manually changed by the user, see the list of information above, then the FC amounts are recalculated and the flag is set to false.
| Field | Description |
|---|---|
| FC | Indication of Functional Currency 1 and Functional Currency 2. Values: 1 for Functional Currency 1 and 2 for Functional Currency 2 Functional Impact: None Mandatory: Yes |
| Original Currency | The payment currency for the remittance balance. Values: E xpressed according to ISO definition, e.g. USD, GBP, etc Functional Impact: Basis currency for the exchange rate calculation against Functional currencies. Mandatory: Yes |
| Original Amount | The payment amount for the remittance balance. Values: The payment amount for the remittance balance. Functional Impact: Basis amount for the calculation of the Functional Currency amount. Mandatory: Yes |
| Rate | The current exchange rate between the original currency and Functional Currency 1/Functional Currency 2. Values: Number with 6 decimals Functional Impact: The exchange rate is used to calculate the functional currency amounts. When the window is closed the rate is not stored, only the Functional Amount is stored together with the Functional Currency. It is possible to let the system display the rates again (option View Functional Currencies) but be aware that these displayed rates can vary from the entered rate if they have been overruled by the user. Mandatory: No |
| Functional Currency | Functional Currency 1 and 2 are defined under System Parameters, Accounting, Currency. Unless special functional currencies have been defined for Legal Reporting Units or overwritten on individual businesses. Values: E xpressed according to ISO definition, e.g. USD, GBP, etc Functional Impact: The functional currency amount 2 is calculated in addition to the existing booking detail, and saved as a second additional value to each booking detail. Mandatory: Yes |
| Functional Amount | The calculated Functional Currency Amounts 1 and 2. Values: An amount expressed in functional currency Functional Impact: The functional currency amount 1 and 2 is calculated in addition to the payment amount, and saved as additional values to each remittance balance. Mandatory: Yes Applicable for: P&C |
| SICS Life |
| Field | Description |
|---|---|
| Status | A remittance progress through different statuses before it can be closed. Values: For Paid Remittances: Authorised, Final, In Progress, Inactive, Planned and Rejected. For Received Remittances: Final, In Execution, In Progress, Inactive, Planned and Rejected. (The available values depend on how the worksheet is generated and how the remittance system parameter is set.Contact your system administrator for further information.) Default: In Progress Validations: For paid remittances each status may be associated to security options allowing different staff members to have different authority levels when handling the remittance. Mandatory: Yes |
| Direction (Unlabelled) | Two tick boxes to indicate if the Remittance Worksheet is for Paid (outgoing) or Received (incoming) payment. Values: Paid and Received (Alternate by selecting the boxes) Default: Received |
| Payment Type | Describes the origin of the Remittance Worksheet Balance, e.g. payment via Wire or Check Values: EDI, eMessaging, Check, Check 2, Auto Check, Internal, External, Wire, Wire 2 and Write Off Default: Wire Validations: Restrictions may be defined for Payment Type in combination with Status and Amounts for Paid- and Received Remittances. (See your System Administrator for further information about the Security settings Using Domain Restrictions) Mandatory: Yes |
| Check No. | Enter the check number associated with the Remittance Values: Free input Derived From: The field is enabled upon selection of the payment type values Check and Check 2 Mandatory: No |
| Wire No. | Enter the Wire ID associated with the remittance. Values: Free text, max. 40 characters Validation: Payment Type must be any type of wire and your system must be set up to allow input of a Wire ID. Functional Impact: None Mandatory: No |
| Payment Currency | The currency of the remittance amount Values: ISO list of Currencies (ADP, AED, AFA, etc) Functional Impact: Business Partner Ledger Mandatory: Yes |
| Payment Amount | The amount of the remittance Values: Amount Functional Impact: Business Partner Ledger Mandatory: Yes |
| Bank Currency | If your bank credits or debits your account in another currency than the original payment currency Values: ISO list of Currencies (ADP, AED, AFA, etc) Default: Same value as Payment Currency. When system Parameter Bank Currency same as Payment Currency for Paid Remittance is selected, the Bank Currency should be the same as Payment currency, else a validation message will be thrown (See System Admin User guide- Chapter 8.2) Mandatory: No |
| Bank Amount | If your bank credits or debits your account in another currency than the original the payment amount is also different from the original. Values: Amount Derived from: The field is enabled when another currency than the Payment Currency is selected in the Bank Currency field Default: Same amount as the Payment Amount Mandatory: Yes, when the Bank Currency is different than the Payment Currency |
| Base Company | The Base Company the remittance applies for Values: Business Partners defined as Base Companies in your system. You can find and enter the Base Company in different ways. If you know the Base Company ID, you can enter it directly. Or you can type in the Base Company name or part of it and select from a list of possible matches. Alternatively you can press the Find button to open the Find Business Partner window and find/transfer the Base Company from there. Functional Impact: Enables the BYRP field in the Remittance Worksheet, which is mandatory for applying the worksheet Mandatory: Yes |
| R.U. | The Reporting Unit the Remittance is allocated to Values: Reporting Units defined for the Legal Reporting Unit Category selected in the System Parameters. Derived from: The Legal Reporting Unit Category field located in the System Parameter’s Miscellaneous tab. (See your System Administrator for further information.) Functional Impact: The field, in addition to the Base Company field, enable the BYRP field in the Remittance Worksheet, which is mandatory for applying the worksheet. Mandatory: Yes, if available |
| Bank Account | The Base Company’s approved bank accounts Values: Currency, Account number and Bank name. (The detail button next to the field enables you to view all details). Derived from: The list of Bank Accounts defined among the Business Partner details Default: The bank account or bank account drop-down list for the entered Bank Currency (if only one per currency or more than one per currency). A system parameter might be set to default one bank account even if there exists more than one for the given currency, see your System Administrator for further information. Functional Impact: The Paid- and Received amounts of the worksheet are added together and displayed per bank account in the Bank Account & Currency Summary tab. Mandatory: Only if the system parameter Own Bank Account Mandatory for Remittance is selected. (See your System Administrator for further information.) |
| Conv.Currency | Base Currency if Payment Currency and Bank Currency are not the same Values: Base Currency Derived from: The Base Currency of the Base Company. Or, if no base currency is defined for the base company, the default Base Currency defined among the Business System Parameters. (See your System Administrator for further information.) Mandatory: Yes, when Payment Currency and Bank Currency differ |
| Difference | The difference between Payment Amount and Bank Amount converted to Base Currency Values: Amount Mandatory: Yes, when Payment Currency and Bank Currency differ Calculation: Bank Amount converted to Base Currency less Payment Amount converted to Base Currency by use of the current daily rate if Value Date is not entered on the remittance, else the daily rate at the Value Date. |
| Charges Currency | The currency used for bank charges in case of received remittances Values: ISO list of Currencies (ADP, AED, AFA, etc) Default: Bank Currency Functional Impact: Business Partner Ledger - booking depends on the System Parameter Book Bank Charges as separate Remittances. (See your System Administrator, and also to the chapter Book Bank Charges on page 11-396 for further information.) Mandatory: No |
| Charges Amount | The amount charged by the bank for received remittances. Values: Amount Functional Impact: Business Partner Ledger - booking depends on the System Parameter Book Bank Charges as separate Remittances. (See your System Administrator for further information.) Mandatory: No |
| Value Date |
The Date of the Remittance given by the bank on the Bank Credit advice and Debit advice. Values: Date Validations: Validated against the system parameter_Value Date in Future allowed_and the system parameter Validation of Value/Due Date on Remittance. Paid Remittances are validated against the system parameter Value Date Mandatory only on Status Final. (See your System Administrator for further information.) Validated agains Booking Year and Period if your system is set up to do so. Value date is not validated against the system parameter Value Date within Booking Year and Period if the Payment type defined is any one of the following BCHARGE - Bank Charge, EDI -EDI EMESSAGE - eMessaging EXDIFF - Exchange Difference EXTERNAL- External INT- Internal WRITE_OFF- Write Off For all other Payment Types, the value date is validated against the Booking Year Period if the system parameter Value Date within Booking Year and Period is activated Mandatory: Yes, when status is Final or if the combination of Base Company, Status and Payment Type is defined in the General Interface triggering rules (see your System Administrator for further information). Other statuses may require a value date if the parameter Value Date Mandatory only on Status Final is cleared |
| Due Date |
The date when the remittance is due. The field is relevant for pending remittances. Value: Date Validations: The field cannot be empty The Due Date entered on Paid, pending Remittances are validated against the current date if the system parameter Give Warning Message when Due Date in Past and Give Warning Message when Due Date in Future are activated or the Due Date is validated against the system parameter Validation of Value/Due Date on Remittance (See your System Administrator for further information.) Mandatory: Yes |
| Document Received | The date when the document, e.g. check, was received by your company Values: Date Derived from: The field is enabled when Check or Check 2 is selected as Payment Type for Received Remittances Validation: The Received date cannot be in the future Mandatory: No |
| Payment Partner, id | The Business Partner name and id the payment is directed to/from. Values: Business Partner name and id. Default: The Business Partner name and id the Remittance Worksheet was created for. (Refer to the chapter Open a New Remittance Worksheet Manually on page 11-360). You can search for and define another Business Partner in following ways. If you know the Business Partner ID, you can enter it directly. Or you can type in the Business Partner name or part of it and receive possible matches for the text. Find button for search for the business partner is also a possibility. Functional Impact: The Remittance Worksheet is booked in the Business Partner Ledger of the defined Business Partner. If the selected Business Partner is defined as Base Company, a Reporting Unit field appears Mandatory: Yes |
| R.U. | The Payment Partner’s Reporting Unit Values: Reporting Units defined for the Legal Reporting Unit Category selected in the System Parameters. Derived from: The Payment Partner when being a Base Company The Legal Reporting Unit Category field located in the Miscellaneous tab among the Accounting System Parameter tabs. (See your System Administrator for further information.) Mandatory: Yes, if available |
| Partner’s Bank Account | The Payment Partner’s approved bank accounts Values: Currency, Account number and Bank name. If the reference data type Remittance Behavior is defined, the Payment Type is shown after the Bank Name. (The detail button next to the field enables you to view all details). Derived from: The list of Approved Bank Accounts defined among the Business Partner details. If the reference data type Remittance Behavior is defined, the available Bank Accounts depends on the Payment Type selected on the Remittance. If the Remittance Payment Type is equal to the value selected for the Remittance Behavior, only approved Bank Accounts having this Payment Type are available. If the Remittance Payment Type is different from the value selected for Remittance Behavior, all approved Bank Accounts are available. Validation: When the Remittance System Parameter Partner’s Bank Account Currency same as Payment Currency for Paid Remittance is selected, the Payment Currency is validated against the Bank Account Currency. The system validates when the paid worksheet is applied. Mandatory: For Paid Remittances when the status is pending (not Final or Inactive), unless the system parameter_Partners Bank Account Optional for Pending Paid Remittance._ For Received remittances or for Paid remittances when status is Final the Partner’s Bank Account is not mandatory. |
| Intermediary Account | Used when there are restrictions paying directly into, or receiving directly from, Partner’s account Values: Currency, Account number and Bank name. (The detail button next to the field enables you to view all details). Derived from: The field is enabled upon selection of Wire, Wire 2 and Internal as Payment Type. The values of the field are derived from the Payment Partner’s bank accounts. (Only the accounts having the check box Intermediary Account selected among their properties.) Mandatory: No |
| Address | The Payment Partner’s active addresses to be used when payment documents, e.g. a check has to be sent by mail. Values: Address + Office/department value, e.g. ‘Karl Johans gate 1, 0001 Oslo (Administration)' Derived from: The field is enabled when Payment Type Check or_Check 2_ is selected for Paid Remittances. The Values derive from the payment partner’s list of active addresses. _Mandatory:_ Yes, when enabled |
| Partner’s Reference | A reference entered to identify the payment, e.g. Statement of account as at …. The field is available for input also after the remittance worksheet has been closed, i.e. changed to Final. Values: Free text (max 40 positions) Mandatory: No |
| London Market Reference | When an EDI LIMNET settlement batch is processed, remittance worksheet is created and the reference from the message is added to the worksheet in this field. A reference can also be entered manually. Values: Member Stamp Number and Signing Reference Derived from: The field is enabled by the EDI System Parameter London Market Module in use. (See your system administrator for further information.) Functional Impact: Automatic pairing with balance having a reference that matches. Mandatory: No |
| Date of Booking | The date when the Remittance Worksheet is booked Values: Date Default: Today’s Date Validations: Not allowed to enter a date less than or greater than a number of days before or after today’s date defined in the system parameters (See your system administrator for further information.). Mandatory: Yes |
| BYRP (Booking Year and Period) |
The Year and Period for which the Remittance is booked in the Business Partner Ledger Values: Year, Period (e.g. 2004, Month 03) Derived from: Local Booking Terms defined for the Base Company in System Parameters (Base Company Specific Settings) Default: The Default value defined in the System Parameters Validations: The Entered value is validated against the Open Booking Year/Periods for Local defined in the System Parameters (See your System Administrator for further information.) Validated agains Value Date if your system is set up to do so. Mandatory: Yes |
| Payee Partner Address | Selecting the details button next to the field in a paid remittance worksheet, a Choose Business Partner and Address window appears. You select a Business Partner, Third Party, Bank or Person and an address that applies for your selected Partner. Only the address is shown in the Remittance Worksheet field. Values: ‘Address (office/department)’, e.g. ‘Main Street 1, 0011 OSLO (Accounting)’ Derived from: The addresses details of the selected partner (Business Partner, Third Party, Bank or Person) Default: Empty, but when you open the details window the Payment Partners first active address is defaulted. Mandatory: No |
| Field | Description |
|---|---|
| Remittance ID | A unique identification of the Remittance Worksheet assigned when the worksheet is saved/applied. Values: Prefix + (‘booking year’) + number, e.g. R'2004'2000 Derived from: Worksheet identifier series defined in the system parameters for Worksheet type Remittance. (See your System Administrator for further information.) Functional Impact: The Business Partner Ledger Mandatory: Yes |
| Payment type | See the Payment Type field in the Remittance properties tab. |
| Status | See the Status field in the Remittance properties tab. |
| Payment Partner | See the Payment Partner field in the Remittance properties tab. |
| Currency | See the Payment Currency field in the Remittance Properties tab. |
| Orig. Amount | See the Payment Amount field in the Remittance Properties tab. |
| Value Date | See the Value Date field in the Remittance properties tab. |
| Field | Description |
|---|---|
| CCY | Payment currencies included in the Remittance worksheet Values: ISO Currency; USD, GBP, CHF, etc. |
| Net Amount | The net of Received Amount and Paid Amount per currency Values: Amount |
| Received Amount | Total of Received Amounts per Currency Values: Negative Amount or ‘0,00’ |
| Paid Amount | Total of Paid Amounts per Currency Values: Positive amount or ‘0,00’ |
| Hash Total | The sum of all Net Amounts without considering currency. (No currency conversion is performed.) Values: Amount |
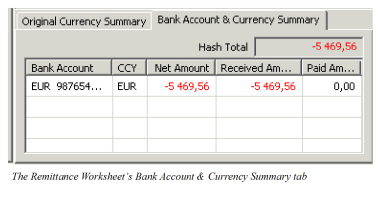
| Field | Description |
|---|---|
| Bank Account | List of Base Company Bank Accounts defined for the different payments in the Remittance Worksheet. See the Bank Account field in the Remittance Properties tab |
| CCY | The currencies for which Base Company Bank accounts have been selected in the Worksheet’s Remittance Properties Values: ISO Currency; USD, GBP, CHF, etc. Derived from: The Payment Currencies included in the Remittance Worksheet |
| Net Amount | The net of Received Amount and Paid Amount per currency. Only including Remittances for which Base Company Bank accounts are defined. Values: Amount |
| Received Amount | Total of Received Amounts per Currency. Only including Received Remittances for which Base Company Bank accounts are defined. Values: Negative Amount or ‘0,00’ |
| Paid Amount | Total of Paid Amounts per Currency. Only including Paid Remittances for which Base Company Bank accounts are defined. Values: Positive amount or ‘0,00’ |
| Hash Total | The sum of Net Amounts per currency. (No currency conversion is performed.) Only including Remittances for which Base Company Bank accounts are defined Values: Amount. |
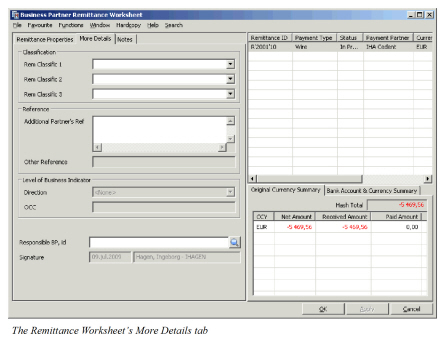
| Field | Description |
|---|---|
| Classification | Select a value from the drop-down list to indicate the nature of the Remittance or to classify the remittance in other ways. Values: None, Premium and_Claim_ plus user defined values _Default:_ Empty _Mandatory:_ No |
| Classification 2 | Select a value from the drop-down list to classify the Remittance Values: None plus user defined values Default: Empty Mandatory: No |
| Classification 3 | Select a value from the drop-down list to classify the Remittance Values: None plus user defined values Default: Empty Mandatory: No |
| Reference - Additional Partner’s Ref | Can be used to give a reference to the Remittance, e.g. if the Partner’s Reference field is not sufficient. Values: Fre text field of 100 characters Default: Empty Mandatory: No |
| Reference - Other Reference | Output field for other reference. Values: Fre text field of 20 characters Default: Empty Derived from: Can only be set via interface or web service Mandatory: No |
| Level of Business Indicator - Direction | Select a value from the drop-down list to indicate whether the Remittance relates to Inward or Outward business Values: None, Inward or Outward Default: None Derived from: The field is activated by the selection of System Parameter Indicator for Level of Business on Remittance Worksheet Required. (See your System Administrator for further information.) Functional Impact: Validated against level of business for balances included in a Balance Pairing process. Mandatory: Yes, must be different from None(when the field is active) |
| Level of Business Indicator - OCC | You can enter the OCC ID or - Name when the Level of Business Indicator - Direction is defined as Outward, Values: Free input of text Mandatory: No |
| General Ledger Account | Reference for the General Ledger. Only used when the Marine Direct Module is in use. Values: Defined in the Reference Data Maintenance by your System Administrator Mandatory: No |
| Responsible BP, id | Enter the name of, or transfer from the Find: Business Partner window, the legal responsible business partner (if applicable) Values: Business Partner name and Business Partner id. Mandatory: No |
| Signature | The date when and the name of the person who last updated the Remittance worksheet Values: Date and full name - logon id Functional Impact: None |

NB! The Business Link tab is visible only if the system parameter Link Business Insured Period To Remittances is activated
| Field | Description |
|---|---|
| Business Id | Enter the Business Id you want to link this remittance to. The field is enabled for input and editing also after the remittance is set to Final. Values: Any business, Assumed, Administrative or Retrocessionaire’s Participation, with at least one definite insured period Default: Empty Functional Impact: Only used for reporting purposes Mandatory: No |
| Insured Period | Select a value from the drop-down list to indicate which insured period the Remittance should be linked to. The field is enabled for input and editing also after the remittance is set to Final. Values: Any of the definite Insured Periods on the given Business Default: Empty, but as soon as the Business Id is given the last definite Insured Period on the given Business is defaulted Functional Impact: Only used for reporting purposes Mandatory: No |
Split Payment Amount by Bank Accounts #
When a Paid Remittance is created and later it is actually paid by the financial department and there is insufficient amount in the foreign currency bank account you may want to split the bank currency/amount in different currencies.
NB! This function is enabled only when system parameter Enable Remittance Bank Account Split is selected and only when the remittance status is Authorized. Furthermore the user must have special access rights to perform the function.
When a Bank Account Split has been made for a remittance balance it is no longer possible to change the direction to Received. But it is possible to change the Payment Currency/Amount and the Bank Currency/Amount on the remittance and it is the user’s responsibility to update the Bank Account Split accordingly.
To create the Bank Account Split:
- Open the Remittance Worksheet for which you want to create the Bank Account Split, it must be a Paid Remittance in Status Authorized.
- Select Bank Account Split from the Menu button at the bottom of the window.
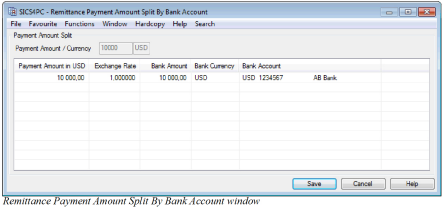
- The Remittance Payment Amount Split By Bank Account window appears. The payment and bank information is copied from the remittance as default values.
| Field | Description |
|---|---|
| Payment Amount / Currency | These fields are output only and are copied from the Payment Currency/Amount on the remittance properties. |
| Payment Amount in xxx | The value in the first row is copied from the remittance properties and the xxx in the heading name represents the payment currency for the remittance. The values in this column indicates how much of the total payment amount is taken from the different bank accounts. When the split is done and the user press Save the system will check that the sum of payment amounts match the total payment amount on the remittance. Values: Any positive amount Default: The remittance payment amount is defaulted in the first row. When new rows are added the field is empty. Functional Impact: Basis for calculation of the Bank Amount field Mandatory: Yes |
| Exchange Rate | The value in the first row is calculated based on the payment amount and the bank amount on the remittance. You can either enter the Exchange Rate and have the Bank Amount calculated or you can enter the Bank Amount and have the Exchange Rate calculated Values: Any positive amount up to 6 decimals Default: The remittance bank amount divided by the remittance payment amount is defaulted in the first row. When new rows are added the field is empty. Functional Impact: If given manually it is basis for calculation of the Bank Amount field, else it will be calculated as a rate between the given payment amount and the given bank amount. Mandatory: Yes |
| Bank Amount | The value in the first row is copied from the remittance properties. The values in this column indicate how much money in the given Bank Currency is taken from the different bank accounts Values: Any positive amount Default: The remittance bank amount is defaulted in the first row. When new rows are added the field is empty. Functional Impact: If given manually it is basis for calculation of the Exchange Rate field, else it will be calculated as the given payment amount multiplied with the Exchange Rate. Mandatory: Yes |
| Bank Currency | The value in the first row is copied from the remittance properties. The value in this column indicates what currency the Bank Amount is expressed in. Values: ISO list of Currencies (ADP, AED, AFA, etc) Default: The remittance bank currency is defaulted in the first row. When new rows are added the field is empty. Functional Impact: None. Mandatory: Yes |
| Bank Account | The value in the first row is copied from the remittance properties, if present. The value in this column indicate what Bank Account the Bank Amount/Currency is taken from. Values: ISO list of Currencies (ADP, AED, AFA, etc) Default: The bank account from the remittance properties is defaulted in the first row if it is present. When new rows are added the field is empty. Functional Impact: None. Mandatory: Yes if system parameter Own Bank Account Mandatory for Remittances is active, else it is not mandatory. |
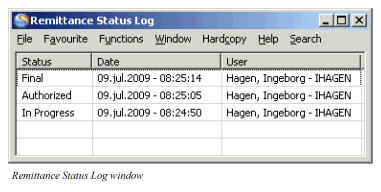
View the Remittance Status Log #
You may want to see the date and by whom the different statuses of the Remittance Worksheet have been changed and updated.
To see the status log:
- Open the Remittance Worksheet for which you want to view the historical status.
- Select View Status Log from the Menu button at the bottom of the window. The Remittance Status Log window appears.
Create a Remittance Notification #
When the Remittance Worksheet is applied you can create and send a notification to another user. I.e. if you are not authorised to change the Status from In Progress to_Authorised_ or _Final_, you can send a notification to a person with this authorisation to fulfil the remittance workflow.
- Open the Remittance Worksheet for which you want to create a Remittance Notification
- Select Attach Notifier from the menu button. The Notifications window appears.
- Enter the applicable information and click OK
The receiver of the notification can open the remittance directly through the attachment of the notification.
For further information regarding Notification see chapter Getting Started.
Reverse a Remittance #
When, for instance, a remittance worksheet has been booked in error, you can choose to reverse the worksheet.
Note! The worksheet has to be ‘Unsettled’ and have the status ‘Final’.
The defaulted payment type of the reversal/annulling remittance is the same as the type of the original remittance, unless your system administrator has decided that the defaulted payment type shall be of a Void type.
When the system parameter ‘Void remittance When Reverse’ has been selected, the defaulted payment type of a reversal/annulling remittance is according to the below table.
The table below shows the original remittance types with their corresponding reversal type when the system parameter ‘Void Remittance When Reverse’ is selected.
| Paid Remittance Worksheet | Reversal Remittance Worksheet |
|---|---|
| Auto-Check | Void P-Auto-Check |
| Check | Void P-Check |
| Check 2 | Void P-Check |
| Wire | Void P-Wire |
| Wire 2 | Void P-Wire |
| Received Remittance Worksheet | Reversal Remittance Worksheet |
| Check | Void R-Check |
| Check 2 | Void R-Check |
| Wire | Void R-Wire |
| Wire 2 | Void R-Wire |
To reverse a remittance worksheet:
- Open the business partner ledger where the unsettled remittance worksheet to be reversed is booked.
- Select the worksheet and select Reverse and Worksheet or Balance from the pop-up menu. A worksheet with reversed signs appears.
- Make changes to details such as date of booking, booking year/period, etc., in the reversed worksheet.
- Click Apply and OK.
The reversed worksheet is booked in the business partner ledger. The Note field indicates which worksheet ID that has been reversed. The system pairs the reversed balances only in case of reversal of a bank charge remittance.
Copy a Remittance #
When most of the information in one remittance worksheet is relevant also for the new remittance worksheet you are about to book, you can select to copy. The source remittance worksheet has to be Unsettled and have the status Final.
- Open the Business Partner Ledger where the unsettled Remittance Worksheet to be copied is booked.
- Select the worksheet and select Copy and Worksheet or Balance from the pop-up menu. A copied worksheet appears.
- Make the necessary changes to the details that are copied from the source worksheet.
- Click Apply and OK.
The copied worksheet is booked in the Business Partner Ledger. The new worksheet’s Note indicates the source worksheet’s ID.
Reverse and Replace a Remittance #
The Reverse and Replace of Remittance function is relevant when you want to move an unsettled remittance with status Final from one business partner to another, or from one base company/reporting unit to another.
To reverse and replace a remittance:
- Open the business partner ledger where the applicable remittance worksheet is booked.
- Select the worksheet and select Reverse and Replace Remittance from the pop-up menu. The Business Partner Remittance Worksheet window opens.
SICS creates reversed and replaced remittances based on the source remittance. 3. If required, modify the Partner’s Reference and Notes fields on the reversed worksheet Additionally, on the replace worksheet, modify the Base Company/Remittance Unit and Payment Partner field. 4. Click Apply and OK when you have made your changes. SICS now books the replaced and reversed remittances with payment type ‘Interal’ on the business partner ledger. In the Notes field you can see the source remittance being reversed and replaced.
Book Bank Charges #
When a received remittance balances is already booked as net (the Charges field on the remittance balance is empty and the Payment amount reflects the original payment from the client less the bank charges) and you want to book the bank charges, you can create a Bank Charges remittance worksheet with a link to the source remittance. The Accounting/Remittance parameter Book Bank Charges as separate Remittances has to be selected. (Refer to your System Administrator for further information).
- Open the Business Partner Ledger where the received net remittance balance is already booked.
- Select the Remittance Balance
- Select Book Bank Charges from the pop-up menu. A Remittance Worksheet appears.
- Define the Bank Charges Currency and -Amount
- Click Apply or OK to store the worksheet.
The Bank Charges Remittance Worksheet fields have predefined information from the source remittance balance. Apart from the fields Charges Currency/Amount-, Date of Booking- and BYRP, all other fields are disabled.
The Bank Charges Remittance is booked with Payment Type Bank Charges. When the source Remittance Worksheet is included in a Balance Pairing, the linked Bank Charges are included automatically.
Auto Generate Payment Request #
You can automatically generate a remittance worksheet for a balance due from you. Most of the generated worksheet’s fields get populated with information from the balance due.
The balance to be paid can be selected from:
- The Business Partner Ledger
- The View Associated Balances.
- Refer to the chapter View Associated Balances on page 11-558
- The Claim Ledger
- The Claim Worksheet
- The Installment schedule of a Non Proportional Outwards Cedent’s Contract
The Status field in the generated worksheet is defined In Progress and the Payment Type is defined as Wire. Most fields are editable except the direction of worksheet and the Payment Currency and -Amount fields, which are copied from the source balance.
When the system stores the Remittance, a pairing between the Remittance WS and the source balance is created.
SICS does not make an automatic balance pairing between members of a settlement balance group and a remittance unless the’Automatic Balance Pairing when Change of Remittance status’ (Accounting tab/Remittance subtab) is in use.
Note! This function depends on and behaves according to the settings of the Accounting/Remittance system parameters ‘Pairing Allowed on Open Remittance ‘and ‘Pairing Allowed on Open Status Authorized only ‘. (Refer to your System Administrator for further information.)
Note! When a remittance is created in the Auto Generate Payment Request function, the only options available in SICS are to save the remittance (by selecting OK) or to cancel the whole operation (by selecting Cancel). You can only create a new or copy an existing remittance if it is been manually created.
To auto-generate payment request from the Business Partner Ledger:
- Open the Business Partner Ledger where the balance due for payment is booked.
- Select the due balance
- Select Generate Payment Request from the pop-up menu. A Paid Remittance Worksheet appears.
- Update the fields of the worksheet and click Apply/OK
The Settlement Indicator of the balance due from you may be Unsettled or Partially Settled.
To auto-generate payment request from the View Associated Balances window:
- Open the Business Partner Ledger.
- Select a Settled Balance with associated balances.
- Select View Associated Balances from the pop-up menu. The View Associated Balances window appears.
- Select a balance with a Payable Part.
- Select Generate Payment Request from the pop-up menu. A Paid Remittance Worksheet appears.
- Update the fields of the worksheet and click Apply/OK
The Unsettled Part of the balance due from you may be equal or different from the Original Amount.
To auto-generate payment request from the Claim Ledger:
- Open the Claim Ledger of the claim where the balance due for payment is booked.
- Select the worksheet with the adjustment due for settlement.
- Select a balance from the List Chooser window.
- Select Generate Paid Remittance from the pop-up menu. A Paid Remittance Worksheet appears.
- Update the fields of the worksheet and click Apply/OK.
The balance due for payment is only selectable when the status is Closed and the transferred to ledger indicator Yes.
(Refer to the chapter Claim Ledger - Details Claim Worksheet Bookings for further information).
To auto-generate payment request from the Claim Worksheet:
- Make your bookings in the Claim Worksheet. When Worksheet Status is changed to Closed, a Generate Paid Remittance check box is enabled.
- Select the Generate Paid Remittance check box and click OK in the Claim Worksheet. A Paid Remittance Worksheet appears.
- Update the fields of the worksheet and click Apply/OK.
To auto-generate payment request from the Non Proportional OCC’s instalment schedule:
Note! The installment itself does not have to be booked in order to generate the remittances.
- Open the Limit/Premium condition of the OCC and navigate to the Instalments tab.
- Select the Premium Accounting button
- Highlight the installment for which you want to create payment request, and select “Book Remittance for selected Instalment” from the popup menu. Note that this option appears on a Non Proportional Outward Cedent’s Contract only.
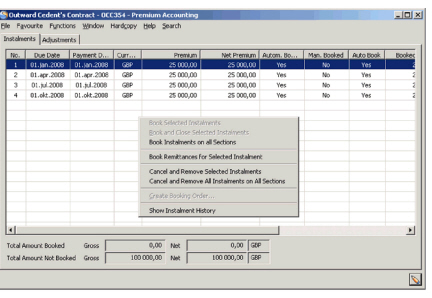 4. Respond “Yes” to the message that appears whether you want to generate for all retrocessionaires. (No will cancel the remittance generation.)
5. Message AC0227 appears - listing the worksheet IDs of the remittance worksheets created. One remittance worksheet is created per placement.
4. Respond “Yes” to the message that appears whether you want to generate for all retrocessionaires. (No will cancel the remittance generation.)
5. Message AC0227 appears - listing the worksheet IDs of the remittance worksheets created. One remittance worksheet is created per placement.
The “Paid” column in the Premium Accounting display list is updated for the relevant installment, both on the OCC as well as on placement level.
The remittance worksheets are created with default information as well as a link to the corresponding instalment as partner’s reference. If the Retrocessionaire is placed through an Intermediary (Broker) and the Broker has the Payment task the remittance will be assigned to the Broker. In other words, the partner with the Payment Task will be assigned as Business Partner on the remittance and the Retrocessionaire will be assigned as the Responsible BP on the remittance.
Remittance Grouping #
When a paid remittance is created or a payment is received and you would like to match it with a Settlement Balance Group, you create and maintain a Remittance Group.
For both paid and received remittances the payment transfers are created in such a way that the Base Company, Inward/Outward Business and System (P&C/Life) can be correctly recorded in the General Ledger System.
The Accounting system parameter ‘Group Remittance in use’ on the Remittance tab has to be activated to be able to use this feature. For more information about this system parameter, refer the System Parameter Maintenance chapter in the System Administrator’s Guide.
It is possible to create a Remittance Group both manually from a Single Remittance and automatically.
For manual creation of groups, see sections Create a Remittance Group from a Single Remittance on page 11-403 and_Maintain a Remittance Group on page 11-404_ below.
For automated creation of groups, see section Create Remittance Groups Automatically on page 11-409.
Example of a Remittance Group:
The Remittance Grouping is relevant when a Remittance covers more than one combination of:
- Base Company (e.g. DXC Oslo and DXC Stockholm)
- System (i.e. P&C and Life)
- Direction of Business (i.e. Inward and Outward) (Only relevant if system parameter ‘Indicator for Level on Remittance Worksheet is Mandatory’ is activated. For more information about Remittance system parameters, refer to the System Parameter Maintenance chapter in the System Administrator’s Guide.)
Technical Balances in P&C:
| TB1 NOK -2.000, | Oslo/Inwards |
| TB2 NOK -4.000, | Oslo/Inwards |
| TB3 NOK -1.700, | Stockholm/Inwards |
| TB4 NOK -1.300, | Stockholm/Inwards |
These balances are grouped in a Settlement Balance of NOK -9.000,-
Technical Balances in SICS Life:
| TB5 NOK - 600, | Stockholm/Inwards |
| TB6 NOK - 400, | Stockholm/Inwards |
These balances are grouped in a Settlement Balance of NOK -1.000,-
When a Remittance is linked to the Settlement Balance of NOK - 9.000,- the following worksheet is created:
| P&C/O/Inw | P&C/S/Inw. | |
|---|---|---|
| Group Wire | NOK 10.000,- | |
| Group Reversal | NOK -10.000,- | |
| Group Internal (TB1+2) | NOK 6.000,- | |
| Group External (TB5+6) | NOK 1.000,- | |
| Group External Reversal | NOK -1.000,- | |
| Group Internal (TB3+4) | NOK 3.000,- |
In addition the following Remittance worksheet has to be created in the SICS Life system:
| Life/S/Inw | |
|---|---|
| Group External | NOK 1.000,- |
Payment Types #
This table describes the different payment types that SICS allows you to use.
| Payment Type | Description |
|---|---|
| Group Owner | The Payment Type Wire/Check is transformed to Group Wire or Group Check. This is the Group Owner. |
| Group Reversal | There will always be just one Group Reversal. This member cancels the sum of the Group owner, the Bank Charges member (if any) and the Exchange Difference member (if any). Whenever the amount of these group members changes, the amount of the Group Reversal changes accordingly. |
| Group Internal | There will be one or more group members of this type, one for each combination of Base Company and Inward/Outward for internal members of the Settlement Balance. |
| Group External | Is created for the difference between the Remittance owner amount and the Settlement Balance amount. This will also create a corresponding Group External Reversal member. |
| Group External Reversal | This remittance is always kept synchronised with a corresponding Group External, however with the opposite arithmetic sign. |
| Bank Charges | Only created when the Group Owner is a received remittance. A Remittance Group can only contain one Bank Charge for each Group Internal/Group External with matching Base Company and Inward/Outward. |
| Exchange Difference | Behaviour is the same as for Bank Charges, except you can change the Paid/Received indicator |
** Exception:
If, in total, only one Group Internal and no Group External have been created, no Group Members will be created. For a created Paid Remittance the type will be ‘Wire’ rather than ‘Group Wire’. For an existing received remittance, the type will remain unchanged. The link between the Settlement Balance and the Remittance Balance is still established.**
Create a Remittance Group from a Single Remittance #
When you have registered a single remittance you can transform it into a Remittance Group. You can maintain the created Remittance Group and later link it to a Settlement Balance Group.
- Start from a single paid/received remittance of payment type Wire or Check that is not closed for updates. The details of the Remittance Worksheet are already recorded. For information about how to enter details on a worksheet, refer to Enter Details in the Remittance Worksheet on page 11-364.
- Select Transform to Group from the pop-up menu.
The system transforms the remittance into a Group Remittance. 3. Maintain the group by, for example, creating, removing or editing group members. For more information about how to maintain a remittance group, refer to Maintain a Remittance Group on page 11-404. 4. When you are happy with your Remittance Group you can link it to a Settlement Balance Group. For information about how to link a remittance group to a settlement balance group, refer to Link a Remittance Group to a Settlement Balance Group on page 11-413. 5. Save the Remittance Group Worksheet by selecting Apply or OK.
When the SICS transforms the Single Remittance into a Group Remittance, it also does the following:
- The Payment Type Wire/Check is transformed to Group Wire or Group Check. This is the Group Owner.
- Creates three Group members: Group Reversal, Group External and Group External Reversal .
Remittance Classification Group #
Both for paid and received remittances the payment transfers are created in such a way that the single remittance can be broken down into multiple group internal remittance worksheets according to the different classifications.
The Accounting system parameter ‘Is Classification Group Remittance In Use’ located in the Remittance tab, has to be activated to be able to use this functionality. For more information about this system parameter, refer the System Parameter Maintenance chapter in the System Administrator’s Guide.
It is possible to create a Remittance Classification Group manually from a Single Remittance.
For manual creation of classification groups, see sections Create Remittance Classification Group from a Single Remittance and Maintain a Remittance Classification Group below.
Example of a Remittance Classification Group:
The Remittance Classification Grouping is relevant when a Remittance is supposed to be broken down into multiple internal remittances according to the different classifications.
Example: The source single remittance worksheet is NOK 10.000. It will be split into four internal remittance worksheets according to the classifications.
Remittance Classification Group:
| Rem Class 1 | Rem Class 2 | Rem Class 3 | Amount |
| Refund | Domestic | OnShore | 1.000 |
| Refund | Domestic | OffShore | 2.000 |
| Refund | International | Onshore | 3.000 |
| Refund | International | Offshore | 4.000 |
As per the classification information, the system will create the following worksheets:
| Group Wire | 10.000 |
| Group Reversal | -10.000 |
| Group Internal | 1.000 |
| Group Internal | 2.000 |
| Group Internal | 3.000 |
| Group Internal | 4.000 |
On the More Details tab on each remittance, the classifications information will be shown in the fields Rem Class 1, Rem Class 2 and Rem Class 3 matching each of the group internal members. On both the Group Wire and Group Reversal, these 3 fields are empty.
The system lets you select any of the group members and Create Balance Pairing and include technical/claim balances in the same way as if it was a standalone remittance, i.e. independent of the other members of the group.
When one of the group internal member is selected as the driving balance to do the balance pairing, in the pairing screen, the system also automatically add the other group internal members of the same group into the pairing process. The user must take the decision if any of them shall be manually removed from the pairing process.
At the same time as the last Group Internal remittance becomes fully Settled (at the time when all Group Internal members of the group are Settled), then the system will also make the pairing of the group owner (Group Wire) and the Group Reversal remittance.
Payment Types #
This table describes the different payment types that the SICS allows you to use.
| Field | Description |
|---|---|
| Payment Type | Description |
| Group Owner | The Payment Type Wire/Check is transformed to Group Wire or Group Check. This is the Group Owner. |
| Group Reversal | There will always be just one Group Reversal. This member cancels the sum of the Group owner, Whenever the amount of Group Owner changes, the amount of the Group Reversal changes accordingly. |
| Group Internal | There will be one or more group members of this type, one for each combination of different classifications. |
Create Remittance Classification Group from a Single Remittance #
When you have registered a single remittance, you have the possibility to transform it into a Remittance Classification Group. You can maintain the created Remittance Classification Group and later do balance pairing between the group members and the technical/claim balance.
-
Start from a single paid/received remittance of payment type Wire or Check that is not closed for update, i.e. in a pending status. The details of the Remittance Worksheet are already recorded.
-
Select Transform to Classification Group from pop-up menu. The system opens a new dialogue window with a table contains of columns: Rem Class 1, Rem Class 2, Rem Class 3, Amount. You can select the wanted value from the drop-down list of Rem Class 1, Rem Class 2, Rem Class 3 if needed. Then, enter the amount after the classifications are selected.
-
Save the changes and return to remittance worksheet screen, the system transforms the remittance into a Classification Group Remittance.
-
Maintain the Classification Group, i.e. by creating, removing or editing group members. For more information about how to maintain a remittance Classification group, refer to Maintain a Remittance Classification Group.
-
Save the Remittance Classification Group Worksheet by selecting Apply or OK.
When the system transforms the Single Remittance into a Classification Group Remittance, the following takes place:
- The Payment Type Wire/Check is transformed to Group Wire or Group Check. This is the Group Owner.
- Group members: Group Reversal, Internal Group Members (The system lets you enter as many Group Internal members as necessary) are created.
Maintain a Remittance Group #
When a Remittance Group is created from a Single Remittance or automatically, SICS lets you maintain the group. You can, for example, create new members, remove members or change the status of the Remittance Group and its members.
Create New Remittance Group Members #
When you have created a Remittance Group, you can maintain it by creating additional members to the group. This may be necessary when you want to match the Remittance Group to a Settlement Balance.
- Start from a Remittance Group that is not closed for update. The Group may or may not be linked to a Settlement Balance.
- Select Create New Group Member from the pop-up menu. Select between the available group members.
- Update the amount field of the new Group Member(s).
- Save the changes to the Remittance Worksheet by selecting Apply or OK.
Available group members:
- Group External: A new Group member of type Group External is created with no Amount. A corresponding group member of type Group External Reversal is also created.
- Group Internal: A new Group member of type Group Internal is created with no Amount.
- Bank Charges: A new Group member of type Bank Charges is created with no Amount.
- Exchange Difference: A new Group member of type Exchange Difference is created with no Amount.
Edit a Remittance Group #
You are allowed to change some fields of the Remittance Group Worksheet. Which fields that are open for changes depend on the member of the group.
- Start from a Remittance Group Worksheet that is not closed for update. The group may or may not be linked to a Settlement Balance.
- Select a member of the group that needs to be edited.
- Make your changes to the group member.
- Select another member of the group that needs to be edited or save the changes to the Remittance Worksheet by selecting Apply or OK.
- The available fields for the Payment Types Group Wire and Group Check are the same as for the payment types Wire and Check. Some changes will be transferred to the members.
- Only some fields are open for changes. Payment type may only be changed from Group Internal to Group External or vice versa. The corresponding Group External Reversal will be created or deleted accordingly.
- Only the amount value may be entered/changed. The Group Reversal amount is updated accordingly.
Remove Remittance Group Members #
If you for instance have created a member of a Remittance Group by mistake or you find out that a member does not match the Settlement Balance, you can delete members from the Remittance Group.
- Start from a Remittance Group Worksheet that is not closed for update. The group may or may not be linked to a Settlement Balance.
- Select the member that you want to delete and select Delete from the pop-up menu. It is not allowed to delete the Group Owner or the Group Reversal member.
- The Remittance Group Member is deleted.
- If the deleted member is a Group External, the corresponding Group External Reversal is also deleted.
- If the deleted member is either a Bank Charge- or an Exchange Difference member, the Group Reversal will be adjusted accordingly.
- When you are happy with your Group Remittance, select Apply or OK to save your changes.
Remove All Members of the Remittance Group #
If you find that a Remittance Group Remittance should instead be a Single Remittance you are allowed to delete all members of the group. Also if a group is created manually and you find that it should be created automatically by linking it to a Settlement Balance, this function can be used.
- Start from a Remittance Group Worksheet that is not closed for update. The group may or may not be linked to a Settlement Balance.
- Select Delete All Group Members from the pop-up menu.
- The Remittance Worksheet is transferred back to a Single Worksheet. All members are deleted and the Group Owner (Group Wire or Group Check) is transferred back to Wire or Check.
If the Remittance Group is linked to a Settlement Balance, the link is broken. 4. Save the single remittance by clicking Apply or OK, create a new Remittance Group manually or create a new Remittance Group automatically by linking it to a Settlement Balance.
Change the Status of the Remittance Group #
You can change the status for the entire Remittance Group or for single members of the group.
- Start from a Remittance Group Worksheet that is not closed for update. The group may or may not be linked to a Settlement Balance.
- If you want to change the status for all members of the group, change the status of the Group Owner.
- If you want to change the status of single members of the group, select the appropriate Group Member.
- When you are finished making changes to the Remittance Group, select Apply or OK to save your Worksheet.
Change of status:
- Group Owner: The new status is copied to all members of the group. If the requested status change is to Inactive, the relationship between the Group Owner and a Settlement Balance is broken.
- Group External: You are only allowed to change the status to Inactive. The Group External Reversal is inactivated as well and the members will no longer be part of the group.
- Group Internal: You are only allowed to change it to Inactive and the member will no longer be part of the group.
- Bank Charges/Exchange Difference: You are only allowed to change it to Inactive and the member will no longer be part of the group. The Group Reversal member will be recalculated.
Copy Owner’s Status to all members of a Remittance Group #
If the status of one or more group members is different from the Group Owner you can change the status of the members into the same status as the Group Owner.
- Start from a Remittance Group Worksheet that is not closed for update. The group may or may not be linked to a Settlement Balance.
- Select Copy Owner’s Status to all Members from the pop-up menu.
The Owner’s Status is copied to all members of the Remittance Group. 3. When you are finished making changes to the Remittance Group, click Apply or OK to save your Worksheet.
If the requested status change is to Inactive, the relationship between the Remittance Group and a Settlement Balance is broken.
Maintain Functional Currency for the Remittance Group #
If you want to inspect or change the Functional Currency Exchange Rates before the remittance status is set to Final, you select the Calculate Functional Currencies option. This option is available for the group owner (e.g. Group Wire or Group Check) in the Business Partner Remittance Worksheet window of an open Worksheet. It is not possible to change the functional currency rate or amount on any of the other members of the group.
The defaulted exchange rates can be overruled depending on system parameter settings. See Currency under Accounting chapter of Maintain System Parameters in the_System Administrator Guide_ for more details.
Follow the workflow in chapter Maintain Functional Currency for the Remittance balance to change the functional currency rate or amount on the Calculate Functional Currency window.
When the rates are saved the system will recalculate the functional amounts for all the group members. In case the sum of the members functional amounts do not match the group owner’s functional amount due to rounding, the system will ask the user if the system, or the user, should select which member to have the functional amount adjusted.
- Select Save on the Calculate Functional Currency window to save the changes.
- If the sum of the group members do not match the group owner’s functional amount the following confirm message appears
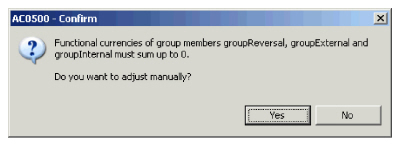
- By selecting No the system will adjust the functional amount on one of the members, but by selecting Yes you will open the following window
 4. By highlighting one of the balances and selecting OK the system will adjust the functional amount for this balance so that the sum of all members matches the group owner.
| Field | Description |
|---|---|
| Identifier | If the group remittance has been written to the database and each member has an identifier it is shown in this field, else this field is empty. Values: Identifier of the remittance group member Functional Impact: None Mandatory: No |
| Currency | The payment currency of the group remittance. Values: E xpressed according to ISO definition, e.g. USD, GBP, etc Functional Impact: None Mandatory: Yes |
| Orginal Amount | The payment amount of the group remittance member. Values: The payment amount of the group remittance member Functional Impact: None Mandatory: Yes |
Maintain a Remittance Classification Group #
Create New Remittance Classification Group Members #
When you have created a Remittance Classification Group, you can maintain it by creating additional members of the group. This might be necessary when you want to do balance pairing.
- Start from a Remittance Group that is not closed for update.
- Select Create New Group Member from pop- up menu. The system opens the new dialogue window.
- Select the classifications and enter amounts for the new Group Member(s).
- Save the changes, and return to the Remittance Worksheet screen.
Available group members:
- Group Internal: A new Group member of type Group Internal is created with Amount and classifications. On the More Details tab on each remittance the selected classifications will be shown in the fields Rem Class 1, Rem Class 2 and Rem Class 3.
Edit a Remittance Classification Group #
You are allowed to change some fields of the Remittance Classification Group Worksheet. Which fields that are open for changes depend on the member of the group.
- Start from a Remittance Classification Group Worksheet that is not closed for update.
- Select a member of the group that needs to be edited.
- Make your changes to the group member. You can change the amount. On the More Details tab, you can change the classifications.
- Select another member of the group that needs to be edited or save the changes to the Remittance Worksheet by selecting Apply or OK.
Remove Remittance Classification Group Members #
If you for instance have created a member of a Remittance Classification Group by mistake or you find out that a member does not match the Settlement Balance, you can delete members from the Remittance Classification Group.
- Start from a Remittance Group Worksheet that is not closed for update.
- Highlight the member that you want to delete and select Delete from the pop-up menu. The Remittance Group Member is deleted. It is not allowed to delete the Group Owner or the Group Reversal member.
- When you are happy with your Group Classification Remittance, select Apply or OK to save your changes.
Remove All Members of the Remittance Classification Group #
If you find that a Remittance Classification Group should instead be a Single Remittance you are allowed to delete all members of the group.
- Start from a Remittance Classification Group Worksheet that is not closed for update.
- Select Delete All Group Members from the pop-up menu. The Remittance Worksheet is transferred back to a Single Worksheet. All members are deleted and the Group Owner (Group Wire or Group Check) is transferred back to Wire or Check.
- Save the single remittance by clicking Apply or OK.
Create Remittance Groups Automatically #
If you already have created a Settlement Balance Group on the Business Partner Ledger, the system offers you the possibility to link it to a Remittance Balance automatically.
Automatically Create a Remittance or a RemittanceGroup from a Settlement Balance Group #
You have a Settlement Balance Group which is not already linked to a Remittance Balance. When you want to both create the Remittance and link it to the Settlement Balance Group, you follow the procedure below or via Web services. The rules of manually creating Remittance Balance also apply for Web services.
- Open a Business Partner Ledger. (Refer to chapter View Business Partner Ledger).
- Search and find the appropriate Settlement Balance Group from the Business Partner Ledger.
- Open the Settlement Balance Group properties.
- Select Create Remittance from the menu. If the Group Remittance is not in use in your system, this option is disabled if the Settlement Balance Group contains balances with different Base Companies or different Reporting Units and this is not allowed according to system parameter settings and base company properties, refer to system administrator. If the Group Remittance is in use the option is always enabled.
- A remittance is created of type Wire or Group Wire, the latter is the situation if the Settlement Balance Group contains balances from different Base Companies and the Group Remittance is in use. In case of Group Wire two or more remittance group members are also created.
- Maintain the Remittance Worksheet(s) and select Apply/OK to save the worksheet(s) when you are finished. For more information Remittance Groups, refer to Create a Remittance Group from a Single Remittance on page 11-403 Remittance and Maintain a Remittance Group on page 11-404.
The Settlement Balance and the Remittance Balance(s) is linked to each other, both in case of a Wire- and Group Wire Remittance.
Automatically Create a Remittance from an Account Balance Group #
You have an Account Balance Group which is not already linked to a Remittance Balance. When you want to both create the Remittance and link it to the Account Balance Group, you follow the procedure below.
- Open a Business Partner Ledger. (Refer to chapter View Business Partner Ledger).
- Search and find the appropriate Account Balance Group from the
- Open the Account Balance Group properties.
- Select Create Remittance from the menu. This option is disabled if the Account Balance Group contains balances with different Base Companies or different Reporting Units and this is not allowed according to system parameter settings and base company properties, refer to system administrator.
- A remittance is created of type Wire.
- Maintain the Remittance Worksheet(s) and select Apply/OK to save the worksheet(s) when you are finished.
The Account Balance and the Remittance Balance is linked to each other.
Automatically Create a Remittance Group from a Settlement Balance Group #
When you have a Settlement Balance Group that you want to link to an either Paid or Received Remittance Balance, you follow the procedure below.
The Remittance Balance has to meet the following criteria:
- Not already linked to a Settlement Balance Group
- Not part of a Remittance Group
- Have the status In Progress
- The Arithmetic sign must be opposite from the Settlement Balance Group.
- Have the same Currency as the Settlement Balance Group.
- Open a Business Partner Ledger. (Refer to chapter View Business Partner Ledger
- Search for and find the appropriate Settlement Balance Group.
- Open the Settlement Balance Group properties.
- Select Link to Remittance from the menu. This option is enabled only if the Group Remittance is in use in your system, refer to system administrator.
- Find the matching Remittance and select Link to Settlement Balance from the pop-up menu.
The remittance is linked to the Settlement Balance. The remittance is either transformed to a Wire Group/Check Group, if the Settlement Balance Group contains of balances from different base companies, or remains a single Wire/Check. 6. Maintain the Remittance Worksheet(s) and select Apply/OK to save the worksheet(s) when you are finished. For more information Remittance Groups, refer to Create a Remittance Group from a Single Remittance on page 11-403 Remittance and Maintain a Remittance Group on page 11-404.
Automatically Create a Remittance Group from a Single Remittance #
When you have a Remittance Balance that is not already transformed to a group and you want to link it to a Settlement Balance Group, you follow the procedure below.
The Remittance has to meet these criteria:
- Not already linked to a Settlement Balance Group
- Not part of a Remittance Group
- Have the Status In Progress
The Settlement Balance has to meet these criteria:
- Not already linked to a Remittance Balance
- The Arithmetic sign is opposite from the Remittance Balance
- The Currency matches the Remittance Balance
- Search and find a Remittance Balance. For more information about Remittance Balance, refer to Access an existing Remittance Worksheet on page 11-358.
- Open the Remittance Worksheet properties.
- Select Link to Settlement Balance from the pop-up menu.
The system opens the Business Partner Ledger allowing you to search for Settlement Balances. 4. Search and find a Settlement Balance. 5. Select the Settlement Balance and select Link selected to Remittance and transform Remittance to Remittance Group from the pop-up menu.
The remittance is linked to the Settlement Balance. The remittance is either transformed to a Wire/Check Group or remains a single Wire/Check. If a Remittance Group is created, group members are also created. 6. Maintain the Remittance Worksheet(s) and select Apply/OK to save the worksheet(s) when you are finished. For more information Remittance Groups, refer to Create a Remittance Group from a Single Remittance on page 11-403 Remittance and Maintain a Remittance Group on page 11-404.
Link a Remittance Group to a Settlement Balance Group #
When you have an individual Remittance Balance or a Remittance Group and you want to link it to a Settlement Balance Group, you follow the procedure below. This function is only possible if the Group Remittance is in use, refer to your system administrator.
The Remittance Balance has to meet the following criteria:
- Is a Group Owner
- Not linked to a Settlement Balance Group
- Unsettled
The Settlement Balance Group has to meet the following criteria:
- Not already linked to a Remittance Balance
- The Arithmetic sign is opposite from the Remittance Balance
- The Currency matches the Remittance Balance
- Search and find a Remittance Balance. For more information about Remittance Balance, refer to Access an existing Remittance Worksheet on page 11-358.
- Open the Remittance Worksheet properties.
- Select Link to Settlement Balance from the pop-up menu.
The system opens the Business Partner Ledger allowing you to search for Settlement Balances. 4. Search for and find a Settlement Balance. 5. Select the Settlement Balance and select Link selected to Remittance from the pop-up menu.
The remittance is linked to the Settlement Balance. 6. Maintain the Remittance Worksheet(s) and select Apply/OK to save the worksheet(s) when you are finished. For more information Remittance Groups, refer to Create a Remittance Group from a Single Remittance on page 11-403and Maintain a Remittance Group on page 11-404.
Remove Link to Settlement Balance Group from a Remittance Group #
When you find that a Remittance Group has been linked to a Settlement Balance Group by mistake, you can remove the link by following the procedure below.
- Search and find the Remittance Group that is linked to a Settlement Balance by mistake. For more information about Remittance Balance, refer to Access an existing Remittance Worksheet on page 11-358.
- Select Remittance Properties or Open Remittance Worksheet from the pop-up menu.
If Remittance Properties is selected_, select Edit_ from the pop-up menu of the Remittance Worksheet. 3. Select Remove Link to Settlement Balance from pop-up menu.
The link to Settlement Balance is broken but the Remittance Group remains unchanged. Link the Remittance Group to another Settlement Balance or maintain the Worksheet. For more information Remittance Groups, refer to Create a Remittance Group from a Single Remittance on page 11-403 Remittance and Maintain a Remittance Group on page 11-404. 4. Click OK/Apply to save the worksheet.
View Settlement Balance Group from a Remittance Group #
When you want to inspect the details of the Settlement Balance Group that is linked to the Remittance Group, you are allowed to navigate directly from the Remittance Group to the linked Settlement Balance Group.
- Search and find the Remittance Group that is linked to a Settlement Balance. For more information about Remittance Balance, refer to Access an existing Remittance Worksheet on page 11-358..
- Select Remittance Properties or Open Remittance Worksheet from the pop-up menu.
If Remittance Properties is selected, select Edit from the pop-up menu of the Remittance Worksheet. 3. Select View Settlement Balance from the pop-up menu.
SICS opens the View Settlement Balance Group window.
View Remittance from Settlement a Balance Group #
When you want to inspect the details of the Remittance Group or Single Remittance that is linked to a Settlement Balance Group, you are allowed to navigate directly from the Settlement Balance Group to the linked Remittance.
- Open a Business Partner Ledger. (Refer to chapter View Business Partner Ledger
- Search and find the appropriate Settlement Balance Group.
- Open the Settlement Balance Group properties.
- Select View Remittance from the menu.
SICS opens the Remittance Properties window.