Examine Business Actual Results
Open and View Online Statistics #
Sometimes the accounting information of a business is best presented by statistics. SICS generates online statistics based on the information from the Business Ledger. The statistics are updated immediately when you close a worksheet. Not only accountants, but also underwriters and managers will find that viewing the statistics is the quickest and easiest way to get an overview of the economic situation of a business.
You can access the Online Statistics from different parts of SICS:
- Select the Online Statistics button from the Business Ledger Account Balances Summary tab.
- Select Business Online Statistics from the pop-up menu on the Business Ledger Account Balances tab.
- Select the Online Statistics tab from the Business Property window.
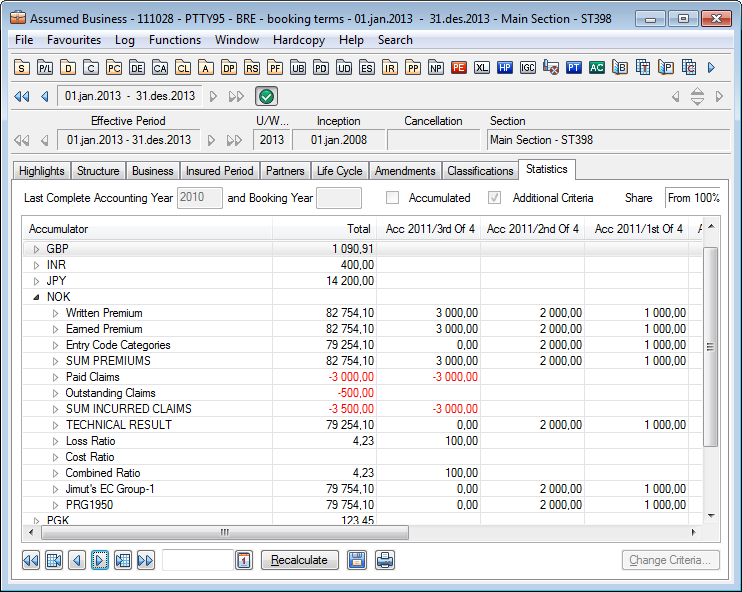
The layout of the Online Statistics window is system defined. You can view the figures of the statistics at different levels in a tree-view. The highest level is the Currency. The currencies are sorted in alphabetical order except for the Main Currency from the latest Insured Period which will be shown at top (if it is found on the ledger).The next level is the Entry Code Categories and the Entry Code Group Categories. When the view is expanded down to Entry Code level, totals are shown for Each Code Group or Entry Code Sub Category.
- Open the Online Statistics window.
- Click the Recalculate button.
 3. View the figures of the statistics at different levels by going deeper into the structures of the tree-view.
When you view the Entry Code Category structure, all booking codes from the Business Ledger are included.
The amount column to the very left shows the total of the columns with amounts per year. The Year can be Accounting Year, Booking Year, Underwriting Year, Occurrence Year or Financial Year, depending on the selection made in the Statistics Criteria window. These columns can show amounts or percentages.
If more than eight columns contain figures for the given extraction criteria, the navigation buttons below the statistic display are enabled. When you navigate to the right (previous columns) or to the left (next columns), you can either move to columns one by one, in bulks of 8 columns or jump directly to the oldest/newest column by use of the three different buttons.
| Field | Description |
|---|---|
| Last Complete Accounting Year | If it contains a year it indicates that this is the last Accounting year where all accounts are received and booked. Values: Year Derived from: The Accounts tab of the Administration Conditions or the Technical Worksheet. Mandatory: No Functional Impact: None |
| Last Complete Booking Year | If it contains a year it indicates that this is the last Booking Year that has been completed for this business. Values: Year Derived from: Technical Worksheet Mandatory: No Functional Impact: None |
| Accumulated | If this check box is selected, the figures of the statistics are accumulated. Values: Empty or selected Derived from: Statistic Criteria window Mandatory: No Functional Impact: None |
| Share | Shows the share conditions of the business for which the figures of the statistic are displayed (For further reference, see the chapter Share Conditions). Values: From 100%, From Brokers order, etc. Derived from: Statistic Criteria window Mandatory: Yes Functional Impact: None |
Open and View Online Statistics for Business Groups #
In SICS different types of business Groups are available for creation. Sometimes we also require accounting information at a group level. Online statistics are based on the information from the Business Ledger; and are automatically available for all types of predefined business groups.
The statistics are updated immediately when you close a worksheet. Not only accountants, but also underwriters and managers will find that viewing the statistics is the quickest and easiest way to get an overview of the economic situation of a group of businesses.
You can access the Online Statistics directly from the different business groups:
- Merger Group
- Business Group
- Master Treaty Group,
- Bouquet Calculation Group,
- Offer Group
- Risk Unit
For more information about business groups in SICS, Group Business in the Structure Incoming Business chapter
Print the Online Statistics/Save as Spreadsheet #
It is possible to print the Online Statistics. The same tree-view as shown on the Online Statistics window will be printed e.g. if you have selected Expand Selected, the printout will show exactly the same structure.
A front page, showing the criteria selections you have defined for the Online Statistics, will also be printed. For example, if figures for only a few Entry Codes have been defined, these Entry Codes will be listed on the front page.
- Define Selection Criteria according to your need
- Expand/suppress the statistics, if desired
- Select the Print Spreadsheet button
- A printout of the Online Statistics is printed on your default printer.
If you want to inspect the figures before making a printout, the Online Statistics figures can be saved as a spreadsheet and later on printed out. Also when you want to save the statistics as spreadsheet, a front page will be created listing all the selection criteria defined for the Online Statistics. The figures on the spreadsheet will have exactly the same structure as the figures shown on the statistics window.
- Define Selection Criteria according to your need
- Expand/suppress the statistics, if desired
- Select the Save as Spreadsheet button
- Define where to save the Online Statistics
- Enter a file name
Maintain Criteria for View of Online Statistics #
There may be many reasons for looking into the statistical material of a business. In your User Preferences you can define various default criteria and settings to meet your specific requirements. The settings in your User Preferences will be used every time you open the Online Statistics, but can be changed in the Statistics view or in the Criteria Selection window. Also additional criteria can be maintained in the Criteria Selection window.
- Open the Online Statistics. Refer to the Open and View Online Statistics section for more information.
- Select Recalculate to view the figures according to defaulted criteria or click the Change Criteria button. You see the Criteria Selection window.
- Make your changes in the Statistic Criteria window and click Recalculate. You see the result of the recalculation in the Online Statistics window immediately.
- Select the Reset Default Criteria button in order to see the figures from defaulted criteria.
- Select the Reset User Default Criteria button in order to see the figures based on the criteria in your User Preferences. Criteria that cannot be set in your User Preferences are reset to system defaults. If you have not defined any criteria in your User Preferences, all criteria are reset to system defaults
- Click OK when you are satisfied with the view of the statistics to close down the Statistic Criteria window.
Change ‘As of date’ of the Online Statistics #
You may need to view the figures of the statistics up to and including a specific booking date.
-
Open the Online Statistics window. Refer to the Open and View Online Statistics section for more information.
-
Enter the required booking date in the ‘As of date’ field of the window.
The system shows the Online Statistics per the specified date without having to click the Recalculate button. -
You can click the Recalculate button before you enter a specific booking date. The system will then show the status per the specified date immediately.
Maintain Original Currencies of Online Statistics #
When you open the Online Statistics and click Recalculate, all ledger currencies are displayed. You can select to view the Online Statistics for only one of the original currencies of the business.
- Open the Online Statistics window. Refer to the Open and View Online Statistics section for more information.
- Click the Change Criteria button.
- Clear both the All or Original Currency checks boxes, and select one of the currencies from the drop-down list.
- Select Recalculate and view the figures in the selected currency.
Convert Online Statistics Currencies #
In some situations you may need to see your statistical information in another currency than the original one(s). Or, you may need to convert all the original currencies into one of the currencies of the ledger. In these cases SICS lets you convert the figures into a selected currency.
- Open the Online Statistics. Refer to the Open and View Online Statistics section for more information.
- Click the Recalculate button and then the Change Criteria button, or click the Change Criteria button initially.
- Select the Convert to currency check box.
- Select a currency from the drop-down list.
- Select an Exchange Rate Type.
- Select an Exchange Rate Category depending on the selection of Exchange Rate Type.
- Select an Exchange Rate as of Type.
For each of the possible combinations in points 5. and 6. the following options are available: When Fixed is selected, enter the required further definitions.
| Exch.Rate Type: | Exch.Rate Category: | Exch.Rate as of Type: | Further input: |
|---|---|---|---|
| Day rate | Daily Rate | Current | |
| Fixed | Date | ||
| Sliding | |||
| Period Rate | Period End Rate | Current | |
| Fixed | Year, Booking Period frequency and booking period (according to frequency) | ||
| Sliding | |||
| Inception | |||
| Provisional Period End Rate | Current | ||
| Fixed | Year, Booking Period frequency and booking period (according to frequency) | ||
| Sliding | |||
| Year Rate | Year End Rate | Current | |
| Fixed | Year | ||
| Sliding | |||
| Provisional Year End Rate | Current | ||
| Fixed | Year | ||
| Sliding |
Note! The following rules when selecting Sliding in combination with Day Rate:
-
The B_ooking Date_ of each booking detail is used to find the nearest Day Rate when the booking origins from a Technical Worksheet.
-
The As at Date of each booking detail is used to find the nearest day rate when the booking origins from a Claim Worksheet. Note! The following rule when selecting Sliding in combination with Year Rate.
-
The Booking Year of each booking detail is used to find the Year Rate both when the booking origins from Technical Worksheet and Claim Worksheet.
Recalculate Online Statistics according to Share Conditions #
By default, the system displays the figures of the Business Ledger in the Online Statistics. If, for example, your bookings in the Business Ledger are according to a signed share of 10%, the system will display ‘From 100%’ in the Share field of the Statistic Criteria window. If you want to view the figures as 100% figures, you can do so by selecting For100% from the drop-down list of the Share field in Statistic Criteria window.
- Open the Online Statistic window. Refer to the Open and View Online Statistics section for more information.
- Click the Recalculate button in order to view figures and then click the Change Criteria button, or click the Change Criteria button directly.
- Select the required option from the Share field’s drop-down list.
- Click Recalculate in order to see the result of the changed share criteria.
If the system cannot find any appropriate share within the Share Conditions of an Insured Period, it does not show any figures for the Insured Period. (For further information, see the Share Conditions chapter.
View Online Statistics of Estimates #
If the Business Ledger contains Estimates, it may be interesting to view these figures in the Online Statistics. You can select to view the Statistics with the Estimates:
- Excluded (Default view)
- Included
- Only To view online statistics of estimates:
- Open the Online Statistics. (Refer to the chapter Open and View Online Statistics).
- Click the Recalculate button to view the figures from defaulted criteria and then click the Change Criteria button, or click the Change Criteria button directly.
- Select one of the options from the Estimates drop-down list as described above.
- Click Recalculate in order to view the result of the changed selection criteria.
View Online Statistics of Open Worksheets #
The Business Ledger can contain open worksheets. You can view the figures from these worksheets in your Online Statistics. If you need to see the total situation of the business and you know that Open Worksheets exist, you can view the figures from Open Worksheets together with figures from Closed Worksheets. You can also select to see the Open Worksheets only.
- Open the Online Statistics. (Refer to the chapter Open and View Online Statistics).
- Click the Recalculate button to view the figures from defaulted criteria and then click the Change Criteria button, or click the Change Criteria button directly.
- The Scope Closed Worksheets is selected by default. Clear the Closed Worksheet check box and select the Open Worksheet check box in order to view open worksheets only. Or, select the Open Worksheet check box in addition to Closed Worksheets in order to view both.
- Click the Recalculate button to view the result of the changed Scope Criteria.
View Online Statistics for Outward business #
In case you inspect the Online Statistics for Outward business you have one extra option, i.e. the Balance Type. For a proportional OCC you can inspect both As Original, As Booking and As Informational balance types. For a proportional ORP you can inspect both As Booking, As Account and As Informational balance types. For an OCC the default Balance Type is As Booking and for an ORP the default Balance Type is As Account. If you need to see the situation of the ORP before running the retrocession account order you must select As Booking. If you need to see the situation of the OCC before running the retrocession calculation order you must select As Original.
- Open the Online Statistics. (Refer to the chapter Open and View Online Statistics).
- Click the Recalculate button to view the figures from defaulted criteria and then click the Change Criteria button, or click the Change Criteria button directly.
- The Scope Balance Type is hidden if it is an Assumed business. If the business is Outward the Scope Balance Type is enabled and default value is As Account if it is an Retrocessionaire Participation and As Booking if it is an Outward Cedet’s Contract. Change to wanted Balance Type and press Recalculated.
View Online Statistics per Accounting Classification #
You can select to group and view the Online Statistics per Accounting Classification. This option is useful when the figures should be presented for instance per Class of Business; Type of Participation or per other types that makes the Accounting Classification unique.
- Open Online Statistics. (Refer to the chapter Open and View Online Statistics).
- Click the Recalculate button to view the figures from defaulted criteria and then click the Change Criteria button, or click the Change Criteria button directly.
- Select the Grouping option Per Accounting Classification.
- Click the Recalculate button to view the result of your grouping of figures.
In the Accumulator column of the Statistics window, the Accounting Classifications are displayed as the first level in the tree-views. Second highest level is the Currencies.
View Online Statistics per Section #
You can select to group and view the Online Statistics per Section. It may for instance be necessary to compare figures with statistics, perhaps from a business partner. If the other statistics are per Section it is important to be able to produce own figures per section.
- Open Online Statistics. (Refer to the chapter Open and View Online Statistics).
- Click the Recalculate button to view the figures from defaulted criteria and then click the Change Criteria button, or click the Change Criteria button directly.
- Select the Grouping option Per Section.
- Click the Recalculate button to view the result of your grouping of figures.
In the Accumulator column of the Statistics window, Sections are displayed as the first level in the tree-views. Second highest level is the Currencies.
View Online Statistics per Headline Loss #
If you have linked claims to various Headline Losses, it may be interesting to group and to view figures per Headline Loss in the Online Statistics.
- Open Online Statistics. (Refer to the chapter Open and View Online Statistics).
- Click the Recalculate button to view the figures from defaulted criteria and then
- Click the Change Criteria button, or click the Change Criteria button directly.
- Select the Grouping option Per Headline Loss.
- Click the Recalculate button to view the result of your grouping of figures.
- In the Accumulator column of the Statistics window, Headline Losses are displayed as the first level in the tree-views. Second highest level is the Currencies.
If Original Responsible Partner is mandatory, this option will automatically group bookings by Original Responsible Partner also.
Note! Claims not linked to any Headline Loss are shown as one group named ‘<None>’.
View Online Statistics per Claim #
Choosing this level, allows you to see the statiscs per claim.
- Open Online Statistics. (Refer to the chapter Open and View Online Statistics).
- Click the Recalculate button to view the figures from defaulted criteria and then
- Click the Change Criteria button, or click the Change Criteria button directly.
- Select the Grouping option Per Claim
- Click the Recalculate button to view the result of your grouping of figures.
- In the Accumulator column of the Statistics window, Claims are displayed as the first level in the tree-views. Second highest level is the Currencies.
If Original Responsible Partner is mandatory, this option will automatically group bookings by Original Responsible Partner also.
Note! Bookings not linked to any Claims are shown as one group named ‘<None>’.
View Online Statistics with multiple grouping levels #
You can select to group and view the Online Statistics with multiple grouping levels.
- Open Online Statistics. (Refer to the chapter Open and View Online Statistics).
- Click the Recalculate button to view the figures from defaulted criteria and then click the Change Criteria button, or click the Change Criteria button directly.
- Select one or more of the required grouping options; Per Section, Per Accounting Classification, Per Headline Loss, and Per Claim
- Click the Recalculate button to view the result of your grouping of figures.
In the Accumulator column of the Statistics window, the selected grouping levels are the first levels in the tree-views. The grouping will always be first Per Section, then Per Accounting Classification within each Section, followed by Per Headline Loss within each Accounting Classification, and finally Per Claim within each Headline Loss.
View Online Statistics Figures as Percentages #
The Online Statistics figures are by default presented as amounts. In some cases it can be interesting to view the figures as percentages. Each percentage reflects each year’s figure in percent of the total figure.
- Open the Online Statistics. (Refer to the chapter Open and View Online Statistics).
- Click the Recalculate button to view the figures from defaulted criteria and then click the Change Criteria button, or click the Change Criteria button directly.
- Select the Figures as Percentages check box.
- Click the Recalculate button to view the result of the figure selection.
This option can be used in combination with the Accumulated Figures option. (For further reference, see the chapter View Online Statistics as Accumulated Figures).
View Online Statistics as Accumulated Figures #
The default view of Online Statistics, is the change in figures per year. You can also select to view the Online Statistics figures as accumulated figures from the earliest year up to and including the latest year.
- Open the Online Statistics. (Refer to the chapter Open and View Online Statistics).
- Click the Recalculate button to view the figures from defaulted criteria and then click the Change Criteria button, or click the Change Criteria button directly.
- Select the Accumulated Figures check box.
- Click the Recalculation button to view the result of the figure selection.
This option can be used in combination with the Figures as Percentages option. It is then the percentages that are being accumulated. (For further reference, see the chapter View Online Statistics Figures as Percentages.)
View Online Statistics per Accounting Year #
The type of year to be viewed horizontally in the Online Statistics is defined in the Statistics Criteria window. The default view is the figures of the Underwriting Year (vertically) per Accounting Year (horizontally).
- Open the Online Statistics. (Refer to the chapter Open and View Online Statistics).
- Click the Recalculate button to view the figures from defaulted criteria and then click the Change Criteria button, or click the Change Criteria button directly.
- If required, narrow the span of Accounting Years to be extracted. You can select between the Accounting Years of the Business Ledger.
- If changes have been done, click the Recalculation button to view the result of the changes.
View Online Statistics per Accounting Period #
When looking into statistics of a business, it can be of interest to view a specific span of accounting years and/or accounting periods.
- Open the Online Statistics. (Refer to the chapter Open and View Online Statistics).
- Click the Recalculate button to view the figures from defaulted criteria and then click the Change Criteria button, or click the Change Criteria button. The Accounting Year option is by default selected as the horizontal view. The Accounting Years From and Up to include the Accounting Years of the Business Ledger. If required, narrow the span.
- In order to view a specific span of Accounting Periods within the Accounting Year(s), select the Enable Period Selection check box. The From- and Up to fields next to the Accounting Year fields are enabled.
- Select Periods from the drop-down lists. You can select between the Accounting Periods of the Business Ledger.
- Click the Recalculate button to view the result of your Accounting Period selection.
View Online Statistics per Booking Year #
The type of year to be viewed horizontally in the Online Statistics is defined in the Statistics Criteria window. The default view is the figures of the Underwriting Year (vertically) per Accounting Year (horizontally). You may also view the figures of the Underwriting Year (vertically) per Booking Year (horizontally).
- Open the Online Statistics. (Refer to the chapter Open and View Online Statistics).
- Click the Recalculate button to view the figures from defaulted criteria and then click the Change Criteria button, or click the Change Criteria button directly.
- Select the Booking Yea r radio button and, if required, narrow the span of Booking Years to be extracted. You can select between the Booking Years from the Business Ledger.
- Click the Recalculation button to view the result of the changes.
View Online Statistics for a selected Booking Period #
When looking into the statistics of a business, it can be of interest to view the figures of a specific span of Booking Years and/or Booking Periods.
- Open the Online Statistics. (Refer to the chapter Open and View Online Statistics).
- Click the Recalculate button to view the figures from defaulted criteria and then click the Change Criteria button, or click the Change Criteria button directly.
- Change the horizontal view from Accounting Year to Booking Year. The suggested Booking Years From and - Up to, includes the Booking Years of the Business Ledger. If required, narrow the span.
- In order to view a specific span of Booking Periods within the Booking Year(s), select the Enable Period Selection check box. The From- and Upto fields next to the Booking Year fields are enabled.
- Select Periods from the drop-down lists. You can select between the Booking Periods of the Business Ledger.
- Click the Recalculate button to view the result of your Booking Period selection.
View Online Statistics per Occurrence Year #
If you have bookings per Occurrence Year it may be interesting to view the Online Statistics per Occurrence Year. The Vertical view will then be the Accounting Years.
- Open the Online Statistics. (Refer to the chapter Open and View Online Statistics).
- Click the Recalculate button to view the figures from defaulted criteria and then click the Change Criteria button, or click the Change Criteria button directly.
- Select the Occurrence Yea r radio button and, if required, narrow the span of Occurrence Years to be extracted.
- Click the Recalculation button to view the result of the changes.
You can select between the Occurrence Years of the Business Ledger.
Note! The option is disabled if the Enable Period Selection check box is selected.
View Online Statistics per Underwriting Year #
It may be interesting to view Underwriting Years (horizontally) per Accounting Year (vertically) for instance if you are interested in the development of one or more Insured Period(s) throughout the accounting years.
- Open the Online Statistics. (Refer to the chapter Open and View Online Statistics).
- Click the Recalculate button to view the figures from defaulted criteria and then click the Change Criteria button, or click the Change Criteria button directly.
- Select the Underwriting Yea r radio button and, if required, narrow the span of Underwriting Years to be extracted.
- Click the Recalculation button to view the result of the changes.
Note! The Underwriting Year option is disabled if the Enable Period Selection check box is selected. The Accounting Year option is selected as the Vertical view automatically.
View Online Statistics per Original Underwriting Year #
If you have bookings per Original Underwriting Years it may be interesting to view the Online Statistics per Original Underwriting Year. The view will then be Original Underwriting Years (horizontally) per Accounting Year (vertically).
- Open the Online Statistics. (Refer to the chapter Open and View Online Statistics).
- Click the Recalculate button to view the figures from defaulted criteria and then click the Change Criteria button, or click the Change Criteria button directly.
- Select the Original Underwriting Yea r radio button and, if required, narrow the span of Original Underwriting Years to be extracted.
- Click the Recalculation button to view the result of the changes.
Note! The Original Underwriting Year option is disabled if the Enable Period Selection check box is selected. The Accounting Year option is selected as the Vertical view automatically
View the Online Statistics as a Ladder view #
If you select the option Ladder view, you can select which type of year to be shown horizontally and which to be shown vertically in the Online Statistics. If, for instance, it is required that the online statistic is displayed with underwriting year as the horizontal view and booking year as the vertical view, you must select the ladder view.
- Open the Online Statistics. (Refer to the chapter Open and View Online Statistics).
- Click the Recalculate button to view the figures from defaulted criteria and then click the Change Criteria button, or click the Change Criteria button directly.
- Select the option Ladder view. The radio buttons for the Vertical options are enabled for all years.
- Define the Layout of the Online Statistics by selecting Year to be shown vertically and Year to be shown horizontally.
- Click the Recalculation button to view the result of your selections.
Also note that if Accounting Year or Booking Year is to be shown horizontally, either Occurance Year, Underwriting Year or Orig. U/W Year has to be selected vertically. Also if Occurance Year, Underwriting Year or Orig. U/W Year is to be shown horizontally, either Accounting Year or Booking Year has to be selected vertically.
If Enable period selection is selected in combination with Ladder view, only Booking Year or Accounting Year can be shown horizontally, and only Occurence Year, U/W Year or Orig. U/W year can be shown vertically.
The selected type of year to be viewed vertically is displayed in the Accumulator column as the second highest level in the tree-view. If more than one year apply in the vertical view, the years are split and displayed separately.
Suppress Entry Code Group Category from Online Statistics #
In order to display fewer levels of the tree-view, you can select to suppress Entry Code Group Category from Online Statistics.
- Open the Online Statistics. (Refer to the chapter Open and View Online Statistics.
- Click the Recalculate button in order to view the figures from defaulted criteria in the Statistics window.
- Expand the tree-view of the Entry Code Group Categories.
- Select the Suppress Entry Code Group Category from the pop-up menu of the Online Statistics window. The levels of Entry Code Group Categories are not displayed in the tree-view.
- Clear the option Suppress Entry Code Group Category from the pop-up menu in order to revert to the default view.
Suppress Entry Code Group Category and Entry Code Group from Online Statistics #
In order to display an Online Statistic with fewer levels of the tree-view, you can select to suppress Entry Code Group Category and Entry Code Group from Online Statistics window.
- Open the Online Statistics. (Refer to the chapter Open and View Online Statistics.)
- Click the Recalculate button to view the figures from defaulted criteria.
- Expand the tree-view of Entry Code Group Categories.
- Select Suppress Entry Code Group Category and Entry Code Group from the pop-up menu of the Online Statistics window. The tree-view is limited to only two levels; the Currency and the Entry Codes per Currency. All levels in between are suppressed.
- Clear the option Suppress Entry Code Group Category and Entry Code Group in order to revert to the default view.
Note! Also Entry Code Groups such as Loss ratio and Cost ratio are suppressed. Since these figures are calculated from more than one Entry Code, they will not be presented.
Expand Entry Code Group Categories down to Entry Code level #
You can expand all Entry Code Group Categories down to Entry Code level in one operation
- Open the Online Statistics (Refer to the chapter Open and View Online Statistics)
- Click the Recalculate button to view the figures (not necessary if your User Preferences have been set up to automatically calculate figures when the Online Statistics is opened).
- Select Expand all items on Entry Code Group Categories from the pop-up menu in the Online Statistics window. All Entry Code Group Categories are expanded down to Entry Code level. You can manually collapse the view again, but as long as the option Expand all items on Entry Code Group Categories is selected all Entry Code Group Categories will be expanded down to Entry Code level again when you press the Recalculate button
- Clear the option Expand all items on Entry Code Group Categories if you do not want Entry Code Group Categories to be expanded down to Entry Code level when you press the Recalculate button.
Expand Entry Code Categories down to Entry Code level #
You can expand all Entry Code Categories down to Entry Code level in one operation. This option is only available if your system has been set up to shown Entry Code Categories in the Online Statistics. (See your System Administrator for further information.)
- Open the Online Statistics (Refer to the chapter Open and View Online Statistics)
- Click the Recalculate button to view the figures (not necessary if your User Preferences have been set up to automatically calculate figures when the Online Statistics is opened).
- Select Expand all items on Entry Code Categories from the pop-up menu in the Online Statistics window. All Entry Code Categories are expanded down to Entry Code level. You can manually collapse the view again, but as long as the option Expand all items on Entry Code Categories is selected all Entry Code Categories will be expanded down to Entry Code level again when you press the Recalculate button
- Clear the option Expand all items on Entry Code Categories if you do not want Entry Code Group Categories to be expanded down to Entry Code level when you press the Recalculate button.
Expand selected line down to Entry Code level #
You can expand a selected line down to Entry Code level in one operation:
- Open the Online Statistics (Refer to the chapter Open and View Online Statistics)
- Click the Recalculate button to view the figures (not necessary if your User Preferences have been set up to automatically calculate figures when the Online Statistics is opened).
- Select a line in the Statistics window, e.g. the total for a Currency or an Entry Code Group Category. Right click and select Expand Selected from the pop-up menu. The selected line is expanded down to Entry Code level.
Establish ad hoc Business Groups for View of Online Statistics #
When accessing the online statistics for a business it might be of interest to include another business to inspect the combined results for two (or more) businesses.
SICS lets you include additional businesses of any business level and any base company, and displays the accumulated result. The ad-hoc business group is only available online and will not be stored when closing the online statistics view.
- Open the Online Statistics for a business. Refer to the Open and View Online Statistics section for more information.
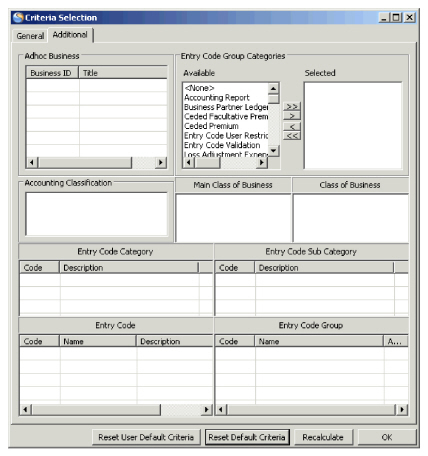
- Click the Change Criteria button, and select the second tab. You see the Criteria Selection, Additional tab
 Add business:
- In the Ad hoc Business area select Add Business and you come to the Find Business window where you can search for business(es) to include.
- Select the Recalculate button and the business(es) is (are) included in the figures.
- Click OK when you are satisfied with the view of the statistics to close down the Criteria Selection window.
Remove business:
- In the Ad hoc Business area select a business and select Remove Business. The selected business is removed from the Ad hoc Business area.
- Select the Recalculate button and the removed business is excluded from the figures.
- Click OK when you are satisfied with the view of the statistics to close down the Criteria Selection window.
Business Properties:
- In the Ad hoc Business area select Business Properties and you see the properties of the selected business.
Maintain Additional Criteria Selections for View of Online Statistics #
To limit the figures to be inspected for a business, to view the figures for only a specific branch or to inspect figures for certain Entry Codes etc., various additional criteria selections can be defined.
- Open the Online Statistics. Refer to the Open and View Online Statistics section for more information.
- Select ‘Recalculate’ to view the figures according to defaulted criteria and click the Change Criteria button or click the Change Criteria button directly. You see the Statistic Criteria window.
- Select the Additional tab and make your changes in the Statistic Additional criteria selection window and click ‘Recalculate’. You see the result of the recalculation in the Online Statistics window immediately.
- Select the Reset Default Criteria button in order to see the figures from defaulted criteria.
- Click OK when you are satisfied with the view of the statistics to close down the Criteria Selection window.
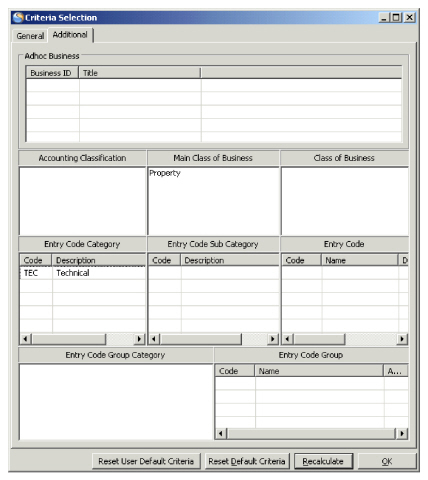
View Online Statistics of selected Accounting Classification #
- In the Accounting Classification area select Edit and you come to Accounting Classification window where you can select one or more Accounting Classifications. Available Accounting Classifications are all Accounting Classifications found on the business, all Insured Periods.
Note! If the statistics is shown for a business group (either a pre-defined business group or a group defined ad hoc), the selection of Accounting Classification is disabled.
- Select the Recalculate button and you see the figures made with the selected Accounting Classifications only.
- Click OK when you are satisfied with the view of the statistics to close down the Criteria Selection window.
Note! If also a Class of Business and/or a Main Class of Business are selected, the selected Accounting Classification must include the same items as the Class of Business/Main Class of Business, else no figures will be shown.
View Online Statistics of selected Main Class of Business #
- In the Main Class of Business area select Edit and you come to Main Class of Business window where you can select one or more Main Classes of Business. Available Main Classes of Business are all Main Classes of Business being part of the Accounting Classifications defined on the Business, all Insured Periods.
Note! If the statistics is shown for a business group (either a pre-defined business group or a group defined ad hoc), the available Main Classes of Business are all Main Classes of Business defined in the reference data.
- Select the Recalculate button and the figures shown are all booking details having an Accounting Classification with a Main Class of Business equal to the ones selected.
- Click OK when you are satisfied with the view of the statistics to close down the Criteria Selection window.
Note! If also a Class of Business and/or an Accounting Classification are selected, the selected Main Class of business must be the parent of the selected Class of Business/an item of the selected Accounting Classification, else no figures will be shown.
View Online Statistics of selected Class of Business #
- In the Class of Business area select Edit and you come to Class of Business window where you can select one or more Classes of Business. Available Classes of Business are all Classes of Business being part of the Accounting Classifications defined on the Business, all Insured Periods.
Note! If the statistics is shown for a business group (either a pre-defined business group or a group defined ad hoc), the available Classes of Business are all Classes of Business defined in the reference data.
- Select the Recalculate button and the figures shown are all booking details having an Accounting Classification with a Class of Business equal to the ones selected.
- Click OK when you are satisfied with the view of the statistics to close down the Criteria Selection window.
Note! If also a Main Class of Business and/or an Accounting Classification are selected, the selected Class of business must be a child value of the selected Main Class of Business/an item of the selected Accounting Classification, else no figures will be shown.
View Online Statistics of selected Entry Code Category #
- In the Entry Code Category area select Edit and you come to Entry Code Category window where you can select one or more Entry Code Categories. Available Entry Code Categories are all Entry Code Categories.
- Select the Recalculate button and the figures shown are all booking details with Entry Codes within all the Entry Code Sub Categories within the selected Entry Code Category(-ies).
- Click OK when you are satisfied with the view of the statistics to close down the Criteria Selection window.
Note! You may combine selection of an Entry Code Category with e.g. an Entry Code Sub Category/Entry Code/Entry Code Group Category/Entry Code Group. The figures shown are all booking details with Entry Codes within the selected ‘Entry Code Category’ andthe Entry Codes within the other selections e.g.' Entry Code'.
View Online Statistics of selected Entry Code Sub Category #
- In the Entry Code Sub Category area select Edit and you come to Entry Code Sub Category window where you can select an Entry Code Category and then one or more Entry Code Sub Categories. Available Entry Code Sub Categories are all Entry Code Sub Categories.
- Select the Recalculate button and the figures shown are all booking details with all Entry Codes within the selected Entry Code Sub Category(-ies).
- Click OK when you are satisfied with the view of the statistics to close down the Criteria Selection window.
Note! You may combine selection of an Entry Code Sub Category with e.g. an Entry Code Category/Entry Code/Entry Code Group Category/Entry Code Group. The figures shown are all booking details with Entry Codes within the selected ‘Entry Code Sub Category’ and the Entry Codes within the other selections e.g.' Entry Code'.
View Online Statistics of selected Entry Code #
- In the Entry Code area select Edit and you come to Entry Code window where you can select an Entry Code Category, an Entry Code Sub Category within the selected category and then one or more Entry Codes. Available Entry Codes are all Entry Codes.
- Select the Recalculate button and the figures shown are all booking details with the selected Entry Codes.
- Click OK when you are satisfied with the view of the statistics to close down the Criteria Selection window.
Note! You may combine selection of an Entry Code with e.g. an Entry Code Category/Entry Code Sub Category/Entry Code Group Category/Entry Code Group. The figures shown are all booking details with the selected Entry Codes andthe Entry Codes within the other selections e.g. ‘Entry Code Group Categories’.
View Online Statistics of selected Entry Code Group Category #
- In the Entry Code Group Category area select Edit and you come to Entry Code Group Category window where you can select an Entry Code Group Category. Available Entry Code Group Categories are all Entry Code Group Categories set up to be shown on the Online Statistics (defined in the reference data).
- Select the Recalculate button and the figures shown are all booking details with Entry Codes defined for the Entry Code Groups within the selected Entry Code Group Category(-ies). The Entry Code Group Category(-ies) shown as accumulator(s) is(are) updated accordingly.
- Click OK when you are satisfied with the view of the statistics to close down the Criteria Selection window.
Note! You may combine selection of an Entry Code Group Category with selection of e.g. an Entry Code Category/Entry Code Sub Category/Entry Code/Entry Code Group. The figures shown are all booking details with Entry Codes defined for all Entry Code Groups within the selected Entry Code Group Category(-ies) andthe Entry Codes within the other selections e.g.' Entry Code'.
View Online Statistics of selected Entry Code Group #
- In the Entry Code Group area select Edit and you come to Entry Code Group window where you can select an Entry Code Group. Available Entry Code Groups are all Entry Code Groups within the Entry Code Group Categories set up to be shown on the Online Statistics (defined in the reference data).
- Select the Recalculate button and the figures shown are all booking details with Entry Codes defined for the selected Entry Code Group(s). The Entry Code Group(s) shown as accumulators are updated accordingly.
- Click OK when you are satisfied with the view of the statistics to close down the Criteria Selection window.
Note! You may combine selection of an Entry Code Group with e.g. an Entry Code Category/Entry Code Sub Category/Entry Code/Entry Code Group Category. The figures shown are all booking details with Entry Codes defined for the selected Entry Code Group and the Entry Codes within the other selections e.g.' Entry Code Group Categories'
Performance Management Data Return Conditions (in Edit mode)