Handle Insurable Objects Cessions
SICS lets you define information about risks relating to objects in a business, and link those risks to the insurable object(s) they cover.
You can access cessions:
- By double-clicking the Cessions icon in the Insurable Objects folder in the SICS desktop
- From the Business Properties window of the business to which the cession is attached
- From the Insurable Object Properties window of the insurable object to which the cession is attached
Handle Cession from the Desktop #
|

Cessions icon | Double-click the Cessions icon in the Insurable Objects folder to see the Find: Insurable Object Cessions window. |
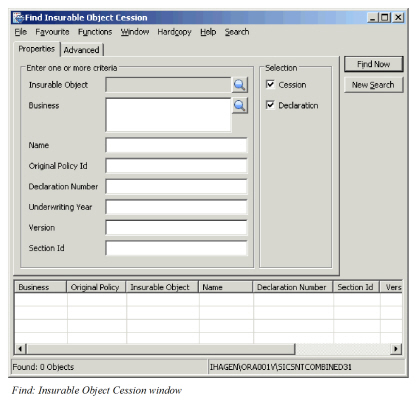
The Find: Insurable Object Cession window is divided into two tabs. The Properties tab enables you to search for a cession by Insurable Object, Business, Title, Original Policy Id and Declaration Number. You can use the Find buttons to search for the Insurable Object or Business to which the cession applies.
The Advanced tab lets you narrow your search by selecting an insurable object type and sub-types. When you select an insurable object type, the sub-types available relate to your selection. The ability to select further sub-types depends on the selections you make.
When you have entered the selection criteria, click Find Now. Any cessions matching your selection criteria are shown in the display table.
Select a cession and click the right-mouse button to access the pop-up menu with the following options:
- Properties access the Cession Properties window, from which you can edit Cession details.
- Insurable Object Properties to see the Insurable Object Properties window for insurable object that is connected to the selected cession.
- Business Properties lets you see the Business Properties window for the business to which the cession is attached.
- Accumulation Control to view the Insurable Object Accumulation Control details.
Handle Cession from the Business #
Information about the Insured Object Cession can be viewed on the Business Cession tab and the Business Structure tab.
Object Name: Indicates the name of the insurable object.
Cession Title: Indicates the name of the cession.
Ceded %: Shows the Original Participation.
Exposure: Shows the exposure for the agreement (the whole exposure).
Our Exposure: Indicates how much of the exposure (risk) your company is responsible for.
Currency: Indicates the type of currency in which amounts are expressed.
Period From and Period To: Indicates the date from which the cession is valid.
The pop-up menu gives you options to Add, Properties, and Remove insurable object cessions.
To create a new insurable object cession:
- Select Add. You see the Add Insurable Object Cession window.
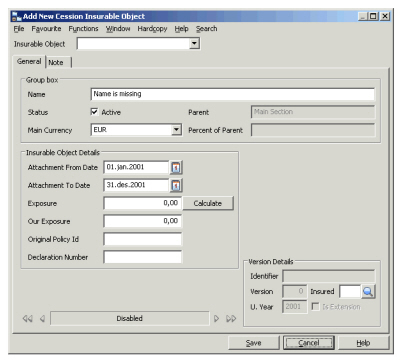 2. Select whether or not you want the cession linked to an insurable object by turning the Cession Without Insurable Object check box “on” or “off.” (This option replaces insurable object goods from previous releases.)
3. Add the Insurable object by clicking the Insurable Object Find button. (This option is disabled if you selected Cession Without Insurable Object.) You see the Find: Insurable Objects window, where you can do a search for the insurable object. Once you have found the insurable object you are looking for, double-click it to transfer it back to the previous window, or select it and select Transfer from the pop-up menu.
4. Select an amendment date from the Amendment field drop-down list if you want to specify the period to which the cession is attached.
5. Add an Attached Date From and To date. This is the date that refers to the agreements valid from and to dates. (Click the Calendar button to see a calendar from which you can select a date, or type in the date directly.)
6. Type in the title of the cession you are creating in the Title field.
7. Enter the Ceded Share,Currency, Exposure, and Our Exposure.
8. Click the Calculate button to calculate exposures.
2. Select whether or not you want the cession linked to an insurable object by turning the Cession Without Insurable Object check box “on” or “off.” (This option replaces insurable object goods from previous releases.)
3. Add the Insurable object by clicking the Insurable Object Find button. (This option is disabled if you selected Cession Without Insurable Object.) You see the Find: Insurable Objects window, where you can do a search for the insurable object. Once you have found the insurable object you are looking for, double-click it to transfer it back to the previous window, or select it and select Transfer from the pop-up menu.
4. Select an amendment date from the Amendment field drop-down list if you want to specify the period to which the cession is attached.
5. Add an Attached Date From and To date. This is the date that refers to the agreements valid from and to dates. (Click the Calendar button to see a calendar from which you can select a date, or type in the date directly.)
6. Type in the title of the cession you are creating in the Title field.
7. Enter the Ceded Share,Currency, Exposure, and Our Exposure.
8. Click the Calculate button to calculate exposures.
The system calculates exposure in the following way:
- A Limit condition for the selected currency is established in the following order of priority:
- Limit for selected currency on the cession
- Limit for selected currency on the scope of cover
- Limit for main currency of scope of cover on the cession
- Limit for main currency of scope of cover on the scope of cover
- For proportional facultative business, the system looks first at the limit conditions at the cession level. Here it takes Limit per Occurrence if it has this. If not, it takes the Loss Probability Amount (PML, EML or MPL) if it has this. If not, it takes the Main Limit of the cessions (for example, expressed as Sum Insured). If the system does not find conditions at cession level, it proceeds to the agreement level, and goes through the same sequence, starting with Limit per Occurrence. The exposure is equal to the liability on the limit of the condition, or if the condition is for “Stop Loss Participation” maximum cover amount.
Click Save to save the information and create the cession. You see the Insurable Object Cession window with the Cession you just created listed in the display at the bottom of the window.
Click the right-mouse button to see the following options:
- Properties, to view the properties of a selected insurable object cession. In order to edit the properties, you click Edit button to switch from View to Edit mode.
- Object Properties, to see the Insurable Object Properties window for insurable object that is connected to the selected cession.
- Remove, to remove a selected item in the list.
Handle Cession from the Insurable Object #
When you open an insurable object to see the Properties window, you can click the Cessionstab to see a list of risks attached to that insurable object.
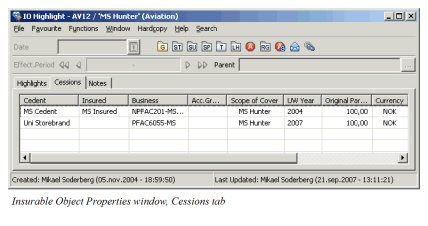
Cessions listed in this window show the following information (input when the cession is created):
- Cedent
- Insured
- Business
- Accumulation Group
- Scope of Cover
- Underwriting Year
- Ceded Percent
- Currency
- Our Exposure
- Attachment Period From and Period To
When you select a cession in the list and click the right-mouse button, you see the following options in the pop-up menu:
-
Add, opens the Create New Businesswizard and lets you create a new business and make a cession for it.
-
Assign, lets you assign an existing business to the insurable object. Note! You are not allowed to assign a business that has no insured period. (This applies only if your system administrator has set up the system to allow for business with ‘To be Advised’ insured period.)
-
Properties, lets you see the properties of the selected cession.
-
Remove, lets you remove a selected cession from the list.
-
Business Properties, lets you see the Business Properties window for the business to which the cession is attached.
Handle Insurable Objects Cession Conditions #
Deduction conditions for a business are inherited on a cession, not just copied. This means that if you update Deduction, Premium, or Limit conditions in the window on the section where those conditions were defined, the inherited conditions on the cession are automatically updated.
If you have amendments to the business and the end date of the Attachment Period for the insurable object cession is older than the start date of an amendment, you will not see the amendment on the cession.
Override Inherited Condition/Enter Special Conditions #
|

Override Condition button | You can override inherited conditions by clicking the Override Condition button on the Navigation bar of the Deductions, or Premium and Limit Conditions for Cession window. |
Note! This button only appears if Deduction conditions have been entered on the business. Otherwise, there are no conditions to inherit.
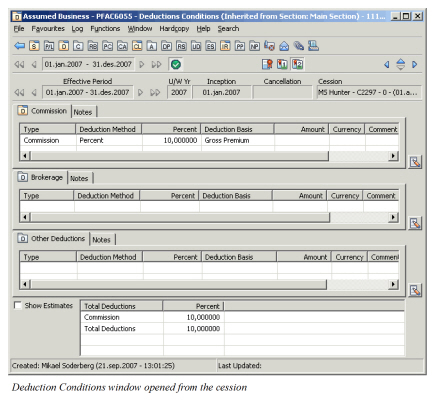
When you override a condition, you make a local copy of the condition. When you click the Override Condition button, you see a message telling you that the condition is inherited, and asking you if you really want to override it and make a local copy. After clicking Yes to proceed, you can then enter your changes to the Deductions window.
Handle Insured Peril of Object Cessions #
The reinsured object can be located in a known risk zone exposed to a certain hazard. To obtain a more precise accumulation control of this hazard, you can include the object’s specific exposure to the hazard in the basis for accumulation control of the hazard by associating the object to it.
|

Insured Peril Cessions button | To view the Insured Peril Cessions for an Insurable Object Cession, click the Insured Peril Cessions button on the Navigation bar of the selected Insurable Object Cession window. |
You see the Insurable Object Cession Insured Peril Cessions window. For more details on the functionality of this window,refer to chapter Handle Insured Peril Cessions