Handle Business Amendments
You may handle formal changes to an agreement in a coherent and an accurate way by use of the SICS business amendments. They ensure that you for all terms and conditions always see the exact period for which they are valid. This and other amendment features allow your company to follow up also other administrative functions, such as accounting, in a correct and secure way.
This chapter covers the general processes involved in recording and maintaining amendments. If you want details on amendments as part of a more specific process; like recording premium conditions or booking; see the chapter describing your particular process.
Amend Business #
Amending a business consists in essence of capturing the relevant amendment information like the effective from date, changing the applicable terms and conditions, linking this to the amendment information and receiving an amendment number.
Amendments Principles #
When Possible to Amend? The system allows you to amendment a business after the business have become definite or the business is of an informational nature. More specifically, you are allowed to amend a business when its life cycle status is categorised as either definite, e.g_. offer accepted,_ or _informational_.
If your system administrator has set up the system to allow for business with ‘To be Advised’ insured periods, your businesses might not have an insured period at all (e.g. business with an informational status). In this case, you will not be allowed to amend the business.
If your system administrator has activated the contract registration complete facility, the system requires that a user has selected the registration complete indicator, before you may register an amendment.
If, in addition, the amendment complete facility is active, the system requires that the user have selected the amendment complete indicator for any existing amendment before allowing registration of a new amendment.
Effective Periods: Whenever you amend a particular set of terms e.g. limit and premium conditions, the system gives this set effective period. It gives one effective period for the amended version and another for the version valid up to that amendment. Consequently if there were NO other amendments recorded for the insured period, the terms will have two effective periods after amendment.
Example:
The insured period of a business is 01/01/2002 to 31/12/2002
Amendment 1 is from 01/05/2002. When you link this amendment to a condition, you will see two effective periods:
The first from 01/01/2002 to 30/04/2002
The second from 01/05/2002 to 31/12/2002
Amendment Buttons: When you make an amendment, an amendment button appears for each amendment that is made, and each has a number telling you which amendment it is for that insured period (starting with amendment 1).
Amend Business Conditions #
Make a change or correction to a particular condition, e.g. clauses conditions, as part of an amendment.

- Open the existing data for the condition that you want to amend, e.g. click the Clauses (CL) button from the Navigation bar.
- Click the Amend Condition button. You see a window showing an empty list of available amendments.
- Select New Amendment from the pop-up menu.
- Enter your amendment data and then click OK. You see the amendment number selected in the window.
- Click Save. You see that a new amendment icon has appeared on the Navigation bar. You also see a new effective period in the Navigation bar.
- If the system has not already done so, click the latest (right most) amendment icon and also navigate to the newest effective period. The conditions you now see are a copy of the old conditions and are connected to the new effective period.
- Click the Edit button and make your changes to the conditions.
Amend Multiple Business Conditions #
Capture one amendment and apply it to several conditions, e.g. the premium and limits conditions and the deductions condition.
- Open the business and click the Structure tab.
- Click the Edit button in the bottom right corner.
- SICS asks you if this edit is part of an Amendment. Select the check box to indicate that it is, and click the OK. If there are already amendments on the business, you now see a list of these.
- Select one from the list or select New Amendment from the pop-up menu to create a new amendment.
- Select each condition in turn and make your changes.
- When you are happy with all your changes to you conditions, click the Save button on the Section Overview to save all these changes.
Note! Only when you click the Save button will all your changes to all your conditions are saved. If you click the Cancel button on the Section Overview, then none of your changes will be saved.
Amend Business Classifications #
When the agreement scope of cover changes, you may add or remove classifications as part of an amendment.
- On the Classification tab of a business, select Amend Classification from the pop-up menu in the Coverage display list. You see the Amendment List.
- Select one of the amendments listed or select New to create a new Amendment.
- Make your relevant changes to you classifications as required and click Save.
Add Cession or Declaration as Part of Amendment #
You may include an insured object cession or a declaration under your agreement as part of an amendment, e.g. when an endorsement adds a vessel mid-period. In addition to linking the cession to an amendment, the system will also set the attachment from date of the cession equal to the amendment effective from date.
- Open the Structure tab of your business.
- Click the Edit button in the bottom right corner.
- SICS asks you if this edit is part of an Amendment. Select the check box to indicate that it is and click the OK. If there are already amendments on the business, you now see a list of these.
- Select one from the list or select New Amendment from the pop-up menu to create a new amendment.
- Record the Cession or Declaration as normal, e.g. select Add child Declaration from the pop-up menu.
- Back on the Structure tab, click Save.
- If special conditions (for e.g. limits and premiums) apply to the added cession/declaration, you may now enter these: Navigate to the cession/declaration, open the condition you require, reply Yes to the system confirmation question.
- Make your entries to the conditions as normal and click Save. You will see that for the cession/declaration, these entries only exist as of the Effective From Date of the amendment.
Amend Cession or Declaration #
Sometimes the information of an insured object cession or a declaration under your agreement changes. For example its amount of exposure changes as of a certain date. To handle this, the system lets you add a new version to the cession/declaration, which you can make your changes to.
- Click the Structure tab of your business.
- Select the cession or declaration that should receive the change.
- From the pop menu, select Amend/Extend Cession or select Amend Extend Declaration as appropriate.
- Enter from when the new version should be valid in the Attachment From Date.
- Click Save.
- Back on the Structure tab, click Save again.
- To see the new version, double-click the cession/declaration concerned and click the Cession/Declaration tab.
- Make the changes to this version as you require.
- To see the version valid up to the added version, click the period Navigation bar at the bottom of the Cession/Declaration tab.
Add Insured Peril Cession as Part of Amendment #
As part of an amendment, cover a new peril in a risk zone by your agreement.
- From the Amendments tab of your business, click the Menu button to the right of the No. field.
- Select New
- Select Amendment
- Click OK
- Enter your amendment effective from date in From.
- Click OK
- Click the PE (Insured Peril Cessions) button in the Navigation bar.
- On the insured peril cession list, click the Edit button and select Add from the pop-up menu.
- Select the peril zone you require
- Click Save.
- In the Attachment Date Column, select the amendment you require.
- Click O_K_
Discontinue Insured Peril Cession as Part of Amendment #
Stop the exposure to a particular peril in a risk zone as of a certain date. The system links the insured peril cession to the amendment and gives the cession an attachment end date equal to the effective start date of the amendment.
- Open your business and click the PE (Insured Peril Cession) button from the Navigation bar.
- Click the Edit button.
- For the Attachment End Date, select the required amendment.
- Click OK
Process Out of Sequence Amendment #
It may happen that you receive amendments that are “out of date” or “out of sequence”.
For Example: Amendment 1 has an effective date of 4th June and you process this amendment. You then receive amendment 2, which has an effective date of the 3rd of March.
SICS gives you the option to process this out of sequence amendment by over-riding the previous amendment. This means that the previous amendment to the condition is replaced by the new amendment with the new effective period.
- Create an amendment and amend a condition.
- In the example given the effective date for this amendment is 4th June. You now have two effective periods for the amended condition:
- 1st January to 3rd June
- 4th June to 31st December - Create a second amendment with a From Date equal to a date before the From Date of the previous amendment. In the example given the From Date of this amendment will be 3rd March.
- Select the condition previously amended and request to amend this condition again. Make sure you are viewing the last effective period of the condition. In the example given this is from 4th June to 31st December. A window showing a list of available amendments is displayed.
- Select the amendment required. The condition data is copied using the values from the effective period before this new amendment’s From Date. The data can be edited as you wish.
The condition now have the two effective periods:
- 1st January to 2nd March
- 3rd March to 31st December.
Extend Insured Period as Part of Amendment #
You can make the period of cover longer for an insured period by amendment.
- From the Amendments tab of a business, click the Edit Menu button and select New from the pop-up menu.
- Select Extension for the Type of Amendment and click OK.
- Enter a To Date and any other relevant amendment data and click OK.
- If a condition also changed for the extended part of the period, open the relevant condition and click the Amend Condition button.
- Select the extension amendment and click Save. The condition is now linked to the extension amendment.
| Field | Description |
|---|---|
| No. | Amendment Number. Values: Number Calculation: Consecutive number given by the system, where the first amendment is given number 1, the second is given number 2 and so on Validations: Output field only. Mandatory: Yes |
| From | The date from when the amendment is valid, (also called Effective Period From Date). Values: Date Validations: Must be w ithin the Insured Period unless the amendment is an Extension amendment. Derived from: When the amendment is an Extension, this is one second after the Insured Period To Date. Mandatory: Yes Functional Impact: - Premium Conditions (Amounts) - Premium Due Dates - Handle Insured Object Cessions - Handle Declarations - Handle Insured Peril Cessions - Claims Accounting - Automatic Premium Accounting - Proportional Automatic Retrocession Accounting |
| To | The date until when the amendment is valid, (also called Effective Period To Date) Values: Date Derived from: Insured Period To Date, unless the amendment is an extension. Validations: Input only allowed at extensions. Cannot be earlier than Effective Period From Date. Mandatory: Yes Functional Impact: - Premium Conditions (Amounts) - Automatic Premium Accounting |
| Agreed Date | The date when the amendment was agreed. Values: Date Default: Today’s Date Mandatory: Yes Functional Impact: None |
| Underwriter | The name of the underwriter who made the agreement for this amendment. Values: System Users Default: The user who registers the amendment. Mandatory: Yes Functional Impact: None |
| Type | Indicates whether the amendment is regarding a correction or an endorsement. Values: * Correction - The amendment is a correction to an error in the conditions * Endorsement - The amendment is a change of conditions, often with effect from a certain date * None - The Underwriter/user didn’t want to specify the reason for the amendment _Mandatory:_ No _Functional Impact:_ None |
| Reference | A free identifier for the amendment, e.g. the broker’s reference on the received amendment advice (could be a different to the number SICS gives.) Values: Text Maximum number of characters: 30 Mandatory: No Functional Impact: None |
| Active | Indicates whether the amendment is eligible for linking to a condition or not. Values: * Yes - The amendment can be used for amending term and conditions. * No - The amendment can NOT be used for amending term and conditions. _Default:_ Yes. _Mandatory:_ Yes _Functional Impact:_ Amend Conditions Amend Classifications Amend Cessions Amend Protection Assignment Manual Accounting Handle Claims |
Ensure Complete Amendment Registration #
You may have accepted a contract and marked the contract as complete. When later receiving an amendment, to ensure that the amendment is ready to be processed, your company may use an additional flag to mark the amendment as complete. The registration complete of the amendment facility ensures that this flag is set before allowing to process it further e.g. book or register claims as part of the amendment. This flag being set also limits the possibility of updating the terms and conditions as part of the complete amendment.
Indicate Amendment Complete Registration #
Change status to indicate that all amendment details are registered.
- Open wanted contract and navigate to the Amendment tab
- Select Edit Amendment Complete option from the menu button
- Select Amendment Complete flag
- Select OK
Functions Requiring Amendment Complete Registration #
When the amendment complete facility is in use, the system requires completeness of the last amendment to allow the following functions to be executed:
- Make bookings (technical or claim)
- Create Accounting Orders
- Create Group Orders
- Create claim
- Create amendment
- Renew contract
Functions Restricted when Amendment Complete #
After the registration is set to complete on an amendment, you may no longer do changes to the following, unless they are done as part of a new, not complete amendment:
- Business conditions
- Classifications
- Sections, insured object cessions and declarations
Require Accounting Classfication for Amendment Complete #
Depending on the set up of your system administrator, the system may require accounting classifications recorded before allowing you to set your amendment registration to complete. The system will stop you if the accounting classification will be missing for a secton at the lowest level of the section hierarchy (Leaf section).
Allow only One Reporting Unit for Amendment Complete #
Depending on the set up of your system administrator, the system may require that there is only one reporting unit on your contract before allowing you to set the your amendment registration to complete. The system checks only the lowest level of the section hierarchy and only reporting units of categories (e.g. profit center, segment) selected by your system administrator.
Allow Only one Main Class of Business on Sub Sections for Registration Complete #
When the Only allow one MCOB on Leaf Sections facility is in use, an amenment cannot be set to complete unless you have only one main class of business on each leaf section of the contract. This means, it checks the sections at bottom level of the section hierarchies. If there are no sections, the system checks only the contract level/main section. If one or more leaf section have more than one Main Class of Business, the system stops you.
| Field | Description |
|---|---|
| Amendment Complete | Indicates whether the registration of all details of an amendment is complete or not Value: Selected Not Selected Default: Not Selected Validations: -Only available if set up by your system administrator -Level of Business must be Assumed Business or Outward Cedent’s Contract -Special authorisation required to select or deselect Amendment Complete -Security may require someone else to select Amendment Complete if you are the user shown in Last Updated By on this amendment -Security may prohibit clearing Amendment Complete if bookings exist for the amendment Mandatory: Yes Functional Impact: Maintain Bookings Handle Claims Amend Business Renew Business Maintain Insured period Maintain Conditions Assign Business Partners Maintain Classifications Maintain Section Maintain Declaration Maintain Insured Object Cessions Maintain Outward Cedent’s Contract placements |
| Complete Updated By | Name of user who last updated the complete indicator Values: SICS user’s name Validations: Defaulted by the system to current SICS User - not changeable Mandatory: No Functional Impact: None |
| Complete Updated Date | Date the complete indicator was last updated Values: Date Validations: Defaulted by the system to today’s date - not changeable Mandatory: No Functional Impact: None |
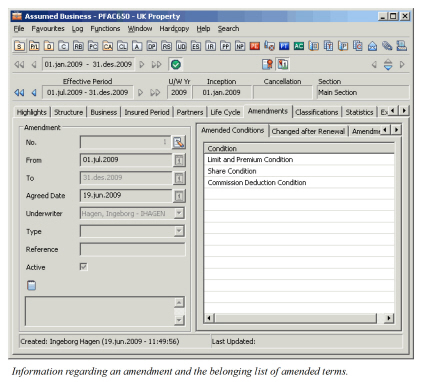
List Amended Terms and Conditions #
You can view items, e.g. premium & limits, deduction, classifications that have been amended on your business.
When you click the Before Amendment button, you will naturally see no items listed as amended. However, when you click one of the amendment buttons, you will see amended items listed for the selected amendment.
You can view what conditions have been affected by an amendment in the following way:
- Open the business and click the Amendments tab.
- From the Navigation bar select the amendment you wish to view by clicking the relevant amendment number.
- On the Amendment tab, click the Amended Conditions sub tab, and you see on the right hand side the list of the conditions that have been affected by that Amendment number.
Undo Existing Amendment #
Inactivate Amendment #
You can inactivate amendments if you require. After you have inactivated the amendment, it will not be available on any lists where you can select amendments in SICS, such as when you edit a protection assignment as part of an amendment. Condition changes can only be linked to active amendments.
Although new changes cannot be linked to inactivated amendments, conditions linked to an amendment before it was inactivated will remain linked to this amendment.
- Open the business and click the Amendments tab.
- Select the amendment you require from the Navigation bar.
- Click the Menu button to the right of the No. field.
- Select Inactivate from the menu.
If you have created an amendment by mistake and nobody has yet used it, you should consider deleting the amendment instead of inactivating it.
Reactivate an Inactive Amendment #
Make an amendment that was inactivated by mistake, active again.
- Open the business and click the Amendments tab.
- Select the amendment you require from the Navigation bar.
- Click the Menu button to the right of the No. field.
- Select Edit from the menu
- Select Active
Delete Amendment #
You can delete an amendment that you have created in error. The information on the business will then be as if the amendment never was created.
- Open your business.
- Click the Amendments tab.
- Click the Amendment button for the amendment you want to remove (1,2,3 etc.) from the Navigation bar.
- On the Amendment tab, click the Menu button to the right of the No. field.
- Select Delete from the menu.
- Click OK.
The system will stop you from deleting the amendment if one or more of the following items are part of the amendment:
- Conditions
- Classifications
- Sections
- Cessions
- Bookings
- Protection Assignments
- Claims
Disconnect Amendment from Business Condition #
If you have amendment a condition, which should not have been amended, you may disconnect this condition from the amendment. This condition will then be as if you never amended it by the amendment that you remove. The disconnection will NOT affect any other items.
- Open the existing data for the condition that you want to disconnect from the amendment.
- Click the latest (right most) amendment button
- Navigate to the Effective Period that applies to the amendment you want to disconnect.
- Click the Delete Condition button and reply Yes to the confirmation question.
View Historical Information after Amendment #
Even if the business has been amended, you still can view the business as it was prior to the amendments. The system then shows the information on the business as it was before receiving any further amendments than the one you selected to see.
For example, if you ask to see the situation before any amendments were made to the business, you see the premium and limit conditions with only one effective period, which is the insured period. Likewise, if you have several amendments, you may see the limit and premiums per an earlier amendment than the latest.
 Newest Amendment button
 Amendment button
- Open your business. In the Navigation bar, you see the newest Amendment button pressed down.
- Click the Amendment button (number) as of which you want to see the condition, e.g. Before Amendment.
- Click the Amendments tab to see information regarding this amendment
- Click a condition to see it the way it was after the amendment you selected.