Create New Business
Record New Business #
Registering a business for the first time is easy in SICS because the Create New Business wizards take you step by step through the necessary windows. The first window that you see is always the same. It is here you select the level of business, type of business, and life cycle status of the business. The second window that you see next depends on the level of business and the life cycle status that you selected.
Everything you enter when creating a new business need only be entered once. Links are created to this core information each time you add on to the business. This makes it easy to add and delete information and keep the information timely.
SICS lets you set default values that affect what you see on the Create New Business wizards.
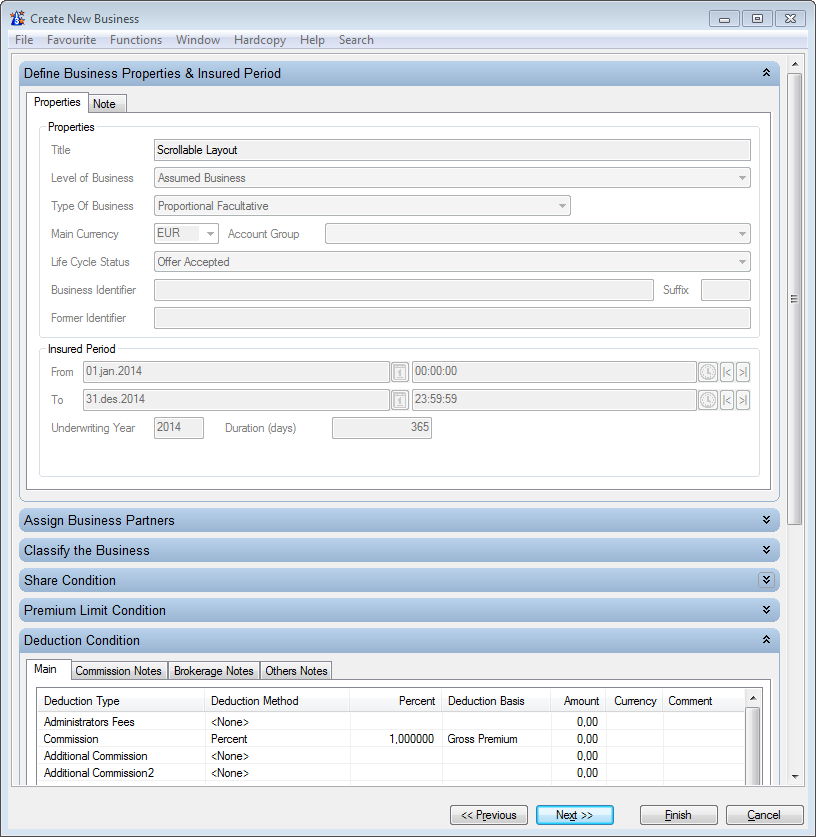
You may also select the wizard layout. The “Pages” layout is the one used in this chapter, but you can select to have the wizard presented as “Scrollable” layout, where terms and conditions are all in one page, presented as collapsible sections.
The above options are explained in the Getting Started chapter under Set Default Preferences.
Click in the Business display list in the Find: Business window. Select New from the pop-up menu. You see the Create New Business Wizard.
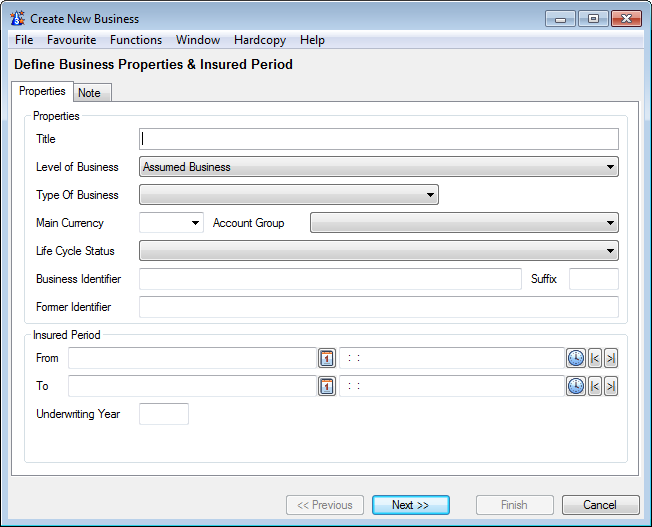
Title: Type in a business title (or, in the case of a Protection Program, a program title).
Level of Business: Use the drop-down list to select the level of business. The Level of Business you select affects which fields are available. For example, if you select
- Assumed Business Template, the Insured Period section disappears
- Portfolio Program or Reinsurance Program, the Type of Business disappears
- Outward Cedent’s Contract, the Type of Business values Proportional and Non Prop Direct disappears
- Protection Program, the
Type of Business/type of program: Depending on your system administrator’s set up, Type of Business might be closed for input. In that case it is derived from your selection of Type of Participation and Agreement Type.
Main Currency : Use the drop-down list to select the main currency of the business. If you have selected Default Base Currency in your User Preferences, the system defaults the Main Currency to the Base Currency for My Default Base Company from your User Preferences. If the Default Base Currency is selected and there is no My Default Base Company, or no Base Currency is defined for My Default Base Company, the system defaults Main Currency to the Default Base Currency set up by your system administrator.
Life Cycle Status: Whether or not this option is available depends on the Level of Business. When available, use the drop-down list to select the life cycle status of the new business. Depending on the set up of your system administration, the system might require some extra information if you select a definite status.
Insured Period: Enter a from and to date for the insured period of the business, and the system automatically gives you an underwriting year based on that information. Add a from and to time for the insured period, if there is one.
When you type in a date directly, you can type in the last two digits of the year and the system will compute the year for you. Numbers from 00-22 are automatically calculated as 2000. Anything else is automatically calculated as 1900. For example, if you type in 010105, the system will read it as 01.01.2005.
You can click the Calendar button to see a calendar from which you can select a date. When you then close the calendar, the date appears in the Date field.
The Underwriting Year and Insured Period Duration appear automatically based on the From and To dates you input.
Your system administrator may have set up the system to default the insured period to one calendar year. The To Date will then automatically be set when you have entered the From Date.
If your System Administrator has set up the system to allow for business with ‘to be advised’ insured periods, you do not need to enter a period at all. You then proceed to the next page in the wizard, without entering any data in these fields. The business will then get an insured period ‘To Be Advised’ (TBA), with no Insured Period Duration or Underwriting Year. For more information, refer to the Maintain Insured Period Information section
Attachment Method: Whether or not this option is available depends on the Level of Business. Available and mandatory for Treaty Outward Cededent’s Contract only. Default value New/Renewal unless the System Administrator has set up Reference Data differently. Use the drop-down list to select the attachment method of the new business if it is different from the defaulted value.
Assign Business Partners #
| If your business has a declined status, the next step is to enter the Life Cycle Status information. | Click Next to see the second Create New Business page. Typically, this will be the Assign Business Partners page where you can assign business partners to the contract and enter relationship information. |
(If, however, your business has a declined status, the second wizard you see lets you enter Life Cycle Status information.)

Each row represents a business partner relationship and consists of editable and non editable items.
In addition to the Business Partner identification, some key information may be typed in directly. Once a business partner is selected, you can also open the relationship by double clicking on a non editable field or selecting Edit from pop up menu and enter all information there.
Refer to Handle Partner Roles for more information.
Displayed first are the mandatory business partner roles for the type of business you are creating.
If you want to link more business partners to the contract, you can select the wanted role in the next rows. Only the roles available for the type of business you are creating will be selectable.
Assign Business Partner
- Select the Business Partner Name cell of the first mandatory role, e.g. Cedent
- Select the business partner that you want to assign.
You have three possibilities:
a.If you know the ID of the Cedent, you can type that directly into the Business Partner Name field, and the system will do a search for that business partner. b.You may also use the ‘type ahead’ feature. Type in the Business Partner name or part of the name directly and you will receive one or more possible matches for the text. The matches are immediately presented in a separate container. Double-click on the wanted Business Partner or press Enter on the highlighted partner. c.You may also choose to search for the Cedent by selecting the Find button placed in the Business Partner Name field. You see the Find: Business Partner where you can search for the appropriate Cedent. When you find the business partner you want in the Business Partner display list, double click or select Transfer from menu. 3. Move to the next editable cell by tabbing to the next or select it. Available for direct input: Reference, Valid From date, Valid To date 4. Navigate to the Task cell. Select enter or select drop down to see available tasks. Select by choosing wanted tasks or use the keyboard arrows to navigate to wanted task and select the space bar. 5. Move to the next row for a new assignment. If this is an optional assignment select first the relevant role in the Business Partner Role cell.
Note! It can be useful to define the display order of the columns according to your preference (the most commonly used edit items first)
Assign Business Partner Roles
- Select a business partner role from the drop down list
- Or you can type in the first letter to let the system display a matching role
- Make you selection and tab to or click in the next field for Business Partner assignment.
The business partners to be assigned to a contract can have various roles. Only the roles that are allowed for the type of business you are about to create will be available for selection:
- Broker
- Administrator
- Agent
- Producer
- Pre Producer
- Insured (party being insured by this policy)
- Insurer (the company that compensates losses, liability, or damages incurred by the insured)
- Other Co-Insurer (if you are an insurer on a co-insurance policy, it may be of interest to record also the other co-insurers of this policy)
- Reinsurer
- Other Reinsurer (if you for example are a reinsurer on this contract, it may be of interest to record also the other reinsurers participating in this contract)
- Appointed Agency (you can add one or more appointed agencies to the insured period)
- Appointed Agent (you can assign one or more appointed agents to the insured period)
- Cedent (the party being insured by this agreement)
- Original Cedent (the business partner who was the original assigned cedent for the insured period)
- Other Cedent (represents other reinsured parties than the one recorded as a cedent on your agreement. It may be of interest to record also these parties)
Payment Task
If Payment Task is mandatory for the type of business you are creating the system will default the Payment task to the Cedent when you leave the Assign Business Partner page in the wizard. This is unless you have already assigned the task to another partner.
Once a Broker is assigned to the business the tasks not already assigned to another partner will be defaulted to the Broker. The assigned tasks will be displayed listed in the Task field.
Menu options
Once a relationship is established (role and business partner is selected), the relationship or parts of the relationship may also be modified without using the editable fields.
Be placed on a non editable cell of a relationship to open a pop up menu listing the available options:
- Edit or double click opens the Edit Business Partner Relationship window where you can make any allowed changes to the business partner (including roles and tasks)
- Edit Business Partner Task/Reference
- Edit Period
- Remove lets you remove the relationship between the business partner and the insured period
- Replace Reinsurer/Insurer
- Transfer Payment Task
- Business Partner Properties opens the Properties window for the selected business partner where you can view details about the business partner
Main Base Company #
Using this functionality enables you to decide that the recoveries under a Group Protection Program (Group Retrocession) shall be made under the Base Company of the corporate head office only.
By selecting one of the Cedents of the outward business as Main Base Company, this Cedent will be linked as Base Company to balances created on the business. Additional to this general rule, it is possible to mark a Cedent with Separate Balance, which will split balances to more than one Cedent on the OCC, see the section Separate Balance below.
This option is primarily meant for outward businesses where you want to assign more than one Cedent.
Note! Main Base Company selection only applicable for Protection Program, Outward Cedent’s Contract and Placements of Outward Cedent’s Contract when assigning Cedent or editing Relationship Properties of Cedent.
Field: Check box for Main Base Company on Relationship Properties of Cedent. Only available if no other Cedent on the Business is selected as Main Base Company.
Default: Not selected
Mandatory: No
Functional Impact:
Business: When adding business to the Protection Program or placing the Outward Cedents Contract to Retrocessionaire Participation, the Cedent will keep the Main Base Company selection on the new business.
Accounting: When linking the balance(s) created on an OCC /Retrocessionaire Participation ledger to the Base Company, the system shall pick the Main Base Company of the business, if selected, otherwise existing function will apply.
Worksheet is created on an Outward Cedent’s Contract or an OCC’s Retrocessionaire Participation manually or by the system.
Applicable accounting functions leading to creation of worksheet:
- Recovery Calculation
- Prop Retro Accounting (REAC)
- Instalments
- Manual Technical Worksheets
- Manual Claim Worksheets
- FGU Claim Worksheets
When creation of a worksheet will result in linking the balance(s) to the Base Company of the outward business, the following rules apply:
When Main Base Company IS selected on the business: The Base Company to be linked to the balance(s) shall be the Cedent selected as Main Base Company.
When the balance includes more than one Insured Period and the system finds that Insured Periods do not have the same Main Base Company selection, the system will split the balances according to Main Base Company. This means that a balance that otherwise would not be split, now should be split into one detail for each Main Base Company. Remaining details for IP’s with NO Main Base Company will be treated accordingly (see below).
When Main Base Company is NOT selected on the business: If the OCC/RP has more than one Cedent assigned, it depends on the nature of the creation of the worksheet (recovery calculation, manual booking, etc.) whether or not the balances are linked to different or to one and the same Base Company.
Separate Balance #
This is enabled only if one of the Cedents on the OCC (prop/non-prop treaty/fac OCC) is marked as Main Base Company. If you select the Separate Balance flag on one or more of the other Cedents (not marked as Main Base Company) on the Insured Period, this indicates that this/these Cedent(s) should also have separate balances.
Field: Check box for Separate Balance on Relationship Properties of Cedent. Only available if another Cedent on the Business is selected as Main Base Company.
Default: Not selected
Mandatory: No
Functional Impact: In accounting only. When user runs Retrocession Calculation order/Retrocession Account order on a prop treaty OCC, or process Recovery Calculation order/Reinstatement Premium order on Non-Prop OCC. Or when user makes a manual booking on a prop/non-prop OCC/ORP or the user book instalment/adjustment on a non-prop OCC.
For automatic booking on OCC/ORP the system shall read the value in the new column Separate Balance and for all the Base Companies with ‘Yes’ in this column the system will keep details with these base companies, in separate balances. For the Base Companies with No in this column the system will merge these details together and either booked with the Main Base Company if one is indicated, else take one accidentally (the first in the list).
When manual booking takes place on a prop/non-prop OCC/ORP and at least one of the Base Companies has Yes in the new column ‘Separate Balance’ the system will check the Reporting Unit in the Accounting Classification. If only one RU is found in the AC and this RU is linked to only one Base Company, then the system will assign this Base Company automatically to the balance these details belongs to, else the system will use the logic described under Main Base Company to assign the Base Company. It will always be possible to manually assign a Base Company from the OCC to one or more detail(s) and if the given Base Company is marked with Separate Balance, then this/these details will be grouped together in a balance with this Base Company.
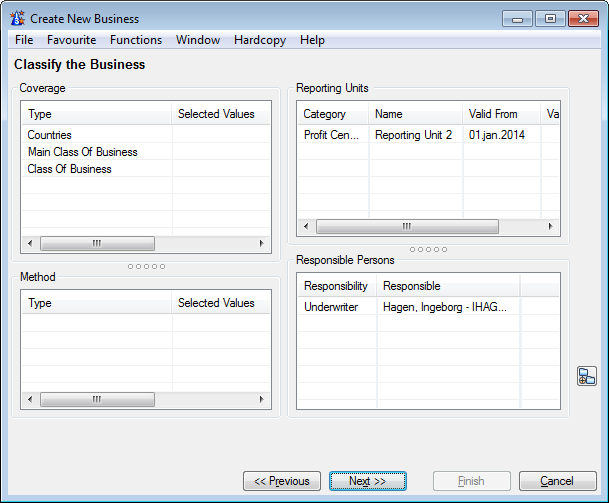
Classify Business #
Click Next to see the third Create New Business window. This is where you add information about classifications including_: Residence Country Groups, Residence Countries, Residence State Groups, Residence States, Country Groups_, _Countries_, _State Groups_, _States, Main Class of Business_, _Class of Business_, _Sub-Class of Business_, _Type of Participation_, _Origin of Business_, _Peril Type_, and _Additional Classifications_. The classification types that appear depend on the type of business that you entered.
It is your system administrator who decides if Accounting Classifications should be generated automatically or not from this window. If automatic generation applies, the Accounting Classifications are created when you select of Next in this window.
Note! Automatic creation only applies for Assumed Businesses.
If manual creation applies or another level of business than Assumed applies, you will see an Accounting Classifications button (AC). By clicking this button, you can manually generate Accounting Classifications before moving to the next window in the wizard.
Copy Area Classifications #
For specific companies and Main Classes of Business, the system may be set up to require that contracts are also classified with a Residence Area / Underwriting Area. To ease the registration, area classifications can be copied
- In the new business process or on an existing contract, navigate to the contract’s classifications in edit mode
- Enter legal area and residence area, e.g. Countries
- Alternatively, enter one of the area classification and then, from pop-up menu, select Copy Legal Area to Residence Area or Copy Residence Area to Legal Area
- Select OK
Enter Conditions and Inter Business Relations #
The Conditions window that you see when creating a new business varies depending on the Level of Business, Type of Business, and the status of the business. Information that is mandatory for the business will also vary depending on what was entered on the first business wizard, and depending on the settings in the System Parameter Maintenance window. (These settings are input by your SICS System Administrator on the New Business Wizard tab on the Business tab of the System Parameter Maintenance window.)
If the business you are creating has a definite status, the next window you see after Classify the Business is the Enter ShareConditions window.
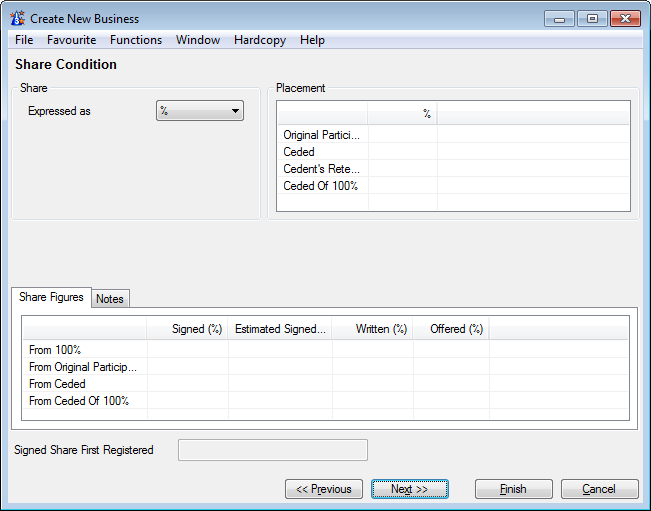
| The details of what can be registered when a new business is created depends on several factors: what was input on the first Create New Business wizard window, and the system parameters that your SICS System Administrator has input for you. | The Create New Business wizard makes it possible for you to include detailed registration as the business is created. This can include underwriting details, conditions and information like limits, rates, deductions, insurable objects, and insurable perils. In short, you can register a business at a booking level, without having to open individual condition screens after having finished the wizard. (Again, what you are able to register when creating a business depends on what was input on the first wizard window, and on what was set in System Parameters.) |
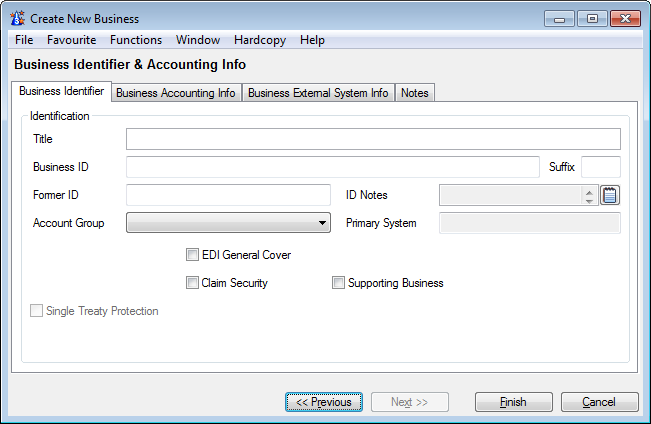
Confirm Business Title and ID #
- Business Identification in External Systems
Click Next to see the final window for creating a new business. Here you see the title of the Business (which you can change, if necessary), and a Former ID field where you can type in the previous ID, if there is one. If a business ID series has a suffix, it will be used as the default suffix when the business is created. You can remove the suffix or replace it with another one in the final Create New Business wizard window. (You can also add one here if the Business ID series does not have a default suffix.)
It is also in this window that you can assign the business to an account group by selecting an account group from the drop-down list. What you see in the list is user-defined, and will vary de_pending_ on what your SICS System Administrator has input for you. For more information on account groups, refer to Add Business Information on page 5-108 explained later.
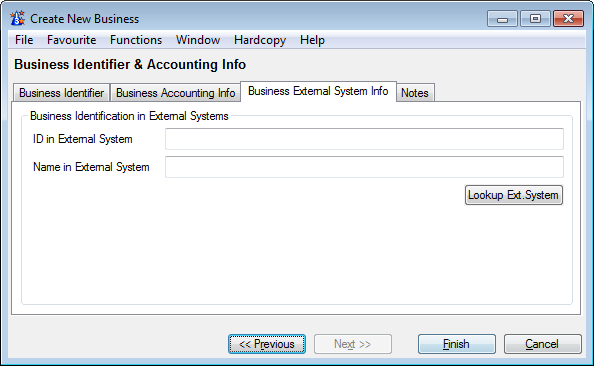
- Business Identification in External Systems
If your company is using the functionalityRetrieve Business Info from External System and the business is falling within the defined base company/main class of business group, you can enter external business information at the end of the create new business wizard.
To enter an external business identification:
- Click the Business External System Info tab.
- If your company allows manual input of external Business ID and Name, enter the relevant values, or click the Lookup Ext. System button. SICS calls out an external system using the business partner pdentifier of the cedent of the business and the Retrieved External System Information window showing the data retrieved from the external system.
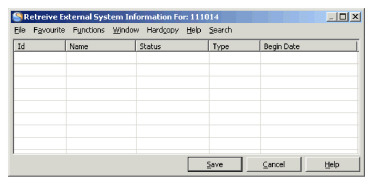 3. Select one treaty and transfer the ID and Name to the Create New Business wizard.
Click Finish. You see the Properties window for the business you created. Here you can continue to register details, link claims to the business, link other business partners to the business, and, register conditions for the business.
 All Business Property windows have a Navigation bar at the top. Each type of business has different buttons on the Navigation bar that are pertinent to that type of business. Refer to the Business Conditions chapter.
SICS lets you create inward and outward businesses. Details that you register and maintain for a business vary a great deal de_pending_ on the type of business. When, for example, you create a _protection program_, SICS gives you flexibility to plan protection and build a _protection program_ for any scope of coverEand then plan how many outward _cedent_ s' contracts you want to create for each scope of cover. You can also plan and create as many retrocessionary placements and brokers as you want for each of those _cedent_ s' contracts.
Copy to New Business #
You may want to use an already established business as a template to create a new business.
- Select the contract you want to copy in the Find Business display list, and select copy from the pop-up menu, or: Open the contract you want to copy and select its Life Cycle tab
- From the menu button, select Copy to New Business
- Enter wanted Insured Period From and To dates
- Select Life Cycle Status
- Select Save to indicate that the process is finished
- If there are missing mandatory class of business classifications, as some are inactive, the system stops you and asks if you want to update the classifications for the new contract
- Answer No and the copy process is stopped
- Answer Yes and the Edit Coverage Classification for New Business is opened
- Give the new contract wanted classifications
- Select Save.
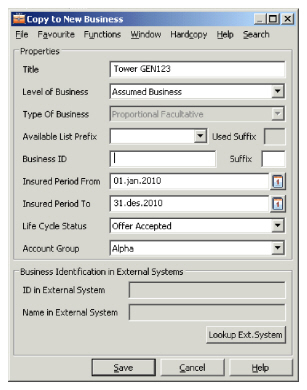
The Copy to Business window displays the Properties of the business to be created by copy.
Title: The title of the business.
Level of Business: Use the drop-down list to select the level of business.
Type of Business: This field shows the Type of Business from which the new business is being copied.
Suffix: When copying a contract that has an ID suffix, you can choose to use the existing ID with a new suffix.
Business ID: This is the number or name that uniquely identifies the business.
Insured Period From: The date that the reinsurance coverage of the new business will begin. You can type in the date directly, or use the Calendar button that brings up a calendar from which you can select a date. If your company allows for business with ‘To be Advised’ insured periods, you do not have to enter a date, if the business you are copying from also does not have a date.
Insured Period To: The date that the reinsurance coverage of the new business will end. You can type in the date directly, or use the Calendar button that brings up a calendar from which you can select a date. If your company allows for business with ‘To be Advised’ insured periods, you do not have to enter a date, if the business you are copying from also does not have a date.
Your system administrator may have set up the system to default the insured period to one calendar year. The To Date will then automatically be set when you have entered the From Date.
Life Cycle Status: Refers to the status of the new business. Use the drop-down list to select from the list of statuses. Depending on the set up of your system administration, the system might require some extra information if you select a definite status. If this information is not present in the original business, you will be stopped.
Account Group: Only available if your system administrator has allowed it, and if a definite Life Cycle Status is selected. For further information, please see chapter Add Business Information.
Business Identification in External System':‘If your company is using the functionality Retrieve Business Info from External System and you are copying a business that is falling within the defined base company/main class of business group, you can enter external business informationin the Copy to New Business wizard. Refer to Confirm Business Title and ID.
When you are finished entering all the information into the Copy to Business window, click Save to confirm and save the information you input.
Note! Any Extended Reporting Period on the originating business’ Claim Condition is not copied to the new business.
Note! Depending on what your system administrator has set in the system parameters, SICS will copy and automatically generate all Accounting Classifications from the copied business to the new business. This feature only applies for Assumed businesses.
Copy when Source Inactive Class of Business Classifications
In the same way a new contract cannot be created with inactive class of business classifications, SICS makes sure that when copying to new contract, no inactive class of business classifications are copied. When copying to new contract, for each parent class of business classification type having a mandatory sub classification type, SICS checks that on the new contract, each section has at least one active sub item per parent item. If this is true, the system copies the contract and any inactive classification items are ignored.
In other cases, the new contract will not get an active classification value for each mandatory classification type.
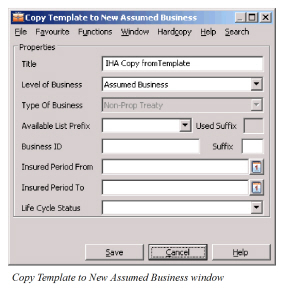
Copy from Template #
The Assumed Business Template is a level of business in SICS that lets you define core information for a type of business. When the ABT is complete, you can use this template and copy to new businesses. This is faster than using the Create New Business wizard for an Assumed Business. For example, an Assumed Business Template can be created without the base company (or any other business partner) being defined.
An Assumed Business can be copied from the ABT business.
When the Assumed Business Template is copied to create a new Assumed Business, SICS assigns a reinsurer to the new business by selecting a base company according to what was set in the User Preferences window.
To copy a template to a new Assumed Business, select the ABT business and select Copy to New Business from the pop-up menu. You see the Copy Template to New Assumed Business window.