Handle Miscellaneous Business and Accounting Information
This section handles information regarding the Former Identification, some Accounting options, EDI information and the Reporting Classifications of your business.
The Reporting Classifications you will only have available if your System Administrator has set up the system this way.
When dealing with outward facultative business, you have some different options such as Active Indicator, Placement Completed and Reinsurance Category.
Maintain EDI Information on Insured Periods #
You can create and view EDI information connected to an insured period by clicking the Edit Menu button in the Insured Period tab on the Business Properties window and selecting:
View EDI Information, Edit EDI Information, or Create EDI Information.
This window lets you view and modify important data relating to London EDI messages.
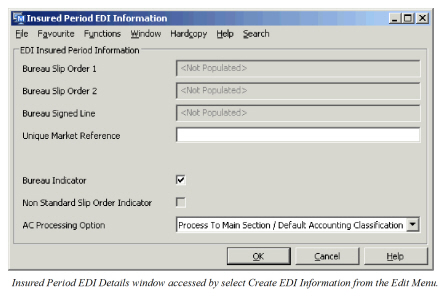
There are two types of data shown: those relating to share, and those relating to the business.
Those relating to share are:
- Bureau Slip Order 1
- Bureau Slip Order 2
- Bureau Signed Line
- Non-Standard Slip Order Indicator
Those related to the business are:
- Bureau Indicator
- Unique Market Reference
- AC Processing Option
The bureau indicator is used in EDI validation tests, and can be used to prevent EDI making a booking against non-EDI business. The Unique Market Reference is checked against an EDI message, but it is not used to link a message to a business.
The share fields are automatically updated from an EDI message, and are used in the validation of signed shares. The values from an accepted message are stored with the business, and when subsequent messages are received, the new values are compared with those shown here. Missing values in the message (for example, the slip order percentage is zero.) are assumed to be unchanged. If there are no differences, the slip orders and share on the new message are assumed to be valid. If there are differences, the message may be rejected so the user can check the signed share. The user may then use the Swap to Share feature on the View Message window to reset the EDI information share fields to the new values. The share fields are also updated automatically if the Swap to Worksheet feature is used to process the message.
In Edit mode, the Bureau Indicator and the Unique Market Reference may be changed. The user cannot directly modify the fields relating to share.
AC processing Option #
Unlike the JV messages, the LIMNET messages do not carry any information that links to a SICS accounting classification. Historically, LIMNET messages were booked to the first available accounting classification, unless the message was referenced to a specific section.
The AC processing option allows greater flexibility when booking all EDI (JV and LIMNET) messages. There are three choices:
- Process As Default
- Process to Specific Accounting Classification(s)
- Process According to Accounting Classification split
The first of these supports the general approach and is the method used by default. In LIMNET it will book the message on the default Accounting classification instead of the first. If there is no default accounting classification specified, the first is used. In JV the message must be referenced to an Account Classification and Section.
The second option forces the message to link to a specific accounting classification to which the message will be booked. In LIMNET, if the EDI system parameter ‘reference to section’ is on, the link to a specific section may be made automatically. In JV choosing this option will allow any messages linked to the insured period to process automatically (The Automatic Booking check box is set “On” on the booking mapping tab of the message)
The final option will book according to the Accounting Classification split. In LIMNBET this will always cause the message to reject, and the user must confirm the accounting split to be uesed. See chapter Electronic Data Interchange for more details. In JV the message will not be rejected, but the Use Accounting Classification split check will be set “On” on the booking mapping tab of the message.
Permanent Overrides #

Clicking on the Permanent overrides icon will open the Permanent Overrides window. This window shows any EDI validation rules that have been permanently overridden for this Insured Period. All messages linked to this period will omit the permanently overridden rules. In Edit mode it is possible to remove the permanent override status from each rule. When changing the status, you must enter a reason for the change in the Permanent Override dialogue box.
Cease Accounting #
Cease Accounting: This function can be set by the user or automatically set by SICS. If the Cease Accounting function is in use, it prevents you from doing any bookings on technical and claim worksheets. When you select the ‘Cease Accounting of this Period’ checkbox, SICS will validate that no open claim and/or technical and claim worksheet exist.
The Cease Description field enables you to enter a reason for the ceased accounting unless the business is marked ‘as commuted’, in which case the commutation code appears. Refer to Terminate Business.
Individual Options #
Use Vat Calculation: This flag is available when the system parameter Is Automatic Vat Calculation In Use is activated. It relates to assumed business. If you have selected this option, the system will trigger automatic Value Added Tax (VAT) calculation when the cedent and/or the broker of the business is located in a country applicable to VAT and when the Claim or Technical Worksheet contains bookings that are subject to VAT.
Cross-references in guide: Calculate and Book Value Added Tax Automatically in Manual Bookings on a Worksheet, Accounting Chapter
VAT% and Surcharge%: The default values of VAT% and Surcharge% have been defined on Country, VAT properties in Reference Items folder, Locations window. They can be overwritten here if needed.
If you want to further define these values based on accounting period, You can overwrite VAT% and Surcharge% on the Administration Conditions for all proportional business or on the Premium/Limit conditions, Instalments for all non-proportional business.
Inter-Company Pooling: In the market place there are several types of pools. This flag applies when one company cedes risks into a pool of companies that they are a member of, but that company does not assume any risk they cede to the pool.
The Inter-Company Pooling flag applies to Proportional Treaty Outward Cedent’s Contract (OCC) business. An Unplaced Share Business may also be flagged as being subject to Inter-Company Pooling. The Unplaced Share business then assumes the bookings not assumed by Retrocessionaire Participant (RP) due to the RP having ceded risk to the pool.
- Open the Insured Period tab of an Proportional Treaty OCC business or an Unplaced Share business.
- Select Edit Individual Options.
- Clear the Inter-Company Pooling check box.
- Click OK
Note! The check box is available on Proportional Treaty OCC businesses only if system parameter Trace Source Business from Outward Bookings is activated.
For further information about Inter-Company Pooling, refer to the Proportional Retrocession Accounting chapter.
| Field | Description |
|---|---|
| Inter-Company Pooling: | Values: Cleared, Selected. Default: Cleared Validation: OCC business: Original Cost Participation on Premium/Limit condition can not be activated. Unplaced Share business: The field Inter-Company Pooling on the OCC business must be activated. This field can not be activated for another Unplaced Share business. The Share of the Insured Period must be equal to 0,00%. Functional Impact: Proportional Retrocession Accounting Mandatory: No |
Placement Completed: This flag indicates whether or not the contract is 100% placed for the insured period and placement is considered completed. Available for Outward Cedent’s Contract, XLCA of Outward and Insured’s Contract.
For Outward Cedent’s Contract and XLCA of Outward flag can be modified manually or automatically from the Placement list.
For modification of flag see Place Outward Cedent’s Contract chapter for description.
For Insured’s Contract flag can be modified manually from Individual Options or automatically from the Placement list.
To set the flag manually for Insured’s Contract: #
- Open the Insured Period tab.
- Select Edit Individual Options.
- Select the Placement Completed check-box.
- Click OK.
| Field | Description |
|---|---|
| Placement Completed | Values: Cleared, Selected Default: Cleared Validation: This flag can only be selected if the retrocessionaire participation has a definite life cycle status and a signed share totalling 100%. Functional impact: Recovery Calculation Order Mandatory: No |
Exclude Contribution to Net Quota Share #
Indicate whether the bookings made on the Retrocessionaires of the contract must be retroceded to the Net Quota Share OCC (Cover Basis ‘Original Cost Participation) or not.
- Open the Insured Period tab of your contract
- Select Edit Individual Options:
- Select Exclude Contribution to Net Quota Share
- Select OK.
| Field | Description |
|---|---|
| Exclude Contribution to Net Quota Share | Indicates whether the bookings made on the Retrocessionaires of contract must be retroceded to the Net Quota Share OCC (Cover Basis ‘Original Cost Participation) or not. When selected, the bookings made to the Retrocessionaire Participations of this OCC are excluded from being booked to the Net Quota Share OCC defined on the same. Values: Cleared, Selected Default: Cleared Validations: Level of Business must be outward cedent’s contract Type of Business must be proportional treaty Mandatory: No Functional impact: Retrocession Calculation Order Assign Proportional Protection |
Contribute to Net Quota Share OCC
Indicate that the bookings made to the retrocessionaires of this contract must be retroceded to a Net Quota Share OCC. The Contribute to Net Quota Share Percentage will then be applied to the non-proportional retrocessionaire figures before being retroceded to the Net Quota Share OCC ‘as Original’ business ledger.
- Open the Insured Period tab of the the non-proportional contract.
- Select Edit Individual Options:
- Enter the Net Quota Share OCC or use the Find button to select one from the Find: Business
- Enter a Percentage in the second field
- Select OK.
| Field | Description |
|---|---|
| Contribute to Net Quota Share OCC |
The Net Quota Share contract to which bookings made on the non-proportional retrocessionaires must be retroceded. Values: OCC business, title and Insured Period From-To Validation: Available only for Level of Business outward cedent’s contract Available only for Type of Business non-proportional treatv Insured Period of the OCC must be is a valid period for protecting the business. Mandatory: No Functional impact: Retrocession Accounting |
| Percentage | The percentage applied to the bookings made on the retrocessionaire of the Non-Proportional OCC efore being retroceded to the entered Net Quota Share OCC ‘as Original’ business ledger. Values: Percentage Validations: A ‘Contribute to Net Quota Share OCC’ must be present Functional Impact Retrocession Accounting |
Register Administration Channel #
A reinsurance contract may be administered in different ways. For example the accounting may be done manually, electronically, by a standard application or by an internal application. By recording the administration channel used, the development and success of a particular administration channel can be monitored.
- Open the Insured Period tab your contract
- Select Edit Administration Channel from the menu button
- Select the value as you require
- Click OK
| Field | Description |
|---|---|
| Administration Channel: | The way the contract is administered Values: Customized by your company, e.g. EDI LPC Classic Validations: Level of Business must be Assumed Businesses Mandatory: No Functional Impact: None |
Register Insured Period Identification #
Insured Period Identifiers give an identification of a specific Insured Period. These are identifiers manually given or automatically generated by SICS and refer to specific insured period references e.g. used in an old version of SICS or even in a completely different system.
Register identifier related to Insured Period:
- From the Business’ Insured Period tab, select Edit or Edit Identification
- Register Insured Period Former ID and/ or Original Former ID
- Press OK to save input
| Field | Description |
|---|---|
| Insured Period ID | Identifier that uniquely identifies the contract insured period. Values: Text Derived from: Automatically generated by the system Validations: Cannot be manually entered Mandatory: No Functional Impact: None |
| Insured Period Former ID |
Free text field where an earlier Insured Period ID/ reference can be registered Values: Text field Maximum number of characters: 50 Validations: Depending system parameter setting, Insured Period Former ID may be copied to new Insured Period Mandatory: No Functional Impact: None |
| Original Former ID | Free text field where an earlier Insured Period ID/ reference can be registered Values: Text field. Maximum number of characters: 20 Mandatory: No Functional Impact: None |
Register Claim Validation Indicator #
The Claim Validation indicator is used together with other items on the insured period to match Claim Accuracy Template to the Insured Period.
Register Claim Validation Indicator:
- From the Business Insured Period tab, select the menu
- Select Edit Claim Validation Indicator
- Select the required Validation indicator from drop-down, and press OK.
| Field | Description |
|---|---|
| Seq.no | The seqence number generated for the validation indicator. Output field only. Values: Integer |
| Date | The date the claim validation indicator was defined. Output field only. Values: Date field. |
| Validation Indicator | The name of the validation indicator. Values:Customised by your System Administrator. Mandatory: Yes Functional impact: Used when finding which Claim Accuracy Template applies. |
| Updated By | User who updated the indicator - output field only |
Trace Options #
Base Company #
There are various trace options available on outward cedent’s contracts to enable creation of a link between the outward booking detail and the source booking:
- Source Business
- Claim
- Headline Loss
- Base Company
- Original Responsible Partner
This choice is only enabled if your system administrator has set up the system accordingly.
Refer to the Add Accounting Information on Business section in the Accounting chapter for more details.
Attachment Method / In Force from Date #
Some times it is necessary to indicate on what basis the outward cedent’s contract should attach to the inward businesses. SICS allows you to do this by setting the attachement method.
| Field | Description |
|---|---|
| Attachement Method: |
The state that the inward business needs to be in to be protected by this contract. Values: New/Renewal: OCC protection applies to businesses that incepts or is renewed from a date within the OCC’s Insured Period. In Force: OCC protection applies to businesses being in force at the point of OCC inception. New/Renewal/In Force: As for New/Renewal, but OCC amendments applies to existing business from the selected date. Validations: Level of Business must be Outward Cedent’s Contract Type of Business must be proportional treaty, non-proportional treaty Mandatory: Yes Functional Impact: Depending on set up by your System Administrator, may have impact on: Single and Multi Business Auto Protection Single and Multi Claim Auto Protection |
| In Force from Date: | From this date changes on the OCC applies also to in force bussiness. Values: Date Defaults: OCC Insured Period From date. Validations: Applicable only when in force attachment methods selected. If OCC amended, select appropriate date, (from which amendment changes apply to in force business).Functional Impact: Depending on set up by your System Administrator, may have impact on: Single and Multi Business Auto Protection, Single and Multi Claim Auto Protection |
Post Booking Review (PBR) Reports #
In the Plausibility system parameter, you can define your plausibility validation rules for closed worksheets and define up to nine predefined Post Booking Review Reports to be used to validate closed worksheets for Assumed Business. (The available BPR reports are all reports included in the reference data Post Booking Review Report). The result of the Post Booking Review Reports will be produced through WEB service. For more details regarding the various PBR Reports, refer to system parameter Accounting/Plausibility Rules.
The following Post Booking Review (PBR) Reports are available;
- Positive Loss Reserve
- Negative Earned Premium
- Change in Loss Incurred
- Wrong Financial Period
- Claims Booked But No Premium
- Claims Paid Without Reserves Maintained
- Loss Portfolio Withdrawal With Reserves
- Premium Portfolio Withdrawals With Reserves
- Loss Portfolio Entries With No Reserves
Post Booking Review Exceptions #
If your company have defined Post Booking Review (PBR) Reports to check closed worksheets (refer to system parameter Accounting/Plausibility Rules), the Post Booking Review Exceptions may be defined to exclude one or more PBR Report for this specific business insured period. You can access the Post Booking Review Exceptions from the PBR Exceptions tab on the business. This tab is visible only for Assumed Businesses and only when a Default Rule is defined (as active or inactive) in the system parameter ‘Plausibility Rules’.
Note: This information is available for business with Level of Business ‘Assumed Business’ only
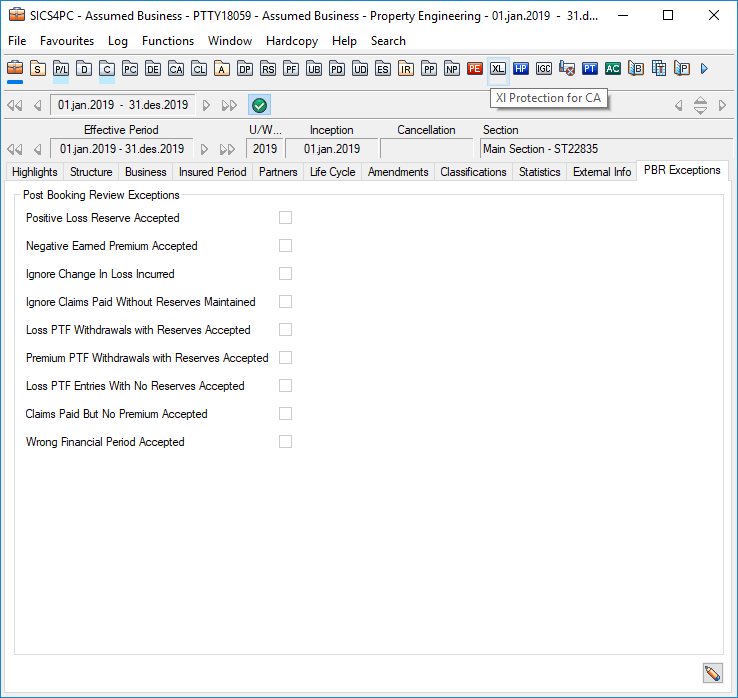
The PBR Exceptions tab on the business showing exceptions to the Post Booking Review Reports
- Open your business and select the PBR Exceptions tab
- Click the Edit button on the PBR Exceptions tab. You see the Edit Post Booking Review Exceptions window.
- Select the required PBR Exception(s) for the business;
- Positive Loss Reserve Accepted
- Negative Earned Premium Accepted
- Ignore Change In Loss Incurred
- Ignore Claims Paid Without Reserves Maintained
- Loss PTF Withdrawals with Reserves Accepted
- Premium PTF Withdrawals with Reserves Accepted
- Los PTF Entries With No Reserves Accepted
- Claims Paid But No Premium Accepted
- Wrong Financial Period Accepted
- Click OK
Note: Access to modify the PBR Exceptions is controlled by a security use case.
| Field | Description |
|---|---|
| Positive Loss Reserve Accepted | Determines if the PBR report ‘Positive Loss Reserve’ should be excluded or not Values: Selected, cleared Default: Cleared Selected: When PBR report is run and the field ‘Positive Loss Reserve Accepted’ is selected, no check of positive loss reserve for this business insured period will be performed Cleared: When PBR report is run and the field ‘Positive Loss Reserve Accepted’ is cleared, a check of positive loss reserve for this business insured period will be performed |
| Negative Earned Premium Accepted | Determines if the PBR report ‘Negative Earned Premium’ should be excluded or not Values: Selected, cleared Default: Cleared Selected: When PBR report is run and the field ‘Negative Earned Premium Accepted’ is selected, no check of negative earned premium for this business insured period will be performed Cleared: When PBR report is run and the field ‘Negative Earned Premium’ is cleared, a check of negative earned premium for this business insured period will be performed |
| Ignore Change In Loss Incurred | Determines if the PBR report ‘Change in Loss Incurred’ should be excluded or not Values: Selected, cleared Default: Cleared Selected: When PBR report is run and the field ‘Ignore Change In Loss Incurred’ is selected, no check if loss incurred is changed or not for this business insured period will be performed Cleared: When PBR report is run and the field ‘Ignore Change In Loss Incurred’ is cleared, a check if loss incurred is changed or not for this business insured period will be performed |
| Ignore Claims Paid Without Reserves Maintained | Determines if the PBR report ‘Claims Paid Without Reserves Maintained’ should be excluded or not Values: Selected, cleared Default: Cleared Selected: When PBR report is run and the field ‘Ignore Claims Paid Without Reserves Maintained’ is selected, no check if loss without any corresponding loss reserve exist or not for this business insured period will be performed Cleared: When PBR report is run and the field ‘Ignore Claims Paid Without Reserves Maintained’ is cleared, a check if loss without any corresponding loss reserve exist or not for this business insured period will be performed |
| Loss PTF Withdrawals with Reserves Accepted | Determines if the PBR report ‘Loss Portfolio Withdrawal With Reserves’ should be excluded or not Values: Selected, cleared Default: Cleared Selected: When PBR report is run and the field ‘Loss PTF Withdrawals with Reserves Accepted’ is selected, no check if loss portfolio withdrawal and corresponding loss reserves exist for this business insured period will be performed. Cleared: When PBR report is run and the field ‘Loss PTF Withdrawals with Reserves Accepted’ is cleared, a check if loss portfolio withdrawal and corresponding loss reserve exist for this business insured period will be performed. |
| Premium PTF Withdrawals with Reserves Accepted | Determines if the PBR report ‘Premium Portfolio Withdrawal With Reserves’ should be excluded or not Values: Selected, cleared Default: Cleared Selected: When PBR report is run and the field ‘Premium PTF Withdrawals with Reserves Accepted’ is selected, no check if premium portfolio withdrawal and corresponding premium reserves exist for this business insured period will be performed. Cleared: When PBR report is run and the field ‘Premium PTF Withdrawals with Reserves Accepted’ is cleared, a check if premium portfolio withdrawal and corresponding premium reserves exist for this business insured period will be performed |
| Loss PTF Entries With No Reserves Accepted | Determines if the PBR report ‘Loss Portfolio Entries With No Reserves’ should be excluded or not Values: Selected, cleared Default: Cleared Selected: When PBR report is run and the field ‘Premium PTF Withdrawals with Reserves Accepted’ is selected, no check if loss portfolio withdrawal and no corresponding loss reserves exist for this business insured period will be performed. Cleared: When PBR report is run and the field ‘Premium PTF Withdrawals with Reserves Accepted’ is cleared, a check if loss portfolio withdrawal and no corresponding loss reserves exist for this business insured period will be performed |
| Claims Paid But No Premium Accepted | Determines if the PBR report ‘Claims Booked But No Premium’ should be excluded or not Values: Selected, cleared Default: Cleared Selected: When PBR report is run and the field ‘Claims Paid But No Premium Accepted’ is selected, no check if claims booked, but no corresponding premium exist for this business insured period will be performed. Cleared: When PBR report is run and the field ‘Claims Paid But No Premium Accepted’ is cleared, a check if claims paid booked, but no corresponding premium exist for this business insured period will be performed |
| Wrong Financial Period Accepted | Determines if the PBR report ‘Wrong Financial Period’ should be excluded or not Values: Selected, cleared Default: Cleared Selected: When PBR report is run and the field ‘Wrong Financial Period’ Accepted is selected, no check of the Accounting Period From Date of the booking details against a Booking Date will be performed. Cleared: When PBR report is run and the field ‘Wrong Financial Period’ Accepted is cleared, a check of the Accounting Period From Date of the booking details against a Booking Date will be performed. |