Terminate Business
Cancel Business Provisionally #
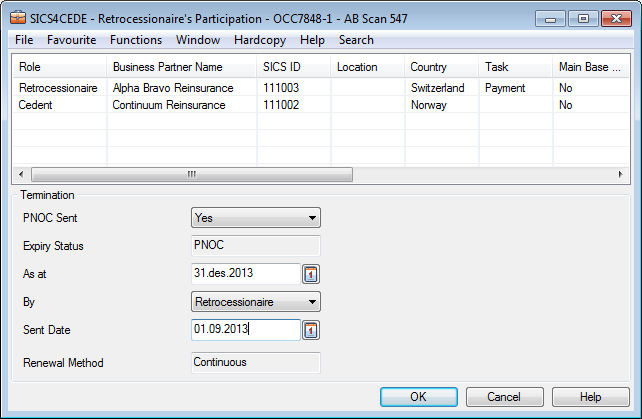
Indicate Provisional Cancellation Sent #
For continuous treaties, you can record that a provisional notice of cancellation has been submitted.
To record the provisional notice of cancellation:
- Open your business.
- Select the Partner tab.
- On the Menu button, select Provisional Cancellation.
- For PNOC Sent, select Yes. You see the fields required for submitting Provisional Cancellation.
- Enter the required data and select OK
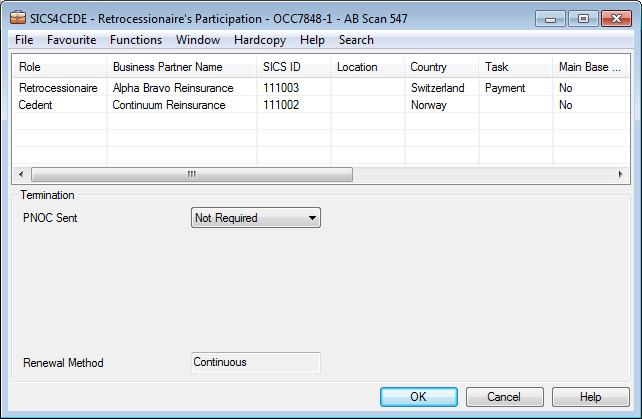
 Indicate Provisional Cancellation Not Sent
In some cases you may want to register a reason for a PNOC not having been sent. The reason may e.g. be that it has not yet been sent or due to contractual or other business reasons it is not required at all.
- Open your business.
- Select the Partner tab.
- On the Menu button, select Provisional Cancellation.
- For PNOC Sent, select the applicable reason for Provisional Cancellation not being sent.
- Enter the required data and select OK.
| Field | Description |
|---|---|
| Expiry Status | Termination status. Value: PNOC (Provisional Notice of Cancellation) Derived from: PNOC Sent is Yes |
| PNOC Sent | Refers to Whether or not PNOC (Provisional Notice of Cancellation) is to be Sent. Value: Yes, No, Not Required, Waived (and others depending on the setup by System Administrator) Default: May be set up by System Administrator, e.g. to be defaulted to ‘No’ Functional Impact: Other Provisional Cancellation Items Mandatory: Yes |
| As at | The date from when the business is provisionally cancelled. Values: Date Default: Insured Period To Date Validations: PNOC Sent must be Yes Warning when PNOC As at outside Insured Period Functional Impact: None Mandatory: Yes. |
| By | By the party that cancelled the business. Validations: PNOC Sent must be Yes |
| Sent Date | The date that the provisional notice of cancellation was sent to the business partner. Values: Date Default: Today’s date Validations: PNOC Sent must be Yes Must be later than Provisional as at Date |
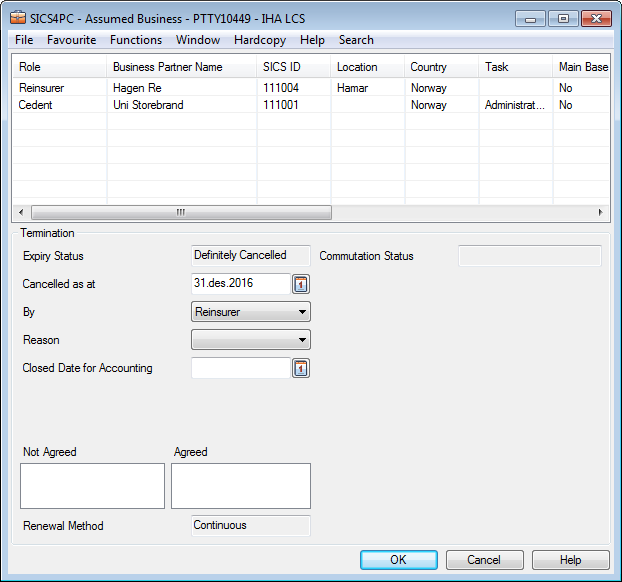
Cancel Business Definitely #
The Definite Notice of Cancellation is option similar to the Provisional Notice of Cancellation option with one additional section: Not Agreed/Agreed. This section shows the accounting conditions that the parties agreed on, or that are still outstanding (not agreed). Clicking the right-mouse button takes you to the window where you can view those conditions.
To cancel the business definitely:
- Open your business.
- Click the Partner tab.
- On the Menu button, select Definite Cancellation.
- Enter relevant data and click OK
 If a closed date or commutation code has been set, the ‘Cease Accounting ‘check box on the Insured Period tab of the Business Properties window is automatically selected and disabled. SICS validates that no open claims exist for the period or the business before setting the flag. If open claims exist, an error message appears.
Note! If these fields are blank, it is possible to select the box manually on the Business tab of the Business Properties window.
| Field | Description |
|---|---|
| Expiry Status | Termination status. Value: Definitely Cancelled |
| Cancelled as at | The date from when the business is definitely cancelled. Values: Date. Default: The business’ end-date. Derived from: Insured Period Validations: A warning message appears if the Cancelled as at date is a date outside the Insured Period. Functional Impact: None Mandatory: Yes |
| Agreed | The accounting conditions that the parties have agreed on as part of the cancellation. Values: Customised by you company e.g. as original, clean cut, loss deposit Functional Impact: None Mandatory: No |
| Not Agreed | The accounting conditions that the parties still have not agreed upon as part of the cancellation. Values: Customised by you company e.g. as original, clean cut, loss deposit Functional Impact: None Mandatory: No |
Capture that Business Not Renewed #
- Open your business.
- Click the Partner tab.
- On the Menu button, select Not Renewed.
- Enter the required data and click OK..
| Field | Description |
|---|---|
| Expiry Status | Termination status. Value: Not Renewed |
| Expiry date | The date from when the business expires Values: Date. Default: The business’ end-date Derived from: Insured Period Validations: A warning message appears if the Expiry date is a date outside the Insured Period. Functional Impact: None. Mandatory: Yes |
Cancel Agreeements for New Cessions #
In some markets, (e.g. life) it is often agreed that an agreement is cancelled only for new policies. Whether this functionality is available depends on your company’s system set up.
- Click the Partners Tab
- From the menu button, select Cancel for New Cessions
- Give a date and click OK
| Field | Description |
|---|---|
| Cancelled for New Cessions as at: | The date from when the agreement is cancelled for new policies. Values: Date. Validations: Must be before Insured Period To Date Must be before ‘Definetely Cancelled as at’ if agreement is definitively cancelled. Must be before ‘Cancelled for New Claims as at’ if the agreement is cancelled for new claims. Warning if before Insured Period From Date. Functional Impact: None. Mandatory: No |
Cancel Agreement for New Claims #
Whether your company allows cancelling agreements for new claims depends on the system set up of your company.
- Click the Partners Tab
- From the menu button, select Cancel for New Claims
- Give a date and click OK
| Field | Description |
|---|---|
| Cancelled for New Claims as at date: | The date from when the agreement is cancelled for new claims. Values: Date. Validations: Must be before Insured Period To Date when Claim Accounting Basis is ‘Clean Cut’. Must be before ‘Definetely Cancelled as at’ if agreement is definitively cancelled. Must be before ‘Cancelled for New Claims as at’ if the agreement is cancelled for new cessions. Warning if before Insured Period From Date. Functional Impact: None. Mandatory: No |
Commute a Business #
have several options to capture this in SICS.
Note! The'Commute Business' option is only available if the Insured Period is not already commuted by the option'Business to be Commuted'.
Depending on the system parameter setting, the business will not be commuted if ‘Unreleased’ Deposits, Non-Liquid Deposits, Cash Claims, Premium Due Later and/or Reserves exist on the Business Ledger.
Commute One Insured Period #
When the commutation agreement applies to only one insured period, then capture this as follows:
- On the Insured Period navigation bar of your business, navigate to the insured period that you want to commute.
- On the Partners tab, click the Menu button and select Commute Business and Insured Period.
- Enter the required information and click OK.
Commute All Insured Periods #
When the commutation agreement applies to all insured periods of your agreement, then capture this as follows:
- On the Partners tab of your business, click the Menu button and select Commute Business and All Insured Periods.
- Enter required information and click OK.
Modify Commutation Information #
Sometimes new information requires that you need to adjust the recorded commutation information. For example, from when the commutation is effective.
- On the Partners tab of your business, click the Menu button and select Modify Commutation.
- Make your changes and click OK.
Revoke Commutation #
Sometimes the company needs to revoke the commutation information on a business. This might be due to new information, or that the business was commuted by mistake.
- On the Partners tab of a business, click the Menu button and select Revoke Commutation.
- Choose a reason and click OK.
SICS asks whether the commutation information shall be revoked for all insured periods. 3. Confirm your choice.
If you answer ‘No’, the Commutation is revoked only for this insured period. Depending on your choice for revoking commutation,SICS asks whether or not the Cease Accounting flag shall be removed for all insured periods or for this insured period. 4. Confirm your choice.
View Commutation Update Information #
Sometimes it is important for the company, for example for audit reasons, to see when the commutation information for an insured period was last updated and by whom.
- On the Partners tab of your business, click the Menu button and select Commutation Last Updated.

| Field | Description |
|---|---|
| Commutation Status | Termination status. Value: Commuted |
| Commuted | Indicates that the current insured period is commuted or that all insured periods of this agreement are commuted. Values: All Insured Periods Insured Period Mandatory: Yes Functional Impact: Other Commutation Information Cease Accounting Indication Automatic Booking Indication |
| Commutation Reference |
Reference that can be given upon commutation of a business, e.g. referring to a commutation identification given by an external system. Values: Free text field Maximum number of characters: 40 Mandatory: No Functional Impact: None |
| Commuted Effective Date | The agreed cut-off date for the insured period. Values: Date Validations: Cannot be later than Commuted Processed Date. Default: Today’s date Mandatory: Yes Functional Impact: Other Commutation Information |
| Commuted Processed Date | The date that the last commutation transactions took place. Values: Date Validations: Must be equal to or higher than Commuted Effective Date. Cannot be higher than today’s date. Mandatory: No Functional Impact: Other Commutation Information |
| Commutation Revoked Reason | Indicates the reason for the commutation having been revoked. Values: Customised by your company. For example, New Information, Re-Negotiated, Recorded in Error, Wrong Business Commuted, Wrong Insured Period Commuted. Mandatory: Yes Functional Impact: None |
| Commutation Last Updated | Shows when the last update relating to any commutation information for the insured period was made. Values: Date and Time Derived from: Date and Time when last updated. Validations: Cannot be changed manually. Functional Impact: None |
| By | Shows who made the last update relating to commutation information for the insured period. Values: Name / ID Derived from: Name and ID of the logged in user that did the last update. Validations: Cannot be changed manually. Functional Impact: None |
Record Information for Business to be Commuted #
After an agreement or some of its insured periods have been some years in run-off, you may decide it is time to commute the remaining outstanding reserves, e.g. by calculating a portfolio withdrawal. When under commutation discussion, you may indicate that commutation is in progress, and record relevant information.
Note! For proportional treaty retrocessionaire participation the conditions only apply when accounting basis is ‘Run-off’
Note! The Business to be Commuted option is only available if the insured period is not already commuted by the option Commute Business.
Apply Commutation Rules to One Insured Period #
When the commutation in progress information applies to only one insured period, then capture this as follows:
- On the Insured Period navigation bar of your business, navigate to the insured period that you want to commute.
- On the Partners tab, click the Menu button and select Business to be Commuted. and Insured Period.
- Enter relevant information. Click OK.
Apply Commutation Rules to All Insured Periods #
When the commutation in progress information applies to all insured periods of your agreement, then capture this as follows:
- On the Partners tab of your business (on any insured period) click menu button and select Business to be Commuted and All Insured Periods.
- Enter relevant information. Click OK.
Modify Information for Business to be Commuted #
Sometimes new information requires that you need to adjust the recorded commutation information, for example, the accounting period selected in Commute per.
For proportional treaty retrocessionaire participations, this option is disabled if the Account is already accounted for.
- On the Partners tab of your business, click menu button and select Modify Business to be Commuted.
- Make your changes and click OK.
Revoke Commutation Rules #
Sometimes the company needs to revoke the commutation information on a business.This might be e.g. due to new information or that the business was commuted by mistake.
For proporotial treaty retrocessionaire participation, this option is disabled if the Account entered in the Commute per is already accounted for.
- On the Partners tab of a business, click the Menu button and select Revoke Business to be Commuted.
The system asks whether the commutation information shall be revoked for all insured periods. Confirm your choice.
If you answer ‘No’, the Commutation is revoked only for this insured period.

| Field | Description |
|---|---|
| Commutation Status | Termination status. Value: In Progress |
| To be Commuted | Indicates whether commutation is under discussion for the current insured period or for all insured periods Values: All Insured Periods, Insured Period Mandatory: Yes Functional Impact: Proportional Retrocession Accounting, (Portfolio Withdrawal bookings when business commuted). Manual Accounting Automatic Premium Accounting Claims Handling |
| Commute per | The agreed Accounting Year and Period for cut-off and if relevant, calculation of portfolio withdrawal for the insured period. Values: Accounting Year and Period Derived from: The Number of Accounts in the Single Account, Administration Condition Validations: Must be present when To be Commuted selected if business is proportional treaty retrocessionaire participation. If proportional treaty retrocessionaire participations, warning if selected Accounting Year and Period already accounted. Functional Impact: Proportional Retrocession Accounting, (Portfolio Withdrawal bookings when business commuted) Manual Accounting Automatic Premium Accounting Claims Handling |
| Portfolio Adj per | The agreed Accounting Year and Period for calculating an adjustment of the portfolio withdrawal amount previously calculated for the insured period Values: Accounting Year and Period Derived from: The Number of Accounts in the Single Account, Administration Condition Validations: Type of Business must be proportional treaty Accounting Year and Period must be higher than the Accounting Year and Period in Commute per. If proportional treaty retrocessioniare participation, warning if selected Accounting Year and Period already are accounted. Mandatory: No Functional Impact: Proportional Retrocession Accounting, (Portfolio Withdrawal Adjustment bookings when business commuted) Manual Accounting Automatic Premium Accounting Claims Handling |
| Commute Per Date | The date from which the commutation will be effective. Once the relevant commutation calculations have been made, this will be the commuted effective date. Values:Date Derived from: Selected Accounting Year and Period, if defined. Validations: * Type of Business must be Non-Proportional Treaty. * Level of Business must be Retrocessionaire Participation _Mandatory:_ No _Functional Impact:_ Non-Proportional Retrocession Accounting |
Change Renewal Method #
The renewal method is the renewal options for an agreement. It specifies what should or can happen when the expiry date is reached. Continuous means that the agreement is renewed unless Notice of Cancellation is provided. Non Continuous means that it expires but can be renewed following negotiation. Non Renewable means that the agreement expires, and any re-negotiation constitutes a new agreement.
If your renewal method is Continuous, you can change it to Non Continuous, and visa versa. You see a dialog asking you if you wish to make the change. Click Yes if you do.
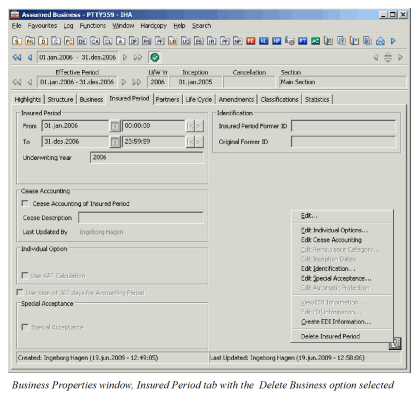
Delete Business #
If a business has been created or renewed by mistake, you can delete the business or the insured period.
Only users with proper authorisation are allowed to delete businesses.
Restrictions for Deletion of Business #
An insured period cannot be deleted if any of the following items are linked to the insured period:
- Bookings
- Claims
- Facultative or Single Treaty Protections, proportional or non-proportional
- Placed businesses, (e.g. an OCC containing retrocessionaires cannot be deleted before all retrocessionaires are deleted)
Delete Business Created in Error #
Remove an entire business so that the system becomes as if it never existed. Is allowed to delete the business only when it has one insured period. (If your business has more than one insured period, refer to the Delete Renewal Made in Erroron page 5-188 section.).
- Open the Business and select the Insured Period tab
- Click the menu button and select Delete Business
- Reply Yes to the warning.
- Click Save.
Delete Renewal Made in Error #
It is only possible to delete the latest insured period of the business. (If you have more than on insured period that needs to be deleted, start with deleting the latest and then proceed to the next insured period.)
- Open the Business and navigate to the latest insured period.
- Select the Insured Period tab
- Click the menu button and select ‘Delete Insured Period.
- Answer “Yes” to warning message asking if you really want to delete this insured period
- Click Save and insured period is deleted.