Claim Ledger - Details Claim Worksheet Bookings
View the Claim Ledger #
The claim ledger gives you an overview of all bookings created for a specific claim-to-section link on a Claim Worksheet, sorted by the As of dates or Date current status of worksheet was set, if this has been chosen by your System Administrator. Opposed to the Business and Business Partner Ledgers, which only include worksheets transferred to the ledger, the Claim Ledger will also include those that were not transferred. The Claim Ledger and its menu present you with lots of options that will be explained in detail in this chapter.
In addition to being a separate tab on each claim, the Claim Ledger can be accessed directly from numerous places.
View Claim Ledger from Find Claim #
- From the desktop, select Claim, perform a search (refer to Find Claim).
- Select the required claim.
- Select Claim Ledger from the pop-up menu.
- If the claim is linked to more than one section and your Find Claim Query options are either Claims or Claims Quick Find you must select the section from the List Chooser.
View Claim Ledger from Partner Claim List #
The Partner Claim list is available for partners that are cedents (on treaty and facultative business) or insureds (on direct business).
- Open the partner’s properties, and select the Claims icon.
- Select type of claim list (cedent or insured), and whether you want to include subsidiaries in the result.
- Select retrieve claims.
- Select the Claim for which you want to view the Claim Ledger.
- Select Claim Ledger from popup menu.
View Assumed Claim’s Claim Ledger from Headline Loss #
- Open the Headline Loss (refer to Find Headline Loss), and select the Claim List tab.
- Select Retrieve Linked Claims.
- Select the Claim you want to view the highlights for.
- Select Claim Ledger from the pop-up menu.
- If Claim is linked to more than one section, select the required section from the List Chooser.
View Non-Proportional Treaty Outwards Claim’s Claim Ledger from Headline Loss #
- From desktop, select Headline, perform a search (refer to Find Headline Loss), and open the Headline Loss.
- Select the Non-Proportional Recovery List tab.
- Select Retrieve Linked Claims.
- Select the Claim you want to view Claim Ledger for.
- Select Claim Ledger from the pop-up menu.
- If Claim is linked to more than one section, select the required section from the List Chooser.
View Claim Ledger from Claim Group #
- From desktop, select Claim Group, perform a search (refer to Find Claim Group), and open the Claim Group.
- Select the Claim you want to view Claim Ledger for
- Select Claim Ledger from the pop-up menu.
- If Claim is linked to more than one section, select the required section from the List Chooser.
View Claim Ledger from Claim Program #
- From desktop, select Claim Program, perform a search (refer to Find Claim Program), and open the Claim Program
- Open the Claims List tab
- Select the Claim you want to view Claim Ledger for
- Select Claim Ledger from the pop-up menu
- If Claim is linked to more than one section, select the required section from the List Chooser.
View Claim Ledger from Find Worksheet #
- From desktop, select Worksheet, perform a search for Claim Worksheets (refer to Find Worksheets)
- Select the required worksheet and balance
- Select View Claim Ledger from the pop-up menu.
View Claim Ledger in Default View #
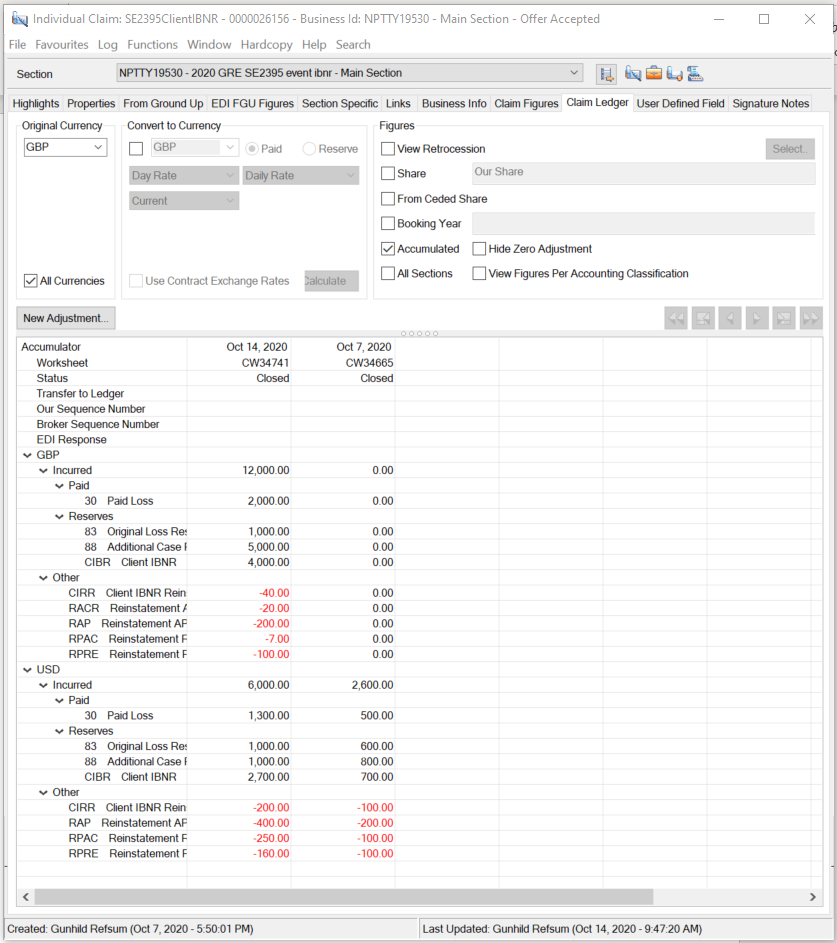
The upper part of the Claim Ledger consists of an Original Currency section, a Currency Conversion Section and a Figures Section. Each of these sections will be handled in detail below.
The lower part of the Claim Ledger displays an Accumulator column, and then columns for the latest adjustments. The Accumulator column displays for each adjustment the currencies used, whether the booking was transferred to ledger, the worksheet status, and each entry code used in that booking. An adjustment is considered to be an as-of-date, a worksheet identifier, or even a row within the same worksheet.
In its default view the claim Ledger displays all bookings in all currencies for the selected section in an accumulated view. The bookings are sorted so that the most recent booking appears first. If the Hide Zero Adjustment check-box is selected, the default view only displays worksheets with actual adjustments. All worksheets where adjustments to each entry code is zero have been filtered out.
View Claim Ledger for Single Currency Only #
If you have a claim with bookings in more than one currency, the claim ledger can be quite long in its expanded view. The currencies are sorted in alphabetical order except for the Main Currency from the latest Insured Period which will be shown at top (if it is found on the claim ledger). It could also be that you are only interested in adjustments made in one specific currency. SICS enables you to extract adjustments for a single currency only
- Open the Claim Ledger (refer to View Claim Ledger) of the required claim
- In the Original Currency section of the upper part of the Claim Ledger, select the currency you want to inspect
- Clear the All Currencies check box.
Convert Figures into other Currencies #
There are a number of reasons why you might want to convert the Claim Ledger figures into different currencies. The contract might have multiple currencies defined, and you have booked the claim in more than one of these. To see the overall exposure quick and easy, you can see all bookings expressed in one of these currencies. Another reason could be that you want to compare the incurred claim figure with some figure expressed in your base currency. Whatever the reason, SICS enables you to convert the Claim Ledger into any currency defined in the system, using whichever rate defined in the system.
To Convert Claim Bookings into another Currency:
- Open the Claim Ledger (refer to View Claim Ledger)) of the required claim
- In the Convert to Currency section of the upper part of the Claim Ledger, select the check box next to the disabled currency field. The system now enables the currency field. By default the Main Currency of the Business is selected, but all currencies defined in the system are available.
- Select Exchange Rate Type (Day Rate, Period Rate, or Year Rate).
- Select Rate Category (e.g. Provisional Year End Rate).
- Select the Exchange Rate As-of-Type (e.g. current).
- If you select Fixed, you must further define the Year for Year Rates, for Period Rate you must specify the Year, and the Period itself, and for Day Rates you must specify the Date.
- When you have completed the rate definition, press the Calculate button to recalculate claim ledger figures
Claim Ledger Currency Conversion -Exchange Rate System #
In the Currency System (refer to Currency and Exchange Rates in the System Administration Guide) you can define Day Rates, Period Rates, and Year Rates. For these you may also have different categories, such as Actual Rates and Provisional Rates. Finally, you may want to further specify the exact rate that shall be applied in the calculations. Depending on your choice of Rate and Rate Category, you will have different options for the Exchange Rate as-of-type like Current, Fixed, Inception and Sliding.
Claim Ledger Currency Conversion Exchange Rate As Of Type Impact #
| Rate | Definition |
|---|---|
| Current Rate: | The most recent rate within the selected Category is applied in the calculations. |
| Fixed: | The rate recorded as per the specified date, or the one valid at that point in time. |
| Inception: | Rate valid as per Insured Period Start Date. |
| Sliding: | Could also be named rate as per transaction date. The Rate applied will depend on the as-of-dates of the individual adjustments. Each adjustment will be considered separately to find the rate that shall be applied to it. |
Claim Ledger Currency Conversion - Selecting Conversion Rates #
- Open the Claim Ledger of the required claim
- In the Convert to Currency section select the check box next to the disabled currency field. The system now enables the currency field. By default the Main Currency of the Business is selected, but all currencies defined in the system are available.
- Select Exchange Rate Type (Day Rate, Period Rate, or Year Rate).
- Select Rate Category (e.g. Provisional Year End Rate).
- Select the Exchange Rate As-of-Type (e.g. current).
- If you select Fixed, you must further define the Year for Year Rates, for Period Rate you must specify the Year, and the Period itself, and for Day Rates you must specify the Date.
Claim Ledger Currency Conversion Options - Paid and Reserve #
The options Paid and Reserve are enabled when Day Rate - Daily Rate - Sliding Rate is selected. The “Paid” option will probably give you the most “correct” converted figure. The conversion calculation is made in steps and each payment is converted by using the rate as per the as-of-date (or the one prior), whereas the accumulated reserves are converted using the current rate. The “Reserve” option will convert the accumulated Payment and Reserve figures using the current rate only; in other words identical to how the reserves are calculated in the “Paid” conversion.
Claim Ledger Currency Conversion using Limit Condition Rate of Exchange #
When you have a claim that is booked in multiple currencies, it is sometimes helpful to see all these bookings in only one of the Limit currencies. This can be helpful when you want to check whether any reinstatements are due, or how much you have paid overall. In these situations you can disregard the Exchange Rate selection fields.
- Open the Claim Ledger of the required claim.
- In the Convert to Currency section of the upper part of the Claim Ledger, select the check box next to the disabled currency field. The system now enables the currency field. By default the Main Currency of the Business is selected, but all currencies defined in the system are available.
- Select one of the Limit Currencies.
- Select the Use Contract Exchange Rates check box.
Viewing Ledger considering Proportional Protections #
When your business is retroceded proportionally, it might be of interest to view the Claim Figures net of Proportional Protections, or even view the Claim Figures towards each retrocession net of any unplaced shares. SICS allows you to view the Claim Ledger for each Retrocession, and also for each retrocession net of any unplaced share. If you select, you can also view the figures towards Own Retention, with or without unplaced share figures.
- Open the Claim Ledger of the required claim.
- In the Figures section of the upper part of the Claim Ledger, select the check box View Retrocession check box. (Make sure that check box for share is not selected.)
- Click the now enabled Select button. The system displays a list of all the linked proportional protections (OCCs, Facultative, and Own Retention).
- Select the Retrocession (or Own Retention) for which you want to view the Claim Ledger.
- Select whether you want to adjust figures for Unplaced Share by selecting this check box in the lower left corner.
- Click Calculate in the lower right corner.
The Claim Ledger in the background is immediately updated, and the figures now displayed are those for the selection made. Without adjustment for unplaced share, the figures presented are our share of the assumed figures multiplied by the retroceded percentage. If you select to adjust figures for unplaced share the unplaced share for each retrocession is deducted from these and added to the own retention. Note that the option to View Retrocessions is only enabled for accumulated figures for our share.
Viewing Ledger for Other Share #
The Claim Ledger by default displays the actual bookings made; that is figures for our share. If your share is part of a broker’s order for example, it might be of interest to view the figures for another share than your own.
- Open the Claim Ledger of the required claim.
- In the Figures section of the upper part of the Claim Ledger, select the_Share_ check box. (Make sure that the _View Retrocession_ check box is not selected.)
- The Share defaults to 100 %.
- Enter the Share Percentage in the Share field.
- Tab out of the share field to recalculate the claim ledger.
Viewing Ledger for From Ceded Share #
In order to easily compare your bookings to those advised by the cedent, it can be of interest to view all bookings expressed in From Ceded Share.
- Open the Claim Ledger of the required claim.
- In the Figures section of the upper part of the Claim Ledger, select the_From Ceded Share_ check box. (Make sure that the _View Retrocession_ check box is not selected.)
Note! If From Ceded share is not available for section, the figures are displayed for 100% figures.
Viewing Ledger for Specific Booking Year #
Sometimes it can be of interest to only view adjustments made within a specific booking year, for example when you want to see the movement within that year.
- Open the Claim Ledger of the required claim.
- In the Figures section of the upper part of the Claim Ledger, select the check box Booking Year.
- Enter the Year you want to inspect.
- Tab out of the field to recalculate the claim ledger.
View Claim Ledger Movement Figures #
The defaulted Claim Ledger view will display the accumulated position. If you want to see the actual movements (that is the amounts booked for each entry code per adjustment) you can do so.
- Open the Claim Ledger of the required claim.
- In the Figures section of the upper part of the Claim Ledger, clear the Accumulated check box. The list box now displays each individual adjustment.
View Figures for Other Sections #
The Claim Ledger is unique for each specific claim-to-section link, and the figures presented are therefore only those for that specific link regardless of how many links that may exist on the claim. When a claim is linked to many sections or businesses, it is obviously of interest to see the overall position for all sections. SICS allows you to see the “total” Claim Ledger from any of the individual ledgers.
- Open the Claim Ledger (refer to View Claim Ledger) of the required claim.
- In the Figures section of the upper part of the Claim Ledger, select the All Sections check box.
View Figures per Accounting Classification #
When viewing the claim ledger, the system lets you expand the claim bookings down to predefined levels with entry code as the most detailed level. By selecting ‘View Figures Per Accounting Classification’ you can also view the bookings per accounting classification for each entry group, i.e. Paid, Reserve and Other.
- Open the Claim Ledger of the required claim.
- Select View Figures Per Accounting Classification check box.
Create New Adjustment #
If you want to book a new adjustment or if you want to change status of an existing open worksheet you can access the Claim Worksheet directly from the Claim Ledger.
- Open the Claim Ledger of the required claim.
- Click the New Adjustment button on the Claim Ledger. This is only enabled if the claim is open for booking that is it must be Active, and have status Open. The Business must further be open for Accounting (that is the Cease Accounting check box on Insured Period tab of the Business must not be selected). If the Claim Bdx is in use, and the claim is linked to more than one business, the Bdx indicator must be the same for all.
- If an open worksheet already exists for this claim, the system opens the Select Open Claim Worksheet display list. All open worksheets are listed. Select the existing open worksheet, or select New from the pop-up menu. Note that New is only enabled if the parameter Allow Multiple Open Claim Worksheets per Claim-to-section link has been selected. Refer to Claim Parameters in the System Administrator’s Guide.
For further details about Claim Worksheet handling, refer to Claim Accounting chapter.
Navigation to other Adjustments #
When you have made several bookings on a claim, the initial Claim Ledger view does not include all of these. To navigate to older or more recent adjustments you must use the arrow buttons.
Claim Ledger Menu Options #
If you select any of the adjustment dates and open the pop-up menu, you see that the Claim Ledger provides you with several options. These include navigation to Business and Business Partner Ledger, Generation of Remittance, Creation of Settlement Balance and Balance Pairing. Most of these are explained in detail in the Accounting Chapter of this Guide, but a brief description of each option will follow.
Worksheet Properties: This option is available for both open and closed worksheets. Selecting this for an Open Worksheet the system opens the worksheet in edit mode. If your worksheet is closed, the system opens the closing window, and no further edit of the bookings is possible.
- Open the Claim Ledger.
- Select the column header (displaying either as of date or worksheet approved date) of the worksheet you want to inspect.
- Select Worksheet Properties from the pop-up menu.
For further details about Claim Worksheets and Claim Worksheet Handling, refer to Claim Accounting chapter in this guide.
More Balance Properties: This option is only enabled for Closed Worksheets. Refer to Accounting chapter for further details about balance Properties.
- Open the Claim Ledger.
- Select the column header (displaying either as of date or worksheet approved date) of the worksheet that includes the balance you want to inspect.
- Select More Balance Information from the pop-up menu.
- Select the required Balance on the List Chooser.
- Click OK.
More Details Information: This option is only enabled for Closed Worksheets. Refer to Accounting Chapter for further details about More Details Information.
- Open the Claim Ledger.
- Select the column header (displaying either as of date or worksheet approved date) of the worksheet that includes the detail you want to inspect.
- Select More Details Information from the pop-up menu.
- Select the required Detail on the List Chooser.
- Click OK.
Expand All Items: This option does not require a selection of a specific adjustment, and is enabled whenever bookings exist. All bookings will be expanded to the lowest level (that is displayed per entry code).
- Open the Claim Ledger.
- Place your mouse anywhere in the display list, and select Expand All items from the pop-up menu.
Business Partner Ledger: The option to navigate to the Business Partner Ledger is enabled from all Claim Ledgers, regardless of whether bookings have been created or not.
- Open the Claim Ledger.
- Place your mouse anywhere in the display list, and select Business Partner Ledger from the pop-up menu.
Refer to Business Partner Ledger for further details.
Business Ledger: The option to navigate to the Business Ledger is enabled provided a booking that is transferred to ledgers exists on the business (that is not necessarily a claim worksheet)
- Open the Claim Ledger.
- Click anywhere in the display list, and select Business Ledger from the pop-up menu.
Refer to Business Ledger for further details.
Balance Pairing Properties: This option is only enabled if the selected adjustment has been paired.
- Open the Claim Ledger.
- Select the column header (displaying either as of date or worksheet approved date) of the worksheet that includes the balance for which you want to inspect the pairing properties.
- Select Balance Pairing Properties from the pop-up menu.
- Select the balance you want to inspect in the List Chooser.
- Click OK.
- The Pairing of the selected balance is displayed. Refer to Balance Pairing Properties in the Accounting Chapter for further details.
Create Balance Pairing: This option allows you to initiate the creation of a Balance Pairing from the Claim Ledger. The option is only enabled when selected worksheet includes a liquid balance that has not been paired, and has not been included in a Settlement Balance.
- Open the Claim Ledger.
- Select the column header (displaying either as of date or worksheet approved date) of the worksheet that includes the balance you want to inspect.
- Select Create Balance Pairing from the pop-up menu.
- Select the balance that will act as your driving balance from the List Chooser.
- Click OK.
The selected claim balance is already included in the pairing. Continue with Creation of Balance Pairing. Refer to Create Balance Pairing in the Accounting Chapter.
Generate Paid Remittance: This option allows you to initiate the creation of a remittance from the Claim Ledger. The option is only enabled when selected worksheet includes a liquid balance, and this has not been included in a settlement balance.
- Open the Claim Ledger.
- Select the column header (displaying either as of date or worksheet approved date) of the worksheet that includes the balance for which you want to generate a remittance.
- Select Generate Paid Remittance from the pop-up menu.
- Select the balance that will act as your driving balance from the List Chooser. Note that figures appear in original booking currency.
- Click OK.
The remittance worksheet opens and the details of the balance are already inserted. If selected balance has an expected settlement currency, the remittance worksheet will reflect this. Refer to Remittance Worksheet for more details.
View Settlement Balance: This option is enabled if the selected worksheet includes a balance that is part of a Settlement Balance.
- Open the Claim Ledger.
- Select the column header (displaying either as of date or worksheet approved date) of the worksheet that includes the balance that is included in a settlement balance you want to inspect.
- Select View Settlement Balance from the pop-up menu.
- Select the balance that is part of the Settlement Balance from the List Chooser.
- Click OK. The system opens the Settlement Balance Properties window.
Refer to Settlement Balance for further details.
Create Settlement Balance: This option is enabled when the selected worksheet contains a liquid balance that is not part of a settlement group, or has not been paired.
- Select the column header (displaying either as of date or worksheet approved date) of the worksheet that includes the balance you want to include in a settlement balance.
- Select Create Settlement Balance from the pop-up menu.
- Select the balance you want to include in a Settlement Balance from the List Chooser.
- Click OK. The system opens the Create Settlement Balance Properties window.
Refer to Settlement balance for further details.
Remittance Worksheet Properties: This option is enabled if the selected worksheet contains a liquid balance for which a remittance has been generated.
- Open the Claim Ledger.
- Select the column header (displaying either as of date or worksheet approved date) of the worksheet that includes the balance for which you want to inspect the remittance worksheet.
- Select Remittance Worksheet Properties from the pop-up menu.
- The system opens the Remittance Worksheet.
Refer to Remittance worksheet for further details. Produce Documents: Refer to Create Claim Remittance Advice.
EDI Details: This option is enabled for all worksheets, but is not of any interest unless you use the EDI CLASS functionality. This option allows you to register information about “Our Sequence Number”, “Broker’s Sequence Number” and “Response”. Other information about the message and worksheet is generated by the system.
- Open the Claim Ledger.
- Select the column header (displaying either as of date or worksheet approved date) of the worksheet that includes the balance for which you want to inspect the EDI details.
- Select EDI Details from the pop-up menu.
- The system opens the EDI Details.
- If you want to register or edit any of the sequence numbers or the response information, click the Edit button.
- Register the relevant information.
- Click OK.
Refer to EDI Handling for further details.
eMessaging Details:
This option is only relevant if eMessaging is in use. It allows you to view and edit data related to the messaging aspects of the claim adjustment, in particular the Transaction Reference. This replaces the sequence number formerly used in EDI
- Open the Claim Ledger.
- Select the column header (displaying either as of date or worksheet approved date) of the worksheet that includes the balance for which you want to inspect the eMessaging details.
- Select eMessaging details from the pop-up menu
- The system opens the eMessaging Details
- If you want to register or edit the transaction reference or response, click the Edit button
- Register the relevant information
- Click OK.
View EDI message/eMessage:
The name of the menu item will vary, depending whether the adjustment was created by EDI or eMessaging. Opens the EDI or eMessaging view message window of the message that created the balance.
Reverse Worksheet: This option is available when the selected claim worksheet is closed.
- Open the Claim Ledger.
- Select the column header (displaying either as of date or worksheet approved date) of the worksheet that includes the balance you want to reverse.
- Select Reverse Worksheet from the pop-up menu. The entire worksheet of the selected balance is copied with all details reversed.
- Booking Year/Period is copied from the reversed Claim Worksheet. Default open Booking Year/Period is used if the copied one is closed. The Booking Year/Period can be changed.
- You can exclude Businesses and/or Currencies from the Reverse Claim Worksheet window.
- You can add new bookings to the Claim Worksheet if required.
- When you have done the required updates, close the reversed Claim Worksheet.
The reversed balance/s is paired and settled automatically, and the settlement indicator is changed from Unsettled to Settled.
Note! If TA Process ID and/or CL Process ID were registered on the original worksheet they are copied to the new reversed worksheet balance(s).