Handle Claims from Claim Programs
The Claim Program includes a separate Claim List tab. This tab includes two sub tabs, the Linked Claims and the Linked Claim Figures. From these you can easily view and administer claims affecting the Claim Program. The pop-up menu from the Linked Claims gives you the option to create and delete claims, move a claim from one Claim Program to another, navigate to Claim Ledger and From Ground Up Recording.
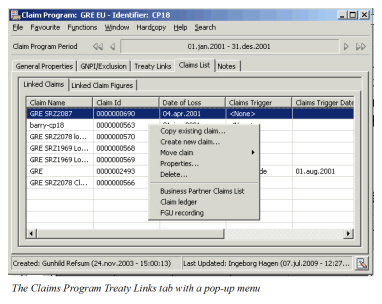
Create New Claim #
When you create claims from a Claim Program you automatically create the link between the claim and all the treaties included in the Claim Program.
- Open the Claim Program - Claim list tab - Linked Claims
- Select Create new claim from the pop-up menu
- Go through the Create New Claim wizard. Refer to Create New Claim earlier in this chapter.
(The system default Location, and Section Specific Classifications from the Claim Program. The entered information is now validated against the Claim Program information).
Copy an Existing Claim #
You can also use an existing claim on the same Claim Program as a template for the new claim (on the same Claim Program) thus making the creation process quicker. All of the information, except the identifier, status, disposition and bookings, will be copied over to the new claim, but can be changed if required.
- Open the Claim Program - Claims List - Linked Claim tab.
- Select the claim you want to use as a template.
- Select Copy Existing Claim from the pop-up menu.
- Complete the Copy Claim Wizard changing information where required. Refer to Copy Existing Claim explained earlier in this chapter.
(The entered information is now validated against the Claim Program information).
Delete Claim from Claim Program #
If a claim has been created in error on a Claim Program it is possible delete it from all the linked treaties in one process rather than deleting it from each of the linked treaties.
- Open the Claim Program - Claims List - Linked Claims tab
- Select the claim you want to delete.
- Select Delete from the pop-up menu.
Refer to Delete Claim for further details.
Move Claim to another Claim Program #
If you have created a link between a claim and a Claim Program in error, you can easily move the claim to the correct Claim Program. The new Claim Program may be on the same treaty or on another treaty and may contain additional treaty links than the existing one.
Move Claim from Claim Program with Multiple Treaty Links #
- Open the Claim Program - Claims List - Linked Claims tab.
- Select the Claim you want to move.
- Select Move to another Claim Program from the pop-up menu. The system starts the Move Claim wizard displaying all linked treaties in current Claim Program.
- Select the treaties you want to include in your Claim Program search.
- Click Next.
- Select the Claim Program from the drop-down list or click the Menu button to create a New Claim Program.
- Click Finish.
Move Claim to Claim Program on Same Single Treaty #
- Open the Claim Program - Claims List - Linked Claims.
- Select the claim you want to move.
- Select Move Claim to same source treaty.
- Select the new Claim Program from the drop-down list, or click the Menu button to create a new claim program.
- Click OK.
Move Claim to Claim Program on other single treaty #
- Open the Claim Program - Claims List - Linked Claims.
- Select the claim you want to move.
- Select Move Claim to other source treaty.
(The system opens the Find Business window with default extract criteria). 4. Add search criteria if required and click Find Now. 5. Select the treaty to which you want to move the claim and transfer back to Move Claim wizard. 6. Click Next. 7. Select the new Claim Program from the drop-down list, or click the Menu button to create a new claim program. 8. Click OK.
Move Claim System Validations and Process #
-
Validates that the Claim is valid for the selected Claim Program. In addition to checking the claim itself, the treaty links are also checked. The new Claim Program must at least contain the same treaty links as the old Claim Program. Additional Treaty Links are allowed.
-
If Additional Links (other treaties and/or sections) exists, the system automatically links the claim to these.
-
If claim is moved to another Claim Program on the same treaty, the claim maintains its current identifier.
-
The system will check and return a warning if any of the claim programs’s mandatory class of business classification values are inactive. Only when the claim is moved to a Claim Program on another treaty:
-
Inactivates the old claim if possible (a message appears) or if the old claim cannot be inactivated, the old claim is closed (a message appears). If the claim can neither be inactivated nor closed it cannot be moved.
-
Creates a new claim on the new Claim Program.
-
If Claim Bdx is in use, note that the Bdx on the new claim will be set as per the treaty selected.
Other Claim Program Claim List Options #
View Claim Properties from Claim List #
You can easily navigate to the claim from the claim list.
- Select the claim.
- Select Properties from the pop-up menu.
- If the claim is linked to multiple treaties, select the treaty you want to view from the List Chooser.
Refer to Handle Claim Properties.
View Claim Ledger from Claim List #
The Claim Ledger can be accessed directly from the Claim Program.
- Select the claim.
- Select Claim Ledger from the pop-up menu.
If the claim is linked to multiple treaties, select the treaty you want to view from the List Chooser. Refer to View Claim Ledger.
View Claim From Ground Up from Claim List #
The From Ground Up tab of the claim can be accessed directly from the Claim Program.
- Open the Claim Program - Claim List - Linked Claims.
- Select the claim.
- Select FGU Recording from the pop-up menu.
- If the claim is linked to multiple treaties, select the treaty you want to view from the List Chooser.
Refer to Record From Ground Up figures.
View Claims for Business Partner #
From the Claim Program’s Claim List you can navigate to the Business Partner Claim List.
- Open the Claim Program - Claims List - Linked Claims tab.
- Select Business Partner Claim List from the pop-up menu.
- Select the Business Partner.
Refer to View Claims for Business Partner for further details of the Business Partner Claim List.
View Linked Claim Figures #
The second tab of the Claims List displays the Linked Claim Figures.
- Select the Retrieve Linked Claims check box.
- Expand all claims to see bookings per treaty and entry code.
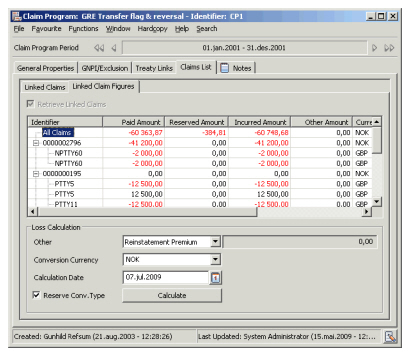
The system displays a line with the overall total for all claims in the base currency and a line for each claim with the total per claim in the base currency. Bookings are converted using the latest daily rate. Clear the “Is Reserve Conversion Type” checkbox to convert all paid amounts using the as-of date connected with the booking. Reserves are converted using the latest Daily Rate.
All bookings in original currency can be seen in the collapsed view.
To view bookings as per a specific date, enter the required date in the date field, and click Calculate. All bookings are filtered using the as-of-date of the Claim worksheets.
To view figures converted in another currency, select this from the drop-down list.
The column named “Other Amount” displays all bookings for the selected Entry Code Sub Category, as selected in the lower part of the window. The default sub category is the one chosen in the System Parameters.
All bookings in original currency can be seen in the collapsed view.
| Field | Description | Location |
|---|---|---|
| Identifier | The unique claim identifier generated by the system to denote the Claim. | Claim Figures |
| Paid Amount | The amount booked for Technical Entry Code subcategory Loss. | Claim Figures |
| Reserved Amount | The amount booked for Reserve Entry Code subcategories Original Loss Reserve and Additional Loss Reserve | Claim Figures |
| Incurred Amount | The sum of Paid and Reserved amounts | Claim Figures |
| Other Amount | The bookings made for “default other entry code subcategory” specified by your System Administrator. | Claim Figures |
| Currency | The currency in which the amounts are expressed. | Claim Figures |
| Entry Code | The entry codes used for booking. | Claim Figures |
| As of Date | The date associated with the booking | Claim Figures |
| Field | Description | Location |
|---|---|---|
| Other | An Entry Code Sub Category determining which bookings will be displayed in the “Other Amount” column in the Display List. Default: As defined by your System Administrator Values: All Entry Code Sub Categories |
Claim Figures |
| Amount field | The total amount booked for the selected Entry Code Sub Category, expressed in the selected Conversion currency, using the latest Daily Rate of Exchange. | Claim Figures |
| Conversion currency | The Currency into which bookings shall be converted. Default: Base currency as defined by your System Administrator. Values: Any currency defined in SICS. |
Claim Figures |
| Calculation date | The latest as-of date that shall be included in the listed figures. Default: Today’s date Values: Any date |
Claim Figures |
| Is Reserve Conversion Type | Indicator of which rates will be applied in conversion of figures. Default: Selected Functional impact: When “Is Reserve Conversion Type” is selected, all figures are converted into selected currency, using the latest daily rate. When “Is Reserve Conversion Type” is cleared, all Paid Amounts are converted using the daily rate as per the booking’s as-of-date, and all reserves are converted using the latest daily rate. |