Maintain Headline Loss Event Groups
If your System Administrator has enabled this function, SICS allows you to create Event Groups on a Headline Loss. The purpose of such Event Groups is to extract and group claims which are linked to the Headline loss, and calculate and book the IBNR for the subset, using pre-defined calculation rules. The Event Group contains criteria identifying which claims are to be considered in the calculation of the group’s Event IBNR, linked claims, and Calculation Data, including Loss Development Pattern.
View Event Groups for a Headline Loss #
The Headline Loss Event Groups can be viewed on each Headline Loss.
- Open the Headline Loss Properties
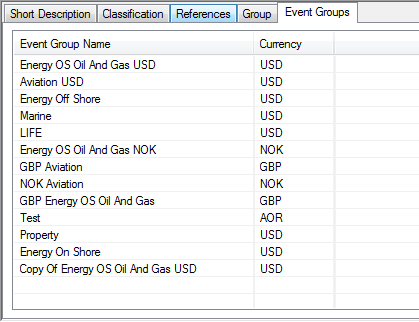
- Open the Event Group tab. The system displays the available event groups for that Headline Loss.
Create an Event Group #
- Open the Event Group tab in lower left corner, and select New from popup menu. The system opens the Create Event Group window.
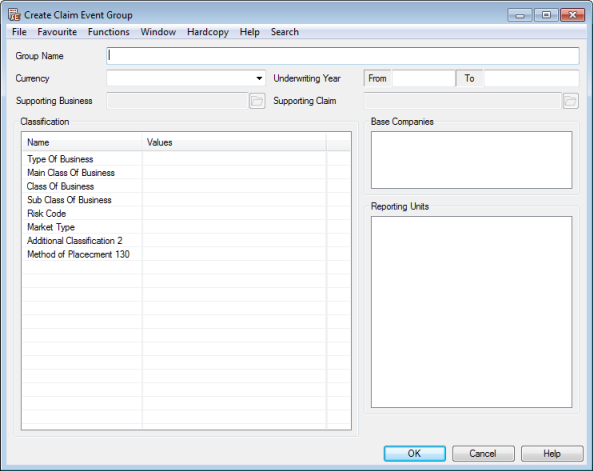
- Define name and currency as well as other criteria which should characterise the claims which can be linked to the Event Group, and press OK. The Base Company may be mandatory if your System Administrator has activated this behaviour. If Base Company is mandatory you can only select one Base Company per Event Group. The Event Group must further contain all classification items which your System Administrator has set as mandatory for that Base Company.
The system validates that all mandatory items have been registered, that the new Event Group has a unique name, and that the new Event Group does not overlap an existing Event Group, for example when two groups cover the same Classifications. Please refer to paragraph concerning Classifications of Supporting Business, Supporting Claim, and Event Group later in this chapter.
| Field | Description |
|---|---|
| Name | The name of the Headline Loss Event Group. The name serves as the group’s identifier. Mandatory: Yes Values: Free text input |
| Currency | The currency of the Event Group. Mandatory: Yes Default: The base currency of the selected Base Company, if only one has been defined. Otherwise the default base currency. Values: Any active currency Functional impact: The event IBNR is calculated and booked in the selected currency. If system parameter Actual Losses in Event IBNR Currency Only is activated, only bookings in this currency are considered in the calculation of the Event IBNR. Refer to Calculation of Event IBNR. |
| Base Company | The Base companies for which the specific event group is valid. Mandatory: Only if system parameter Base Company Mandatory for Event Group is activated. Values: All base companies Functional impact: When defined only claims for the specified base company or base companies can be linked to the Event Group, and are considered in the calculation. |
| Reporting Unit | The Reporting Units (of the businesses to which the assumed claims are linked) for which the Event Group is valid. Mandatory: No Values: Any reporting unit defined Functional impact: When defined only claims linked to businesses which has one of the defined reporting units can be linked to the group. |
| Underwriting Year | The insured periods covered by the specific Event Group Mandatory: No - when not defined this means the group is valid for all years. Values: DD/MM/YYYY - DD/MM/YYYY Functional impact: When defined, only claims linked to an underwriting year covered by the event group’s period can be linked to group. |
| Main Class of Business | The Main Class(es) of Business for which the Event Group is valid. Mandatory: When mandatory for the included base company Values: Any Main Class of Business defined. Functional impact: When defined only claims which has the defined Main Class of Business defined on its Section Specific Classification can be linked to the group. |
| Class of Business | The Class(es) of Business for which the Event Group is valid Mandatory: When mandatory for the included base company Values: Any Main Class of Business defined. Functional impact: When defined only claims which has the defined Main Class of Business defined on its Section Specific Classification can be linked to the group. |
| Sub Class of business | The Sub Class(es) of Business for which the Event Group is valid Mandatory: When mandatory for the included base company Values: Any Main Class of Business defined. Functional impact: When defined only claims which has the defined Main Class of Business defined on its Section Specific Classification can be linked to the group. |
| Type of Business | The type of business for which the Event Group is valid Mandatory: No Values: None, one, or more of the defined Types of Business Functional impact: When defined only claims which are linked to one of the defined Types of Business can be linked to the Event Group. |
| Additional Classifications | There may be up to 4 additional classification items, if these have been activated by your System Administrator, all of which behave and has same functional impact as above. |
Copy an Event Group #
You can create a new event group for the same Headline Loss by using an existing group as a template.
- Select the Event Group you want to use as a template from the Event Group list, or open the Event Group, and select this option from the menu.
- Select Copy
- The system defaults all information from the originating group.
- Make required changes, and press Save.
- The system validates that the group has a unique name, and that the group does not overlap any existing group.
Delete an Event Group #
If you have created an Event Group in error, you can delete the group.
- Highlight the Event Group which you want to delete on the Event Group List
- Select delete from popup menu.
- Confirm that you want to delete the group
- The group is deleted.
Note that if the Event Group was linked to a Supporting Business or Claim, or if the Event Group had linked claims, or if the Event Group has any Event IBNR calculations performed, deletion is not allowed.
Assigning Claims to an Event Group #
SICS allows you to assign claims to an event group from the claim itself, or from the specific event group, or from the Headline Loss.
Linking a specific Claim to an Event Group #
- Open the claim which you want to link to an event group
- Open Links - sub tab Claim Event Groups.
- From the popup menu select Link to Event Group. This option is only enabled if the Claim is linked to a Headline Loss. The system opens a list of Event Groups for the linked Headline loss. Only Event Groups which may be valid for the claim are displayed.
- Select a group, and transfer it back.
- The system sets the allocation percentage to 100%. Modify this if required.
- Repeat steps 3 - 5 until you have linked the claim to all required groups, and press save.
The system validates that the allocation percentage to any one group is not more than 100%.
Assigning claims to an Event Group from the Event Group #
- Open the Event Group and select Assign Claims to selected Group from the menu
- The system searches for all claims linked to the Headline Loss which does not have a link which is 100%. Note that the claim booking currency is not considered in this process, so that a claim may be valid for more than one group, regardless of the booking currency. A link is created between the claim and the event group with an allocation percentage of 100%. Also refer to Calculation of Event IBNR.
Assigning claims to Event Groups from the Headline Loss #
- Open the Headline Loss for which you want to assign claims to any of its Event Groups
- Open the Event Group tab
- Select Assign Claims to All Groups from the menu. This option is only enabled if there any claims which has not yet been linked, or which has not been linked 100%.
- The system searches for all claims linked to the Headline Loss which does not have a link to an Event Group which is 100%. Note that the claim booking currency is not considered in this process and a claim may be valid for more than one group. A link is created between the claim and all the valid event groups with an allocation percentage of 100%. Also refer to Calculation of Event IBNR.
View Failed Assignment #
If some claims could not be assigned to the selected group, or to any group (using one the above options), the system displays a failed assignment list with the reason for failure.

Failed assignment could be due to:
- Base Company not matching: No event group were found which matches the Base Company of the claim
- Underwriting Year not matching: No event group could be found which covers the Underwriting Year of the claim.
- Classifications not matching: The claim’s section specific classifications are not matching that of any event group.
- Currency no matching: The currency used when booking on the claim does not match the currency of the Event Group. (Only relevant if system parameter Actual Losses In Event IBNR Currency Only is activated.
- Reporting Unit not matching: No event group could be found which matches any of the reporting units on the business to which the claim is linked.
Note that the list only includes claims without any assignment.
View Claims not Assigned to an Event Group #
Before you perform a link to an Event Group you may want to inspect the claims which have not yet been assigned to a group.
- Open the Headline Loss properties
- Select the Event IBNR tab
- From the menu select View Claims not Linked to Groups
The system displays a list of all claims not yet assigned to a group, or claims which have been assigned with an allocation percentage of less than 100%. Note that all claims must be assigned to a group before you can create any calculation data.
Define Event IBNR Calculation Data #
The calculation of the Event IBNR and Event IBNR Reinstatement is based on the actual claim bookings of the linked claims. On the Calculation Data tab you can register required variables such as UNL, Estimated Industry Loss, Market Share, and so on. Which fields are available also depend on whether you have applied a loss Development Pattern, or not.
To register calculation data - general:
- Open the Event Group for which you want to register calculation data
- Open the Calculation data tab
- Select Create Event IBNR Record from the menu. The Booking Period Selection window opens.
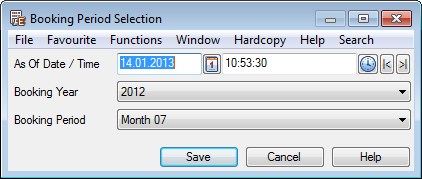
Define the As of Date and Booking Year and Period, and press Save. The As of Date and Time in combination with the selected Booking Year and Period determines which contributing claim details shall be considered in the IBNR calculation. The booking period defaults to the default period defined in Booking Terms, or Extended Booking Terms. All open periods are available for selection. if you have a later record with a linked worksheet, the system returns a validation error.
- The system opens the Event IBNR Record window.

- Define the calculation data. For details about the individual fields see the field description.
- Press save.
Note that all claims linked to the Headline Loss must be assigned to a group before you can create calculation data for any of the Event Groups.
Judgment Based Event IBNR #
This method should be used when you have an estimated UNL figure, or want to carry a specific amount for an event.
Calculation using UNL:
- Register the UNL Estimate
- Based on the Actual Loss Figures the system calculates the new Event IBNR, as Expected UNL - Actual Incurred including Client IBNR and ACR
- You can overwrite the calculated Event IBNR. If you do, the system recalculates the UNL Estimate to Event IBNR + Incurred
Calculation without UNL:
- Register the Event IBNR amount directly
- The system calculates the UNL
- Estimate to Actual Loss Figures + Event IBNR
Market Share Event IBNR #
When an estimated industry loss amount is known, you may choose to use this as the basis for the Event IBNR calculation:
- Register the Estimated Industry Loss amount
- Register the Market Share percentage
- The system calculates the UNL Estimate as Estimated Industry Loss * Market Share % Actual Incurred Claim (including Client IBNR and ACR)
- The Event IBNR is calculated as UNL Estimate - Actual Incurred (incl. Client IBNR and ACR)
- You can overwrite the calculated Event IBNR. If you do the system recalculates UNL Estimate.
Loss Development Event IBNR #
If you want to use Loss Development Patterns to calculate the Event IBNR, you must first assign the Pattern to the Event Group, before you define the Event IBNR Record. Refer to Apply Loss Development Pattern to an Event Group for a description of how to do this. Once the pattern is applied, and the type is defined, you can create the IBNR record.
- Define the Loss Development Pattern, as described below in Apply Loss Development Pattern to an Event Group
- Select Create Event IBNR Record from menu, or select an existing record and press Edit
- The system retrieves the updated Loss Figures, updates the Loss Development Month, and recalculates the Expected Unpaid Loss and Event IBNR when pattern type is “paid”, or the Expected UNL and Event IBNR when pattern type is “Reported Incurred”. Note that Initial UNL must have been registered in order to calculate the Expected Unpaid Loss.
- You can overwrite the calculated Event IBNR, or UNL Estimate if required.
| Field | Description |
|---|---|
| Currency | The currency in which the Event IBNR is calculated and will be booked. Output field only. Derived from: Event Group currency |
| Estimated Industry Loss | The estimated industry loss amount Mandatory: No Functional impact:: UNL estimate, if combined with Market Share % |
| Market Share % | A percentage of the Market Share relevant for this group Mandatory: No Functional impact: UNL Estimate, if combined with Estimated Industry Loss |
| Initial UNL Estimate | The initial UNL estimate Mandatory: Yes, when Loss Development Pattern is type “Paid” Functional impact:Expected Unpaid Loss |
| UNL Estimate | The current UNL Estimate Mandatory: No Derived from: 1. Market Share % * Estimated Industry Loss 2. Event IBNR - Actual Losses |
| Expected Unpaid Loss | The estimated amount for loss still unpaid. Output field only Available:When Loss Development Pattern type “Paid” is applied. Derived: Initial UNL * (1 - loss curve at Loss Development Month) Functional impact: Event IBNR |
| Expected UNL | The amount expected to be UNL. Output field only. Available: Only when Loss Development Pattern of type “Reported Incurred” is applied. Derived: Actual Incurred Losses incl. ACR / Loss Curve Development Month |
| UNL Reinstatement | The UNL estimated reinstatement premium for the Event Group . Mandatory: No Values: 1. Free entry 2. Calculated from Event IBNR Reinstatement + Actual Incurred Reinstatement |
| Actual Paid Loss | The booked paid loss amount on claims linked to the Event Group multiplied with the allocation percentage. Paid loss contains the entry code category “Cash claim”, the category “Informational” - sub category “Advised Paid”, and category “Technical” - sub category “Loss”. The amount is negated. If your System Administrator has activated the parameter Actual Losses in Event IBNR currency only, only bookings in this currency are considered (no conversion takes place). If the parameter is not activated, the system converts the paid amounts into the Event Group’s currency using the rate of exchange as per the original booking’s as of date. |
| Actual Reserve Loss incl Client IBNR/ACR | The booked reserve loss amount including Client IBNR and ACR for all claims linked to the Event Group multiplied with the allocation percentage. Loss Reserves contains entry code category “Reserve” - sub categories “Original Loss Reserve”, “Client IBNR”, “Additional Case Reserve”, “Additional /Evaluated Reserves”. The amount is negated. If the parameter Actual Losses In Event IBNR Currency Only is not activated, the system converts the reserve amounts into the Event Group’s currency using the latest daily rate of exchange. |
| Actual Incurred Loss incl Client IBNR/ACR | The sum of Actual Paid Loss and Actual Reserve Loss incl Client IBNR/ACR. |
| Actual Paid Reinstatement | The booked reinstatement premium amount on claims linked to the Event Group multiplied with the allocation percentage. Reinstatement premium paid contains entry code category “Technical” - sub category “Reinstatement Premium Paid. |
| Actual Reserve Reinstatement incl Client IBNR/ACR | The booked reinstatement premium reserve, for original loss reserve, Client IBNR, and ACR, on claims linked to the Event Group multiplied with the allocation percentage. |
| Actual Incurred Reinstatements incl Client IBNR/ACR: | The sum of Actual Paid Reinstatement and Actual Reserve Reinstatement incl Client IBNR/ACR |
| Event IBNR | The current calculated or estimated amount for Event IBNR Derived: 1. UNL Estimate - Actual Incurred Loss incl Client IBNR/ACR 2. When Loss Development Pattern is “paid” the greater of Expected. Unpaid Loss - Actual Reserve Loss incl Client IBNR/ACR, or 0 3. When Loss Development Pattern is “Reported Incurred”: Expected UNL - Actual Incurred Loss incl Client IBNR/ACR 4. Free entry of an amount |
| Event IBNR Change | The change in Event IBNR for Event Group. Output field only. Derived: Event IBNR - already booked Event IBNRs on linked Supporting Claim |
| IBNR Reinstatement | The current calculated or estimated amount for reinstatement Derived: 1.UNL Reinstatement - Actual Incurred Reinstatement ACR 2.Free entry of an amount |
| IBNR Reinst. Change | The change in IBNR Reinstatement. Output field only. Derived: IBNR Reinstatement - already booked on the linked Supporting Claim |
Apply Loss Development Pattern (LDP) to an Event Group #
If the calculation of Event IBNR is to be based on an LDP, you should apply the relevant pattern to the group before entering the calculation data.
- Open the Event Group for which you want to apply an LDP
- Open the Loss Development Pattern tab
- Click the edit button and then the edit button next to the Loss Development Pattern field. The system opens a list of available patterns, as defined by your System Administrator.
- Select the required pattern, and press Save. The selected pattern is transferred to the Event Group.
- Modify the pattern if required.
- Select the Type of Pattern and press OK.
Edit Loss Development pattern #
You can at any time edit and change the pattern. Note that if you do so, the available Event IBNR calculation data fields are changed also for existing entries. The result of the calculation is not updated though.
Delete Loss Development pattern #
You have the option to delete a loss development pattern which has been applied to an Event Group. Be aware that this impacts the fields displayed in the calculation data form: Loss Development Month, Expected UNL, and Expected Unpaid Loss are removed also from existing records.
- Open the Event Group for which you want to delete an LDP
- From menu, select Delete Loss Development Pattern
| Field | Description |
|---|---|
| Loss Development Pattern | The Loss Development Pattern which is applicable for the Event Group Mandatory: Yes Available values: Patterns defined by your System Administrator Functional impact: Event IBNR calculation |
| Number of Months | The number of months defined for pattern Mandatory: Yes Default value: As per selected pattern Available values: 1 - 999 Functional impact: Event IBNR calculation |
| Paid Loss Development Pattern | A type of Loss Development Pattern Mandatory: Yes - if not Reported Incurred Loss development Pattern has been selected. Functional impact: Event IBNR calculation |
| Reported Incurred Loss development Pattern | A type of Loss development Pattern Mandatory: Yes - if not Paid Loss Development Pattern has been selected Functional impact: Event IBNR calculation |
Create a Supporting Business from a Headline Loss Event Group #
In order to book the calculated Event IBNR and Event IBNR reinstatement, the system requires you to have a supporting business which is used specifically for this purpose, and an associated claim. You can create such supporting businesses either from Find Business, or directly from an Event Group. You can also link an Event Group to an already existing Supporting Business. The link between the supporting business and the Event Group must be created from the group itself.
To create a supporting business from an Event Group #
- Open the Headline Loss and navigate to the list of Event Groups
- Highlight the Event group for which you want to create a Supporting Business, and select this option from popup menu, or open the Event Group and select this option from the menu. (Note that the option is disabled if the Event Group is already linked to a Supporting Business.)
- The system opens the Create New Business wizard. Some of the information in the wizard is defaulted from the Event Group itself, whereas the location is defaulted from the Headline Loss. If you modify the information, the system validates that the business is covering the Event Group. Please refer to paragraph concerning Classifications of Supporting Business, Supporting Claim, and Event Group later in this chapter.
- On the last page of the wizard, the system displays the “Supporting Business” indicator, which is not editable.
- Complete the wizard. The Supporting Business is created with a new identifier. The identifier series applied can be specific for Supporting Business, provided your System Administrator has defined this.
Note! If any of the Event Group’s class of business classification values are inactive, supporting business cannot be created
To create a supporting business from Find Business #
- Open Find Business, and select New
- Create an Assumed Business, with Life Cycle Status Offer Accepted, and make sure that you on the last page of the wizard select the “Supporting Business” indicator. Also refer to paragraph concerning Classifications of Supporting Business, Supporting Claim, and Event Group later in this chapter. You should now continue to link the relevant Event Groups to the created Supporting Business.
To link an Event Group to an already existing Supporting business #
- Open the Headline Loss and navigate to the list of Event Groups
- Highlight the Event group which you want to link to an existing Supporting Business, and select this option from popup menu, or open the Event Group and select this option from the menu. The option is disabled if the Event Group is already linked to a Supporting Business. The system opens the Find Business window, with default search criteria populated from the Event Group. Only supporting businesses are displayed.
- Press Find Now, and select the Supporting Business you want to link to your Event Group, and transfer back.
- The system validates that the Supporting Business is valid for the Event Group, and if so creates the link between the two.
Unlink a Supporting business from an Event Group #
If you created a link between a supporting business and an event group in error, you can delete the link provided no supporting claim exists.
- Open the Headline Loss and navigate to the list of Event Groups
- Highlight the Event group for which you want to remove the link to the Supporting Business, and select this option from popup menu, or open the Event Group and select this option from the menu. The option is disabled if the Event Group already is linked to a supporting claim.
- The system removes the link.
Create Link to Supporting Claim from Event Group #
The supporting claims (so called as they are created on an Assumed Business which has the “Supporting Business” indicator set), should be used only to book the calculated Event IBNR and Event IBNR figures. It is from this claim the current Event IBNR bookings are fetched, and the change in Event IBNR is calculated. The Supporting Claim can be created either directly on the Supporting Business, or from the Event Group itself.
- To create a supporting claim from the Event Group: Open the Headline Loss for which you want to create a supporting claim on one of its Event Groups
- Open the Event Group List
- Highlight the Event Group for which you want to create the Supporting Claim and select Create Supporting Claimfrom the popup menu, or open the Event Group itself and select this option from the menu. The options are disabled if the event Group is not linked to a Supporting Business or if the Event Group is already linked to a Supporting Claim.
- The system opens the Create Claim wizard and defaults the information from the Headline Loss itself, as well as the Event Group’s classification items, provided these items are available for Claims. Please refer to paragraph concerning Classifications of Supporting Business, Supporting Claim, and Event Group later in this chapter.
When you have completed the Create Claim wizard, the system has created the Supporting Claim on the Supporting Business, and established the link between this and the Event Group.
To create a supporting claim from the Supporting Business
When you create a claim on a Supporting Business, you will find that the system does not validate that Limit, Claim Condition, or Protection Assignment has been defined, but allows you to create claims without these. However, since the Supporting Business is to be used for Event IBNR calculation, which is based on a Headline Loss, it requires that all claims are linked to a Headline.
- Open the Supporting Business Claim list
- Select Copy Existing Headline Loss from the popup menu
- Find the Headline you want to copy, and transfer back
- The system defaults the information from the selected Headline Loss.
- Complete the Create New Claim wizard. The system creates the claim, and also creates a link to the Headline Loss. Note that the Supporting Claim has not yet been linked to an Event Group.
To link Event Group to an existing Supporting Claim
This option is useful if you have already created the Supporting Claim directly on the Supporting Business, or want to link the Event Group to an existing Supporting Claim which you created for another currency for example.
- Open the Headline Loss, and select the Event Groups tab and select the Event Group which you want to link to a Supporting Claim, or open the group itself.
- Select Link to Supporting Claimfrom (popup) menu. The option is only enabled if the Event Group is linked to a Supporting Business, and has not yet been linked to a Supporting Claim.
- The system opens the Find Claim window, and displays all claims which has been linked to the Event Group’s Supporting Business.
- Select the one you want to link your claim to, and transfer back. If the selected claim contains a link to another Event Group, the system returns a warning, or an error. You can only link the same Supporting Claim to more Event Groups when your System Administrator has decided that the Actual Losses for an Event Group should only contain the bookings made in the same currency as the Event Group’s currency.
To unlink Supporting Claim from an Event Group
If you have created a link between an event group and a Supporting Claim in error, you can remove the link.
- Open the Headline Loss, and select the Event Groups tab and select the Event Group for which you want to remove the link to its Supporting Claim, or open the group itself
- Select Unlink from Supporting Claimfrom (popup) menu. The option is only enabled if the Event Group is linked to a Supporting Claim.
- The system removes the link to the Supporting Claim.
If you have already booked Event IBNR worksheets on the Supporting Claim for this Event Group you cannot remove the link between the Event Group and the Supporting Claim.
Classification of the Supporting Business, Supporting Claim, and Event Group
It is important that your Supporting Business provides the same degree of detail as the Event Group, so that required classifications can be carried over to the supporting claims. The classification items of the Event Group will always include Type of Business, Main Class of Business, Class of Business, Sub Class of Business. Which other items are available depend on which four additional classification items your system administrator has made available for you. Claims are valid for a specific Event Group if it matches the classifications of the group, or is a sub-set of the group’s classifications.
As the Event IBNR bookings applies the Accounting Classifications of the Supporting Business, you must take care to include the necessary classification items on the supporting business itself to provide the required degree of detail and breakdown of the Event IBNR booking. If you want to report an Event Group for a specific Main Class of Business, Class of Business, Sub Class of Business, Risk Code, and an Additional Classification 1 combination, you should make sure that your Supporting Business has the same classification items. The Accounting Classification can then be created using the same items.
Supporting Claims and Businesses and Claim Programs
Claims linked to Supporting Businesses cannot be part of a Claim Program, and neither can these Businesses be included in the Claim Program.
Create Event IBNR Bookings #
When you have entered all relevant data on the Event Group, resulting in a change to either Event IBNR or Event IBNR Reinstatement, SICS allows you to create the Event IBNR worksheet on the supporting claim.
To create Event IBNR worksheet for a single Event Group
- Open the Headline Loss Event Group List
- Select the Event Group which you want to create a booking for, or open the Event Group.
- Select the option from the menu/popup menu.
- The system creates an open worksheet for the Event Group.
To create Event IBNR worksheet for all Event Groups for a Headline Loss
- Open the Headline Loss Event Group List
- Select the Create IBNR Worksheet for All Groups option from the popup menu.
The system creates an open worksheet for all Event Groups of the Headline Loss.
View Produced Event IBNR worksheets for a specific Event IBNR record
When an Event IBNR record has been booked, you can access the worksheet directly from the record.
- Open the Event Group for which you want to inspect a worksheet
- Open the Calculation Data window
- Navigate to the Event IBNR Record you want to inspect
- Click the worksheet icon.
Event IBNR Mass Update Order #
The Event IBNR Mass Update Order enables you to create new event IBNR records as well as book the resulting Event IBNR changes.
Create Event IBRN Mass Update Order:
- Open Find Accounting Order
- Select Create New
- Select Type Event IBNR Mass Update. The order window opens.
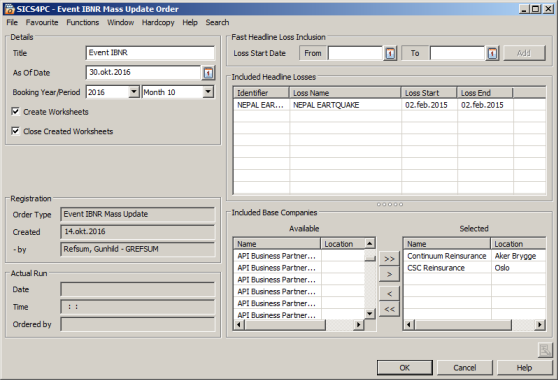
- Define Title
- Define As of Date and Booking Year and Period. The Booking Year and Period defaulted is the default period defined in Booking Terms/Extended Booking Terms, and the as of date is derived from that period. Note that only bookings made up to the selected period and date are considered in the IBNR calculation.
- Select whether you want to Create worksheets, and if so whether these should be closed.
- Select which Headline Losses you want to include in the order. You can do this by either using the Fast Option, where you can define the period for which the included Headline Loss' start dates must be within, or select Add in the Included Headline Loss section. Only active Headline Losses can be included in the order. If you want to remove some of the Headline Losses which were listed, highlight those you want to exclude, and select Remove from the popup menu. Note that all Event Groups of the included Headline Losses will be included in the order.
- Specify Base Companies which you want to calculate the Event IBNR for. This option is only enabled if your System Administrator has activated it.
- When you are satisfied with the order, press OK. The system validates that all mandatory information is recorded.
Run the order #
Before you run the order, the system validates that all claims for the included Headline Losses have been linked to Event Groups, and that all Event Groups have a link to a Supporting Claim. If Event IBNR is only used for particular Headlines (parameter “Mandatory Link when Event IBNR Group on Linked Headline” is activated), the validation is only for claims linked to Headlines with one or more Event Groups.
Depending on the order definition the order can result in the following:
- New Event IBNR records are created on all included Event Groups
- New Event IBNR record are created on all included Event Groups, and a Claim Worksheet with status Open is created for all Supporting Claims where the record resulted in a change in the Event IBNR/Event IBNR reinstatement.
- New Event IBNR record are created on all included Event Groups, and a Claim Worksheet with status Closed is created for all Supporting Claims where the record resulted in a change in the Event IBNR/Event IBNR reinstatement. Note that although you select this option, the worksheet may still be left in Open status if mandatory worksheet information could not be populated; for example missing Accounting Classification.
Run order without producing worksheets
If you choose this option, the system creates a new Event IBNR record on the Event Groups. The Actual Loss figures are updated, fetching all worksheets which have been booked up to and including the order Booking Year and Period, and as of date. To make sure that you include all bookings for a selected BYRP, use current date as as of date. If a Loss Development Pattern applied, the Loss Development Month is updated on the new record. If you have existing Event IBNR Records on the Event Group, which contains Calculation Data, the system calculates changes to Event IBNR. No worksheets are produced.
Run order with open worksheets
If you choose this option, the system additionally creates open worksheets for those Event Groups where the order resulted in a change to the Event IBNR figures. You can the inspect the worksheets, and close them at your convenience.
Run order with closed worksheets
If you choose this option, the system closes the produced worksheets whenever possible.
View Produced Worksheets
When the order produced worksheets, open or closed, you can view the worksheets.
- From the order properties, select Worksheets from menu
- The system opens the list of worksheets. Select the worksheet you want to inspect and double click, or choose View Worksheet Properties option from popup menu
Edit Produced Open Worksheet
If you want to view and edit an open worksheet, for example define any missing information, you can access the worksheet in edit mode from the order.
- From the order properties, select Worksheets from menu
- The system opens the list of worksheets. Select the worksheet you want to edit and choose Edit Worksheet option from popup menu
Close All Worksheets or Close Remaining Open Worksheets
When the order produced open worksheets, you can select to close all or close all remaining open worksheets.
- From the order properties, select either Close All Worksheets OR
- From the order properties, select Worksheet
- From the list of worksheets window select Close All Remaining Open Worksheets option from popup menu.
The system closes all (remaining) open worksheets associated with this order.
Inactivate All Worksheets
If you want to inactivate the produced worksheets you can do so for all worksheets, or only selected worksheets. Only open worksheets can be inactivated.
To inactivate all worksheets:
- From the order properties, select Inactivate All Worksheets
The system sets the status to Inactivated for all worksheets associated with this order, which has not yet been closed.
To inactivate selected worksheet:
- From the order properties, select Worksheets
- From the list of worksheets, select the worksheet you want to Inactivate, and select Edit Worksheet from popup menu
- Change the worksheet status to Inactivated
View Business Ledger from Order
From the order itself you can navigate directly to the Business Ledger of the Supporting Businesses for which the order produced a worksheet.
- From the order properties, select Worksheets
- From the list of worksheets, select a worksheet and select Business Ledger from popup menu
View Supporting Business Properties from Order
From the order itself you can navigate directly to the Business Properties of the Supporting Businesses for which the order produced a worksheet.
- From the order properties, select Worksheets
- From the list of worksheets, select a worksheet and select Business Properties from popup menu
Subsequent running of order
An order which did not produce any worksheets can be run as many times as required. If the order produced a worksheet, even though this is inactivated, cannot be run again. If you need to run it again, you should copy it to a new order.
Request Scheduled Job #
If you want to run the order at regular intervals, for example as part of your monthly closing procedure, you can define an order without an as of date, and request a scheduled job.