Headline Loss Group
SICS lets you link two or more Headline Losses to indicatethat these are a part of a bigger catastrophe. The grouping of these headline losses allows reporting and extraction of figures on the combination of these Headline losses.
Find Headline Loss Group #
When you decide that you want to link the Headline Loss a Headline Loss Group, the first step would be to search for any existing Headline Loss groups in the system. The Headline Loss group consists of a name and can be Active or Inactive.
- Double-click the Headline Loss Group icon in the Claim folder on the SICS desktop.
You see the Find Headline Loss Group window.
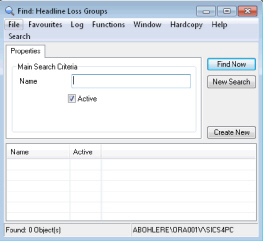
- Enter the name.
- Select the Active check box if you want to search for active group. Clear the check box if you want to search for inactive groups.
- Click Find Now
| Field | Description | Location |
|---|---|---|
| Name | The Name of the Headline Loss group Values: Free-text entry. |
Properties |
| Active | Indicator of whether the Claim Group is Active Properties or Inactive. | Properties |
Create Headline Loss Group #
If your search for the existing Headline Loss Groups did not retrieve any suitable match,you must create a new group from the Find Headline Loss Group window.
- Double-click the Headline Loss Group icon in the Claim folder on the SICS desktop. You see the Find Headline Loss Group window.
- Click Create New or select New from the pop-up menu. You see the Create Headline Loss Group window.
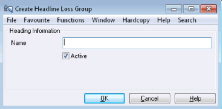
- Enter the name.
- Set the Active/Inactive status.
- Click OK.
Delete Headline Loss Group #
After some time you might decide that a Headline Loss Group no longer serves a purpose, or was actually created in error. SICS allows you to easily delete the Headline Loss Group.
- Double-click the Headline Loss Group icon in the Claim folder on the SICS desktop. You see the Find Headline Loss Group window.
- Click Find Now to list all Headline Loss Groups in the display list.
- Select the Headline Loss Group you want to delete.
- Select Delete from the pop-up menu.
- Click OK in the Confirm dialog box to confirm that you want to delete the group from the database. (A message might appear twice, one if there are linked headline losses, and one for the confirmation.)
Note! Only the Headline Loss Group will be deleted. Not the linked headline losses.
Inactivate Headline Loss Group #
If you for some reason do not want to delete the Headline Loss Group, but at the same time do not want it to appear on all lists, you can select to Inactivate it.
- Open the Headline Loss Group from the SICS desktop.
- Find the Headline Loss Group you want to Inactivate, and select Properties from the pop-up menu.
- Click the Edit button.
- Clear the Active check box.
- Click OK.
Link Headline Loss to Headline Loss Group #
To include a Headline Loss in a Headline Loss Group, you must create a link between the Headline Loss and the Headline Loss Group. This link is created from the Headline Loss Group List.
- Open the Headline Loss Group from the SICS desktop
- Find the Headline Loss Group you want to link a Headline Loss to and select Properties from the pop-up menu. The linked Headline Losses are displayed.
- Select Add from the pop-up menu.
- Find the Headline Loss you want to link to the Headline Loss Group. Refer to Find Headline Loss.
- Select the Headline Loss and double click or select Transfer from the pop-up menu.
Note! If the Headline Loss is already linked to another Headline Loss Group the system will stop you by a validation message.
Maintain Signature Notes
The Signature Notes for Headline Loss Group are similar to those on the Headline Loss, and contains “sets” of notes associated with a date. Look at ‘Register Additional Headline Loss Information’ for more information.