View Message
The view message window displays everything there is to know about a single message. It defaults to the highlights tab, which shows a summary of the message. Other tabs show additional information.
Highlights #
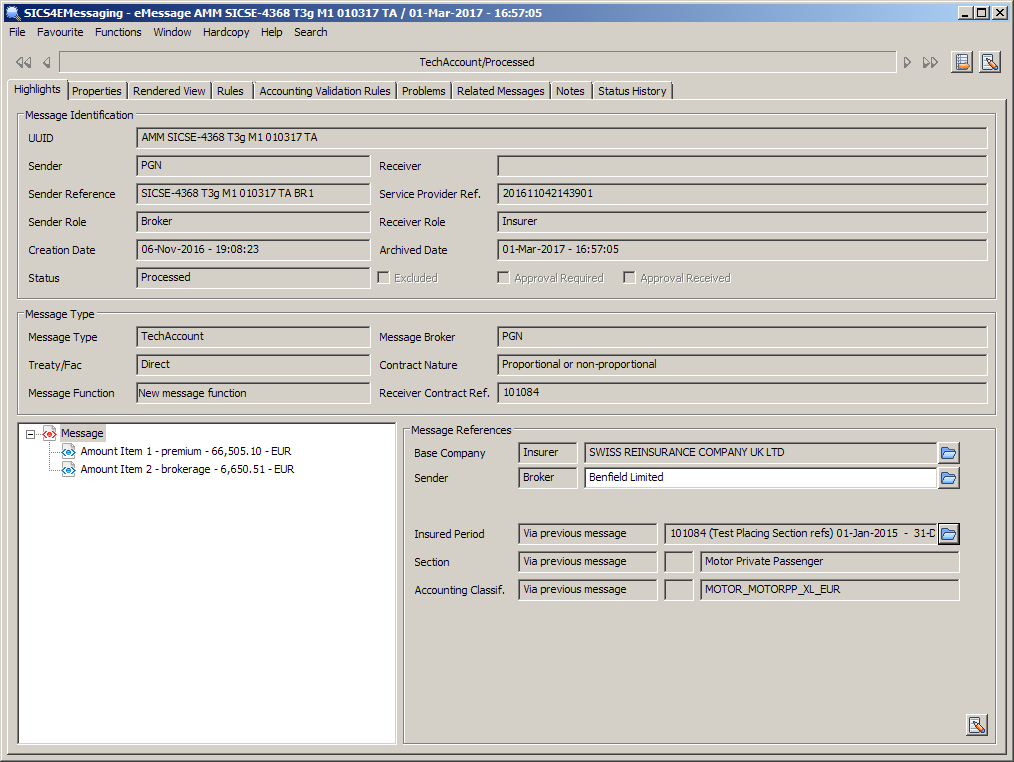
This tab is composed of three parts. The first part. Message identification, tells you about the sender and receiver, the dates the message was created and loaded into SICS, the life-cycle status and the include/exclude flag. This part is constant for all message types.
The second part is the message type part. The content will vary according to message type.
The final part shows some of the references made to other SICS objects such as Base company, Sender party and Insured period. The content will vary according to message type and message contents. For some references, clicking on the folder icon will take you directly to the referenced object. For some complex references, the method by which the reference was made is shown.
On TechAccount and Claim movement messages, the final part shows the tree structure of the message on left hand side, whilst the right hand side shows details for the selected leaf.
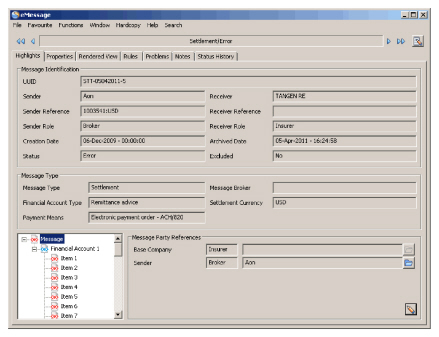
For settlement messages, the final part shows a tree structure of the message on the left hand side, whilst the right hand side shows references for the selected leaf from the tree. At message level these are the references to sender and receiver, and at Financial Account Item level the references to a TechAccount message, SICS balance, settlement balance, acknowledgment and additional Comments if any.
Referenced SICS Objects - Tech Account Message #
There are two different edit windows. If you select the root item from the message tree, you can change references at message level, including partners, insured period and sections.
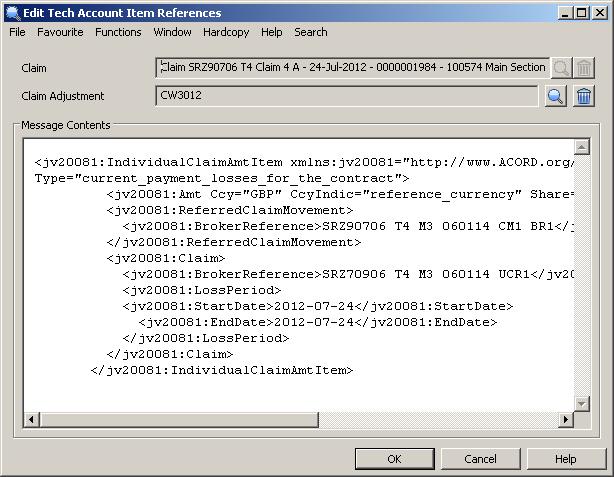
If you select an item in the message tree, you can change the references at item level - this only applies to claim items.
If the message is linked to an open, unfinished worksheet, you are not allowed to edit any references. Nor are you allowed to edit references on unprocessed or processed messages.

Bulk claim: #
This is only shown for claim signing account messages, and allows the user to specify that this message is to be treated as a bulk claim signing
If you change any reference, when you click OK, the message will be re-validated - all the referencing and validation rules will be reapplied to the message.
Previous Message References #
This part shows the Reference Method used to find any Previous Message along with the Mapping Order of any Mappinng Set used. The UUID of Previous Message (if any) will be displayed alongside.
Previous Message Exclusions #
This non-editable field will show the Previous Excluded status for the lookup for Previous Messages at the time when the latest update of the Previous Message field has been made on the current Message. Possible values of the field are:
No Exclusions
Individual Message(s) excluded
Insured Period excluded
Referenced SICS objects - Claim Movement message. #
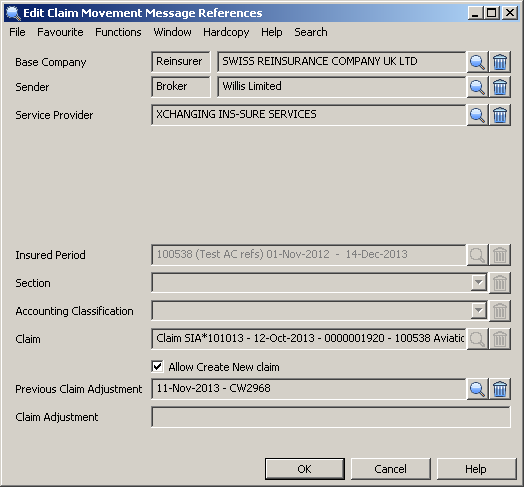
The top part of the window shows the partners to which the message is referenced. References to the service provider are key to enabling the special London Market process for claims. The lower part of the window shows references to
- Insured Period
- Section
- Accounting Classification
- Claim
- Related Claim adjustment
- Claim adjustment
You may only change references if the message is not processed, and is not linked to an open worksheet. The claim cannot be changed if the message is linked to a related claim adjustment. The Insured period cannot be changed if the message is linked to claim.
Allow create New Claim #
This checkbox may be ticked if the message has referenced to an existing claim, but it is found to be incorrect and a new claim is required instead. This may happen if the referencing rule uses Date of Loss alone. Once checked, a new swap-to option of ‘Replacement Claim’ is enabled on the message menu.
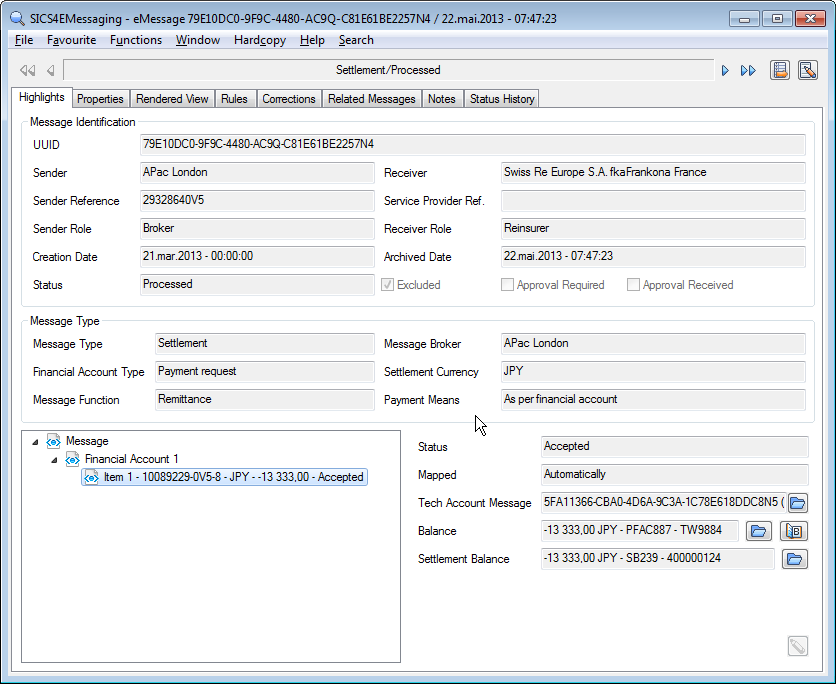
Referenced SICS Objects - Settlement Message #
The container in left side of the frame displays the list of Financial Account Items in a grid view. The grid view has the layout and sort pop-up menu where the user can change the column view, sort, find, open the items in spread sheet, like the other grid views.
The rows and columns of this grid contains Financial Account items and their details respectively. The columns shown are - ‘Item Number/Object’, ‘Sender Reference’, ‘Currency’, ‘Amount’, ‘Status’ and ‘Comment’.I can organize, find, sort, filter any values in the column as per the need. I also have an option to open the grid as an excel spreadsheet.
After updating an item, filtered/ sorted items view remains and the updated item remains selected and visible (scroll bar remains at the same position).
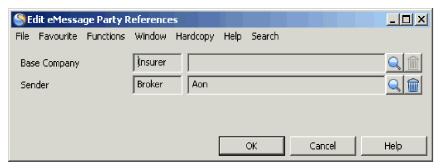
The attributes shown on right side of the frame when viewing/editing referenced SICS objects varies according to which leaf from the highlights tree structure you have selected. If you have chosen the message root, you will be shown the Edit eMessages Party References window. The message sender must reference to a SICS business partner, and the message receiver must reference to a SICS base company.
If the chosen leaf is a Financial Account, there is no edit version of the window available. The user is not permitted to change references made by a financial account directly, but can use the ‘swap to settlement balance’ option to create a new settlement balance or to view the existing one linked to the selected item. The ‘swap-to’ option is only enabled if all the Financial Account items in the selected account are either ‘accepted’or ‘rejected’. If the account type is permitted to create a remittance, the user may swap-to remittance to create a new remittance worksheet, or to view an existing one already liked to the message.
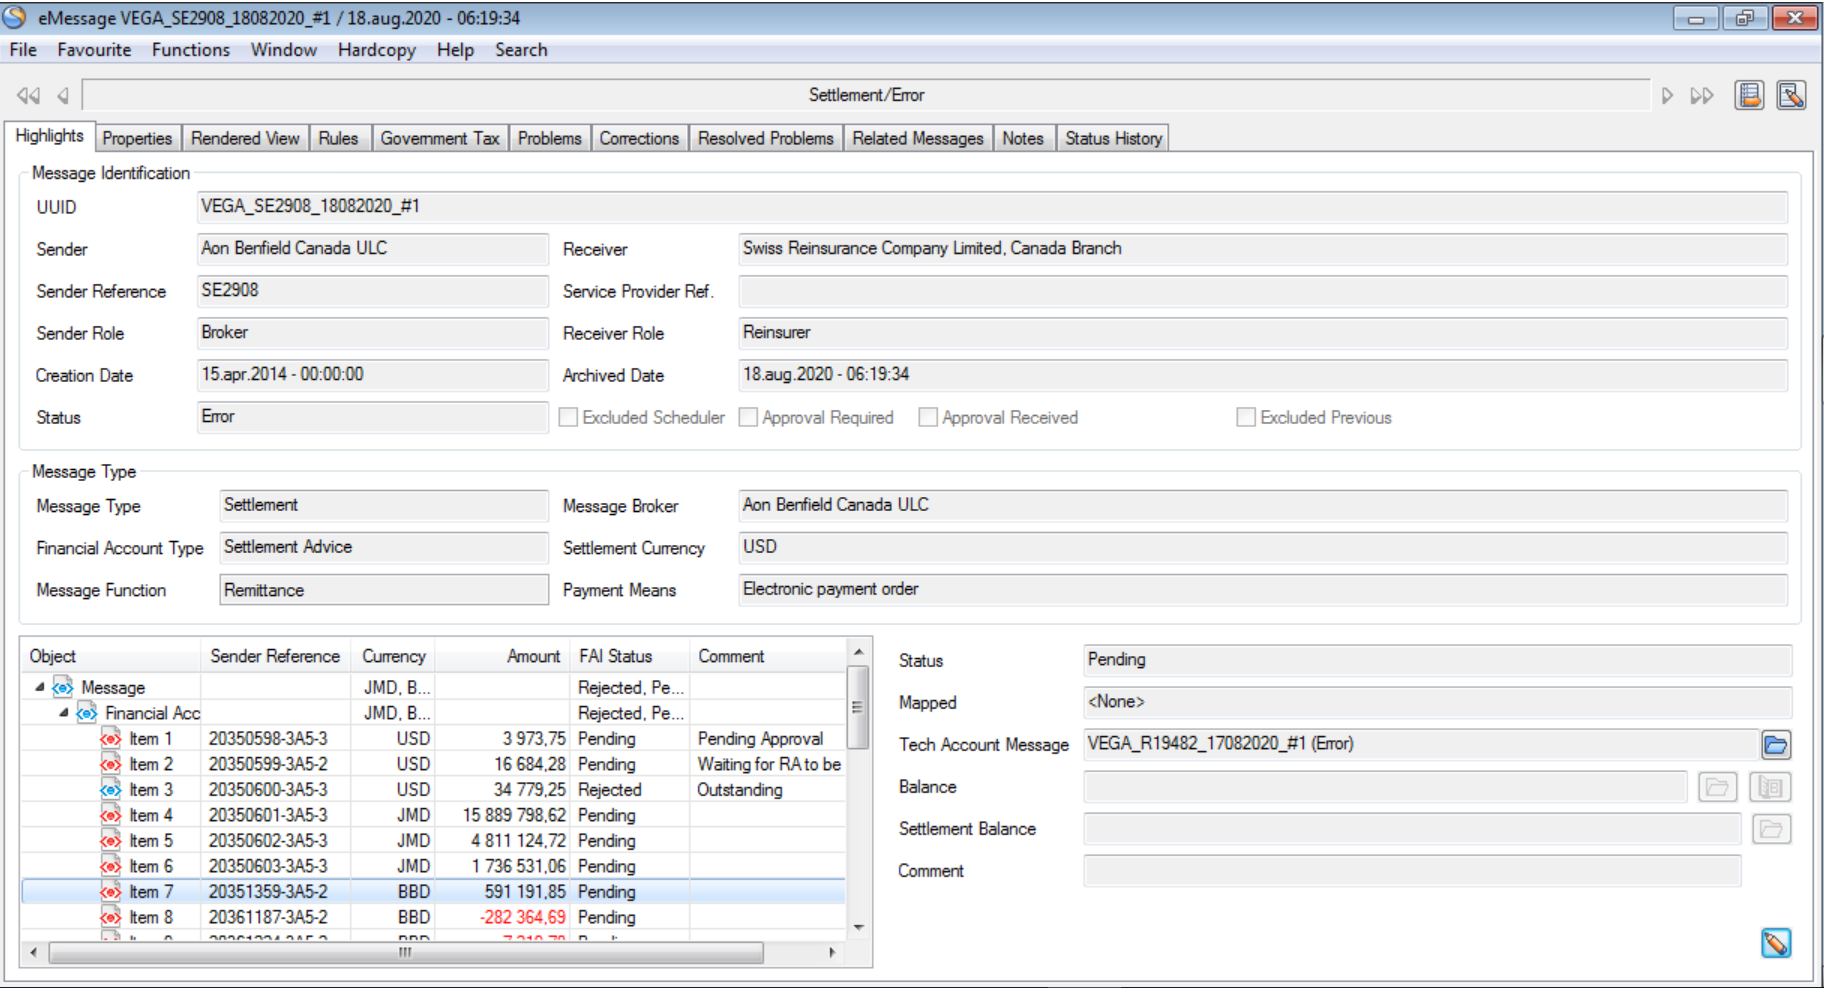
If the chosen leaf is a Financial Account item, the Edit Financial Account Item References window will be opened. The top half of the window will show the status of the item, and Tech Account message, balance to which the item is referenced and a Comment field for any additional remarks. The Comment field is only editable when message is in status ‘error’ or ‘validated’. There is also a button to reject or reset the status. The lower half of the window shows the message elements for the selected item.
Multiple FA items can be selected in the tree structure, so long as they are all in ‘pending’ status. Using right click, all the items can be rejected at once.
Each Financial Account item starts off as ‘pending’. In many cases, the system will automatically find the corresponding technical balance by using the referred Uuid in the item to locate a TechAccount message. Assuming the chosen balance is acceptable, the item Status will be changed to ‘Accepted’ and the Mapped will be changed to ‘Manual’.
The user may manually select either a Tech Account message or a SICS balance. When a suitable balance is found, the item Status is changed to ‘Accepted’ and the Mapped is changed to ‘Automatically’. If the item does not include a referred Uuid, SICS will look for a suitable balance using either the sender’s booking reference or the service provider reference. If the Financial Account Item is not referenced to any SICS balances by use of a referred Uuid, a service provider booking reference or the sender’s reference, the system will try to find a SICS balance without a Business Partner Reference, matching the amount in the Settlement message FA Items. If one and only one matching balance is found, within the tolerance limit defined on the rule, this balance is automatically linked to the FA Item. If a balance is not found, the item remains in ‘Pending’status and the Mapped remains as ‘None’. If no balance can be found, the user may set the status to ‘rejected’by pressing the ‘Reject this item’button. The text of the button will then change to ‘Reset to pending’, and pressing it will change the status back to ‘pending’. An accepted item can be changed back to ‘pending’ by removing the link to the balance. It is also possible to reject multiple FA Items from the tree structure.
Mapping of the FAI bookings with the linked SBG takes place when the technical balance is part of a settlement balance group.
The status of the item is displayed as pending. It is also indicated that the item is included in an SBG when the details of the SBG are displayed. Since the balance is included in an SBG, the user can navigate to the linked SBG’s properties to edit it and either add or remove the technical balance from the SBG if necessary

If you change any reference, when you click OK, the message will be re-validated - all the referencing and validation rules will be reapplied to the message.
Referenced SICS Objects - Placing message #
Party References #
Business References #
Previous Message References #
This part shows the Reference Method used to find any Previous Message along with the Mapping Order of any Mappinng Set used. The UUID of Previous Message (if any) will be displayed alongside.
Previous Message Exclusions #
This non-editable field will show the Previous Excluded status for the lookup for Previous Messages at the time when the latest update of the Previous Message field has been made on the current Message. Possible values of the field are:
No Exclusions
Individual Message(s) excluded
Insured Period excluded
Menu Options #
Process #
This option initiates the processing of the message - the rules for this message are executed until the message is processed or an error that stops processing is detected.
Validate #
Similar to process, but no apply rules(those that do updates) are executed. The process stops once all the validation rules have been executed.
Swap-to #
Opens a sub-menu showing the swap-to options allowed on the message. Unavailable options are greyed out.
For TechAccount message the available options are
- Share
- Worksheet
For Settlement the options are
- Settlement Balance
- Remittance
- Billing Statement
For Claim movement the options are
- Claim
- Replacement Claim
- Worksheet
For Placing messages the options are
- Share
- Placing References Share: Opens the share conditions window on the referenced insured period. If the Insured period does not contain a signed share percentage, the window opens in edit mode, and the share percentage from the message is copied into this attribute.
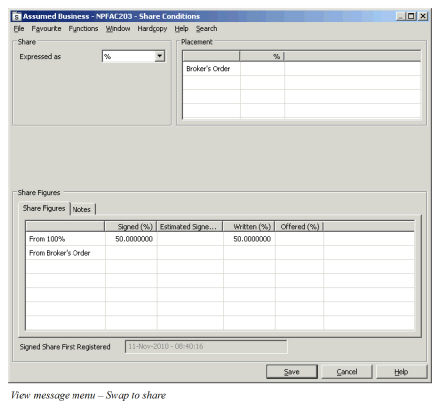
If the signed share already exists on the insured period, the window opens in view mode.
For Placing messages, the swap to share window has two parts, to reflect the fact that Placing messages can carry two shares - one for main section, and one for a child section. The swap to window always opens in view mode - click on one of the edit buttons to open the share update window. Both shares may be edited.
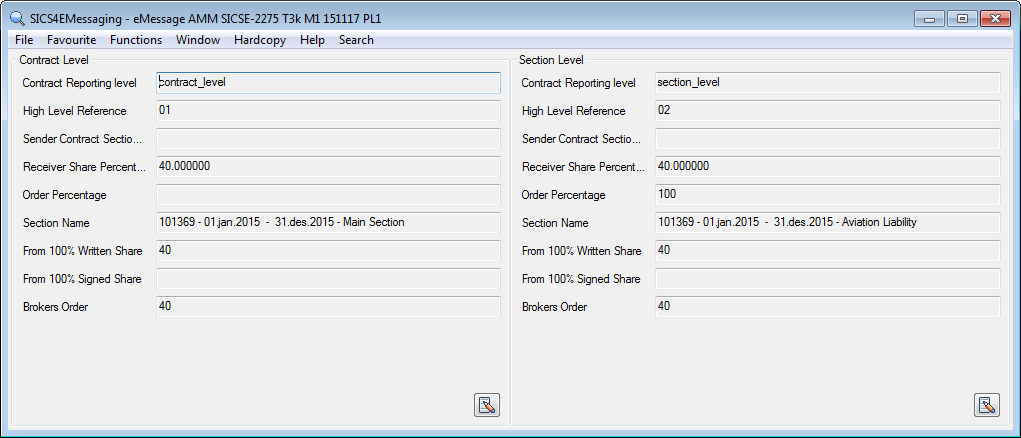 Placing - swap to share window
Claim: On a message not yet linked to a claim. swap to claim will open the new claim wizard. On a message already linked to a claim, swap to claim will open the claim window, with data from the message populating missing and updated attributes.
Replacement Claim: If a message is already linked to a claim, but this is the wrong claim (and a new claim should be created), selecting this option will open the new claim wizard. On completion, the old claim will be replaced by the new claim and any existing link to a claim adjustment will be removed. This option is only available if ‘allow create new claim’ is ticked on edit message references.
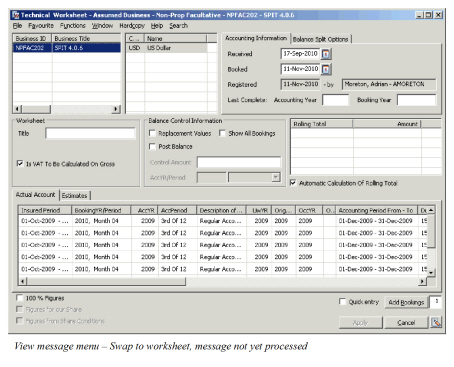
Worksheet: On a processed message, swap to worksheet will open the worksheet closing window, so you can view the bookings created from the message.
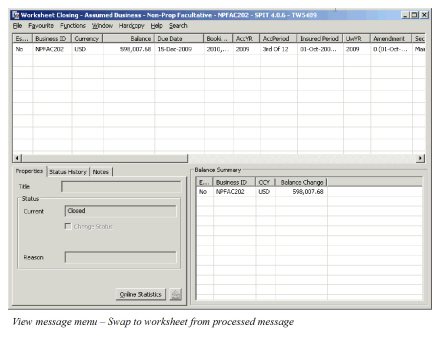
If the message is not yet processed, swap to worksheet will either open an existing worksheet (if the message has one that was left unfinished earlier), or create a new worksheet. Data from the message will populate the worksheet, but control of the worksheet then rests with the user. You can close the worksheet manually, and we will automatically change the message status to ‘processed’, at which point an acknowledgement is created. Alternatively, you can save the open worksheet using ‘UNFI’.
On TechAccount messages relating to claims and on Claim Movement messages, swap to worksheet will open a claims worksheet.
Settlement Balance:
If a Settlement Balance Group is linked to the message this option opens the Settlement Balance Group Properties for the referenced Settlement Balance so you can view the included balances. The window is opened in view mode. The Settlement Message can be opened in edit mode to change e.g. the Reference or the Due Date. It is not possible to remove balances from or add balances to the Settlement Balance Group.
If the message is not already linked to a Settlement Balance Group and there are accepted and no pending Financial Account Items in the message this option will create a new Settlement Balance Group and open the properties for this message in view mode.
Remittance: This option is enabled if a Remittance and/or a Settlement Balance Group is linked to the message.
If a Remittance is linked to the message this option opens the Remittance Properties for this Remittance. If the Remittance is in a pending status, the Remittance is opened in edit mode, if the Remittance has status Final, it is opened in view mode.
If no Remittance is linked to the message, but the message has a link to a Settlement Balance Group, this option opens a new Remittance Worksheet with a link to the Settlement Balance Group. The Remittance Worksheet has Payment Type eMessaging. The direction of the Remittance (Paid or Received) will depend on the balance of the Settlement Balance Group. If the Settlement Balance Group has a positive balance, the system will create a Received Remittance. This will be created with status Planned. If the balance of the Settlement Balance Group is negative, the system will create a Paid Remittance. This will be created with status In Progress.
The other information on the Remittance will be populated with data from the Settlement Balance Group, with exception from the Bank Account, the Reporting Unit and the Partner’s Bank account.
When populating the Bank Account, the system searches for a Bank Account with a Reporting Unit for the populated Base Company and Currency. If one, and only one, Bank Account is found, this is populated to the Remittance Worksheet. If none or several Bank Accounts are found, no Bank Account is populated. The Reporting Unit on the selected Bank Account will be populated to the Remittance Worksheet. If no Bank Account is populated then also no Reporting Unit is populated.
When populating the Partner’s Bank Account the system will check if Remittance Type eMessaging is selected in reference data type Remittance Behavior. If this is the case the system will search for a Bank Account with Payment Type eMessaging with a Reporting Unit for the populated Business Partner and Currency. If Remittance Type ‘eMessaging’ is NOT selected in reference data type Remittance Behavior, the system will search for a Bank Account with a Reporting Unit for the populated Business Partner and Currency. In both cases, if one and only one Bank Account is found, this is populated to the Remittance worksheet. If none or several Bank Accounts are found, no Bank Account is populated.
The user can make any necessary changes to the Remittance Worksheet and press the Apply button to save the Remittance.
Billing Statement: On a processed Settlement message, swap to Billing Statement will open the Billing Statement For Selected Balances Order window, so you can view all balances included. A link is created between the order and the included balances. The Balance Properties can be opened for a balance by selecting the option ‘Balance Properties’, showing the Billing Date, the Rem no and the signature (the signature of the person who processed the message). The document can be created by selecting the option ‘Produce Documents’.
Placing References: The main updates from a Placing message are the shares, (see Swap-to Share above), but the secondary updates are to various references used to link messages to a SICS insured period and scope of cover. A summary of these references can be seen and updated on the Swap to Placing References window, and include:
- Unique Market Reference (copied from Insured Period tab)
- Sender Partner Reference (copied from Partners tab)
- Main Section eMessaging references
- Child Section eMessaging references
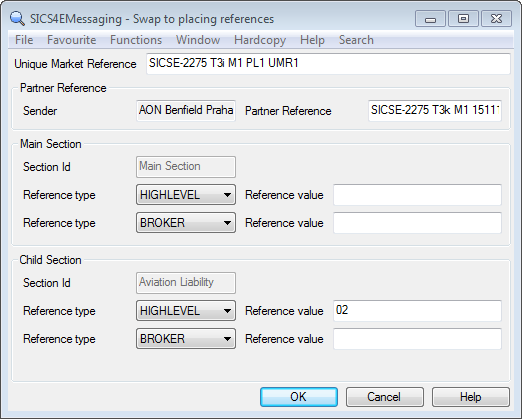 Placing references window
Message view tabs #
Discard/Restore #
This option allows the user to change the life cycle status of the message to ‘Discarded’. If already discarded, you can restore the message to ‘Unprocessed’ status. The user must enter a reason for discarding or restoring the message, and on discard may also create a query acknowledgement to return to the message sender.
If the System Parameter ‘Query Acknowledgement Not Allowed’ is activated, the possibility to create the acknowledgement is disabled. For further information about this we refer to the System Administration Guide.
Most eMessaging processes ignore discarded messages; for example, when checking for duplicate UUids, or when looking for related messages. When discarded, all references made by the message are removed. Note: you cannot discard a message linked to an open unfinished worksheet until the worksheet is inactivated.
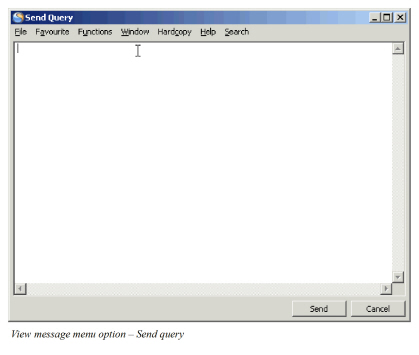
Send Query #
Opens the Send Query window, where the user can add text that will be included in a query acknowledgement returned to the message sender.
If the System Parameter ‘Query Acknowledgement Not Allowed’ is activated, the Send Query option is disabled. For further information about this we refer to the System Administration Guide.
Mark as Examined #
This option will change the status of the message to ‘examined’. It also allows you the opportunity to add a reason or responsible code, and a note, though none of these are mandatory.
Examined is useful if you have messages you are not able to process at this time, but which you don’t need to be reminded about. By marking the messages as examined, and then excluding ‘examined’ messages from the search options, these messages will not be presented for correction/processing.
Reason/Responsible #
If you use mark as examined, you have the option to include reason and responsible codes. If you want to set reason and responsible codes without marking the message as examined (which changes the message status), you can use this option instead.

Include #
Changes the setting of the include/exclude flag on the message. Any scheduled eMessage job will reprocess Included messages so long as the job is set to reprocess existing messages.
Exclude #
Changes the setting of the include/exclude flag on the message. Scheduled eMessage jobs will not reprocess Excluded messages.
View Acknowledgement #
This option is only available on processed messages, and is a quick way of opening and viewing the acknowledgement message created when the message was completed.
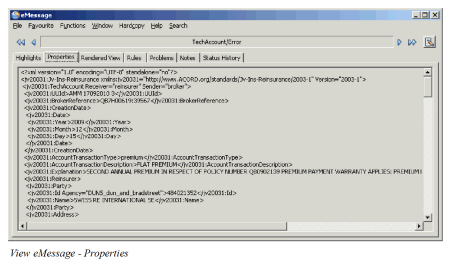
Properties: Shows the raw xml message, as held in the archive.
Rendered View: Here we apply an xsl stylesheet to the raw message to produce a formatted view. The initial view will use the default stylesheet for the message type defined in user preferences, (see User Preferences - Default Stylesheets for further details). If no user preference exists, then we use the system parameter default instead. The tab has three buttons
- Browse: Allows you to select an alternative stylesheet
- Default: Reverts to the default stylesheet
- Apply: Re-renders the message using the chosen stylesheet

Rules: Here you can see the rules that have been or will be applied to this message. The default is to show them in the order they are applied. Clicking on a single rule will show further rule details in the lower frame. You cannot modify rules here, but if override is allowed, it can be selected here.
Accounting Split
We add this tab to the message view if the referenced insured period has the eMessaging processing option set to book according to accounting split. If you change the setting on the insured period, the accounting split tab will only appear/disappear when you process or validate the message.
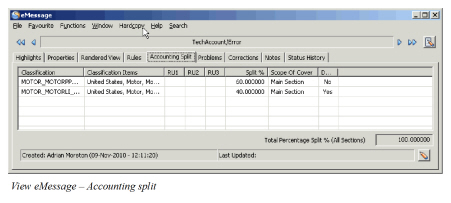
The tab will try to show the split used previously on messages for this insured period. If this is the first message, it will show the split from the accounting classification on the insured period. To confirm or change the split, click on the edit button. You can only change the split percentages - it is not possible to add or remove accounting classifications. If you do not want to book on a particular classification, set the split percentage to zero.
You must confirm the accounting split before a message can be processed if it is linked to an insured period where booking is made according to the accounting split. Swap-to worksheet is not enabled until the confirmation has been made. However, it is possible to turn this rule off, so that subsequent messages simply use the same split as the first message.
Clicking OK will confirm the split, and trigger a re-validation of the message. A warning message is shown if the sum of splits is not 100%, and the message will be prevented from completion.
Government Tax #
If a rule detects an error due to Government Tax validation, it will create an error message on the Government Tax tab.
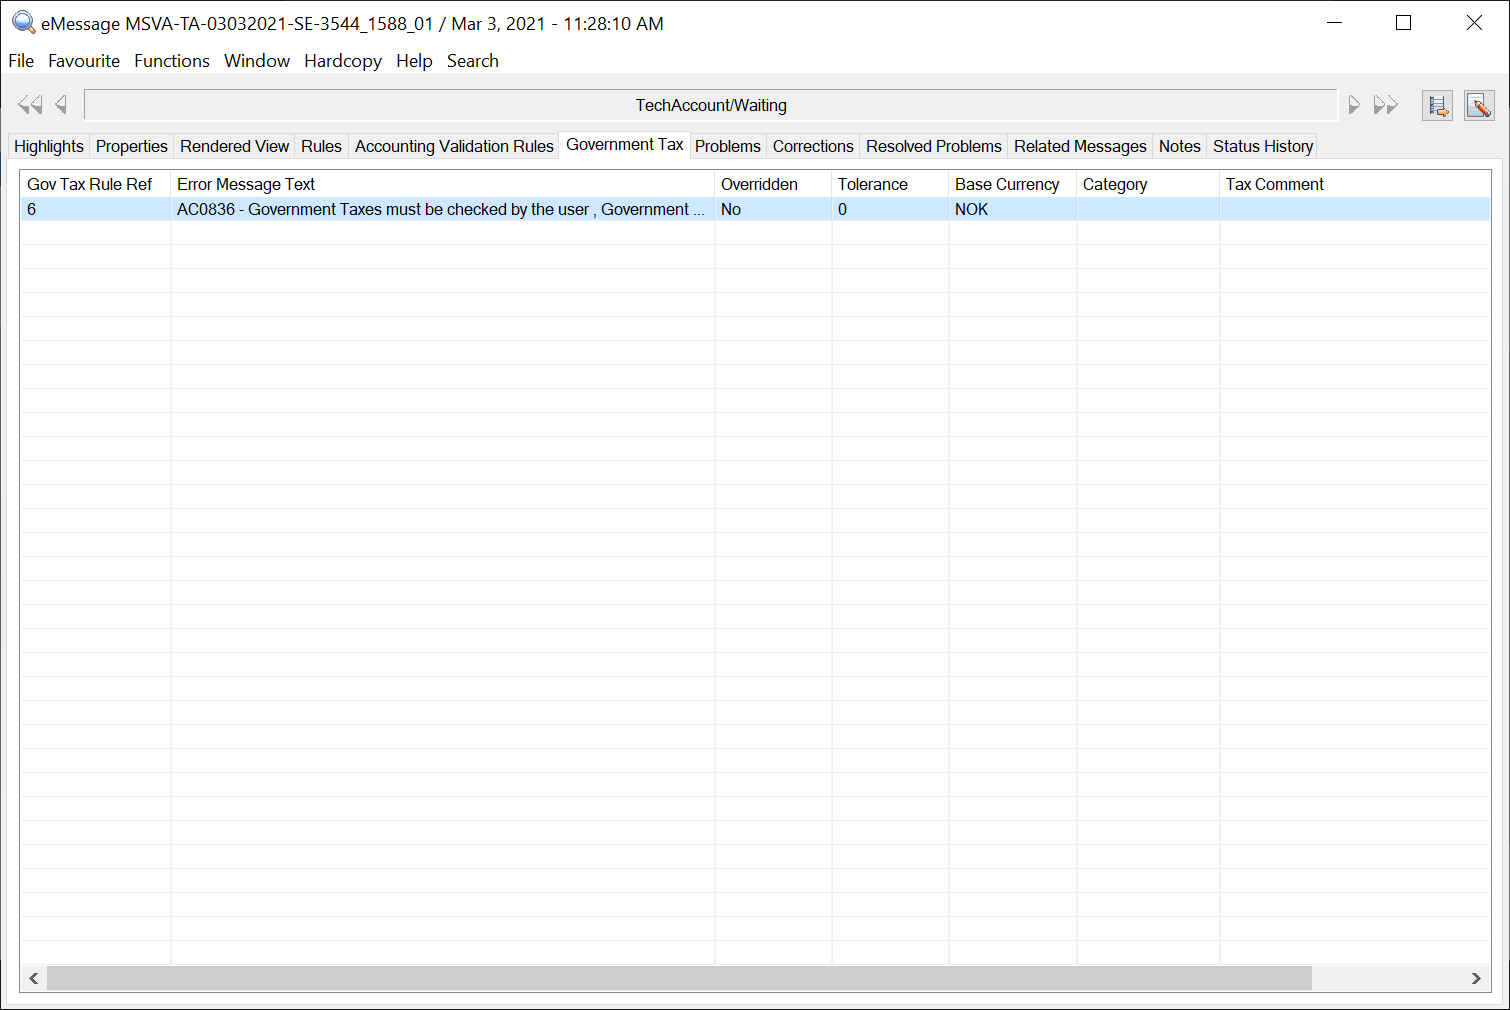
The tab includes an error message with reference to the Government Tax Rule Ref which was validated and failed when trying to Process or Validate + ‘Swap to Worksheet’ from the eMessaging. One line per failure is shown.
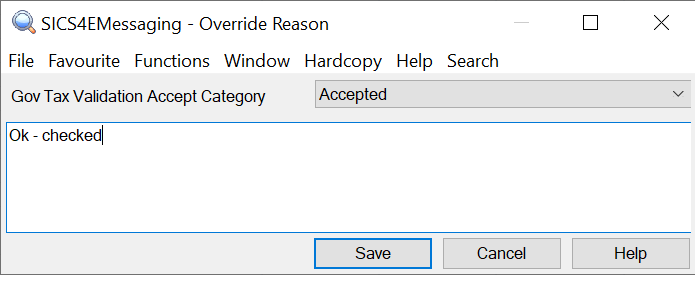
If you override a Government Tax rule, this rule will be omitted on future validation of this message. You can override the rule by marking a rule and right click and selecting the option Override from the pop-up menu. A new window Override Reason is opened where you can select a Gov Tax Validation Accept Category from the drop-down and by giving a Government Tax Comment.
You may also remove the override by right click on a Government Tax Rule Ref and from the pop-up menu select the option Remove Override from the rule. If you remove the override, the system will apply the rule for future validations of this message.
Problems: If a rule detects an error, it will create an error message on the problem tab.
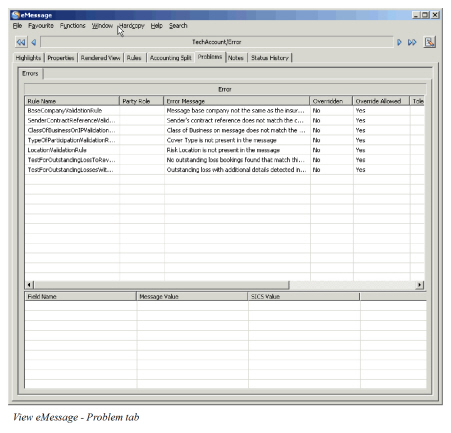
We only add the problem tab to the message view if it has a problem. The tab can contain up to three sub-tabs, showing
- referencing problems
- general errors
- warnings.
The operation of all three sub-tabs is identical. The upper frame contains a list of all the errors detected. If you select a single error, the lower frame will show additional details for that error. You can right click on an error, and from the menu select to override the rule or view the rule details.
You may also be able to select Group Override. This is not available on all rules, but if selected it will omit the rule from this message, and all other messages in the same group as this one, regardless of message type. For the purposes of Group override, the following related messages are considered:
- Messages with a common group reference
- Messages in the same FGU group
- Messages which refer to another
- Messages which are referred by another
It does not include previous messages.
If you override a rule, we will omit it on future validations of this message. eMessaging only permits override on some rules.
Corrections: We only add this tab if you have applied an override to a rule, in which case we show overridden rule here. You can right click on a rule and from the menu select to remove the override or group override from the rule, or view the rule details.
If you remove the override, we will apply the rule for future validations of this message.
Resolved Problems #

When problems are resolved, they will appear on the resolved problems tab, but only if the eMessaging system parameter ‘Apply enhanced Error History for resolved errors’ is in force.
Rules may appear multiple times, either because the same problem has reoccurred for the message, or because the rule set multiple errors.
The following Resloving Methods are available:
- Override - An override has been applied to the rule raising the problem
- Edit Highlights - Problem does not reoccur - or was an Apply problem and thus not re-triggered - after automatic validation of a message following edit Hightlights (manually change references.)
- Undetermined - Something else, e.g. a correction has been made elsewhere in SICS
- Active Rule Change - Rule is turned off or removed from rule set or the ruleset appled has changed and the rule is not present. Related Messages
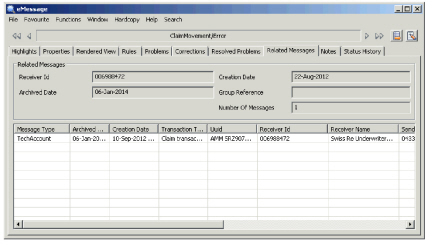
This tab will show other messages to which this one is related. The relationships can be
- Common Group reference
- Previous message
- Referred message (either by UUid or by sender’s reference)
- Cancelled pair
- FGU Group
Double clicking on the message will open a view message window for the selected message. Referred messages work both ways- messages to which the current message refers, and messages which refer to the current message.
Notes: Here you can add your own notes about the message. It will also show any reason/responsible notes added by the ‘Mark as examined’ or ‘Discard/Restore’ menu options.
Status History: This tab shows all the life-cycle status changes undergone by the message from when it is first loaded to when it is processed. By default, we show the latest status change first.
Status history records are also added to messages processing foreground (on the view message window) whenever an override is applied to a rule, or when a menu action is completed. The name of the user completing the action is recorded as intervention user. The intervention action is also recorded. Messages processed in background (e.g. as part of a group), do not record an intervention user.
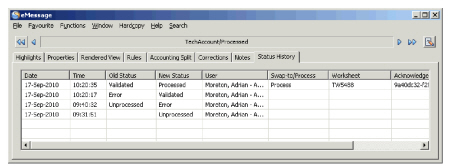
If you select a line with an Acknowledgment Uuid, the pop-up menu has an option to View Acknowledgment/Query and if it has a Worksheet id, the pop-up menu has an option to view the Worksheet Properties.