Things to Know before You Begin
The SICS user interface was designed to be as user-friendly as possible. The look and feel of the interface continues to evolve to give you better dialogs and more advanced navigation features to help you through otherwise complex structures.
In order for this guide and the user interface to make sense, you should be aware of how SICS defines the term “Business”.
Business refers to the insurance policy and the information that goes into it, which includes quotes, agreements, offers, and declinations.
Printing Windows from SICS #
You can print or take screen shots of windows in SICS by clicking the Hardcopy menu (at the top of a window), and then selecting one of the sub-menus.
| Print Window (default printer) | Alt + P |
| Print Window (select printer) | |
| Copy Window to Clipboard | Alt + Shift + P |
When you select Print Window (default printer), the printer you have selected to be your system default printer will print out your screen shot. If the system does not have a default printer, a list of the available printers is presented and you can select the printer you want to be your default printer.
The Print Window (select printer) option always presents you with a list of available printers. Select the printer you want to use by clicking it in the list. (If you a defined a default printer for the system, this printer always selected in the list.) The active window is then printed to the selected printer.
The Copy Window to Clipboard option copies a bitmap representation of the active window to the clipboard. You can then, for example, paste this bitmap in a Word document or a Power Point presentation.
Editing with Edit Buttons #
|

Edit button | When you are entering information to the system for the first time, you are automatically in the Edit mode. When you open up already registered information, however, you are in the View only mode. In order to make changes to information, you must then use the ‘Edit’button. Clicking the ‘Edit’button opens a new window in which you can make your changes. |
|

Edit Menu button | Clicking the ‘Edit Menu’button brings up a pop-up menu of options. Each option requires a specific type of edit to be performed. The options you see when you click the ‘Edit Menu’ button vary de_pending_ on what edit options are relevant for the particular window with which you are working. | |
Undo Last Entry #
Several fields in SICS have manually entered input. This can lead to e.g. typing errors.
Newly entered values can easily be removed by selecting:
- “Undo” from pop-up menu
- “Ctrl + z”
Undo last entry functionality only applies to fields where the user can manually enter a value, such as:
- Text fields, e.g. Business Partner name fields, “Cease Description” in Cease Accounting and “Change Reason” Claim Disposition properties
- Numeric fields, e.g. amount fields, number of days and percentage
- Date fields
- Text fields in containers Note! Undo last entry functionality does not apply to fields where values are selected from drop-down lists or retrieved from other places in SICS (e.g. values that can be found by use of the Find facility)
Pop-up Menus #
SICS lets you add and edit information in your database by selecting a pop-up menu with various editing options. Whenever it is possible to add or edit information, you can access Edit windows or Add windows by clicking the right-mouse button once.
Interrupt a Search Process #
Working in SICS, the Find facility and other search facilities often require the system to handle huge quantities of information.
The search process’ progress is displayed and can be interrupted (i.e. if the process takes more than 3 seconds) on the following screens:
- Find Business
- Find Claim
- Find Worksheet
- Online Statistics
- Business Ledger
Business Partner Ledger
Using Identifiers #
Business Identifiers #
An identifier is a number or name that uniquely identifies a business. Business identifiers are automatically generated by the system according to the predefined Identifier Series. Your SICS System Administrator sets this up. Refer to System Parameter Maintenance, Assign Business Identifiers in the System Administrator’s Guide for information on predefining and assigning business identifiers.
Business Partner Identifiers #
If you do not enter a value in the SICS Identifier field for a Business Partner, Person, Bank, or Insured, the system automatically creates a unique identifier based on the Identifier Series definitions that have been set up by your SICS System Administrator. (This assumes that an Identifier Series with a selection rule matching the Business Partner, Person, Bank, or Insured exists.) If you do enter a value in the SICS identifier field, this value is used by the system and the system does not create an identifier for you.
For more information, refer to Assign Identifiers for Business Partners in the System Administrator’s Guide.
Claim Identifiers #
Claim identifiers are unique identifiers that are used to identify a claim and are generated automatically by the system. You can predefine how claim identifiers should be generated: this is done from the System Parameters window Claim Identifier tab. (See Setting Claim Identifier Values in the System Administrator’s Guide for more information.)
Deleting and Inactivating Data #
SICS offers support for deleting various data types. A user may, for example, delete most of the detailed information on a Business Partner(Address, Electronic Address, Rating, etc).
The Delete feature for a data element is typically available from the pop-up menu, after selecting the object you want to delete from a list. If the pop-up menu does not have the Delete option, it means SICS does not support the deletion of this type of object.
For some types of data, the system needs to check whether any references exist before the deletion is carried out. If a reference to the data element exists, SICS will issue an error message, and the data element is not deleted. In order to delete the data element, all references to it must first be removed (if possible). If no references are found, SICS deletes the data element, including any detailed information regarded as part of the data element. (For example, if you delete a Business Partner, the Addresses and Electronic Addresses will also be deleted.)
Example 1: If you attempt to delete a Currency(select Delete from the pop-up menu in the Currency list, on the Currency and Exchange Rate window), SICS will first check whether the currency has been used in any part of the system.
Example 2: If you attempt to delete a Business Partner(select Delete from the pop-up menu in the Find Business Partner window), SICS will first check whether the Business Partner has any references to it (for example, if it is used as Cedent or Insured on a Business).
In some cases (for example, when deleting a Currency), the reference checking may be time consuming, as SICS has to check for a large number of possible references.
Delete with reference checking is supported for the following types of objects:
- Business Partners
- Banks
- Insureds
- Countries
- Currencies
- Reference Data
- Reporting Unit Leaves
- Businesses
- Claims
In some cases, it may prove difficult or impossible to delete a data element. If, for instance, an Insured has been used as an Insured on a Business, you cannot delete it. You would first have to remove the Insured link. Since this may not be possible, or desirable, you may not be allowed to delete the Insured at all. The same applies for a Currency or for a Reporting Unit leaf.
In some cases, an alternative may be to inactivate the data element. This usually means that the data element is regarded by the system as “logically deleted,” in the sense that SICS will not let you create additional links to it. To inactivate a data element you must (typically) clear the Active check box found in the Properties window of the data element.
Favourites #
The Favourites menu makes it easy for you to return to businesses, business partners, insurable objects and claims that you regularly work with.
The Favourites menu is available on every window in SICS. Using this menu you can add, organise and access the objects that you want to work with.
The option Copy SICS Live Desktop URL to clipboard is available for the following: Business, Business Partner, Business Partner Ledger, Worksheet, eMessaging Message and Claim.
The copied URL can be added as a link in documents, emails, notifiers or in Task Management and can be embedded in web pages to open the relevant SICS object on giving the necessary credentials.
Create a Favourites Folder #
Add an Object to the Favourites List #
- Go to the business or object that you often want to work with.
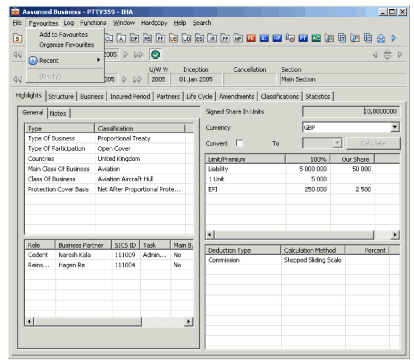
- Click the Favourites menu and select ‘Add to Favourites.’
You see the Add Favourite window. The default folder is called Favourites.
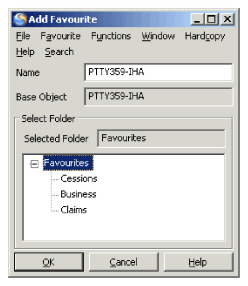
- Click ‘OK’ to add the object to the Favourites list.
The next time you want to access this object, you can select it from the Favourites menu from any window in SICS. You can organise items in your Favourites by creating new folders for the different types of objects in the list. For example, you could create folders for business, insurable objects and claims.
To organise items in your Favourites list:
- Click the Favourites menu and select Organize Favourites.
You see the Arrange Favourites window.
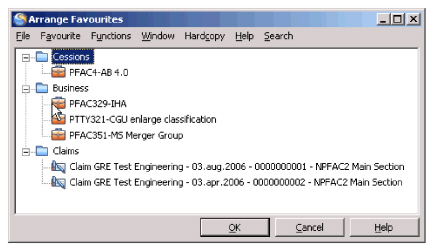
- Select ‘Add Folder ‘from the pop-up menu.
- In the Add Folder window, select the root folder and enter the new name for the folder. The new folder appears in the Arrange Favourites window.
- Move the required objects into the folder by selecting an object and selecting Edit from pop-up menu.
- Click the folder in which you want to place the object.
You can rename items in the Favourites list by selecting Edit from the right-mouse button pop-up menu and entering a new name in the Name field.
Passwords #
You need a user name and password when you log in to SICS. The password is the secret word that identifies you as the person specified by the user name.
Your System Administrator defines a user name and password for you when installing and customising the system. Usually, it is the responsibility of the System Administrator to define and control the user names and passwords of all the staff using SICS in your company. However, you can change your password yourself if you are using SICS with an Oracle database.
To change your password, select Change Password from the Password menu on the SICS desktop.
When you are using SICS with an Oracle database, you can also change the password expiry date yourself. When your password is about to expire, SICS gives you a warning message. You can change your password immediately or when you log in the next time. Only non-expired passwords can be changed using SICS. If SICS cannot save the new password, your account will be locked and you need to contact your System Administrator.
Set Up Automatic Spell Check #
In SICS there is an automatic as-you-type spell check. The option is available on Notes fields, and on Key Names and Titles. It defaults to using windows local language, and in addition the dictionary includes base company names, active user names, ISO Currency and country codes from SICS. The automatic option can be deactivated, and only used on demand.
- From the Notes field, Key Names or Title, open up the pop-up menu and select Spelling Settings
- I see the Spelling settings for SICS options
- I can de-select the Check Spelling as you Type. This inactivates the automatic check for SICS.
Text Editors for Notes, and Notes Tabs #
| Action | Description | |
|---|---|---|
 |
The Notes tab without any notes. | SICS provides fields where you can take notes about businesses and people. This can be a very useful feature and an invaluable reference tool. |
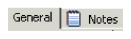 |
The Notes tab including notes. | Whenever available throughout the application, you can click the Notes tab to see the Notes window where you can enter your own notes about a business partner. If entries already exist on the Notes tab, you will see a little “Book” icon displayed next to the Notes title on the tab. |
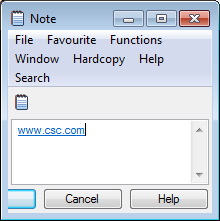 |
If you type an URL into a Notes field, it will be automatically detected as an URL and open the system web browser when clicking in it. |
Click the ‘Edit ‘button to start entering text. Standard cut, copy, paste and print features are available when you click the right-mouse button to activate the pop-up menu.
To use an URL in a Notes field:
If you type an URL into a Notes field, it is automatically detected as an URL and will open the system’s web browser when clicking in it. This allows an easy access to a web-site outside of SICS.
ISO Standards for Countries and Currencies #
SICS uses ISO information standards for countries, and lists all countries in the world according to ISO 3166. Standards for currencies in SICS are according to ISO 4217. The official English name is listed next to each ISO code.
Currency Selection #
Whenever you have the option to select a currency from a drop-down list in SICS, you have several options for selecting the currency you want. You can:
- Can scroll through the list using the arrow button,
- Type the currency code directly,
- Type in the first two letters, for example, to jump to that currency in the drop-down list,
- Click the right-mouse button on the arrow of the drop-down list to open a table where you can search for the ISO code, currency name, and country.
When you first see the table, it is blank. Select a column, e.g. Country, and type in a letter. All countries starting with that letter are displayed in alphabetical order. If you select a country and click Enter without first typing a letter, all countries are displayed (in alphabetical order), and you can scroll down the list to find what you are looking for.
You can double-click a currency to select it, or you can select it and click the ‘Close’button on the Currency table.
Creating and Viewing Notifiers #
|

Notifier button |
When you click the ‘Notifier’ button you see the Notifier window. A notifier is used as a communication and reminder mechanism within the SICS application, and is basically an intelligent “post-it” note that can be attached to certain pieces of data within SICS. |
If, for example, you want to remember to call a particular business partner, you can attach a notifier to that business partner, so that when you open SICS the next day and check your notifiers, you see the message you left for yourself to contact that partner. You can read your note, and then open the attached business partner with just a click of the mouse.
Or maybe you want to remind yourself something personal about someone so that when he or she calls, you can open the window on that person and be reminded, for example, that this is someone you met at a golf tournament in August.
The examples just mentioned are personal notifiers. Only you see them, unless you designate specific other users to be able to access them, too.
You can also attach public notifiers that are intended for any user to see. This could be a warning or a piece of information that you want everyone to know about when you open that piece of data. For example, you can attach a notifier to a country that indicates an economic situation that is of importance to your colleagues.
When a notifier has been created and attached to a piece of data, the envelope on the icon changes from empty to filled so that you (or other users) know to open the Notifier window to see the attachments.
Notifiers contain attachment information that binds or “glues” the piece of data and the notifier together. Notifiers can be attached to the following pieces of information in SICS:
- User - A user can have personal notifiers, which are managed and viewable only by that person (unless otherwise specified).
- Business - any kind of business
- Business Partner - any business partner
- Person - any person
- Bank - any bank
- Insurable Objects - any insurable object
- Claims - any type of claim
- Claim Dispositions
- Country - any country
- State - any state within a country
Notifiers from the SICS Desktop #
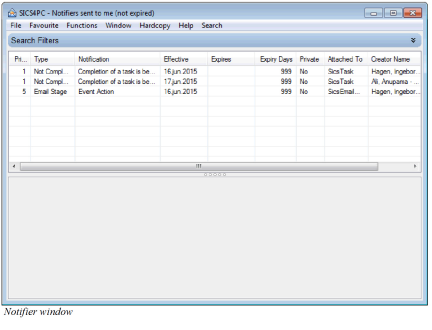
Notifiers can be accessed from the main SICS desktop by clicking the ‘Notifier’ button on the Navigation bar. All notifiers attached to the currently logged in user will appear in a list in the Notifier window.
In the User Preferences you can set SICS to open the Notifier window automatically whenever you log in to SICS. Refer to User Preferences, Misc. Preferences for more information about your personal settings.
From every SICS window you can use the shortcut keys Alt+N to open a window listing all notifiers sent to you.
Notifiers throughout the Application #
Whenever it is applicable, throughout the SICS application, you will see the ‘Notifier’button. This will allow accessibility to the notifiers attached to the data you are viewing. Generally, the button appears next to the high level information in which the notifier is attached. For example, a ‘Notifier’button is situated on the main Bank details tab. Clicking the button would allow a user to attach/view a notifier for the currently viewed Bank.
- Personal notifiers: When logging into SICS, each user has a given User ID. Notifiers can be attached to individual User IDs where they are stored until retrieved for viewing and maintenance.
- Business notifiers: Business notifiers are attached to a specific business object as designated above (for example, Bank, Person). They are accessible by browsing the specified object or opening the object via browsing an attached notifier.
Claim Notifiers #
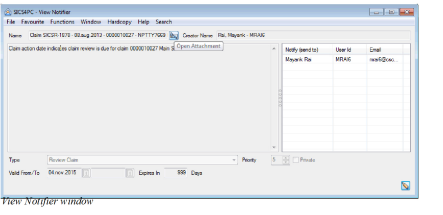
There are several types of notifiers, including claim notifiers. You can add notifiers on claim action dates and various claim disposition changes. For example:
- Claim Action Date: A notifier is created based on the claim action date minus one month. The action date will default to a year ahead of the review date. If this is the first advice, the default action date will be a year ahead of the advised date. A month prior to the action date, the claim will appear on the Notifier list, so that you are reminded to update claims. The claim will appear on this list until the review date (and therefore the action date) changes. The use of action dates is optional.
- Claim Disposition: A notifier is created for a claim disposition when a claim disposition is updated. When the disposition is updated, a message appears asking you if you want to create a notifier. If you select Yes, you see the Create Notifier window.
Notifier Attachment Information #
Each notifier is attached to a given piece of information. During the attachment process, certain information is captured and carried along with the notifier for informational purposes. Selecting a notifier, the detailed information for the selected notifier is displayed.
Notification Details #
Each notifier has specific details that are set at creation time or during maintenance. When you create a notifier (by selecting New from the pop-up menu in the Notifier display list) you see the Create Notifier window.
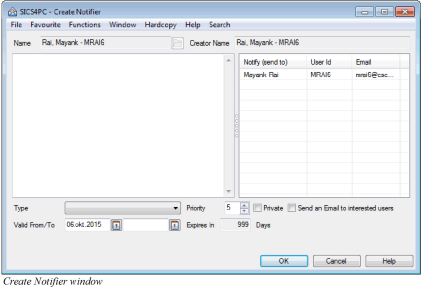
Name: Description of the object to which the notifier is attached.
Creator name: Name of the user who created the notifier.
Notification Details: The free text box is used to describe the detailed purpose of the notifier.
Notify (send to): List of users designated to have a specific interest in the notifier
Type: User defined description of the notifer (reference data item)
Priority: Priority is a numeric field with valid values from 1-5. It is used to designate the relative priority of the notifier.
Private: This check box is used in the determination of which users are available to see the notifier. Selecting Private allows only the creator and user(s) designated in the interested user list to view the notifier. Clearing Private allows anyone to view the notifier; it makes the notifier Public.
Valid From: Designates the starting period for the notifier.
Valid To: Designates the ending period (expiration date) for the notifier.
Expires In: Calculated field as the Valid To subtracted from the current date.
General Notifier Functionality #
The Notifier window is broken down into three main sections:
- Search Filters including Date Filter and View Notifiers
- Notifier display list
- Selected Object details
Search Filters: Collapsible Search filters provide below options:
Date Filter:This section lets you select notifiers for viewing according to expiry date set on individual notifier in the main list box.
-
Not Expired: Displays the list of non-expired notifiers for the associated current attachment object when the user has been designated as an interested user for the notifier or the notifier has been designated as public (Private toggle has not been selected).
-
Expired: Displays the list of expired notifiers for the associated current attachment object when the user has been designated as an interested user for the notifier or the notifier has been designated as public (Private toggle has not been selected).
-
All: Displays both current and expired notifiers for the associated current attachment object when the user has been designated as an interested user for the notifier or the Notifier has been designated as public (Private toggle has not been selected).
-
View Notifiers:
For selected object: Displays notifiers for a specific object. Option is only enabled when notifiers is opened from an object, e.g. a contract. -
Sent to me: Displays notifiers that have been sent to me.
-
Created by me: Displays notifiers that have been created by me.
Notifier List: This list displays the notifiers as the filter type directs.
Selected Object Details:This section is for information only and displays the object type, name of the object to which the notifiers are attached, validity, creator name and ‘Sent to’ user information
Pop-up Menu Options in the Notifier Window #
When you click right- mouse in the Notifier list, you see a pop-up menu with the following options:
New: Allows the creation of new notifiers for the current attachment. When you select New, you see the Create Notifier window.
Edit: Allows editing of the selected notifier.
View: Allows viewing of the selected notifier. Click the ‘Edit ‘button to switch from View mode to Edit mode. From this window you can open the Attached To object by clicking the ‘Open Attachment ‘button. (The button is disabled if the option is not available.)
Delete: Deletes the currently selected notifier.
Note! Only the person who created the notifier can delete the notifier.
Interested Users: Allows for the viewing and selection of interested users associated with the notifier.
Sort Notifiers #
Sort Priority: Sorts the current list by priority, either ascending or descending.
Sort Type: Sorts the current list by Type, either ascending or descending.
Sort Start Date: Sorts the current list by Start Date, either ascending or descending.
Sort End Date: Sorts the current list by End Date, either ascending or descending.
Sort Attached To: Sorts the current list by Attached To, either ascending or descending.
Sort Creator: Sorts the current list by Creator, either ascending or descending.
Notifier Visibility #
A notifier can have varying degrees of visibility in which other users can share or play a role in viewing the attached notifier.
- Public: Any user can see the notifier. (The ‘Private Toggle ‘button was not selected.) Exceptions to this are notifiers attached to users themselves. Notifiersattached to the user are not visible to others unless they have been specifically designated as an interested user.
- Private: The notifier is attached to the user. It is only visible to users listed as interested parties. Technical Note:
Notifiers are attached through a ‘weak’ reference. If the Attached To Object is removed, the notifiers will remain and must be removed manually.
Attaching Documents #
|

Attachments button |
SICS lets you create attachments for individual business object s. This functions in the same way as notifiers, but there are a few differences. While ‘Notifier’ buttons let you attach notes or reminders to business object s, ‘Attachment’ buttons let you attach complete documents and their associated applications. Also, with notifiers you specify who can see the reminders, while attachments are for all users to access. |
When you click the ‘Attachments ‘button, you see a list of attachments for that particular business object, and you can then open the external file and its associated application (for example, Microsoft Word and Microsoft Excel).
You can create attachments for the following business object s:
- Business
- Business Partner
- Person
- Bank
- Insured
- Country
- Insurable Objects
- Claims
- Headline Loss
- Claim Groups
To create an attachment, click the ‘Attachments’button. You see the Attachments window.
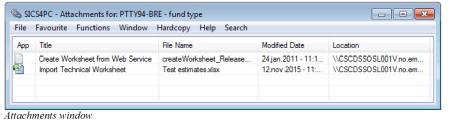
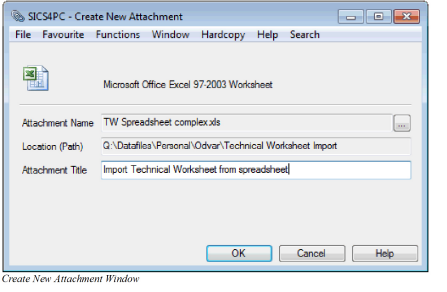
Here you see a list of attachments for the business object, and an icon next to the title of the attachment, which indicates the application in which it was created (if there are no attachments, the list in the window will be empty). Add an attachment by selecting New in the pop-up menu. Then select the file you want to attach.
To open attachments in the list, double-click the attachment, and you see a window displaying the attachment properties.
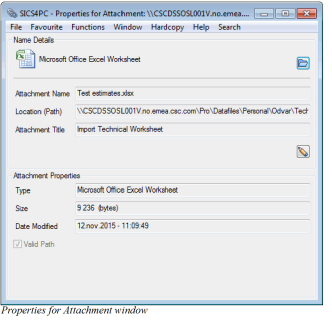
From here you can open the attachment by clicking the ‘Open File’button. The attachment application is launched, and the attachment is opened.
You can also edit the attachment title and location by clicking the ‘Edit ‘button in the Properties window. You see an Edit window where you can make your changes.
The location of a file is stored in either of two formats, de_pending_ on the physical location of the file. For network files, the location is converted to the Universal Naming Convention (UNC) enabling accessibility to the file without having a specific drive mapping (for example, \SICSNT\Customer Documents\Word\0110 Monthly Financials). The location of a file stored on a local machine will be stored using the mapped drive information (for example, C:\Personal\My Document).
Attach document to Email #
Document(s) attached to e.g. a business can be automatically attached to a new mail in current user’s default Email client.
- Open e.g. a business and click on the Attachments icon
- Highlight wanted document(s)
- Select Attach to Email from the pop-up menu
Document Production #
SICS allows you to create templates that are set up by your SICS System Administrator. The external templates may be individually configured using standard text layout techniques. Some text fields may also be altered. Data is placed into the document from SICS through the use of document tags. Documents can be produced from:
- Accounting Orders
- Business Contracts
- Business Partners
- Caim Figures
- Cessions
The production of documents from accounting orders is treated separately from other documents due to the differences in the nature between accounting style documents and business style documents. See the respective sections about creating documents explained later.
For further information with regard to creating and setting up document templates, see the Document Production Chapter in the System Administrator’s Guide.
(You cannot create a document unless an identifier series has been defined for the respective document category and sub-category. This is done by your SICS System Administrator. Refer to the System Parameter Maintenance chapter in the System Administrator’s Guide for more information.)
Note! **** Documents will not be created if the selection criteria of the respective template do not match the currently selected object. This is your System Administrator’s responsibility. Refer to the Document Production chapter in the System Administrator’s Guide for more information.
Creating Business Style Documents #
Business Style Documents are created from a single object in SICS, such as a business, or claim. The information shown in these documents is taken mostly from this object.
To create a business style document:
- Open the Business or claim in SICS.
- On the Navigation bar, click the ‘Produced Documents’ button. You see the Document List window listing all previously produced documents for that object.
- Click in the Document List window and select New from the pop-up menu. You are presented with the available document types (sub-categories), which are set up by your System Administrator.
- Select a document type. If any templates are set up for that type, they will appear in the lower part of the window.
- If more than one template is available for the type you have selected, you will have to select which template you wish to use. If only one template is available it will be automatically selected. If no templates are available, contact your System Administrator.
- Click ‘OK’. Note! Two special types of documents (Risk Profile per Retrocessionaire and Loss Advice per Retrocessionaire) have been made available for facultative business, which allow the user to create outward business documents from an inward business. Selecting these document types will produce one document per facultative retrocession. The produced documents will be available from the document list on inward business.
Once the document has been produced you are returned to the Document List window. Double-click the document to view it. If you right-click your document a pop-up menu appears, giving you the option to print directly from SICS. We suggest that you open the document before printing to check the content of the document.
Creating Accounting Style Documents #
Accounting Style Documents are more complex as calculations have to be performed to generate figures for the document. These calculations may repeat over many objects. For example one accounting document may contain figures in many currencies, from many insured periods including many classes of business.
To produce documents from an accounting order:
- Go to the respective accounting order in SICS.
- Click the ‘Menu’button in the lower right corner of the window.
- Select Produce Documents from this menu. There are no choices to make, as each accounting Order knows which documents it should produce. You will be presented with a dialog when the documents have been produced.
Note! One exception to step 3 is the Treaty Outward/Fac Accounting Order, where you will be presented with a option of available document types before continuing.
Due to the complexity of these documents, this process will vary in time depending on the number of businesses present and the type of Accounting Order being run.
To view the documents that have been created, click the ‘Menu ‘button and select List Documents. You see the Document List window, which can be used as in the Creating Business Style explained earlier.
Attach Produced Document to Email #
Produced document(s) e.g. for a business can be automatically attached to a new mail in current user’s default Email client.
- Open e.g. a business and click on the Produced Documents icon to open the Document List
- Highlight wanted document(s)
- Select Attach to Email from the pop-up menu
Log Activities #
The log function in SICS enables you to see what has been changed, when it was changed and by whom.
Depending on how the system has been set up by your system administrator, you may have one of the two below log functions:
- Log Changes
The system does NOT log the first created version of an object, (for example, the deduction conditions), but as soon as a change is made to this version, the system logs this. The system offers this log facility throughout the whole system. For example, for conditions, insured period, classifications, business partners, claims, insurable object (person) and system parameter maintenance.
- Log Condition after Booking
The system logs changes done to a business condition, but not before at least one booking has been made on the business.
To view a log:
- Select ‘Log View ‘from the Log menu at the top of the window.
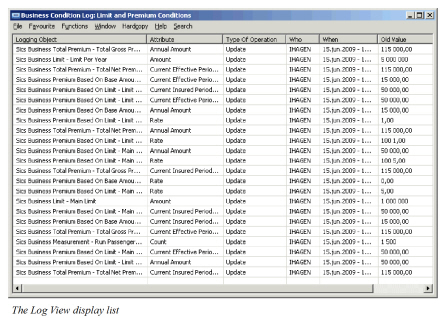
| Field | Description |
|---|---|
| Logging Object | In which area the log is created e.g. Business Condition, Insured Period, Business Partner, System Parameter |
| Attribute | The specific field that is changed. |
| Type of Operation | Indicates if the change is an update, delete or insert |
| Who | Who made the change (SICS User) |
| When | When the change was made, date and time |
| Old Value | Value before the change |
| New Value | Value after the change |
The Log View display list can be organised in different ways, Interrupt a Search Process.
Online Help #
SICS uses HTML help, making it easier for you to navigate through the online help files. Depending on how your SICS System Administrator has set up your help options, you can either access online help through SICS, or you can double-click a help icon on your desktop (separate from SICS) to access help files for SICSEor both.
On-line help is available in SICS by:
-
Selecting Help from the Menu bar (where applicable),
Or
-
Clicking the ‘F1’ button
Or
-
Selecting Help from the pop-up menu (where applicable)
Or
-
Clicking the ‘Help’ button of the SICS desktop
-
Double-clicking a SICS help icon on your desktop (separate from SICS).