Create and Define a Portfolio Program
The Multi GAAP module consists of several components. First there is a level of business called Portfolio Program. With the Portfolio Program you can structure your business and group it into portfolios. This is done by assigning individual sections of the assumed business to a hierarchical structure of the Portfolio Program. The hierarchical structure of the Portfolio Program is built using the section structuring facility. The reason for using the Portfolio Program is to:
- Have an overview of the financial result of your businesses.
- Provide and maintain certain values (like estimation patterns) to the attached businesses.
- Make adjustments to the estimations on the attached businesses.
- Calculate Loss Ratios for the defined portfolios
One of the main purposes of the Multi GAAP module is to do estimations. These estimations can be done for different combinations of base companies, coverage classifications, reporting units, etc and for different estimation items such as premiums, deductions and claims. For each business the user can enter estimations and for every business condition the estimations can be entered on the main section, section, or subsection level. These estimations are booked by an automatic calculation order. To make things easier, you do not have to enter single estimations. The system calculates the estimations, using predefined calculation rules maintained in the System Parameters, and you can overwrite them (although this is not usual).
The Portfolio Program is an overview of all assumed business belonging to the same business segment. You can enter default patterns (for example, premium earning patterns) for the assumed businesses that are linked to the portfolio program, or you can view and adjust estimations made at assumed business level.
Sections are used for structuring the portfolio. When you create a portfolio program, you create sections to reflect the various follow up levels of the business portfolio. The classifications for each section are entered accordingly.
In conjunction with the estimation facilities, it can be a tool for budget planning of assumed business at a high level. This is possible by using the business conditions on the portfolio program.
To create a Portfolio Program:
- Open the Find: Business window.
- Click in the display list and select New from the pop-up menu, or click the Create New button. You open the Create New Business wizard.
- Type a Portfolio Program title in the Title field.
- Select Portfolio Program from the Level of Business drop-down list.
- Select a main currency from the drop-down list.
- Enter the From date and To date for the Insured Period. A From and a To Time, which you can edit automatically appear. An Underwriting Year based on the From Date of the Insured Period also automatically appears.
- Click Next. You see the Assign Business Partner window.
- Click the Reinsurer button to select a base company.
- Click the Cedent button to select the cedents. You can add several cedents.
- Click Next. You now see the Classification window.
- Add the classifications for each of the categories in the list.
- Click Next. You see the Business Identifier window, which is the last window in the Create New Business wizard.
- Click Finish. You see the Property window, Highlights tab for the Portfolio Program.
Maintain Business Highlights and Structure #
A Portfolio Program looks like an ordinary Assumed Business. In the upper part of the window it has the same tabs etc. The Business Condition buttons are not the ordinary set since only some of these are visible. A Portfolio Program can have many consecutive validity periods. For example, for each underwriting year or financial year it can have one validity period. Each validity period has individual conditions.
Use the navigation buttons to change between validity periods.
The underwriting year is determined by the start date of the validity period. The inception date is the start date of the first validity period.
Keep an Overview over All Sections #
On the Structure tab it is possible to have an overview of all sections in the Portfolio Program. It is also a shortcut to each section with the specific coverage classifications reflecting the business portfolio of the attached Assumed Business.
Use Business Information #
On the third tab of the Portfolio Program you can enter identification information. This includes the Business ID and the Title. The Business ID cannot be changed after the Portfolio Program is created. It is automatically determined by the system.
The account group can be used to group Portfolio Programs together with Assumed Business.
Determine the period of the Portfolio Program through the validity period.
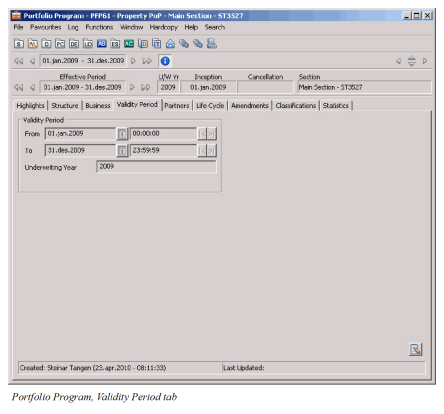
The validity period is used to determine the underwriting year. The underwriting year of a Portfolio Program is used to show the user which underwriting years the attached businesses has.
Field Descriptions
Validity Period From: The start date and time of the Portfolio Program period. All Assumed Business matching the other criteria can be attached if the insured Period starts within the Validity Period.
Calculation: Manual entry
Validations: Checks standard SICS date functionality. The Insured Period Start Date of the Assumed Business must be within the Validity Period From and To date.
Values: Date
Functional Impact: Help linking Assumed Business to Portfolio Program
Validity Period To: The end date and time of the Period of the Portfolio Program. Assumed business must have a Period Start date less than or equal to this date if it shall be linked.
Calculation: Manual entry
Validations: Checks standard SICS date functionality. The Insured Period Start Date of the Assumed Business must be within the Validity Period From and to date.
Values: Date
Functional Impact: Help linking Assumed Business to Portfolio Program
Underwriting Year: The Year of the start date of a validity period covered by the Portfolio Program.
Calculation: Created from Year in Validity Period From. Manually entered.
Validations: Year within standard SICS functionality. Checks against the year of the attached business.
Values: Year
Functional Impact: Help linking Assumed Business to Portfolio Program
The validity period can be prolonged with an extension amendment that has an effective period that is ending after the validity period to date. To change the Validity Period as follows;
- Click theValidity Period tab.
- Click the Edit button.
- Select Edit.
- Change the Validity Period To date.
- Click OK to save the new setting.
Set the Re-insurer to be the Base Company of the Portfolio Program #
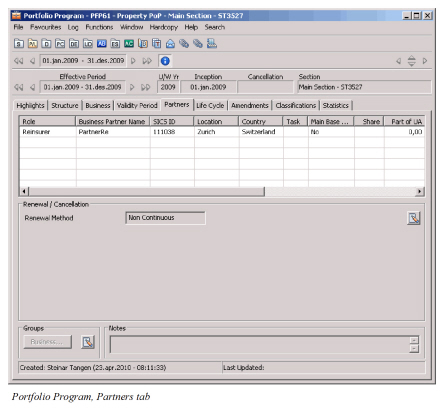
On the Partners tab of the Portfolio Program you can only choose Re-insurer (Base Company) as Business Partner role. The renewal method is used when a new validity period is created.
The setting of the Base Company is done in the New Business Wizard, and shall not be edited.
Initiate Life Cycle on Portfolio Program #
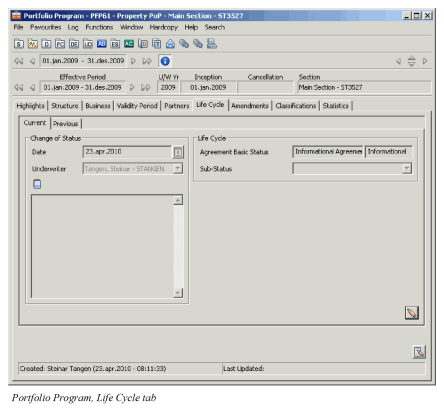
A Portfolio Program is an information agreement and it can only have an Informational life cycle status.
You can use the Edit Menu button to renew or copy a Portfolio Program. This creates a new validity period. The new validity period does not have to start at the end of the old period. To renew a Portfolio program do the following:
- Click Edit Menu button
- Select Renewal alternatively Copy to New Business.
- Follow the steps in the Renew business wizard or
- Type the required data in the Copy to new business window.
Set the Classification Criteria to Match the Business #
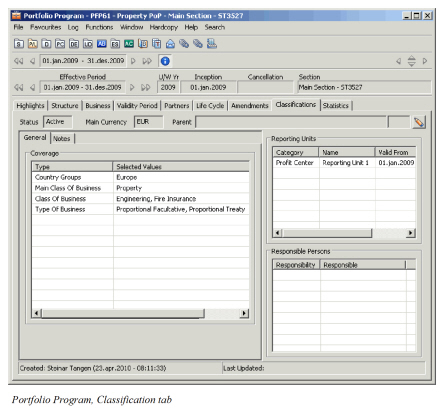
The Selected Values made on each Type in the Coverage window reflects the scope of the business that is covered by the Portfolio Program. For each section of the Portfolio Program you can determine the exact classification. The exact classification shall then mirror the portfolio of business that you want to analyse. Select any of the available classification categories. Select one or more reporting units. To define classifications do following steps:
- Click the Classification tab.
- Double-click in the left window.
- Select the classification you want to update by double-click the classification.
- In the selection window, transfer all values that shall be used to the selected part of the window.
- Click Save. And then click OK.
For information about the Amendments/Renewal and Online Statistics tabs, see the SICS User Guide.