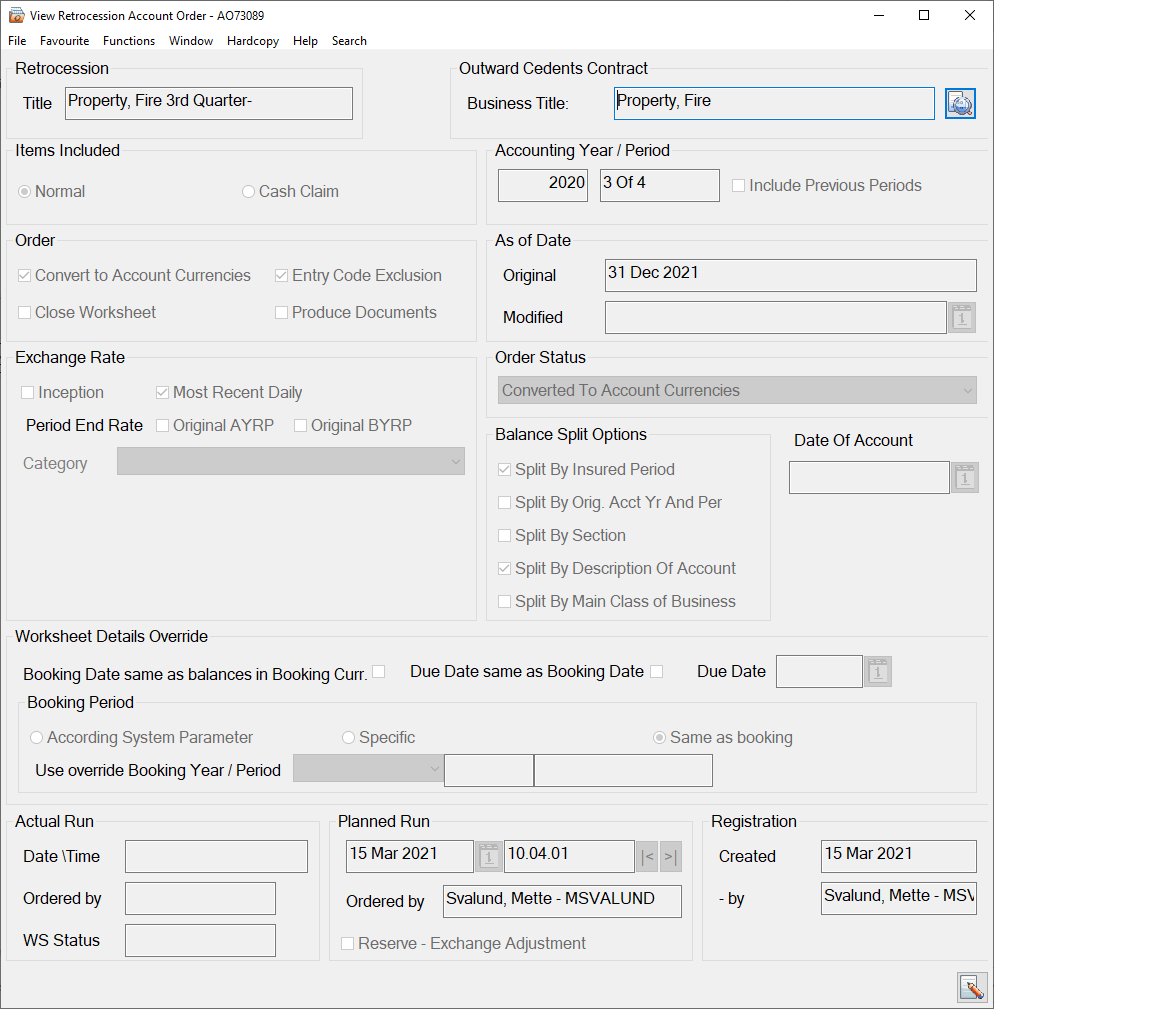
The Retrocession Account Order
To be able to convert figures from the Booking currencies to the Account currencies for the Retrocessionaire Participation’s (ORP’s), the Retrocession Account order has to be created and run. The conversion to Account currency is done according to Currency Transformation Terms entered on the Outward Cedent’s Contract (OCC) Administration Conditions and the Exchange Rate definitions on the order. The balances in Account currency are booked in the as account business ledger for each ORP. In addition, the balances are booked in the Business Partner Ledger for the ORP or Intermediary. Which Business Partner Ledger depends on the assignment of the payment task.
When converting the figures to Account Currency(-ies), the system may book a Reserve adjustment amount representing the change in the Exchange Rate from the previous Account(s) within the same Accounting Year as the one defined on the order.
The Reserve adjustment amount may be (dependent on the trace options) be included in the ordinary Reserve figures in Account Currency or not. To be able to differ the Reserve adjustment amount from the ordinary Reserve amount in Account Currency, the Reserve adjustment has a different pairing type (Placements to Accounting - Exchange Rate Adjustment). For more information of how to define the Reserve adjustment to be calculated - refer to field ‘Reserve - Exchange Adjustment’ on the Retrocession Account Order.
Technical Account and Statement of Account documents to be sent to the ORPs are produced from the Retrocession Account order. The Technical Account may be produced for the Retrocessionaire Participation’s and/or Intermediary Placements (summary/separate accounts) for their share percentage, shown either as an ordinary share percentage or as an alternative share percentage only used in document production (refer to field Alt. Share On Tech. Acc. on Share Conditions). In addition the following documents are produced if conditions and frequency apply; Profit Loss Account, Loss Participation Statement and Sliding Scale Commission Statement.
Create and Run a Retrocession Account Order #
- Open the Administration Conditions of the OCC for which the account order is to be created.
- Select the Account no. to be processed from the Account tab.
- Select Create Retrocession Account order from the menu. A New Retrocession Account order window appears.
- Define the different fields of the order. (Refer to the field description below.)
- Select Run Now from the menu.
- Select Edit from the menu if the order needs modifications. Select Run Now again to rerun the order.
The basis for each Retrocession Account order is the ORP business ledger in booking currency. Only the figures booked from Retrocession Calculation orders for the same Account no. as the Retrocession Account order being run, is basis. If previous Retrocession Account order has been run for the same Account no., only new as booking figures for the same Account no. are being processed.
Note! It is recommended to create and run accounts in sequence.
| Field | Description |
|---|---|
| Title | A title making it easy to find/identify the specific order among other orders in a list, i.e. from the Find: Accounting order window. Values: Free text. Functional Impact: Search criterion in the Title field in the Find: Accounting order window. |
| Business Title | The title defined on the OCC business. (The detail button next to the fields displays the Business ID and Insured Period/UW years). Values: Text Derived from: The title field in the Business tab of the OCC |
| Items Included - Normal | All bookings are extracted from the ORP as booking ledger and used as basis when converting to account currencies. Also Cash Claim bookings are extracted if included in basis. Select this option for all accounts not being specific Cash Claim accounts. Values: Yes, No Default: Yes |
| Items Included - Cash Claim | Bookings made with Entry Codes included in the Entry Code Category/Sub Category Cash Claim are extracted from the ORP’s as booking ledger and used as basis for booking in ORP’s business ledger in account currency. Select this option if the account is a Cash Claim account and only Cash Claim amounts are to be included in the calculations. Values: Yes, No Default: No |
| Items Included - Special |
Only bookings on worksheets marked with the ‘Special’ flag are extracted from the ORP’s as booking ledger and used as basis for booking in ORP’s business ledger in account currency. Select this option if a special account is to be produced to the retrocessionaire participations. This option is activated by a system parameter. Refer toMark a Worksheet Special for the Document Production in Retrocession Accounting". Values: Yes, No Default: No |
| Accounting Year/Period | The Year and Period the account applies for. Values: Accounting Year: Year value (yyyy), Accounting Period: 3rd of 4,02nd of 2, 1st of 12, etc. Derived from: The Account no. selected and the Account frequency defined in the OCC Administration Conditions. E.g. Account no. ‘3/2004’ and account frequency Quarterly => Accounting Year/Period ‘2004, 3rd of 4’. Functional Impact: The ORP business ledger in account currency is updated with the Accounting Year/Period values both on Balance- and detail level. |
| Include Previous Periods | Selected: Deselected by Default. When running the Retrocession Account Order the system will extract bookings on the As Booking ledger that has an Accounting Year/Period that is Equal to or smaller than the Accounting Year and Period on the order, and has not been included in Retrocession Account Order before. ALL types of bookings on previous periods, that has not been included in a Retrocession Account order before, will be included e.g. bookings created by the UPR order. Cleared: Retrocession Account Order will not include previous bookings and separate Account order will be required to run for previous accounting year/periods. Relevant when: When e.g. the UPR bookings created on Accounting Year/Periods that has already been processed by a Retrocession Account order, then the next Retrocession Account order will still include these UPR details. |
| Order - Convert to Account Currencies | Selected: Selected by default. The step of the Retrocession Account order where booking currencies are converted to account currencies is activated. The conversion is done according to Currency Transformation Terms defined in the Administration Conditions of the OCC and the Exchange Rate definitions of the order. Cleared: No impact - the conversion from booking currencies to account currencies is performed when running the order. Relevant when: Select the option whenever bookings in booking currencies are to be converted to account currencies. |
| Order - Entry Code Exclusion | Selected: Selected by default. All Entry Codes having the flag ‘Is Excluded from Documents’ selected will be excluded from the order. (The flag may only be set on Entry Codes not affecting the liquid balance. The Entry Code flags are maintained by your system administrator.) Cleared: Entry Codes are not excluded from the order. Relevant when: Select the option when you want the order to exclude Entry Codes having the flag Is excluded from Documents selected. |
| Order - Close Worksheet | Selected: The worksheets created for the ORP business ledgers in account currency are closed. If open worksheets are to be closed without further conversions, you select the Close Worksheet check box alone before running the order. Once the worksheets are closed, it is not possible to rerun the order. Note! In case the ORP business is linked to an Intra Group Assumed Business the bookings in the closed worksheet will be copied to the linked Assumed Business. Cleared: Cleared by default for a new order. The worksheets, created for the ORP business ledger in account currencies, have the status Open when the order is run. It is possible to rerun the order. Relevant when: Select the check box when you are sure that the As Account figures are correct and you want to close the worksheets. Do notselect the check box if you want to control the figures booked to the as account ledger and possibly rerun the order. |
| Order - Produce Documents | Selected: Technical Account- and Statement of Account documents are produced. In addition, if conditions and account frequency apply, other documents such as Profit Loss Account, Loss Participation Statement and the Sliding Scale Commission Statement, are produced. The documents are only produced if worksheets are being closed in the current run of the order. If ‘Items Included’ is ‘Special’ only Technical Account and Statement of Account are available. Cleared: Cleared by default for a new order. No documents are produced running the order. Relevant when: Select the check box when documents are due for production. |
| As of Date - Original | The Account’s as of date, normally the Accounting Period To- date. Values: A date (mm/dd/yy) Derived from: The Acct. as of date registered for the account in the Administration Conditions of the OCC. Mandatory: Yes |
| As of Date - Modified | An Account as of date that has been changed from the original date. Values: Free input of a date value (mm/dd/yyyy) Functional Impact: If the account’s as of date is to be printed in any of the documents, this value will replace the original value otherwise printed. Mandatory: No |
| Exchange Rate - Inception | Selected: The rate valid as per inception date of the OCC business is used converting booking currencies into account currencies. If Inception is defined as exchange rate condition in the Currencies/Entry Codes tab of the Administration Conditions, the check box is selected as default when the order is created. The Inception option is active if Inception Rate accounting is allowed. (Activated by your System Administrator.) Cleared: The Category field and an additional Day/Year field are enabled/displayed. The Most Recent check box is activated. Relevant when: Select the check box when you want the booking currencies to be converted to account currencies using the rate valid as per the OCC’s inception date. |
| Exchange Rate - Most Recent Daily | Selected: Most Recent Daily Rate is used converting booking currencies to account currencies. If Most Recent Daily Rate is defined as exchange rate condition in the Currencies/Entry Codes tab of the OCC’s Administration Conditions, the check box is selected by default when the order is created. Cleared: The Category field and a new Day/Year field are enabled/displayed. The check box Inception is enabled if Inception rate accounting is allowed. (Activated by your System Administrator.) Relevant when: Select the check box when you want the booking currencies to be converted to account currencies using the Most Recent Daily rates. |
| Exchange Rate - Category | For each Type of Exchange Rate (Day-/Period-/Year Rate), Exchange rate Category(ies) is/are defined. Exchange rates are defined per Category. Values: Daily Rate, Provisional Year End Rate, Year End Rate Functional Impact: The selected Category in combination with the defined Day/Year value determines the Exchange Rate to be used converting booking currency to account currency. Mandatory: No |
| Exchange Rate - Day/Year | A Day- or Year value used to determine which exchange rate to be used. Values: Day: Free input of value (mm/dd/yyyy), Year: Free input of value (yyyy) Derived from: Day: The category Daily Rate/ Year: The categories Provisional Year End Rate and Year End Rate' Functional Impact: The Day/Year value determines, in combination with the selected category, which exchange rate to be used converting booking currency to account currency. Mandatory: Only if a Category is defined. |
| Period End Rate - Original AYRP | When selected, the End Period Rates valid as per the Original Accounting Year and Period of the booking detail are used converting bookings from booking currency to account currency or when calculating the Profit/Loss converted to main/base currency. Values: Selected or Cleared. (The check box is only enabled if the system parameter Convert Figures to Account Currency According to Orig Acc Year and Period is active. (Defined by your System Administrator).) Default: Cleared Mandatory: No Functional Impact: For Outward Proportional treaty business: Retrocession Calculation order, Retrocession Calculation Group order, Retrocession Account order, Retrocession Account Group order. |
| Period End Rate - Original BYRP | Selected: The End Period Rate valid as per the original booking year/period of the ORP booking details in booking currency is used to convert the booking details into Account Currency. If Period End Rate - Original BYRP is defined as exchange rate condition in the Currencies/Entry Codes tab of the Administration Conditions, this Exchange Rate option is selected as default when the order is created. Cleared: The Most Recent check box is activated. Relevant when: Select the check box when you want the booking currencies to be converted to account currencies using the End Period Rate valid as per the Original Booking Year/Period of the ORP ‘as Booking’ detail. Note that this Exchange Rate option is dependent on the system parameter Keep Booking Year/Period from the Source Business being activated. (Refer to System Administration Guide for more information). |
| Order Status | The status of the order Values: Converted to Account Currencies, Document Produced Functional Impact: Updates the Status field of the selected account no. in the Administration Conditions of the OCC. Mandatory: Yes |
| Balance Split Options - Split By Insured Period |
Selected: All balances are split by Insured Periods when booked on the ORP business ledger in Account currency. The check box is selected by default. Cleared: All Insured Periods are included in one balance. Relevant when: Select the check box when you want the system to split balances per Insured Period. |
| Balance Split Options - Split By Org. Acct. Yr and Per |
Selected: All balances are split by Original Accounting Year and Period when booked on the ORP business ledger in Account currency. Cleared: All Accounting Years and Periods are included in one balance. The check box is cleared by default Relevant when: Select the check box when you want the system to split balances per Original Accounting Year and Period. |
| Balance Split Options - Split By Section |
Selected: All balances are split by Sections when booked on the OCC- and ORP business ledgers in booking currency. Cleared: All Sections are included in one balance. The check box is cleared by default. Relevant when: Select the check box when you want the system to split balances per Section. |
| Balance Split Options - Split By Description of Account |
Selected: All balances are split by Description Of Account when booked on the OCC- and ORP business ledgers in booking currency. Cleared: All Description Of Account are included in one balance. The check box is cleared by default. Relevant when: Select the check box when you want the system to split balances per Description of Account. |
| Balance Split Options - Split per Main Class of Business |
Selected: All balances are split by Main Class of Busines when booked on the ORP business ledger in Account currency. Cleared: All Main Class of business included in one balance. The check box is cleared by default. Relevant when: Select the check box when you want balances to be Split based on Main Class of Business). |
| Date of Account | A date that overrides the default date of account. Values: A date (mm/dd/yyyy) Functional Impact: Updates the default Date of Account printed in the documents. The default value is the date when the documents are produced. Mandatory: No |
| Worksheet Details Override - Booking Date same as balances in Booking Currencies | Selected: The default booking date, today’s date, is overridden by the Booking Date from the ORP business ledger in booking currency when bookings are made to the business ledger in account currency. Cleared: The default Booking Date value, today’s date' is updated in the ORP business ledger in account currency. Relevant when: Select the check box when you want the Booking Date in Account Currency to be the same as in Booking Currency. Validations; Checked against values defined in system parameter Accounting, Booking Dates selected by your System Administrator. If not within values according to system parameter, today’s date is allocated to the bookings. |
| Worksheet Details Override - Due Date same as Booking Date | Selected: The default due date is overridden by the booking date and updated in the ORP’s business ledger in account currency. The default due date is the date from the Payment Cedent column in the Administration Conditions of the OCC for the selected account. The Worksheet Details Override - Due Date field is disabled. Cleared: The Due Date updated in the ORP’s business ledger in account currency running the Account order is either the default value (the Payment Cedent date) or another date defined to override the default value. Relevant when: Select the check box when you want the system to use the booking date as due date, e.g. in case of an overdue account being processed. |
| Worksheet Details Override - Due Date | A date to override the default Due Date. (The Payment Cedent date defined in the Administration Conditions of the OCC for the account being processed.) Values: Date value (mm/dd/yyyy) Functional Impact: Updates the Due Date field of the RP’s business ledger in Account Currency. Mandatory: No |
| Booking Period - According System Parameter | Selected: The Booking Year and -Period defined as Default Value for Local Booking Terms in the Base Company Specific Settings. The booking terms are defined by your System Administrator. The default value is selectable in the Use Override Booking Year/period field and updates the RP’s business ledger in account currency. Cleared: Specific or Same as Booking is defined. Relevant when: Select the check box when you want the system to use the default booking year/period when updating the RP’s business ledger in account currency. |
| Booking Period - Specific | Selected: You must select the Booking Year Period in the Use Override Booking Year/Period field. You may select between the Open Booking Year and Periods for Local defined by your System Administrator in the Base Company Specific Settings. The Booking Year/Period selected is updated in the RP’s business ledger in account currency. Cleared: According System Parameter or Same as booking is defined. Relevant when: Select the check box when you want to define a specific Booking Year/Period among the available/open periods. |
| Booking Period - Use override Booking Year / Period | Booking Year/Periods selectable according to According System Parameter or Specific being defined. Values: Drop-down list of values (yyyy, Month xx) Functional Impact: Selected value updates the Booking Year/Period fields in RP’s business ledger in account currency. Mandatory: Only if According to System Parameter or Specific is selected |
| Booking Period - Same as booking | Selected: The Booking /Year period values updated in the ORP’s business ledger in Account Currency are the same as in Booking currency. Cleared: The According to System Parameter or Specific is defined. Relevant when: Select the check box if the Booking/Year Period in account currency should be the same as in booking currency. |
| Actual Run - Date/Time | A date- and time field updated each time the order is run. Values: Output of Date (mm/dd/yyyy) and Time (hh:mm:ss PM/AM) Functional Impact: When the order is run with the order step Close Worksheet selected, the Account’s Closed Date field in the Administration Conditions is updated with the Actual Run Date. Mandatory: Yes |
| Actual Run - Ordered by | The name of the person who runs the order Values: Full name and Logon ID Derived from: The register of System Users in SICS Mandatory: Yes |
| Actual Run - WS Status | The status of the worksheets produced when the order was last run. Values: Open, Closed Derived from: The status is open until the order is run with the Close Worksheet check box selected. Mandatory: Yes |
| Planned Run | A date- and time field to indicate when the order is planned to be run. Values: Date (mm/dd/yyyy) and Time (hh:mm:ss PM/AM) Default: The date and time when the order was first created from the Administration Conditions. Functional Impact: The order is listed among Retrocession Accounting Run Due orders with the Planned Run Date & Time if the order is created/modified but not yet run/rerun. Mandatory: Yes |
| Planned Run - Ordered by | The name of the person who created the order Values: Full name and Logon ID Derived from: The register of System Users in SICS Mandatory: Yes |
| Planned Run - Reserve - Exchange Adjustment |
Selected: You must select this field if you want to have Reserve figures adjusted according to the Exchange Rate defined for the current order. Cleared: Existing Reserve figures are not adjusted according to the Exchange Adjustment of the current order. Relevant when: Select the check box when you want the system to calculate the Reserve Adjustment amount, representing the change in Exchange Rate from one Account to the next Account, booked to the ORP Business Ledger ‘as Account’. The calculation of the Reserve adjustment amount is limited to the Accounting Year equal the year defined on the order only. Mandatory: No |
| Registration - Created/ - by | The date when the order was first created and the name of the person who created the order Values: Created = Date (mm/dd/yyyy), by = full name and logon ID Mandatory: Yes |
| Special | Only bookings on worksheets marked with the Special flag are extracted from the ORP’s as booking ledger and used as basis for booking in ORP’s business ledger in account currency. Select this option if a special account is to be produced to the retrocessionaire participations. This option is activated by a system parameter. Also Refer to Mark a Worksheet Special for the Document Production in Retrocession Accounting, chapter 12 - Accounting, Technical Worksheet part Values: Yes, No Default: No |
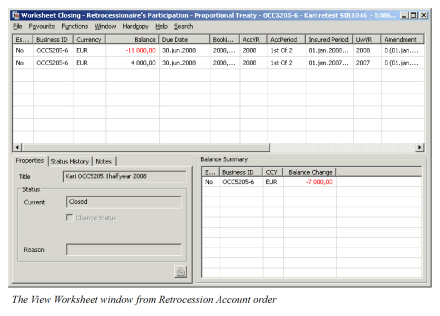
View Worksheets from a Retrocession Account Order #
When the order has been run, the produced worksheets can be inspected directly from the order.
- Create and run a Retrocession Account order.
- Select View Worksheets from the order menu. The View Worksheets window appears.
- Select the Worksheet you want to inspect and select View Worksheet from the pop-up menu. The Worksheet Closing window appears.
- In order to inspect the booking details of the balance, select a balance and select View Balance Details from the pop-up menu. The View Balance Details window appears.
In the View Worksheet window a worksheet is produced per Business ID. You are allowed to access the Business Properties and Business Ledger for these businesses by selecting Business Properties or Business Ledger from the menu.
To open the balance details window for a balance, select the balance from the Worksheet Closing window and select More Balance Information. You are allowed to do the following from the More Balance Information window in edit mode:
- Select the Include in Statement check box.
- Update the Cedent/Broker reference.
- Update the EDI reference field.
- Create/Edit or Delete Expected Payment.
(For further information about the More Balance Information window, see the chapter The Business Ledger.)
(For further information about the Worksheet Closing window, see the chapter Manual Bookings on a Worksheet.)
| Field | Description |
|---|---|
| WS ID | The Worksheet IDs created per Business Id from running the order. Values: Prefix + number, e.g. R101 Derived from: A Worksheet Identifier Serie predefined for the Type of Worksheet Retrocession by your System Administrator in the System Parameters. Mandatory: Yes |
| WS title | (Not relevant for automatically produced worksheets.) |
| WS origin | Describes the origin of the worksheet, hence also in which step of the retrocession booking process the worksheet is. Values: REAC Account Mandatory: Yes |
| Business Id. | The IDs of the different businesses for which the worksheets are produced. Values: Business IDs for RP businesses (For example: OCC100-1 and OCC100-2) Mandatory: Yes |
| Registration Date | The date when the worksheet was created/updated Values: Date value (mm/dd/yyyy) Derived from: The Actual Run Date field from the order. Mandatory: Yes |
| Status | The current status of the worksheet Values: Open, Closed Derived from: The WS Status field from the order Mandatory: Yes |
| Notes | (Not relevant for automatically produced worksheets.) |
| Bookings | The number of booking details included in the balance.Values: A number Mandatory: Yes |
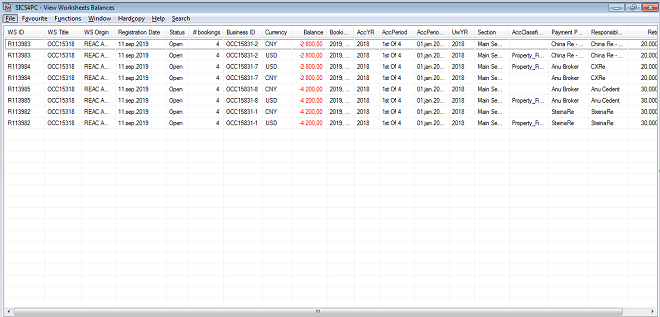
View ALL Balances created by Retrocession Account Order #
Sometimes, the numbers of the produced worksheets may be very large, and the information on the view worksheets window is in some situations, not enough for the users to filter what they want.
In these situations you can choose the option View Worksheets Balances. Through this option, the system can show the balances for ALL Businesses and ALL Worksheets created by the order in the same overview.
You can view all these balances directly from the order:
-
Create and Run a Retrocession Account order.
-
Select View Worksheets Balances from the order menu button. The View Worksheet Balances window appears.
-
For each balance found on the worksheets created by this order, the following information is displayed, which combines the information on View Worksheets window and Worksheet Closing window. (The detailed fields description can found on those two windows)
- WS ID (Worksheet Id)
- WS Title (Worksheet title)
- WS Origin (Worksheet origin)
- Registration Date
- Status
- #Bookings (number of details in the balance)
- Business ID
- Currency
- Balance (Balance amount)
- Booking Year/Period - Local
- AccYR (Accounting Year)
- AccPeriod
- AccPeriod From - To
- UWYR (Underwriting Year) - if more than one Underwriting Year is found on the details within a balance the field is blank and the user can see the values by drop down the list
- Section - if more than one Section is found on the details within a balance the field is blank and the user can see the values by drop down the list
- AccClassification - if more than one Accounting Classification is found on the details within a balance the field is blank and the user can see the values by drop down the list
- Payment Partner - blank for the balances on the OCC
- Responsible BP - blank for the balances on the OCC
- Retroceded% (the signed share of the ORP) - blank for the balances on the OCC
- WS ID (Worksheet Id)
-
In order to inspect the booking details of the balance, select a balance and select View Balance Details from the pop-up menu. The View Balance Details window appears from where you can navigate to the More Detail Information window.
-
In order to open the balance properties window for a balance, select the balance and select More Balance Information from the pop-up menu. The Balance Properties window appears.
-
You are also allowed to access the Business Properties, Online Statistics, Claim Properties for these businesses by selecting the corresponding options from the pop-up menu.
Inactivate Worksheets from a Retrocession Account Order #
You are allowed to inactivate the worksheets produced from a Retrocession Account order if the status of the worksheets is Open.
- Create and run the Retrocession Account order without closing the worksheets.
- Select Inactivate Worksheets from the order menu.
- A confirmation message appears asking if you want to continue. Select Yes to confirm or No to cancel.
The order is inactivated along with the worksheets.
Copy a Retrocession Account Order #
You can make a copy of a Retrocession Account order. This may be relevant when you want to create a new order for the same business and Accounting Year/-Period as defined in the source order.
- Open an existing Retrocession Account order.
- Select Copy to from the menu of the order.
- A New Retrocession Account order is created.
Compared with a New Retrocession Account order created from the Administration Conditions, more fields are predefined in the copied order.
Access the Business Ledger from a Retrocession Account Order #
You may access the Business Ledger of the RP businesses directly from the order or via the View Worksheet window. If you want to open the business ledger for a specific RP, not only the 1st RP, you should navigate via the View Worksheet window.
To open Business Ledger from order menu:
- Create and run the Retrocession Account order, or open an existing order.
- Select Business Ledger from the menu of the order.
- The business ledger for the 1stRP, for which worksheets are produced, is opened.
To open Business Ledger from View Worksheets window:
- Create and run the Retrocession Account order, or open an existing order.
- Select View Worksheets from the menu of the order.
- Select the WS ID/Business Id for which the Business Ledger is to be opened.
- Select Business Ledger from the menu.
Note! If your order has the status Open you have to change the WS Status of the Business Ledger from Closed to Open in order to view the worksheets produced from your order.
(Refer to the section The Business Ledger for further information about business ledger details.)
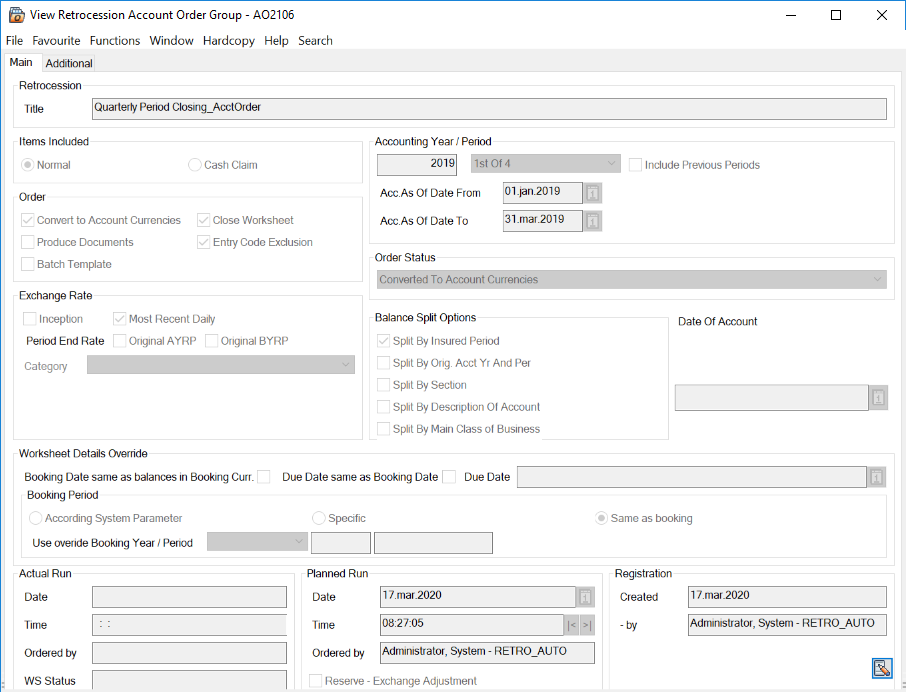
Create and Run a Retrocession Account Group Order #
You can create and run Retrocession Account orders as a group. OCC businesses, for which retrocession account orders are to be run, are defined in a Retrocession Group order. Individual orders per included OCC are automatically created and run in sequence from the group order. The same Accounting Year/-Period must apply for all individual orders.
- Open the Find: Accounting order window from the Accounting folder on the desktop.
- Select New from the menu/Create New. The Order Type Selection window appears.
- Select Retrocession in the drop-down list, select Account Group Order from the list and click OK. A New Retrocession Account Group order appears.
- Select Add Business or Add Group from the menu in Identifier/Business Title/Bouquet Calc.Group Name/Type display area. Dependent on the selection, the Find: Business or the Find: Business Groups window appears.
- Search for Business/Business Group. Businesses are automatically transferred to the order upon selection.
- Define the fields of the order. (Refer to the Field Descriptions below.)
- Select Create Orders from the order menu when the group order is created.
- Select Run Now to process the individual orders in sequence.
When Create orders is selected from the order menu, the individual orders are created with subsequent order numbers. The Order Title on the individual orders is generated from the Group Order ID + Title + Account As of Date. After the group order has been run the worksheets have to be inspected from each individual order. It is recommended to run/rerun the group order without closing the worksheets until the figures on each RP business ledger are correct.
The individual orders created from the Group Order can be edited and ran individually.
You can also create scheduled jobs for the individual orders created from the Group Order, by selecting the option Create Scheduled Jobs for Orders.
From the Retrocession Account Group order you can modify the different fields by selecting Edit from the order menu. Your changes are automatically updated by the individual orders. You may select to rerun the order until the worksheets are closed.
Select Inactivate Worksheets from the Group order menu to inactivate worksheets and the individual orders.
Request Scheduled Job Template #
When the Retrocession Account Order Group is flagged as a ‘Batch Template, a Job Template may be requested from the Retrocession Account Order Group;
- Select the field ‘Batch Template’ in section ‘Order’ on the Retrocession Account Order Group and fill in remaining fields
- Press OK button
- Select ‘Request Scheduled Job Template’ from the order menu
- Job Template window appears (refer to Scheduler, Job Templates for more information)
- If you want, you can change one or more of the default values
- Press the ‘Save’ button
- A Job Template is created and may be inspected from the Periodic Functions, Accounting Order Monitor or from the Schedules Jobs, Job Templates tab.
The Group Order Template holds the information needed to create orders (group order and single orders). Group order and single orders are created when the option ‘Copy to Actual Job’ is selected either from the pop-up menu for the marked Job Template in the Scheduler or in the Accounting Order Monitor (for more information refer to the Scheduler or the Periodic Functions)
The below fields are different from the fields of the individual Retrocession Account order. For description of the remaining fields of the order, see the table on page 13-51 above.
| Field | Description |
|---|---|
| Order - Batch Template |
Selected: The Retrocession Account Order Group is flagged as a ‘Batch Template’. Cleared: The Retrocession Account Order Group is an ordinary group order. Relevant when: Select this if you want to create a Job Template to manage a high number of Retrocession Account Orders. (From the Job Template it will be possible to automatically create group orders and single orders for the inlcuded Outward Cedent’s Contracts. Refer to Periodic Functions/Accounting Order Monitor for more information). Functional impact: Enables the menu option ‘Request Schedules Job Template’ |
| Accounting Year/Period | The Year and Period all individual accounts, created from the order, apply for. Values: Accounting Year: Year Value (yyyy), Accounting Period: All available accounting periods (1st of 12, 3rd of 4, 2nd of 3, 1stof 2, Yearly, etc.) Functional Impact: The account frequency of each business added to the business is validated against these values. Mandatory: Yes |
| Acc. As Of Date From | To be used together with the Acc as of dates on the Single Accounts in the Administration conditions of the Outward Cedent’s Contract as an extraction criteria when Retrocession Account orders are created and linked to the Account Group order. Values: Date (mm/dd/yyyy) that is equal to or less than the Acc. As Of Date To Functional Impact: If both an Acc. As Of Date From and To is given the system validates that the date in the field Acct as of on the Single Accounts in the Administration conditions of the Outward Cedent’s Contract is equal to or within the Acc. As Of Date From and To dates. Mandatory: No |
| Acc. As Of Date To | To be used together with the Acc as of dates on the Single Accounts in the Administration conditions of the Outward Cedent’s Contract as an extraction criteria when Retrocession Account orders are created and linked to the Account Group order. Values: Date (mm/dd/yyyy) that is equal to or higher than the Acc. As Of Date From Functional Impact: If only an Acc. As Of Date To is given the system validate that the entered date is the same as the date in the field Acct as of on the Single Accounts in the Administration conditions of the Outward Cedent’s Contract. If both an Acc. As Of Date From and To is given the system validates that the date in the field Acct as of on the Single Accounts in the Administration conditions of the Outward Cedent’s Contract is equal to or within the Acc. As Of Date From and To dates. Mandatory: Yes, this field and/or the Accounting Year/Period must be defined. It is also mandatory if the field Acc. As Of Date From is given. |
The below fields are different from the fields of the individual Retrocession Account order, and are placed on the ‘Additional’ tab. For description of the remaining fields of the order, see the table on page 13-51 above.
| Field | Description |
|---|---|
| Type ‘Base Company’ |
Select one or more Base Company/-ies to create orders for Outward Cedent’s Contract with the selected Base Company/-ies only |
| Type ‘Main Class of Business’ |
Select one or more Main Class(es) of Business to create orders for Outward Cedent’s Contract with the selected Main Class(es) of Business only |
| Type ‘Type of Participation’ |
Select one or more Type(s) of Participation to create orders for Outward Cedent’s Contract with the selected Type(s) of Participation only |
| Type ‘Reporting Unit’ | Select one or more Reporting Unit(s) to create orders for Outward Cedent’s Contract with the selected Reporting Unit(s) only |
| Business/Business Group display list | List of OCC businesses/Bouquet Calculation Groups Values: Identifier, Title/Name and Type (see below) Validation: A business/business group is only added if the Account frequency of each business (single or included in a business group) matches the Accounting Year/Period defined in the group order. Functional Impact: Individual retrocession Account order is created and run for each added business. Mandatory: Yes |
| Identifier | The OCC business Id if Add Business is selected. No identifier if Add Group is selected. Values: Prefix + number for OCC business |
| Business Title/Bouquet Calc.Group Name | The name of the OCC business and/or Bouquet Calculation Group Values: OCC business title/Group Name |
| Type | Defines if a business or a group is added Values: Outward Cedent’s Contract, Bouquet Calculation Group |
Copy a Retrocession Account Order Group #
When you want to create a new group order for the same businesses/group(s) as defined in the source group order, the easiest way is to copy an existing Retrocession Account Order Group.
To copy a retrocession account order group:
- Open a Retrocession Account Order Group.
- Select ‘Copy to’ from the Order menu.
You see a copy of the source retrocession account order group. Compared with a New Retrocession Account Order Group created from the Find: Accounting Order window, the following fields are predefined in the copied group order:
- Exchange Rate: Copied from the source order group.
- Items Included: Copied from the source order group.
- Order Status: Copied from the source order group.
- List of Businesses/groups: Copied from the source order group.
- Order fields: Copied from the source order group.
- Balance Split Options: Copied from the source order group.
Create a TechAccount Message #
Select the option ‘Create TechAccount message’ when you want to create an outbound TechAccount Message from the Retrocession Account Order. For more information refer to chapter 16.9.1 Create TechAccount Message from the Retrocession Account Order.
View a TechAccount Message #
Select the option ‘View TechAccount Message’ when you want to view an outbound TechAccount Message created from the Retrocession Account Order. For more information refer to chapter 16.9.1 Create TechAccount Message from the Retrocession Account Order.