Place Business
The protection might be placed through an intermediary, or it can be placed directly to a retrocessionaire. The 100% conditions will be inherited, with the ability to create special conditions per retrocessionaire. Refer to Enter Special Conditionson page 7-111 in this chapter for more information.
The Outward Cedent’s Contract and the belonging Retrocessionaires must have the same cedent(s). The same applies for XL CA Of Inward and XL CA Of Outward and their placements. If you need to add, edit or remove a cedent, the changes must be made on the parent business, and the changes are reflected on the placements.
Place Outward Cedent’s Contract #
|

Placements button | Click the Placements button on the Navigation bar of an Outward Cedent’s Contract to see the Placement window. |

This window is divided into two sections, one for Intermediary Placements, and the other for Retrocessionaire Placements.
Place to Single Retrocessionaire
Place the Outward Cedent’s Contract to a single retrocessionaire:
- Open the Outward Cedent’s Contract to be placed.
- Click the PL (Placement) button
- Select Add Retrocessionaire from the popup menu in the Retrocessionaire section
- Select a Life Cycle Status and select Next
- Assign a Retrocessionaire and select Next
- Enter a share. Click Next
- Enter Business Identifier details, if necessary
- Select Finish
Depending on the set up of your system administrator, you might be stopped from setting the life cycle status of the retrocessionaire to a definite one, unless mandatory information is present. In that case they must be present on OCC and inherited to the retrocessionaire.
If the Account Group defined on the Outward Cedent is an Outward Account Group (defined in system parameters), then the Account Groups is inherited to the Retrocession Participation and the Account Group field will be disabled for editing in the update Retrocession Participation business window.
Copy Retrocessionaire
Create a new retrocessionaire participation by copying an existing placement:
- Open Outward Cedent’s Contract, Placement window
- Select the existing placement that you want to copy from and select Copy Selected to Retrocessionaire from the popup menu
- Select a Life Cycle Status and select Next
- Assign a Retrocessionaire and select Next
- Enter a share. Click Next
- Enter Business Identifier details, if necessary
- Select Finish
Place to Intermediary
Place the Outward Cedent’s Contract to an intermediary:
- Open Outward Cedent’s Contract, Placement window
- Select Add Intermediary from the popup menu in the Intermediary Placements section
- Select a Life Cycle Status and select Next
- Assign a Broker and select Next
- Enter a share. Click Next
- Enter Business Identifier details, if necessary
- Select Finish
Depending on the set up of your system administrator, you might be stopped from setting the life cycle status of the intermediary to a definite one, unless mandatory information is present. In that case they must be present on OCC and inherited to the intermediary placement.
If the Account Group defined on the Outward Cedent’s Contract is an Outward Account Group (defined in system parameters), then the Account Group is inherited to the Intermediary and the Account Group field will be disabled for editing in the update Intermediary business window.
Place through Intermediary - Single Retrocessionaire
Place Outward Cedent’s Contract to a single retrocessionaire through an intermediary:
- Open Outward Cedent’s Contract, Placement window
- Select an intermediary and select Place Selected to Retrocessionaire from popup menu
- Select a Life Cycle Status and select Next
- Assign a Retrocessionaire and select Next
- Enter a share. Click Next
- Enter Business Identifier details, if necessary
- Select Finish
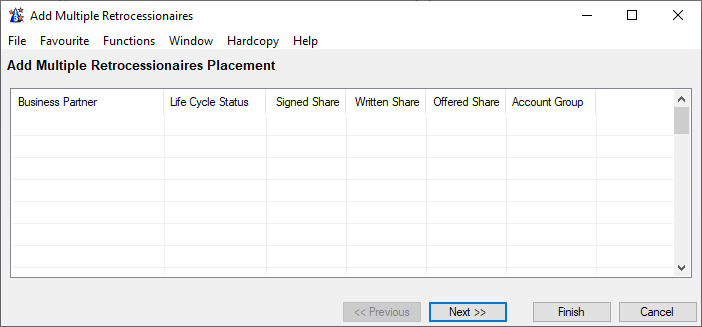
Place to Multiple Retrocessionaires
Place to several direct retrocessionaires on one go
- Open Outward Cedent’s Contract, Placement window
- Select Add Multiple Retrocessionaires from the popup menu
- Select Business Partner by using the Find facility or just enter business partner ID
- Select a Life Cycle Status
- Enter Signed and/or Written and/or Offered share
- Enter Account Group if necessary
- Click on the next row and select a new Business Partner (as in point 3)
- Repeat point 4 - 6 for as many placements as wanted
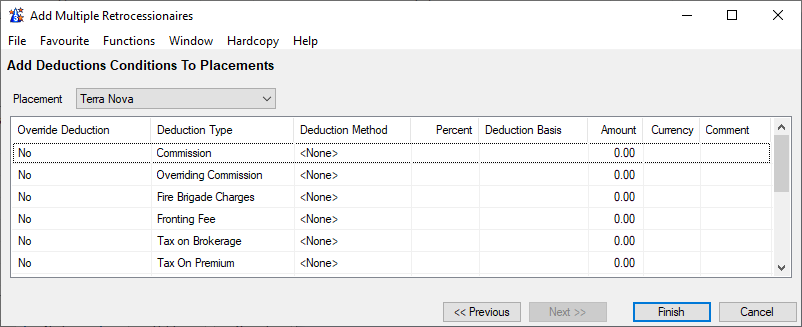
- Click Next to add deduction conditions to the placement
- Select wanted retrocessionaire from the Placement drop-down
- If wanted, select Override Deduction. The deduction fields are made available for input
- Select wanted Deduction Method, enter e.g. Percent and select Deduction Basis. If relevant, enter Amount, Curreny and Comment.
- Repeat point 10-12 for as many placements as wanted.
- Click Finish to save the input
Note! The deductions you select to not override, will still be inherited from the Outward Cedent’s Contract
Upload Retrocessionaires
Load retrocessionaires from external spreadsheet files.
- Open your Outward Cedent’s Contract Placement List.
- In the Retrocessionaire Placements container, select Upload Placements from the popup menu.
- Click the Find button in the Upload Placement Window, and navigate to the wanted folder.
- Select the wanted file and then click Open.
- Click the Import button.
- If the process passes the validations, a small dialogue box appears with the number of details found.
- Click the OK button. The values from the file are loaded and shown in an edit window
- If wanted, manually change some values.
- Click Finish.
If the process fails the validations, an Error List appears. This problem must be solved before the spreadsheet can be imported.
The spreadsheet must have the following columns and in the below order:
- Business Partner Identifier
- Signed Share
Place through Intermediary - Multiple Retrocessionaires
Place several retrocessionaires through the same intermediary in, one go:
- Open Outward Cedent’s Contract, Placement window
- Select an intermediary and select Place Selected to Multiple Retrocessionaires from the popup menu
- Select Business Partner by using the Find facility or just enter business partner ID
- Select a Life Cycle Status
- Enter Signed and/or Written and/or Offered share
- Enter Account Group if necessary
- Click on the next row and select a new Business Partner (as in point 3)
- Repeat point 4 - 6 for as many placements as wanted
- Click Next to add deduction conditions to the placement
- Select wanted retrocessionaire from the Placement drop-down
- If wanted, select Override Deduction. The deduction fields are made available for input
- Select wanted Deduction Method, enter e.g. Percent and select Deduction Basis. If relevant, enter Amount, Curreny and Comment.
- Repeat point 10-12 for as many placements as wanted.
- Click Finish to save the input
Note! The deductions you select to not override, will still be inherited from the Outward Cedent’s Contract
Upload Intermediaries with Retrocessionaires
Load intermediaries and belonging retrocessionaires from external spreadsheet files.
- Open your Outward Cedent’s Contract Placement List.
- In the Intermediary Placements container, select Upload Intermediaries with Retrocessionaire from popup menu.
- For the File to Import, select the Find button.
- Navigate to the wanted folder, select the file and Open.
- Select the Import button.
- If the process passes the validations, a small dialogue box appears with the number of details found.
- Select the OK button. The values from the file are loaded and shown in an edit window
- You can manually change some values if needed.
- Select Finish.
If the process fails the validations, an Error List appears. This problem must be solved before the spreadsheet can be imported.
The spreadsheet must have the following columns and in the below order:
- Business Partner Identifier
- Intermediary Partner Identifier
- Signed Share
Add Unplaced Share #
Record the cedent’s own rentention in the contract.
| Field | Description |
|---|---|
| Business Partner | Name of business partner being the retrocessionaire Mandatory: Yes |
| Legal Id | Legal identifier of the business partner being the retrocessionaire Values: Legal ID of the business partner Mandatory: No Functional Impact: Select Placement Complete Maintain Business Partner Identifier |
| Life Cycle Status | The phase in the retrocession’s life cycle Values: Customized by tour company, e.g. New Agreement Offered Offer Accepted Quoted Offer Declined Mandatory: Yes Validations: Depending on system administrator’s set up, definite statuses only possible if mandatory information present Functional impact: Share condition |
| Signed Share | Retrocessionaires final an exact share of the contract Values: Minimum percentage: 0 Maximum percentage: 100 Number of decimals: 10 Validations: Placing through intermediary, accumulated share from retrocessionaires cannot exceed intermediary’s own share Mandatory: No Functional Impact: Share Condition |
| Written Share | Share the retrocessionaire has accepted to participate with, but not necessarily confirmed by the cedent Values: Minimum percentage: 0 Maximum percentage: 100 Number of decimals: 10 Validations: Placing through intermediary, accumulated share from retrocessionaires cannot exceed intermediary’s own share Mandatory: No Functional Impact: Share Condition |
| Offered Share | The share proposed by the cedent to the retrocessionaire at offer stage Values: Minimum percentage: 0 Maximum percentage: 100 Number of decimals: 10 Validations: Placing through intermediary, accumulated share from retrocessionaires cannot exceed intermediary’s own share Mandatory: No Functional Impact: Share Condition |
| Account Group | Overall category for internal purposes Values: Customized by your company Validations: If outward account group is registered on the outward cedent’s contract, the same account group is mandatory on retrocessionaire participation Mandatory: No Functional Impact: None |
| Placement | Retrocessionaire added to the Outward Cedent’s Placement List Values: Customized by your company Default: The first retrocessionaire in the placement list Validations: Only Retrocessionaires added to the placement list are availbale Mandatory: Yes Functional Impact: None |
| Override Deduction | Indication whether the deduction is overridden or not Values: Yes, No Default: No Validations: None Mandatory: Yes Functional Impact: None |
| Deduction Type | Description of the deduction to be paid Values: E.g. Commission, Overriding Commission, Brokerage and other Cost. Your system adminstrator may have defined customised values Validations: Same values as the ones available on the Outward Ceden’s Contract Mandatory: No Functional Impact: None |
| Deduction Method | Deductions can be calculated in different ways. This indicates how the deduction should be calculated Values: Amount, Original, Original + Additional Amount, Original + Percent, Percent, Sliding Scale, Stepped Sliding Scale Default: Percent Validations: None Mandatory: No Functional Impact: Other commission values, Maintain Premium Conditions, Automatic Booking, Proportional Retrocession Accounting |
| Percent | Commission paid by the reinsured to compensate the cedent for expenses related to the ceded business expressed in percent of e.g. gross premium Values: Minimum value: 0 Maximum value: 100 Number of decimals: 6 Validations: Total Commission cannot exceed 100% Only available for input if Deduction method is Percent or Original + Percent Mandatory: No Functional Impact: Other commission values, Maintain Premium Conditions, Automatic Booking, Proportional Retrocession Accounting |
| Deduction Basis | The premium terms or other basis, e.g. another deduction, from which the deduction is calculated Values: Customized by your company, e.g.: Gross Premium: Total premium to the business Net Premium: Total premium less other deduction items Brokerage: Total brokerage amount Default: Gross Premium May be customized by you company to be the most common value used for the type of business Validations: Must be selected if deduction method is Percent, Original + Percent, Sliding Scale or Stepped Sliding Scale Mandatory: No Functional Impact: Maintain Premium Conditions, Automatic Booking, Proportional Retrocession Accounting |
| Amount | If the deductions are reported as an fixed amount, you can add the amount in this field Values: Amount field Validations: None Mandatory: No Functional Impact: Maintain Premium Conditions, Automatic Booking, Proportional Retrocession Accounting |
| Comment | Free text information regarding the deduction on the same row Values: Text Number of characters: 50 Mandatory: No Functional Impact: None |
Check for Placement Complete #
Ask the system to check whether or not the contract is 100% placed and placement is ready to be set to complete.
- Open the Placement list
- Select Check for Placement Completed
If the placement can be set to completed, the system automatically gives you the choice setting of the Placement Completed flag.
Set Placement Completed #
Indicate that the contract is 100% placed.
- Open the Placement list
- Select Edit Placement Completed
- Select or clear the Placement Completed flag
- Select OK
| Field | Description |
|---|---|
| Placement Completed | Indication that the contract is 100% placed Values: Cleared, Selected Default: Cleared Validation: To be selected: - The retrocessionaire participations must have a definite life cycle status and a signed share totaling 100%. - Total placed signed share through intermediary must equal intermediary signed share. - Depending on the system setup, you may be allowed to place proportionally more than 100% and still set contract to completed -Depending on the system setup, all business partners being intermediary or retrocessionaire must have a legal identifier. Mandatory: No Functional impact: Set Placement Complete Manage Non-Proportional Loss Recovery Manage Recovery Calculation Order Manage US Quota Share Loss Recovery Edit Shares |
Update Shares of Multiple Placements #
When placing an outward cedent’s contract during the renewal season, the placed shares need to be reviewed and sometimes changed for the new period. You may modifying the shares directly from the placement list without having to open Share Condition of each placement individually.
- From either Intermediary or Retrocessionaire part of placement list select Edit Shares from menu
- Enter or change the applicable shares for one or more placements
- You can change the Written Share Frozen flag for a placement if you are authorized to do so by selecting Edit Written Share Frozen from pop up menu
- Select ok. The system validates your input according to share condition of the placements.
- If validation do not fail the system saves the input to the placement share condition
Definite Placements with no Share #
Depending on how the System Administrator has set up the system, the outward cedent’s contract placements may have been mass renewed to a definite state with no shares entered.
Intermediary Display List #
What you see here is customizable. The following is an example.
| Field | Description |
|---|---|
| Intermediary: | Name of a broker placing this contract. |
| Location: | Country of the intermediary |
| Signed Share: | The intermediary’s signed order of the contract, expressed of 100%. |
| Written Share: | The intermediary’s written order of the contract, expressed of 100%. |
| Offered Share: | The intermediary’s offered order of the contract, expressed of 100%. |
| Total Placed Shares through Intermediary: | The total placed shares for the intermediary. Whenever the share of a placement through the intermediary changes, the system recalculates the intermediary’s Total Placed Shares. |
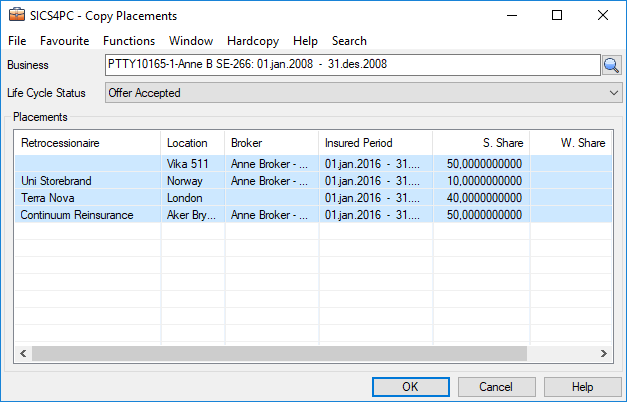
Copy Placement from Other Contract #
Sometimes several contracts have the same list of placements. This is often the case when there are several layers in a protection program and all layers have the same list of placements. To ease the registration of these, SICS offers a possibility of copying placements from one outward cedent’s contract to another.
- Open the outward cedent’s contract that you want to copy from (source business)
- Click the PL (Placement) button
- Select Copy Placement from the pop-up menu
- The system shows the retrocessionaires and intermediaries that will be copied.
- You may deselect an re-select some as you require
- Enter the contract you want to copy to (target business) in Business, or use the magnifying glass to search. Transfer it back to the copy placement.
- Select the Life Cycle Status for the placements of the target contract
- Select OK
- The copied placements are displayed in the Placements List of the target contract
Note! Unplaced share is not copied; it must be entered directly in the target placement list.
| Field | Description |
|---|---|
| Business | The business identifier of the outward cedent contract that you want to copy placements to (Target Business). Values: Text Magnifying button takes to you to Find Business. Validations: Level of Business must be Outward Cedent Contract Cedent of target business must be identical to cedent of source business Warning if placements already present on chosen business_Mandatory:_ Yes |
| Life Cycle Status | The status in which the retrocessionaires or intermediary placements are in respect of the target contract Values: Customised by your company, e.g. New Agreement Offered, Offer Accepted, Quoted, Offer Declined Mandatory: Yes |
Placement Display List of Copy Placement #
Retrocessionaire: Name of retrocessionaire to be copied from source contract
Location: Country of the placement to be copied
Broker: The name of the intermediary of a placement to be copied
Insured Period: Insured Period of source placement. Target placement will get target OCC’s insured period
Signed Share: Signed Share of 100% of source placement. Will be given status Written on definite target business and Offered on pending target business.
Written Share: Written Share of 100% of source placement. Will be copied to target if Signed doesn’t exist.
Offered Share: Offered Share of 100% of source placement. Will be copied to target if Signed or Written doe not exits.
Allow Placement Over 100 % #
| SICS lets you allow placement over 100%. Your System Administrator can enable this parameter. | Allow Placement Over 100%: Your SICS System Administrator can set a parameter that lets you place outward business over 100%. This lets your company obtain a larger volume of assumed business and is therefore sometimes desired. If this parameter is “on,” and overplacing occurs, you should be aware of the following:. |
- SICS will not calculate the 100% amount to be retroceded to the OCC. This must be done manually.
- SICS will automatically distribute the 100% amount booked on the OCC to retrocessionaires according to their sharesEeven when adding up to more than 100%
If you have overplaced and then:
4select Check for Placement Completed (explained above), or
4select the Placement Completed check box, you then see a warning message and you are asked whether or not you want to continue. If you select yes to continue, but are given a message that you do not have the access rights to do so, it means that the Allow Placement Over 100% parameter has not been set by your System Administrator. If the parameter has been set, you are able to proceed.
Enter Special Conditions #
|

Condition button | When you create an Outward Cedent’s Contract, you can enter conditions for that contract by clicking the Conditions button on the Navigation bar at the top of the Outward Cedent’s Contract window. When you click the Placements button and add retrocessionaire or intermediary placements, they inherit conditions from the outward cedent’s contract. These conditions, however, do not “belong” to the retrocessionaire or the intermediary. Therefore, when you open a retrocessionaire or intermediary and try to change certain conditions, you see a message telling you that you must first make a local copy of that condition. You can then override the inherited condition by clicking the Override Inherited Condition button that appears on the Navigation bar. |
When you open a condition for a retrocessionaire or intermediary that has “Standard” conditions entered, the title bar at the top of the window indicates Outward Cedent Contract, plus the business ID, and the name of the condition. (Standard conditions means that none of the inherited conditions have been changed.)
If you recorded special conditions for an intermediary, and you open a condition for a retrocessionaire participating through this intermediary, the title bar at the top of the window indicates the Intermediary Placement, the business ID, and the name of the conditions. You can then continue entering special conditions for the retrocessionaire.
If you open a window for a condtiont that you want to change, you do the following to enter a special condition:
- Click the Edit button for the condition you want to edit.
- If you are allowed to change that condition, you see a message telling you that you must create a local copy of that inherited condition. Click OK.
- Click the Override Inherited Condition button to create the local copy.
- Make your changes.
After you have entered the new conditions and saved them, you see that the title bar at the top of the window indicates “Special Conditions.”
After you have entered the new conditions and saved them, you see that the title bar at the top of the window indicates “Special Conditions.”
You cannot change inherited Reinstatement Premium conditions for a retrocessionaire or intermediary. There are certain other conditions like Administrative Conditions, in which only certain elements on the condition window can be changed.
Indicate Different Premium for Retrocessionaires #
In today’s reinsurance market it is common that premium differs for some of the retrocessionaires on the same slip, normally the premium rate and/or the premium deposits. SICS supports different premiums for non-proportional treaty retrocessionaires.
- Open the outward cedent’s contract
- Open the Premium and Limit Conditions
- Select Main tab in edit mode
- Select Special Premium
- Click Save
When the Special Premium has been selected, you maybe override the following on one or more of the participating retrocessionaires:
- Limit and Premium Conditions (although you may override limits, the OCC limits are used in Recovery Calculation)
- Minimum and Deposit Premium Conditions
- Flat Premium condition
- Installment Conditions and Adjustment Conditions can however not be overridden
SICS calculates Premium Installment Schedules using the overridden premiums, where they exist.

Special Premium: Indicates whether one or more of the retrocessionaires may have different premium conditions than the standard.
Values:
Selected - retrocessionaire can have different (overriden) premium conditions
Not selected - retrocessionaire must have standard (inherited) premium conditions
Validations: Type of Business must be non-proportional treaty
Level of Business must be Outward Cedent’s Contract or XL CA for Outward
Premium Type must be Fixed Rate or Flat Premium
Mandatory: No
Functional Impact:
Maintain Premium and Limit Conditions
Maintain Premium Installments
Accounting of Premium Installments
Accounting of Premium Adjustment
Accounting of Reinstatement Premium
Access Deductions of Retrocessionaire from Placement List #
- Open the Outward Cedent’s Contract to be placed.
- Select the Placement List (PL) button.
- Select a retrocessionaire, and from the pop up menu, select Deduction Conditions
- Enter deductions
View Deductions of all Retrocessionaires Simultaneously #
- Open the Outward Cedent’s Contract
- Select the Placement List (PL) button
- The Deduction Summary column shows for each retrocessionaire all deductions recorded
Freeze Written Share of Placement #
In the process of reviewing the participants of a contract during the renewal process, some companies may want to prevent users from changing the share once it is written. This can be achieved by setting the ‘Written Share Frozen’ flag on share conditions which will disable the Written Share from further update.
To change the Written Share Frozen flag, select ‘Edit Written Share Frozen’ from the Share Condition menu or from placement list.
This is only applicable for proportional and non-prop placements of outward cedent’s contract and excess of loss protection for common account of outward business.

Written Share Frozen: Indicates whether or not the Written Share is restricted from updating
Values: Selected or not selected
Mandatory: No
Functional Impact: Written Share closed for edit
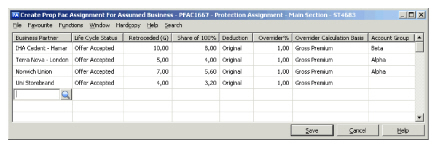
Place Facultative Protection #
Place to Single Retrocessionaire or Intermediary #
Finalise an earlier indicated facultative protection, placing it either with an intermediary or directly with a retrocessionaire:
- Open Proportional Protection Assignment in edit mode
- Highlight an already indicated placement.
- From the popup menu, select Realize Fac Protection
- Select a Life Cycle Status and select Next
- Enter a share. Click Next
- Enter Business Identifier details, if necessary.
- Select Finish
- Select OK
The option Realize Facultative Protection is disabled if you have not recorded any share for the assumed business.
Place to Multiple Retrocessionaires
Place several direct retrocessionaires in one go:
- Open Proportional Protection Assignment in edit mode
- Select Add and Realize Retrocessionaire
- Select Business Partner by using the Find facility or you can type in the Business Partner name or part of it directly into the field and receive possible matches for the text. If you know the Business Partner ID, you can also type this.
- Select a Life Cycle Status
- Enter Retroceded (G) and Share of 100%
- Enter Deduction and Overrider details
- Enter Account Group if necessary
- Click on the next row and select a new Business Partner (as in point 3)
- Repeat point 4 - 7 for as many placements as wanted
- Click Save
- Click OK
Place through Intermediary - Single Retrocessionaire
Place a single facultative protection through an intermediary:
- Open Proportional Protection Assignment in edit mode
- Select an already realized intermediary placement.
- From the popup menu, select Place Selected to Retrocessionaire
- Select a Life Cycle Status and click Next
- Select Business Partner by using the Find facility or you can type in the Business Partner name or part of it directly into the field and receive possible matches for the text. If you know the Business Partner ID, you can also type this. Press Next
- Enter Share Conditions. Click Next
- Enter Business Identifier details if necessary
- Click Finish
- Click OK
Place through Intermediary - Multiple Retrocessionaires
Place several retrocessionaires through the same intermediary in, one go:
- Open Proportional Protection Assignment in edit mode
- Select an already realized intermediary placement.
- Form the popup menu, select Place Selected to Multiple Retrocessionaires
- Select Business Partner by using the Find facility or you can type in the Business Partner name or part of it directly into the field and receive possible matches for the text. If you know the Business Partner ID, you can also type this.
- Select a Life Cycle Status
- Enter Retroceded (G) and/or Share of 100%
- Enter Deduction and Overrider details
- Enter Account Group if necessary
- Click on the next row and enter new Business Partner (as in pointy 4)
- Repeat point 4 - 8 for as many placements as wanted
- Click Save
- Click OK
Copy Retrocessionaire
Place a protection with further retrocessionaires by copying an existing one.
- Select the existing retrocessionaire placement that you want to copy from From the pop up menu, select Copy Selected to Retrocessionaire.
- Select a Life Cycle Status and select Next
- Enter a share. Click Next
- Enter Business Identifier details, if necessary.
- Select Finish
- Select OK
| Field | Description |
|---|---|
| Business Partner | Name of the business partner being the retrocessionaire Mandatory: Yes |
| Life Cycle Status | The phase in the retrocession’s life cycle. Values: Customized by your company, e.g. New Agreement Offered, Offer Accepted, Quoted, Offer Declined Mandatory: Yes Validations: Warning if selecting definite, while assumed business still other than definite Depending on system administrator’s set up, definite statuses only possible if mandatory information present. Functional Impact: Share Conditions |
| Retroceded (G) | Retrocessionaire’s share of assumed business' share from 100% Validation: Total retroceded % for intermediaries and other retrocessionaires cannot exceed 100% Total retroceded percent placed through an intermediary cannot exceed intermediary’s own retroceded percent Calculation: From assumed business Share from 100% and placement’s Share from 100% Mandatory: Yes Functional Impact: Share Conditions |
| Share of 100% | Retrocessionaire’s share expressed of the 100% original policy. Values: Minimum percentage: 0 Maximum Percentage: 100 when Offered or Signed 99 999 when assumed Written or Estimated Signed Number of decimal places: 10 Validations: Accumulated Offered/ Signed share for intermediaries and other retrocessionaires cannot exceed 100% Calculations: Assumed Share from 100% X Retroceded (G) / 100 Mandatory: Yes Functional Impact: Retroceded (G) Share Conditions |
| Deduction | Indication whether retrocession should be set to As Original or None Values: None, Original Default: Original Mandatory: Yes Functional Impact: Deductions Conditions |
| Overrider % | Commission paid to the party that is responsible for placing the agreement Values: Number of decimals: 2 Mandatory: No Functional Impact: Deductions Conditions |
| Overrider Calculation Basis | Premium terms from which the deduction is calculated Values: Customized by your company, e.g.: Gross Premium: Total premium to the business Net Premium: Total premium less other deduction items Validations: Must be selected if Overrider % is entered Mandatory: No Functional Impact: Deductions Conditions |
| Account Group | Overall category for internal purposes Values: Customized by your company. Mandatory: No |
Structure Facultative Placement #
When you create and realize a facultative protection, the system creates the relevant section hierarchy on facultative protection.
Protect Entire Agreement:
If you make the facultative protection on the top (main section) level of the assumed business, the section hierarchy of the facultative protection placement becomes identical to the one of the assumed business.
Protect Part of Agreement:
If you make the facultative protection on a lower level, e.g. on a section (source section) the system creates this section on the facultative protection and also creates its ‘parent’ section, ‘grandparent’ section, and so on, existing on the protected business. In addition, the system creates any sub section, sub sub section, cession and declaration, which the source section has. The system creates the classifications on the facultative protection according to the classifications on the corresponding assumed sections.
If you create the facultative protection from an assumed cession or declaration, the system creates the same cession or declaration (source cession or declaration) on the facultative protection. The system also creates its ‘parent’ section, ‘grandparent’ section, and so on, existing on the protected business. The system creates the classifications on the facultative protection according to the classifications on the corresponding assumed cession or declaration.
If the source section, cession, declaration has sections, cessions or declarations at the same level in the section hierarchy, the system does not create these, or any ‘parent’ or sub sections, cessions or declarations of these on the facultative protection
Note! It is not possible to use the normal renew function to renew the facultative placement when it has been created on a sub level (sub section, cession, or declaration). You must instead create this facultative protection again on the new insured period of the assumed business.
Maintain Facultative Placement Standard and Special Conditions #
Basic Principles: If you have recorded conditions for the assumed business, most of these conditions are inherited if the outward protection is proportional. If you want, you can record special conditions by editing the standard condition. You can however not make special conditions for the limit and premium conditions. The following conditions are not inherited from the assumed business: Deduction conditions and Administrative conditions. If you have recorded special conditions for an intermediary, the retrocessionaire participating through this intermediary will inherit these conditions. You can then continue entering special conditions for the retrocessionaire. If the outward protection is non-proportional, no conditions are copied.
Conditions at Life Cycle Stages: The terms and conditions of an assumed business might vary through its life cycle, from what is offered to what is accepted. Which conditions apply to the proportional facultative protection are defined as follows:
- When creating a new protection and the assumed business has several Life Cycle Statuses, the protection gets its conditions from the chosen status (Life Cycle Status button pressed down) on the assumed business.
- When changing the status of a protection, the information that always must be the same as the assumed business, (e.g. premium and limit conditions, sections and cessions) and the information that is inherited (not overridden), gets the information from the latest status of the assumed business. Information that has been overridden on the protection and or that defaults to empty on the protections, (e.g. deduction conditions), is copied from the previous Life Cycle status of the protection itself. Account Group: If there is one Outward Account Group linked with the Inward Account Group on the system parameter, then the Account Group on Assumed Business is inherited on the Fac Retrocessionaire Participation and the Account Group field will be disabled for editing in the update Intermediary/ Retrocession Participation business window.
If there is more than one Outward Account Group linked with the Inward Account Group on the system parameter, then the Account Group on Assumed Business is NOT inherited on the Fac Retrocessionaire Participation; the user is given the possibility to select one Account Group from the drop down and the Account field will be enabled for editing in the update Intermediary/ Retrocession Participation business window.
Note! If your system administrator has set up your system to allow for business with ‘To be Advised’ insured periods, your assumed businesses might not have any insured period at all. In that case, also the outward facultative placements will be without an insured period. As soon as you however specify dates for the insured period for the assumed business, the placements will receive the same dates. For more information, refer to the Maintain Insured Period Information section.
View Facultative Placements #
When you select Properties from the pop-up menu, you see the details for the outward business that you selected.
Assign Excess of Loss Protection for Common Account of Inward #
Assign XL Protection to Assumed Business #
The Excess of Loss Protection for Common Account of Inward protects an Assumed Proportional Treaty, and limits the risk of particularly large losses for the company accepting a share.
Click the right-mouse button in the XL Protection for Common Account window of the Assumed Business to see the pop-up menu, which gives you the following options:
- Add New XL Protection for Common Account, which enables you to set up a new layer of XL protection for common account.
- Assign Existing XL Protection for Common Account, which opens a window showing the Business ID, Underwriting Year, and the Scope of Cover of the Proportional Treaty to be protected. Click the Find button, which brings you to the Find: Business window where you can search for an XL-Protection and transfer it back.
- Edit Status, lets you change the XL Common Account Status. Valid choices are: <None>, Common Account Accepted, Common Account Declined and Common Account Offered.
- Properties, lets you see more details of a selected business.
- Protected Businesses, opens a new window that lists the Proportional treaties that are protected. Clicking the right-mouse button brings up a pop-up menu that gives you the options to edit the status for a protected business, see its business properties, or sees its protections.
- Remove, lets you remove an item in the list, which results in the Assumed Proportional Treaty not being protected by this particular XL Protection for Common Account anymore.
Place XL for Common Account of Inward to Retrocessionaires #
The XL for Common Account Protection is an Outward Cedent’s Contract with placements, which we call Retrocessionaire Participation. The placed share of the XL for Common Account of Inward must add up to the Assumed Business accepted share.
Click the Placements(PL) button on the Navigation bar of the XL Common Account to see the Placement window.
Click the right-mouse button in the Placement display list for the following options:
Intermediary Placements:
- Add Intermediary, lets you create an Intermediary Placement through the Copy Wizard based on the XL Common Account of Inward contract.
- Place Selected to Retrocessionaire, lets you create Retrocessionaire Participation through the Copy Wizard based on the selected Intermediary Placement.
- Properties, lets you see more details of the selected business.
Retrocessionaire Placements:
- Add Retrocessionaire Participation, lets you create Retrocessionaire Participation through the Copy Wizard based on the XL Common Account of Inward.
- Copy Selected to Retrocessionaire, lets you create a Retrocessionaire Participation through the Copy Wizard based on the selected Retrocessionaire Participation.
- Add Unplaced Share lets you record the Unplaced Share of the Common Account XL.
- Properties, lets you see more detail of the selected business.
Assign Excess of Loss Protection for Common Account of Outward #
Assign XL Protection to Outward Cedent’s Contract #
The Excess of Loss Protection for Common Account of Outward protects the retrocessionaires of a Proportional Outward Cedent’s Contract from particularly large losses. XL for Common Account is offered to the Proportional Retrocessionaires, which separately might accept or decline the offer. A Proportional OCC could be protected by several XL-layers, which are all registered and maintained from the same Proportional OCC.
Note! This function is not available for US Quota Shares.
When you click the XL button in the Business Properties Navigation bar, you see the XL Protection for Common Account window. If Common Account Protections have already been created for that business, you see them listed in this window.
Click the right-mouse button in the Protection for Common Account window of the Outward Cedent’s Contract to see the pop-up menu, which gives you the following options:
- Add New XL Protection for Common Account, which enables you to set up a new layer of XL Protection for Common Account.
- Assign Existing XL Protection for Common Account, which opens a window showing the Business ID, Underwriting Year, and the Scope of Cover of the Proportional Treaty to be protected. Click the Find button, which brings you to the Find: Business window where you can search for an XL-Protection and transfer it back.
- Properties, lets you see more details of a selected business.
- Protected Businesses, opens a new window that lists the Proportional Retrocessionaires Participation that are protected. Clicking the right-mouse button brings up a pop-up menu that gives you the options to edit the status for a protected business, see its business properties, or sees its protections.
- Remove, lets you remove an item in the list, which results in the Proportional Outward Cedent’s Contract not being protected by this particular XL Protection for Common Account anymore.
Offer XL for Common Account Protection to Retrocessionaires #
When created for the Proportional OCC, the XL Protections for Common Account are automatically shown on the XL Protection for Common Account window for each Retrocessionaire Participation of the Proportional OCC. The status is automatically set to Common Account Offered. The status must be updated to indicate whether the Retrocessionaire Participation has accepted or declined participation in the XL for Common Account.
Click the right-mouse button in the XL Protection for CA window of the Retrocessionaire Participation to see the pop-up menu, which gives you the following options:
- Edit Status, lets you change the XL Common Account Status. Valid choices are: <None>, Common Account Accepted, Common Account Declined and Common Account Offered.
- Properties, lets you see more details of a selected business.
- Protected Businesses, opens a new window that lists the Proportional Retrocessionaires that are protected. Clicking the right-mouse button brings up a pop-up menu that gives you the options to edit the status for a protected business, see its business properties, or see its protections.
Handle XL Protection of Own Account #
If the Proportional OCC has an Unplaced Share, and the base company wants to buy an XL Protection to cover its Own Retention; the status of the Common Account XL must be set to Common Account Accepted.
Click the right-mouse button in the XL Common Account window of the Unplaced Share to see the pop-up menu, which gives you the following options:
- Edit Status, lets you change the XL Common Account Status. Valid options are: <None>, Common Account Accepted, Common Account Declined and Common Account Offered.
- Properties, lets you see more details of a selected business.
- Protected Businesses, opens a new window that lists the Proportional Retrocessionaires that are protected. Clicking the right-mouse button brings up a pop-up menu that gives you the options to edit the status for a protected business, see its business properties, or see its protections.
Place XL for Common Account of Outward to Retrocessionaires #
The XL for Common Account Protection is an Outward Cedent’s Contract with placements, which we call XL Retrocessionaires. The placed share of the XL for Common Account of Outward must add up to the total share of the Proportional Retrocessionaires that have accepted Common Account XL and the XL Protection of Own Account.
Click the Placements(PL) button on the Navigation bar of the XL Common Account to see the Placement window.
Click the right-mouse button in the Placement display list for the following options:
Intermediary Placements:
-
Add Intermediary, lets you create an Intermediary Placement through the Copy Wizard based on the XL Common Account of Outward contract.
-
Place Selected to XL Retrocessionaire, lets you create Retrocessionaire Participation through the Copy Wizard based on the selected Intermediary Placement.
-
Properties, lets you see more details of the selected business. Retrocessionaire Placements:
-
Add XL Retrocessionaire, lets you create Retrocessionaire Participation through the Copy Wizard based on the XL Common Account of contract
-
Add Unplaced Share, lets you record the Unplaced Share of the Common Account XL.
-
Properties, lets you see more detail of the selected business.
-
Check For Placement Completed. It is mandatory to complete placement to be able to book on the XL CA of Outward. Placement Completed
When this flag is selected it indicates that the contract is 100% placed.
Can be selected or deselected directly or set as part of the Check for Placement Complete option.
See Place Outward Cedent’s Contract for description.