Follow up Tasks
The Task Management Desktop is the main starting point for following up tasks. The user can see all active tasks where (s)he is the actual owner or the potential owner.
The “My Tasks” element contains four folders:
- Ready- Tasks which are not yet reserved by any user but which the current user can own (because (s)he is among the potential owners of the task Reserved- Tasks which are reserved by the current user (i.e. (s)he is the actual owner of the task)
- In Progress - Tasks which are owned by the current user and which have started
- All - All tasks in the three other “views”.
The number in parenthesis to the right for each element tells how many tasks there are in this view.
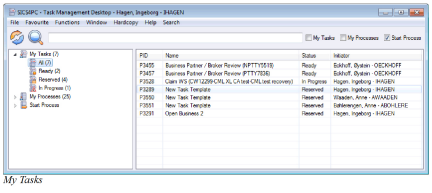
The My Tasks Display List #
In the folder “My Tasks”, all tasks where you are the actual owner or the potential owner, are displayed. Only a few details about each task are displayed
| Display List Item | Description |
|---|---|
| PID | Process' unique identifier, typically a prefix and a number |
| Name | Name of the task as defined in the template |
| Status | Description of which step the task is in |
| Initiator | Name of the person who started the process |
Task Statuses #
Initially, all Tasks have Created status, though the first task in the Process tree is immediately promoted to Ready or Reserved status (depending on Task owner assignment).
When a Task is finished, the next Task will be promoted to Ready or Reserved status. The exception is when a Task is marked as Failed, in which case all remaining Tasks will stay as Created.
A task with status Ready, Reserved or In Progress is called ‘active’.
A task with status Completed, Skipped or Failed is called ‘finished’.
Task Owner #
The task owner is the person to whom the task is assigned.
In most cases a task has a list of potential owners defined in the template the process was created from. If a task has been reassigned due to an escalation, it has its own list of potential owners.
When a task is about to be activated (set to Ready or Reserved status), there will be an attempt to assign a task owner.
- If the list of Potential Owners is empty, the current user will be assigned.
- If the list of Potential Owners contains just one user, (s)he will be assigned.
- If the list of Potential Owners contains more than one user, and the current user is among them, the current user will be assigned.
- If the list of Potential Owners contains more than one user, and the current user is not among them, no user will be assigned.
If an actual owner has been assigned, then the task will appear on this user’s ‘My Tasks’ only.
If an actual owner has not been assigned, then the task will appear on the ‘My Tasks’ list of all Potential Owners.
View Task Details #
View tasks available in the My Tasks folder.
- Open the Task Management Desktop from SICS Desktop
- Expand the My Tasks tree item.
- Highlight wanted task, and right mouse click
- Select option View Details and system opens the Process Details window with the selected task highlighted
- You can navigate between the different Activity Details and also open process / task in edit mode and make adjustments
For a more detailed description of the different activity details, please see section Manage Activity Details earlier in this chapter
Reserve a Task #
The Ready list under My Tasks contains task which are ready to start, but which does not yet have any actual owner and for which the current user is a potential owner.
- Open the Task Management Desktop from SICS Desktop
- Expand the My Tasks tree item.
- Highlight wanted task in the Ready or All folder and right mouse click
- Select option Reserve
- Task is moved from the Ready folder to the Reserved folder, and the user is now the Actual Owner of the task.
The same task is removed from the Ready folder on the other Potential Owners
Delegate a Task #
The process responsible can delegate the current task to another user or user group.
- Open the Task Management Desktop from SICS Desktop
- Expand the My Processes tree item and click on the folder containing the process with the task you want to reassign
- Highlight on wanted process, and right mouse click
- Select option Delegate Task
- In the Delegate Activity, right mouse click and select Assign Users or Assign User Groups
- In the Assign Users / User Groups, move user(s) / user group(s) from the Available to the Selected and vice versa until the task is assigned to correct User(s) and / or User Group(s)
- Click Save
- Click OK.
The current task owner will be removed as the actual owner of the task and the new potential owners will see the task in their list (after a refresh). If the new list of potential owners contains more than one user the task will have status “Ready”. If the new list of potential owners contains only one user this user will become the actual owner and the status will be set to “Reserved”.
Start a Task when no Input is Required #
Task which are in the Ready or Reserved list under My Tasks, can be started.
- Open the Task Management Desktop from SICS Desktop
- Expand the My Tasks tree item..
- Highlight wanted task in the Ready, Reserved or All folder and right mouse click
- Select option Start
- If the task has any associated start action, e.g. open business, this will be performed
- The Task Activity Side Window opens. See later in this chapter for further description of the Task Activity Side Window
- Click the Next button to indicate that current task is completed.
Or click the upper right “X” on the Task Activity Side Window to close the window. The task is moved from the Ready folder to the In Progress folder.
A task can also be started from the “Ready” list. In this case the current user will become actual owner of the task before it is started.
Start a Task when Input is Required #
Task which are in the Ready or Reserved list under My Tasks, can be started. In some cases the task includes a start action and input data may be required.
- Open the Task Management Desktop from SICS Desktop
- Expand the My Tasks tree item..
- Highlight wanted task in the Ready, Reserved or All folder and right mouse click
- Select option Start
- The Input Data window is opened where the user can enter necessary values, e.g. a business ID for start action “Open Business”
- Press OK and correct business is opened in SICS
- The Task Activity Side Window opens. See later in this chapter for further description of the Task Activity Side Window
- Click the Next button to indicate that current task is completed.
Or click the upper right “X” on the Task Activity Side window to close the window. The task is moved from the Ready folder to the In Progress folder.
Start a Task where a Start Action is Defined, but no Input is Required #
Start a task where the first action step is pre-defined.
-
Open the Task Management Desktop from SICS Desktop
-
Expand the My Tasks tree item..
-
Highlight wanted task in the Ready, Reserved or All folder and right mouse click
-
Select option Start
-
The Task Activity Side Window opens and system automatically executes the start action, e.g. if:
Create new Business - Create New Business wizard is opened
Create Claim Worksheet - Create Claim Worksheet is opened -
Complete the task, e.g. creation of new business and mark the task as completed
Maintain a Task from Other Parts of the System #
It is possible to assign input value Start, Reserve and/or Complete a task from other parts of SICS. A direct access button is available from the following windows:
- Business (all level)
- View Business Partner
- Individual Claim
- Worksheet Closing (technical and claim worksheets)
- Remittance worksheet
- eMessage window
Get Overview of Relevant Tasks #
Many tasks has a reference to e.g. a specific business, business partner or worksheet (technical or claim). If e.g. the business ID, business partner ID or worksheet ID is saved as input or output data on a task, the task task can be viewed on the corresponding e.g. business or business partner.
View tasks e.g. triggered by a contract:
-
- From the SICS Desktop/ Find Business, open wanted contract
-
- Select the Task Management button in the Navigation bar
-
- On the Task Overview tab, all tasks triggered by the contract’s Business ID are listed
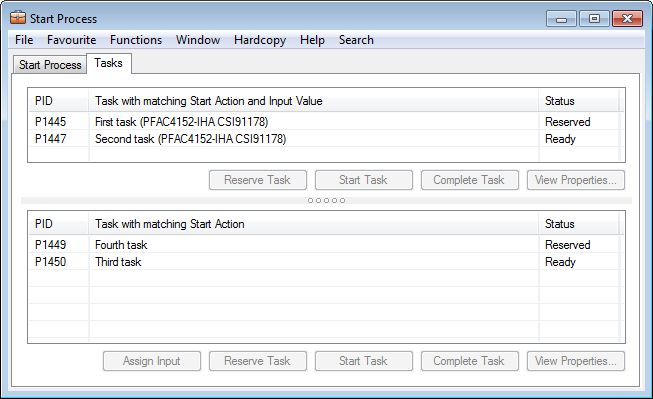
Reserve, Start or Complete Task with Start Action Input value #
A user’s own tasks with status “Ready” or “Reserved” and which has a Start Action Input value, e.g. Business ID matching the business you are working on, are displayed in the upper container of the Start Process / Tasks. Which tasks are available, depend on from which SICS window you start the process and the task’s Start Action type:
| SICS Window | Start Action | Input Data |
|---|---|---|
| Business Properties | Open Business | Business ID |
| Business Partner | Open Business Partner | Business Partner ID |
| Claim | Open Claim | Claim ID |
| Technical Worksheet | Open Worksheet | Worksheet ID |
| Claim Worksheet | Open Worksheet | Worksheet ID |
| Remittance Worksheet | Open Worksheet | 63Worksheet ID |
| eMessage | Open eMessage | UUID (Universal Unique ID) |
Process a Task e.g. from business properties:
- In the Navigation bar, select the Task Management button
- Select the Tasks tab. Your tasks with Start Action Open Business and an Input Value matching the current business ID, are displayed in the upper container
- If wanted, you may select View Properties to make sure correct task is updated
- Highlight wanted task and select:
- Reserve Task - Task is reserved. Option is onlyavailable for tasks with status “Ready”
- Start Task - Task is started
- Complete Task - Task is marked as completed
Add Start Action Input value from a SICS Object #
A user’s own tasks with status “Ready” or “Reserved” and which have a Start Action but no input value, can be updated with input value directly from SICS. Which tasks are available for update, depend on from which SICS window you start the process and the task’s Start Action type, see above.
Add start Action input e.g. from business properties:
- In the Navigation bar, select the Task Management button
- Select the Tasks tab. Your tasks with Start Action Open Business but no Input Value, are displayed in the lower container.
- If wanted, you may select View Properties to make sure correct task is updated
- Highlight wanted task and select:
- Assign Input - Task is updated with current business' identifier
- Reserve Task - Task is updated with current business' identifier and reserved. Option is only available for tasks with status “Ready”
- Start Task - Task is updated with current business' identifier and started
- Complete Task - Task is updated with current business' identifier and marked as completed
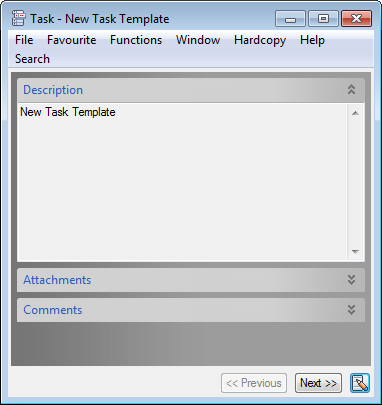
Maintain the Task Activity Side Window #
The Task Activity Side Window will appear whenever a task is started or continued. The window is made up of three parts:
- Description- displays what is entered in the description in General properties on the current task
- Attachments - documents relevant for the current task and previous activities
- Comments - any other comments relevant for current task and previous activities
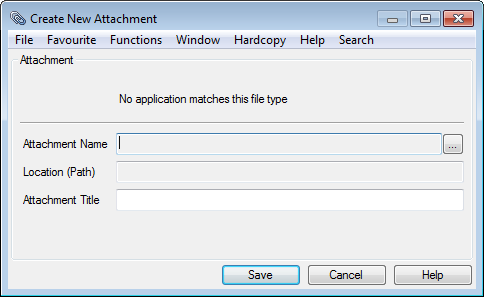
Add an Attachment in the Task Activity Side Window.
- Open the Task Management Desktop from SICS Desktop
- Expand the My Tasks tree item..
- Highlight wanted task and select options Start or Continue
- The Task Activity Side Window is opened and user can view the Description
- Expand the Attachment part and select New from file from pop-up menu. Alternatively, if your company uses the Document Management System Interface, you may select New from DMS from the pop-up menu
- System opens the Create New Attachment window
- Press the button next to the Attachment Name field to find wanted attachment
- Enter an Attachment Title
- Press Save
View an Attachment in the Task Activity Side Window
- Highlight wanted task and select options Start or Continue
- Expand the Attachment part, and select Open from the pop-up menu
- The Attachment is opened
Edit an Attachment in the Task Activity Side Window
- Highlight wanted task and select options Start or Continue
- Expand the Attachment part, and select Edit from the pop-up menu
- The Edit Attachment window is opened
- Replace the attachment and/ or change Attachment Title
- Press Save
Note! Only possible to edit attachment(s) belonging to current task
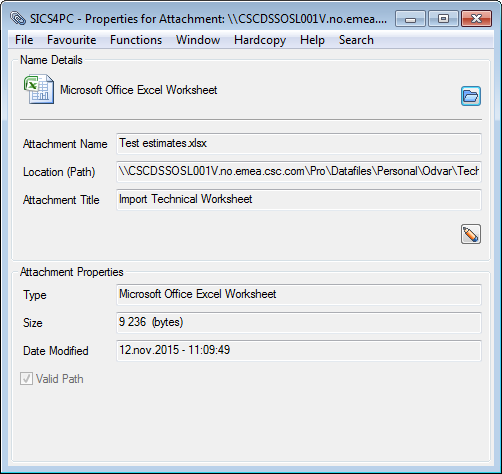
View Attachment properties
- Highlight wanted task and select options Start or Continue
- Expand the Attachment part, highlight wanted attachment and select Properties from the pop-up menu
- The Properties for Attachment window is opened
Remove an Attachment from the Task Activity Side Window
- Highlight wanted task and select options Start or Continue
- Expand the Attachment part, highlight wanted attachment and select Delete from the pop-up menu
- The Attachment is removed
Note! Only possible to remove attachment(s) belonging to current task
View current task’s attachments
As default, all attachments on current task and previous activities are displayed.
Select to view attachments related to current task only:
- Highlight wanted task and select options Start or Continue
- Expand the Attachment part, and select Show Current Task’s Attachments from the pop-up menu
To view attachments related to current task and all previous activities, deselect Show Current Task’s Attachments from the pop-up menu
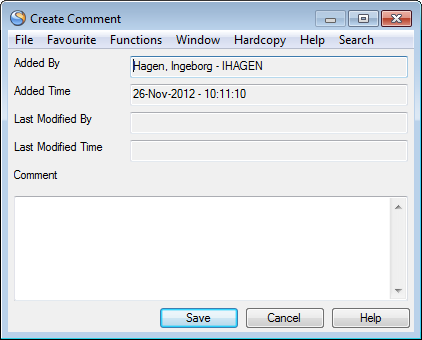
Add a Comment in the Task Activity Side Window
- Highlight wanted task and select options Start or Continue
- Expand the Comment part, and select New from the pop-up menu
- System opens the Create Comment window
- Enter a comment and press OK
Edit a Comment in the Task Activity Side Window
- Highlight wanted task and select options Start or Continue
- Expand the Comment part, highlight wanted comment and select Edit from the pop-up menu
- System opens the Edit Comment window
- Make wanted changes to the comment and press OK
Note! Only possible to edit comment(s) belonging to current task
View Comment details
- Highlight wanted task and select options Start or Continue
- Expand the Comment part, highlight wanted comment and select Details from the pop-up menu
- The Comment window is opened in view mode
Remove Comment from the Task Activity Side Window
- Highlight wanted task and select options Start or Continue
- Expand the Comment part, highlight wanted comment and select Delete from the pop-up menu
- Confirm deletion and comment is removed
Note! Only possible to remove comment(s) belonging to current task
View current task’s comments
As default, all comments on current task and previous activities are displayed.
Select to view comments related to current task only:
- Highlight wanted task and select options Start or Continue
- Expand the Comments part, and select Show Current Task’s Comments from the pop-up menu
To view comments related to current task and all previous activities, deselect Show Current Task’s Comments from the pop-up menu
Continue a Task #
If a task is started, but not completed, it appears in the My Tasks list, “In Progress”.
- Open the Task Management Desktop from SICS Desktop
- Expand the My Tasks tree item.
- Highlight wanted task in the In Progress or All folder and right mouse click
- Select option Continue from the pop-up menu
- If the task has a Start Action, this will be executed and the Activity Side Window for the task will open.
Note! The system checks if the task being activated already has an output data value (e.g. start action is Create Business and the business is already created so that and a business Id exists as output data). In this case the start action will not be re-executed when continuing the task. The Activity Side Window for the task will open.
- Click the Next button to indicate that current task is completed.
Or click the upper right “X” on the Task Activity Side window to close the window. The task is still in the In Progress folder
Complete a Task #
When a user has finished a task it should be set to complete. There are two different ways to set a task to complete.
Complete a Task from My Tasks
- Open the Task Management Desktop from SICS Desktop
- Expand the My Tasks tree item.
- Highlight wanted task in any of the folders and right mouse click
- Select option Mark Completed from the pop-up menu
- The task is removed from My Tasks. The next task in the process (if any) will become the active task
Complete a Task from Task Activity Side Window
- Open the Task Management Desktop from SICS Desktop
- Expand the My Tasks tree item.
- Select to Start or Continue a task. the Task Activity Side window will open
- There are tree different ways to mark the task as completed
- Press the Next button. Current task is set to Completed and removed from My Tasks. The next task (if any) will become the active task
- Select Mark Completed and Continue from the menu button (same as point 1)
- from the menu button.
Skip a Task #
Sometimes a task is no longer relevant e.g. the task is already executed in another connection.
- Open the Task Management Desktop from SICS Desktop
- Expand the My Tasks tree item.
- Highlight a task in any of the folders
- Select Skip from the pop-up menu. Skip may also be selected from the Task Activity Side window
- Current task is marked as Skipped and removed from My Tasks folder. The next task (if any) in the process, will become active
Mark a Task as Failed #
If a task for some reason cannot be executed, it can be marked as Failed.
- Open the Task Management Desktop from SICS Desktop
- Expand the My Tasks tree item.
- Highlight a task in any of the folders
- Select Failed from the pop-up menu. Failed may also be selected from the Task Activity Side window
- The whole process is marked as Failed and the all subsequent tasks (is any) will be discarded
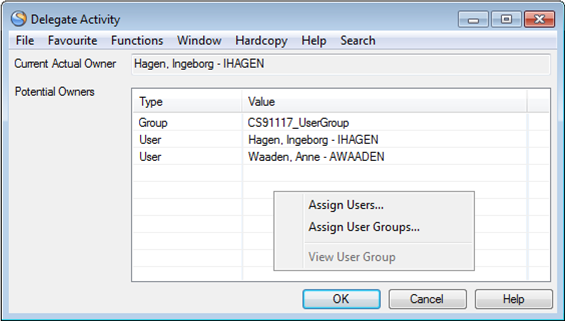
Delegate a Task #
If a user is assigned to a task (i.e. is the actual owner of the task), but is not able to do the task, then the task can be delegated to another user or user group.
- Open the Task Management Desktop from SICS Desktop
- Expand the My Tasks tree item.
- Highlight a task in any of the folders
- Select Delegate from the pop-up menu. Delegate may also be selected from the Task Activity Side window
- The Delegate Activity window is opened
- Right mouse click and select Assign Users or Assign User Groups from the pop-up menu to modify the list of (new) potential owners
- Move User(s) / User Group(s) from the Available / Selected lists
- Press Save
- Press OK.
The original user is removed as the actual owner of the task and the new potential owners will see the task in their list (after a refresh).
- If the new list of potential owners contains more than one user the task will have status Ready.
- If the new list of potential owners contains only one user this user will become the actual owner
- and the status will be set to Reserved.
Handle “Wizard Tasks” #
When a process consist of two or more tasks which can be done by the same user(since the user is among the potential owners of all the tasks), it can be viewed as a “Wizard Process”.
Example:
To calculate instalments, two tasks must be done;
- Register M&D premiums
- Calculate instalments.
It is assumed that one user will do both of these tasks in sequence and it can be modelled in a process template as follows:
The Process as well as the two tasks, have the same set of potential owners, in this case, " none". This means the user who started the process will own the process and the tasks.
The start Action of the first task is “Open Business” and the correct Business ID is given
- Open the Task Management Desktop from SICS Desktop
- Expand the My Tasks tree item.
- Highlight the task in the In Progress folder, and select Start from the pop-up menu
- The start action will open the wanted business and the Task Activity Side Window is opened
- User executes the first task ( i.e. register M&D premiums) on the business.
- When finished with the first task, press Next button on the Task Activity Side Window. The task is then set to Completed and the next task is assigned to the current user and started. This means that the next task will get status In Progress and the Start Action if any) for the next task will be performed.
- When the second task is finished (i.e. calculate instalments), press the Next button on the Task Activity Side Window.
- As there are no subsequent tasks the task and the whole process will be set to Complete d and the Task Activity Side Window will be closed
Note! If the next task in a process cannot be done by the current user (because the user is not among the potential owners of the next task) the “Next” button is disabled.
The pop-up menu choice “Mark Completed and Continue” is equivalent to the “Next” button with the exception that it is disabled if the task is the last task.
Skip and Continue #
When a process includes more than one task, and one of the tasks are no longer relevant, it is possible to skip the current task and continue to the next
- Open the Task Management Desktop from SICS Desktop
- Expand the My Tasks tree item.
- Highlight a task belonging to a process with more than one task
- Select Start or Continue from the pop-up menu
- From the Task Activity Side window, select option Skip and Continue from the menu button. The status of the current task is set to Skipped
- The Task Activity Side Window will be opened for the next task
Note! If the next task in a process cannot be done by the current user (because the user is not among the potential owners of the next task) the option “Skip and Continue” is disabled.
Navigate to Previous Task #
Go back to the previous task and abandon the current task
- Open the Task Management Desktop from SICS Desktop
- Expand the My Tasks tree item.
- Highlight a task belonging to a process with more than one task
- Select Start or Continue from the pop-up menu
- From the Task Activity Side window, select the Previous button
- Confirm to abandon current task and to go back to previous task
- The Task Activity Side Window will be opened for the previous task.
Note! When a task is abandoned the actual owner is removed and the status is reverted back to the original status (“Created”). Note that attachments and comments are kept.
Note! The system checks if the previous task has a create type start action and if an output data value exists.
- If no output data value exists, previous task’s start action is executed.
- If output data value exists, previous task’s start action is NOT executed.
Handle Event Actions #
A process template may be set up with several actions to take place when certain events happen.
An event may be Start Task, Complete Task, Start Process, Sub Process Failed etc.
An action to be carried out can be to send an e-mail or a SICS Notification or to respond to a dialog box. The action(s) is carried out immediately when the event takes place.
Create Notification
A notification may be that an e-mail or a SICS Notifier is sent to a specific user (e.g. the process owner) or user group once the event is executed.
This action is automatically carried out by the system once the user that executes the event (e.g. starts the task).
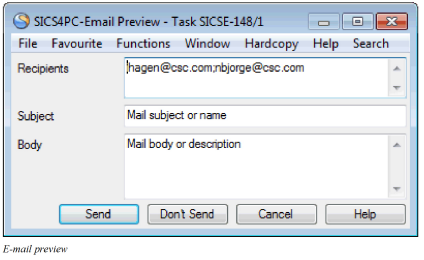
In some cases, the e-mail to be sent is set up to be previewed by the user. The user may change recipients, subject and/or the text (body). (The separator between e-mail addresses in the recipient field can be semi-colon (;) or colon(;)).
In addition the user may decide to:
- Send the e-mail
- Don’t Send the e-mail
- Cancel. In this case the current process/sub-process or task (the activity started by you) is reversed. Note! Any e-mails or SICS Notifiers already sent as part of this activity are not reversed
Dialog Box
The process template may have been set up to return one or multiple dialog boxes during the execution of the process. When the user replays, an Output Data value is created.
Maintain Task through SICS Live Desktop #
When SICS Live Desktop is enabled, external applications may use Web Service technology to ‘call into’ a SICS Workstation in order to open specific screens (Business, Claim, eMessaging, etc.).
In the Task Management facility, you can copy the SICS Live Desktop URL and paste the URL into e.g. an e-mail or directly into the internet browser.
- Open Task Management and access one of the following windows:
- “Process Started”
- “Process Details”
- “Task Activity”
- Select Favourite from the top menu
- Select option Copy Sics Live Desktop URL to clipboard
- Paste URL into the internet browser or e.g. an e-mail
The SICS Live Desktop will open and start (depending on Start Action is defined) a task, mimicking the “Start”/ “Continue” menu item in the “My Tasks” list in the Task Management Desktop.
Note! Only tasks available in “My Tasks” for current user and with status Ready, Reserved and In Progress will be executed.
| Field | Description |
|---|---|
| Status | Description of which step the process / taskis in Values: System defined vales. Values are: Created Ready Reserved In Progress Skipped Completed Failed Validations: Not editable Mandatory: Yes Functional Impact: “My Tasks” status on assigned user |
| Discriminator | Text used to distinguish between tasks from the same template. Is displayed as a parenthesis on the task’s display name Values: Free text field Maximum number of characters: 100 Mandatory: No Functional Impact: None |
| Priority | Used to indicate in which sequence the process/ task should be handled Values: Numeric field Minimum value: 0 Maximum value: 9 Default value: 1 Mandatory: Yes Functional Impact: None |
| Language | Displays the language(s) in which the descriptions and names on Processes and tasks are displayed Values: Customized by your company, e.g. English German French Spanish Italian Default: As defined in System Parameters Mandatory: Yes Functional Impact: Process' and task’s name and descriptions |
| Display Name | Name of process / task Values: Free text field Maximum number of characters: 200 Minimum number of characters: 1 Validations: Not editable on process or task Mandatory: No Functional Impact: None |
| Description | Text that gives further details about the process / task Values: Free text field Validations: Not editable on process or task Mandatory: No Functional Impact: None |
| Attachment Title | Text describing the attachment Values: Free text field Maximum number of characters: 200 Minimum number of characters: 1 Validations: Must be entered if attachments. Only editable in create / edit attachment Mandatory: No Functional Impact: None |
| Attachment File Name | Name of the attached file Values: Text field Validations: Automatically entered - not editable Mandatory: No Functional Impact: No |
| Comment Added By | Name of user who created the comment Values: All SICS Users Validations: Automatically entered if comment - not editable Mandatory: No Functional Impact: No |
| Comments Added Time | Time when comment was first entered Values: Date and Time field Validations: Automatically entered if comment - not editable Mandatory: No Functional Impact: No |
| Comments Last Modified By | Name of user who last updated the comment Values: All SICS Users Validations: Automatically entered if comment - not editable Mandatory: No Functional Impact: No |
| Comment Last Modified Time | Time when comment was first entered Values: Date and Time field Validations: Automatically entered if comment - not editable Mandatory: No Functional Impact: No |
| Comment | The actual comment details Values: Free text field Mandatory: No Functional Impact: None |
| Actual Owner | Name of person to whom the process / task is assigned Values: All SICS Users Validations: Not editable on process or task Mandatory: No Functional Impact: My Tasks My Processes |
| Process Initiator | Name of person who created the process Values: All SICS Users Validations: Automatically updated by the system - not editable Mandatory: Yes Functional Impact: None |
| Potential Owner Type | Describing if task may be assigned to single user(s) or group(s) TypeValues: User Group Validations: Not editable on process or task Mandatory: Yes Functional Impact: My Tasks My Processes |
| Potential Owner Value | SICS user(s) and / or Task Management User Group(s) who may execute the task, i.e. who may be actual owner of the task Values: SICS User names Task Management User Group names Validations: Not editable on process or task Mandatory: Yes Functional Impact: My Tasks My Processes |
| Escalation Deadline Type | Indication if the escalation is a Start or Completion escalation Values: Start Completion Validation: Not editable on process or task Mandatory: No Functional Impact: My Tasks My Processes |
| Escalation Name | Name of the escalation Values: Free text field Minimum number of characters: 1 Maximum number of characters: 50 Default: Depending on Escalation Type: New Start Notification New Start Reassignment New Completion Notification New Completion Reassignment Validations: Not editable on process or task Mandatory: No Functional Impact: My Tasks My Processes |
| Escalation Type | Indication whether the escalation is a Notification or a Reassignment Values: Notification Reassignment Validations: Not editable on process or task Mandatory: No Functional Impact: My Tasks My Processes |
| Escalation Date/Time | Indication of when the escalation is/ was due Values: Day - Month - Year Hour - Minutes - Seconds Validation: Not editable Derived From: Deadline defined on template Mandatory: No Functional Impact: My Tasks My Processes |
| Period between the due time stamp and now Column>Values: Text field Validations: Not editable Derived From: Escalation Date/ Time Mandatory: No Functional Impact: My Tasks My Processes |
|
| Escalated? | Indication whether escalation has been processes or not Values: Yes No Validations: Not editable Default: No Mandatory: No Functional Impact: My Processes My Tasks |
| History Time | When the process / task was started and later changed Values:Day - Month - Year Hour - Minutes - Seconds Validation: Not editable Derived From: Process start and updates Task start and updates Added Attachment(s) Removed Attachment(s) Mandatory: Yes Functional Impact: None |
| History Event Type | Indication of what has been changed on process, task or, Typeattachment (s) Values:Activate Add Attachment Complete Create Delegate Evaluate Fail Re-evaluate Release Remove Attachment Reserve Skip Start Stop Validation: Not editable Derived From: Process start and updates Task start and updates Added Attachment(s) Removed Attachment(s) Mandatory: Yes Functional Impact: None |
| Initiated By | Name of user who started the process Values: SICS User name Validation: Not editable Mandatory: Yes Functional Impact: My Processes |
| Owner After | Actual owner of process / task Values: SICS User name Validation: Not editable Mandatory: Yes Functional Impact: My Processes My Tasks |
| New Task Status | Current process / task status Values: Created Ready Reserved In Progress Skipped Completed Derived from: Status in General Properties Mandatory: Yes Functional Impact: My Processes My Tasks |
| Time | Date and time when process / task was last updated Values:Day - Month - Year Hour - Minutes - Seconds Validation: Not editable Derived From: Process start and updates Task start and updates Added Attachment(s) Removed Attachment(s) Mandatory: Yes Functional Impact: None |
| Data | Further d etails about the individual History Event Type Values: Text field Validation: Not editable Derived From: Process start and updates Task start and updates Added Attachment(s) Removed Attachment(s) Mandatory: Yes Functional Impact: None |
| Input Data Parameter Name | Short description of the input parameter Values: Text field Minimum number of characters: 1 Maximum number of characters: 50 Derived from: Process template Validations: Not editable on process or task Mandatory: No Functional Impact: None |
| Input Data Value | The actual value to be used when executing the task Values: Text field Minimum number of characters: 1 Maximum number of characters: 200 Mandatory: No Functional Impact: Execution of task |
| Input Data Description | More detailed description of the input parameter Values: Text field Validations: Not editable on process / task Mandatory: No Functional Impact: None |
| Output Data Parameter Name | Short description of the output parameter Values: Text field Derived from: Execution of start action Validations: Automatically updated by the system Not editable Mandatory: No Functional Impact: None |
| Expression | The expression for the condition to be tested Values: Text field Validations: Only available for conditional logic sub processes, i.e. “If-Then-Else” and “While” processes Not editable on process / task Mandatory: Yes Functional Impact: Execution of process |
| Expression Evaluation Result | The result of the last evaluation of the expression Values: Text field Values may be “True”, an exception or anything else Validations: Only available for conditional logic sub processes, i.e. “If-Then-Else” and “While” processes Not editable on process / task Mandatory: No Functional Impact: None |
| No of Times Evaluated | Number of times the expression has been evaluated Values: Any number >=0 Validations: Only available for conditional logic sub processes, i.e. “If-Then-Else” and “While” processes Not editable on process / task Mandatory: No Functional Impact: None |
| Output Data Value | The actual result of a start action Values: Text field Validations: Automatically updated by the system Not editable Mandatory: No Functional Impact: Execution of task |
| Output Data Description | More detailed description of the output parameter Values: Text field Validations: Automatically updated by the system Not editable Mandatory: No Functional Impact: None |